Hooking Up
Your Speakers
Before you power up your 1000RB, make sure your speaker cab-
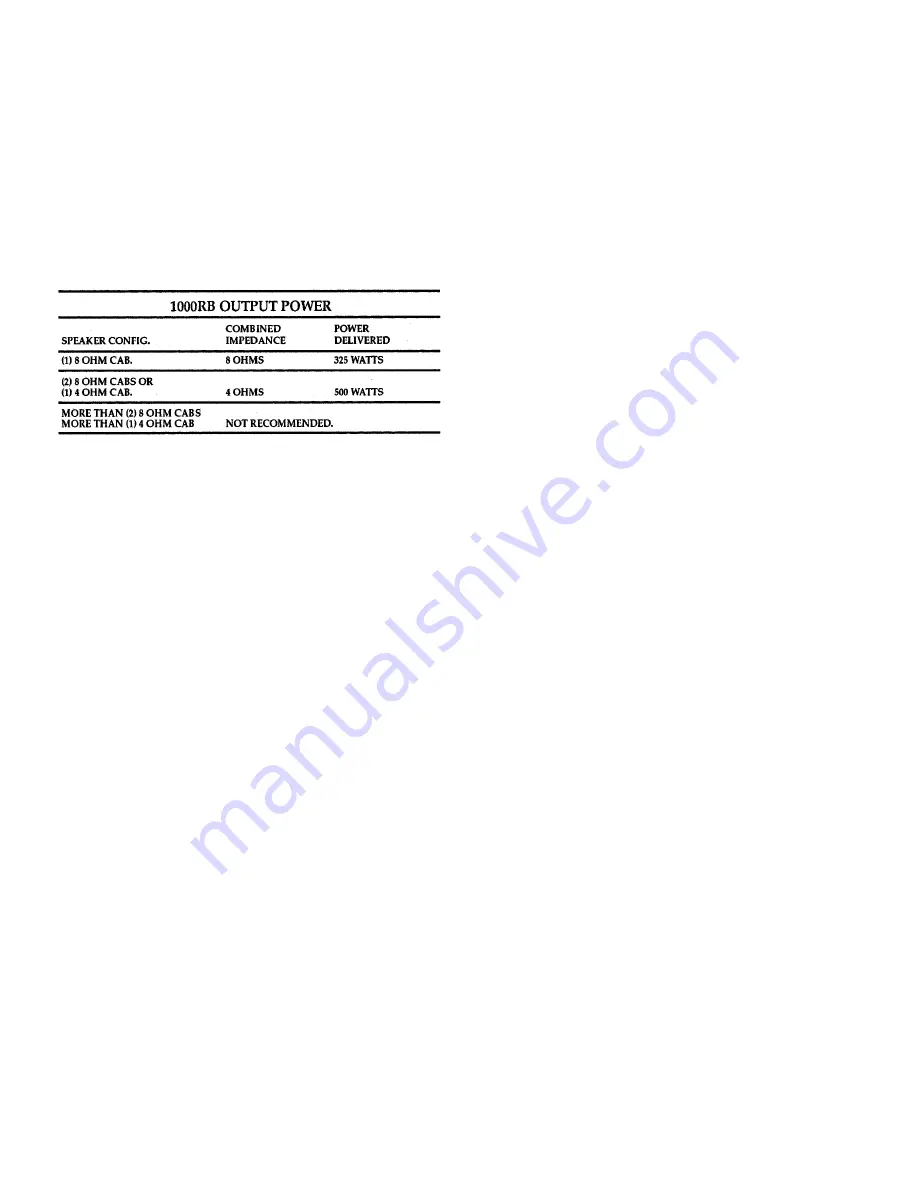
inets are compatible with your amp. Remember, you can not
hook up a combined speaker impedance which is less than
4ohms to your 1000RB. Anything over 4 ohms is OK. Using
more speaker cabinets than recommended will drop your com-
bined speaker impedance below 4 ohms, which could result in
the Fault Detection System disconnecting your 1000RB from
your speakers. Refer to the chart below:
A note regarding speaker cable: The 1000RB is capable of deliv-
ering more power than typical speaker cables can handle. We
therefore recommend Speakon
speaker cables. Choose cables
that are compatible with the connectors on your speaker cabinets.
These can be purchased through your G-K dealer.
G-K part no.: 304-0007-0
(Speakon
-1/4" , "Normal" cable)
G-K part no.: 304-0009-0
(Speakon
-"banana", "Normal" cable)
G-K part no.: 304-0011-0
(Speakon
- Speakon
, "Normal" cable)
Getting Your Sound
Your should have your speakers hooked up with the recom-
mended cables. Now, connect the power cord to your amp and
to a rounded (3prong) AC outlet that has at least 20 amps of
capacity. Use a power cord which is 16 gauge or heavier.
1. PLUG IN YOUR BASS
For starters, turn the volume on your bass all the way up. You
may need to adjust this later. If you have conventional tone con-
trols on your bass, turn them all the way up. If your bass has
active tone controls that boost and cut, set them in the flat posi-
tion. You can fine tune these tone controls after you finish the
following instructions.
2. INITIAL FRONT PANEL SETTINGS
Start by setting these front panel controls at 12 O’clock:
VOICING FILTERS (BOTTOM, CONTOUR, PRESENCE),
ACTIVE EQUALIZATION (TREBLE, HI MID, LO MID,
BASS), BOOST1 and BOOST2. Turn down VOLUME and
MASTER control.
3. POWER UP
Turn on the power switch and wait about 5 seconds for the PRO-
TECT lights to go off and the POWER lights to come on. This
indicates that the system checks OK and protection relays have
connected the 1000RB to your speakers.
4. CHECK TO SEE IF -10dB PAD IS REQUIRED
Play a few notes and notice if the CLIP (3) LED stays on con-
tinuously. If so, press the -10dB PAD(2) to prevent clipping in
the input stage. The CLIP indicator should only light when you
hit your loudest notes. If it stays lit after you have pressed the -
10dB PAD, turn down the volume on your bass.
5. ADJUST VOLUME FOR LOW NOISE OPERATION
Turn up VOLUME(6) as you play, and set it so the CLIP (7)
LED comes on with your loudest notes. Save this setting-it will
give you the best signal to noise ratio. You may have to come
back and re-adjust VOLUME once you have found VOICING
FILTER and ACTIVE EQ settings you like. You may have to
reduce VOLUME (which also determines the SEND level) to
prevent your external effects from being overdriven. You can
now set the MASTER control for comfortable listening.
6. VOICING FILTERS
CONTOUR:
Many players like CONTOUR, so start by setting this control
between 12 and 3 O’clock. CONTOUR drops mids while boost-
ing highs and lows, which creates a "round" sound. If you like a
flatter response ("funk" e.g.)try experimenting with CONTOUR
settings between 9 and 12 O’clock.
BOTTOM:
If you want lots of low end response, try boosting BOTTOM
above 12 O’clock. If you want the tone of older G-K amps, try
setting Bottom between 10 and 12 O’clock.
PRESENCE:
Presence will add "edge" so you can cut through the mix. Try
settings below and above 12 O’clock until you find one you like.
Note: PRESENCE adds high end-too much can also create
unwanted "hiss".
7. ACTIVE EQUALIZATION
Once you have your VOICING FILTER settings, use the
ACTIVE EQ to "tailor" your tone. While you play, adjust each
EQ control all the way up and all the way down from the center
position, until you find settings you like. Let your ears be the
judge. There are no EQ settings that can harm your amp.
8. BOOST 1
Most players use BOOST because it adds "growl" (an effect that
is very noticeable but hard to describe). Start with BOOST 1 set
between 10 and 1 O’clock, and experiment with settings above
and below.
9. BOOST 2 & LEVEL
BOOST 2 (which is only activated by footswitch) gives you
a
more pronounced BOOST effect for solos. In the higher set-
tings, BOOST 2 is slightly overdriven. Use LEVEL to set your
volume for solos.
10. MASTER
Now that you have your basic tone, use the MASTER control to
set your loudness(stage volume).
6
Содержание 1000RB
Страница 1: ...Operating Instructions 1000RB ...


