background image

OPERATION MANUAL   

 
RADIO ALARM CLOCK 
EAN  4 0 1 7 8 0 5 5 1 5 0 2 4  


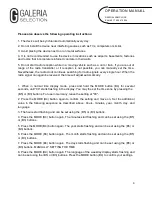
First open the battery compartment cover of the device and insert 2 x 1.5V, AAA LR03 batteries 
at the correct polarity into the battery compartment (the correct polarity is shown in the battery 
compartment). Close the battery compartment cover of the device. 

After  inserting  the  batteries,  the  display  light  and  all  display  indicators  light  up  briefly.  An 
acoustic  signal  will  sound.  Shortly  after  that  the  display  will  show  the  measured  indoor  room 
temperature and then returns to standard value. The clock will automatically search for the radio 
signal. After approx. 3-5 minutes this process is completed. The radio clock reception 

icon (A3) flashes in the display during that process. The clock automatically sets to the correct 
time  and  date  when  the  device  receives  the  radio  clock  signal. The  radio  clock  reception  icon 
(A3) lights up steadily. The clock connects to the radio clock signal once daily. 

Press  and  hold  the  button  (B3)  for  approx.  2  seconds  in  order  to  manually  search  for  a  radio 
clock signal. The radio clock reception icon (A3) flashes in the display during that process.  


Note: 

While searching the radio clock reception signal, the radio clock reception icon (A3) flashes, and 
only  the  SNOOZE/LIGHT  button  (B1)  is  available.  All  other  buttons  are  not  active  at  that 
moment. Press the button (B3) at any time to cancel the search for the radio clock signal. 

The search for the radio clock signal will automatically stop, once an alarm gets activated.  


Information on synchronizing the radio clock signal 


Time and date are radio-controlled. The current time is synchronized with the radio signal from 
Frankfurt,  Germany  (DCF77).  DCF77  is  a  time  signal  and  is  normally  emitted  at  the  normal 
frequency 77.5kHz as time information in coded form. The transmitting power is approx. 50kW 
with  a  broadcasted  power  of  approx.  30kW  and  coverage  of  approx.  1500km  in  the  vicinity  of 
Frankfurt/Main (Mainflingen). 


Daylight saving time 

In  summer  the  clock  automatically  switches  to  daylight  saving  time  and  in  winter  returns  to 
standard  time.  If  daylight  saving  time  has  been  set,  the  daylight  saving  time  indicator  (A5) 
appears in the display. 


Содержание 4017805515024

Страница 1: ...515024 1 RADIO ALARM CLOCK LCD display A1 Time A2 Alarm time 1 A3 Radio clock reception A4 Battery status indicator A5 Daylight saving time A6 Seconds A7 Room temperature A8 Weekday A9 Month A10 Day A11 Alarm time 2 A12 Snooze icon A12 Snooze icon ...

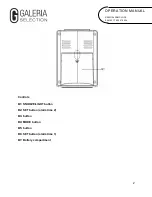
Страница 2: ...OPERATION MANUAL RADIO ALARM CLOCK EAN 4017805515024 2 Controls B1 SNOOZE LIGHT button B2 SET button alarm time 2 B3 button B4 MODE button B5 button B6 SET button alarm time 1 B7 Battery compartment ...

Страница 3: ...or approx 2 seconds in order to manually search for a radio clock signal The radio clock reception icon A3 flashes in the display during that process Note While searching the radio clock reception signal the radio clock reception icon A3 flashes and only the SNOOZE LIGHT button B1 is available All other buttons are not active at that moment Press the button B3 at any time to cancel the search for ...

Страница 4: ...e press and hold the MODE button B4 for several seconds until 00 starts flashing in the display You may the set the time zone by pressing the B5 or B3 buttons For use in Germany leave the setting at 00 2 Press the MODE B4 button again to confirm the setting and move on Set the additional value in the following sequence as described above Hours minutes year month day and language 3 The hours start ...

Страница 5: ... 2 Use this radio clock to set and save up to two different alarm times 1 Press and hold the SET button B6 alarm time 1 until the hour digits of alarm time 1 start flashing in the display A1 appears in the display 2 Press the B5 or B3 buttons to adjust the hours 3 Press the MODE button B4 to confirm your settings The minutes start flashing 4 Press the B5 or B3 buttons to adjust the minutes 5 Press...

Страница 6: ...4 again to return to normal time display mode Interrupting the alarm SNOOZE switching off the alarm clock for the current day You can interrupt the alarm by pressing the SNOOZE LIGHT button B1 The zZ indicator A12 and the symbol for alarm time A2 A11 start flashing in the display By default the repeat alarm function has been set with 5 minutes The alarm sounds again after 5 minutes Press any other...

Страница 7: ... symbol A4 Replace the batteries 1 Open the battery compartment on the back of the radio clock 2 Always use new alkaline batteries and do not mix old and new batteries 3 Always insert batteries observing correct polarity and as indicated in the battery compartment and on the batteries 4 Close the battery compartment with the cover clicking into place ...

Страница 8: ...y explode 5 The connections should not be short circuited 6 Remove used batteries from the product immediately Remove the batteries if you know that the device will not be used for a long period Otherwise the batteries may leak and cause damage 7 Keep all batteries out of the reach of children Seek medical attention immediately 8 If batteries are swallowed 9 Do not attempt to charge non rechargeab...

Страница 9: ...rmful to the environment and human health consumers are there for obligated to return batteries to retail or local collection facilities free of charge used batteries will be recycled they contain important raw materials such as iron zinc manganese or nickel the crossed out wheelie bin symbol indicates batteries and rechargeable batteries must not be disposed of through household garbage the symbo...

Страница 10: ... you promptly read and comply with this Information If this product no longer functions correctly then check whether this is due to a reason such as for example an interrupted electrical supply in so far as this concerns an electrical device or incorrect use in general Ensure that you attach or have ready the following documents or information for your product if possible Sales receipt Device name...

Отзывы: