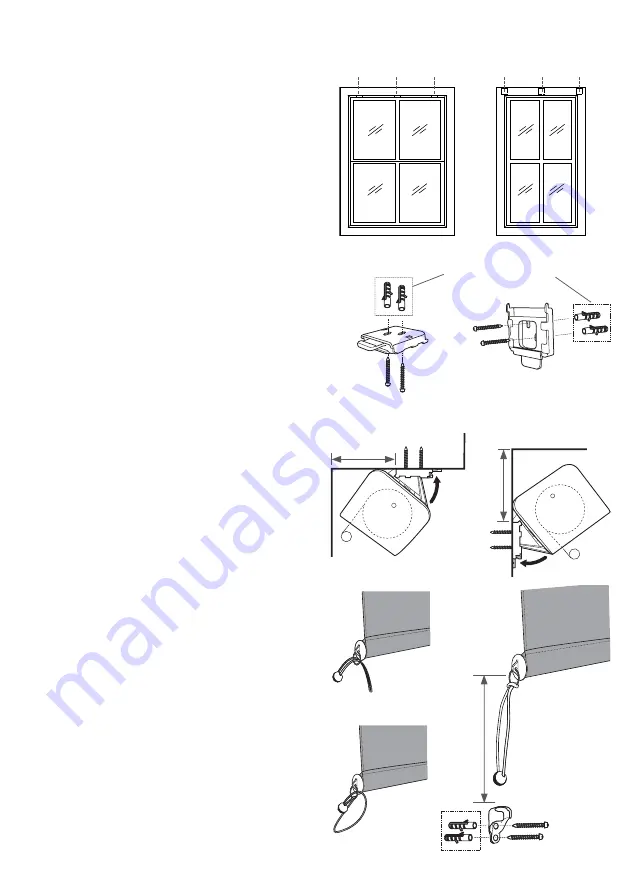
STEP 1
Space the three quick mount brackets evenly
along the length of your blind. Mark the left, right
and centre bracket positions on your installation
surface.
NOTE:
For top mount installation the bracket tabs
should face forwards. For face mount installations
the bracket tab should face downwards. Allow at
least 5cm (2”) of clearance between the bracket
and the wall or ceiling to allow enough clearance for
fitting and removing the pelmet.
In the marked positions attach the three quick
mount brackets using the timber screws. Ensure
the screws are penetrating into timber. If mounting
to masonry, use the 5mm wall plugs.
IMPORTANT:
If the brackets are installed upside
down or backwards, the pelmet will not lock into the
brackets.
STEP 2
Fit the pelmet by first inserting the bracket hooks
into the channel on the pelmet. Then push the
pelmet firmly onto the brackets until all three
latches snap securely into the channel.
NOTE:
Use the channels on top of the pelmet for
top (inside) mount installations and the channels
on the side of the pelmet for face (outside) mount
installations.
STEP 3
Bungee tie downs have been provided to secure
your exterior blind down in mild to moderate wind
conditions.
Thread the bungee cord through the end cap ring
and back through itself, making a lark’s head knot.
Use the timber screws to install the receiver
approximately 13cm (5”) below where the blind will
stop. Fit a receiver on each side of the blind. Use the
5mm wall plugs if screwing into masonry.
Attach the bungee to the receiver to secure the
blind when in the down position.
TOP (INSIDE) MOUNT
FACE (OUTSIDE) MOUNT
Use wall plugs if fixing
to masonry
Space quick mount brackets evenly
13
cm
(
5”
)
5cm (2”)
clearance
5cm (2”)
clearance
TOP (INSIDE) MOUNT
FACE (OUTSIDE) MOUNT
TOP (INSIDE) MOUNT
FACE (OUTSIDE) MOUNT


