background image

23

Electrical Installation

A registered electrician must complete all electrical work to be covered under 
our warranty. Galaxy Spas is unable to arrange or advise on electrical services. 

By this stage, you should have your RCD and 15A outdoor electrical socket installed. 

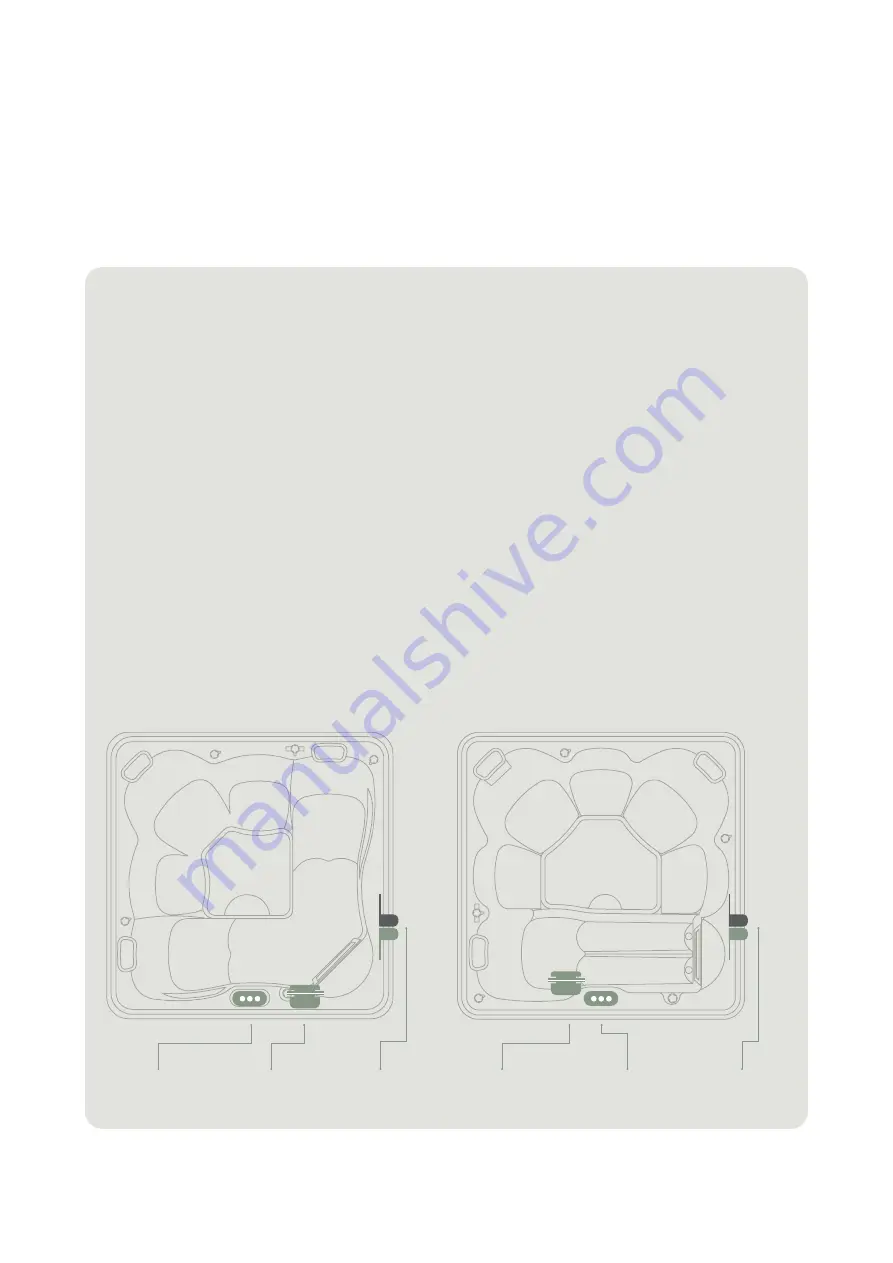
Draco I

Control Box

Control Panel

Control Panel

Control Box

Ara I

15 Amp Spa Pool 

Draco I and Ara I.

1. 

15 amp spas come with a 4m power cable. 

2. 

The power cable will be located inside the cabinetry on the same side as your 
controller.  By removing the panel, you will be able to locate your power cord which is 
attached to the frame above the control box. 

3. 

You can now plug your spa into your outdoor electrical socket. 

Removing the side panel to access componentry.

1. 

Remove the adjacent corner panels by gently pulling the panel out, up slightly and 
then down over the bottom lip of the spa. 

2. 

Unscrew the cabinet’s screws which will now be exposed. Using a standard 
screwdriver, place the screws safely to the side. 

3. 

Lift the cabinet up and then slide out from the base down.

Componentry Locations.

Heat Pump 

Union

Heat Pump 

Union

Содержание Draco I

Страница 1: ...Your Spa Pool Guide Draco I Ara I...

Страница 2: ...very and installation of your spa pool and its accessories Many important considerations and actions are required so please read this guide thoroughly and refer to the pre delivery checklist before th...

Страница 3: ...ements 11 Building Regulations and Consent 12 Pre Delivery Checklist 13 Installation Guide 14 First Steps 15 Hard Cover Installation 16 Cover Lifter Installation 17 Electrical Installation 23 Filling...

Страница 4: ...at pump compatibility One touch settings make for a tranquil spa experience Seating Size m Controller Pool body 5 people 2 x 2 x 0 82 Gecko controller 5 layer insulation Injection moulded acrylic base...

Страница 5: ...ump and WiFi compatibility and five layer insulation prioritising running economy Seating Size m Controller Pool body 6 people 2 x 2 x 0 82 Gecko controller 5 layer insulation Injection moulded acryli...

Страница 6: ...6 Pre Delivery Guide S E C T I O N 1 6 Everything you need to plan and consider before your Galaxy spa arrives...

Страница 7: ...ll ask you to provide specific details about your property via descriptions and images Factors such as powerlines road and driveway access and natural obstacles will be considered If needed we will ar...

Страница 8: ...pa space 1 View What would you like to look at while you soak relax and connect with loved ones If your chosen spa has loungers where or what would you want them to face 2 Privacy If privacy is import...

Страница 9: ...any local spa fencing bylaws See page 12 for further details on building consent Electricity Important Considerations Does your home have the electrical capacity to run a 15 amp spa Most homes are abl...

Страница 10: ...es 32 5cm of space from the top of the installed cover down each side of the cabinet to the lock clips This space is required Not providing the necessary clearances will mean you cannot install your c...

Страница 11: ...bable object Two tier steps dimensions Length 60cm Width 58cm Height 30cm Drainage Water splashing over the side of a spa pool is very common Children playing or having a spa pool full of people is al...

Страница 12: ...nd it there are a few considerations you will need to take into account Building consent you will need to install a fence around your spa and deck to prevent unaccompanied minors and animals from clim...

Страница 13: ...over lifter and cover clip clearances 6 Do you have a concrete pad foundation with room for steps OR Has the deck load rating been checked if the spa is being placed on a deck 7 Is your spa s fencing...

Страница 14: ...14 Installation Guide S E C T I O N 2 14 Everything you need to know once your spa pool arrives...

Страница 15: ...ull it will be too heavy to lift and you will not be able to fit your cover lifter We recommend assembling the cover lifter before delivery so that you can attach it once the spa is placed into positi...

Страница 16: ...he cabinet Cover Care Avoid exposing the cover to excessive chemicals Always remove the cover when adding your spa chemicals Any texture change or extreme discolouration of the base material indicates...

Страница 17: ...ver lifter All left to right instructions are from standing in front of the spa Ensure your spa is placed onto a level surface such as a concrete pad or load checked decking Ensure you have the necess...

Страница 18: ...further in step 5 Note If your spa is rectangular install the cover lifter on the shortest side the width Spa Pool Model Spa Pool Dimensions length x width x depth Total Cover Lifter Width Draco I 2m...

Страница 19: ...re it Step 5 Place the bent arm without foam through the tubular hole circular part on the bracket Important If the width is less than 2m connect the short ends to the straight coupler If the width is...

Страница 20: ...e left You can keep them lying flat on the ground for now Step 8 Slide nylon pivot straps over each of the straight coupler tubes on each side Ensure that the bracket is facing the spa on each side Yo...

Страница 21: ...the seam of the spa If the length of the face parallel to the cover is 2m or more place the long ends on the seam of the spa Step 11 Loop the cover saver strap over the top horizontal section of the s...

Страница 22: ...There are three holes on each end of the couplers Once you have aligned everything perfectly use the hole as a guide to drill a hole through to the inner tube They are smaller than the screws but a dr...

Страница 23: ...nside the cabinetry on the same side as your controller By removing the panel you will be able to locate your power cord which is attached to the frame above the control box 3 You can now plug your sp...

Страница 24: ...sket this will help to prevent air locks in the plumbing 2 Fill the spa pool to the recommended fill line indicated by the sticker on the inside of the spa Remove the hose and place the filter back in...

Страница 25: ...turn clockwise Pull on it slightly until it comes out around an inch 2 Unscrew the dial s retaining cap and attach the draining connector 3 Push in slightly to start draining 4 Pull out to stop drain...

Страница 26: ...iability and ease of use Reminders Maintenance Settings Troubleshooting For information on the above functions and general troubleshooting please click this link to download our full Gecko guide Other...

Страница 27: ...on is highlighted in the middle The home page will display your spa features buttons up and down buttons water temperature messages and quick access to display options display orientation and contrast...

Страница 28: ...erature you will see a message at the bottom of the screen saying either cooling or heating to the set temperature There is usually a short delay before the heating starts during which heating suspend...

Страница 29: ...Direct to function selection wheel Water care Heat pump if installed Maintenance Date time Keypad Electrical con g Wi Miscellaneous About List of featured items Mode selection wheel settings icon To...

Страница 30: ...saving you in running costs As evening approaches and on Saturday and Sunday the spa will move into standard mode and the filtration cycle and heater will switch on ensuring a warm bathing experience...

Страница 31: ...n usual on a certain day by touching the orange line labelled add filter cycle To delete a schedule touch the garbage can icon at the end of the desired line Economy Add an economy cycle if there are...

Страница 32: ...know about balancing your water for the first time For ongoing maintenance and troubleshooting support please visit www galaxyspas co nz support Refer to the relevant section based on your chosen wate...

Страница 33: ...ou must shock dose your spa the first time you fill it with water Shock dosing refers to adding a higher than normal dose of chlorine to the water This is extremely important for good long term water...

Страница 34: ...r and skin eye irritation You need to lower the pH to within the normal range 7 2 7 8 by using this product Alkalinity Up if your alkalinity is not in the optimal range you will have trouble maintaini...

Страница 35: ...ine shock dose as high chlorine levels can alter the test kit s accuracy Remember to ensure your chemicals are within their use by date Testing results may not be accurate otherwise Balancing Your Wat...

Страница 36: ...p 8 Tbsp 80 9 Tbsp 9 Tbsp 90 10 Tbsp 10 Tbsp 100 11 Tbsp 11 Tbsp Water Hardener for increasing calcium content and total hardness Desired ppm increase Draco I Ara I 50 4 Tbsp 4 Tbsp 100 Cup Cup 200 1...

Страница 37: ...its minerals into the water removing contaminants and limiting the formation of scale and rust while inhibiting the growth of bacteria All simplesilver needs to work well is a good flow of water pass...

Страница 38: ...t use your spa pool for the next seven days Removing contamination and dispensing the correct levels of simplesilver minerals will take about a week after which you will have crystal clear clean odour...

Страница 39: ...w block What if I am having problems with simplesilver There can be several variables that prevent simplesilver from working effectively Whilst most can be resolved with troubleshooting and correct fi...

Страница 40: ...liance such as lights telephone radio or television within 1 5m of the spa Always check the spa s temperature before entering During pregnancy seek medical advice about using your spa before doing so...

Страница 41: ...41 Wishing you many relaxing soaks in your new spa...

Отзывы: