background image

50

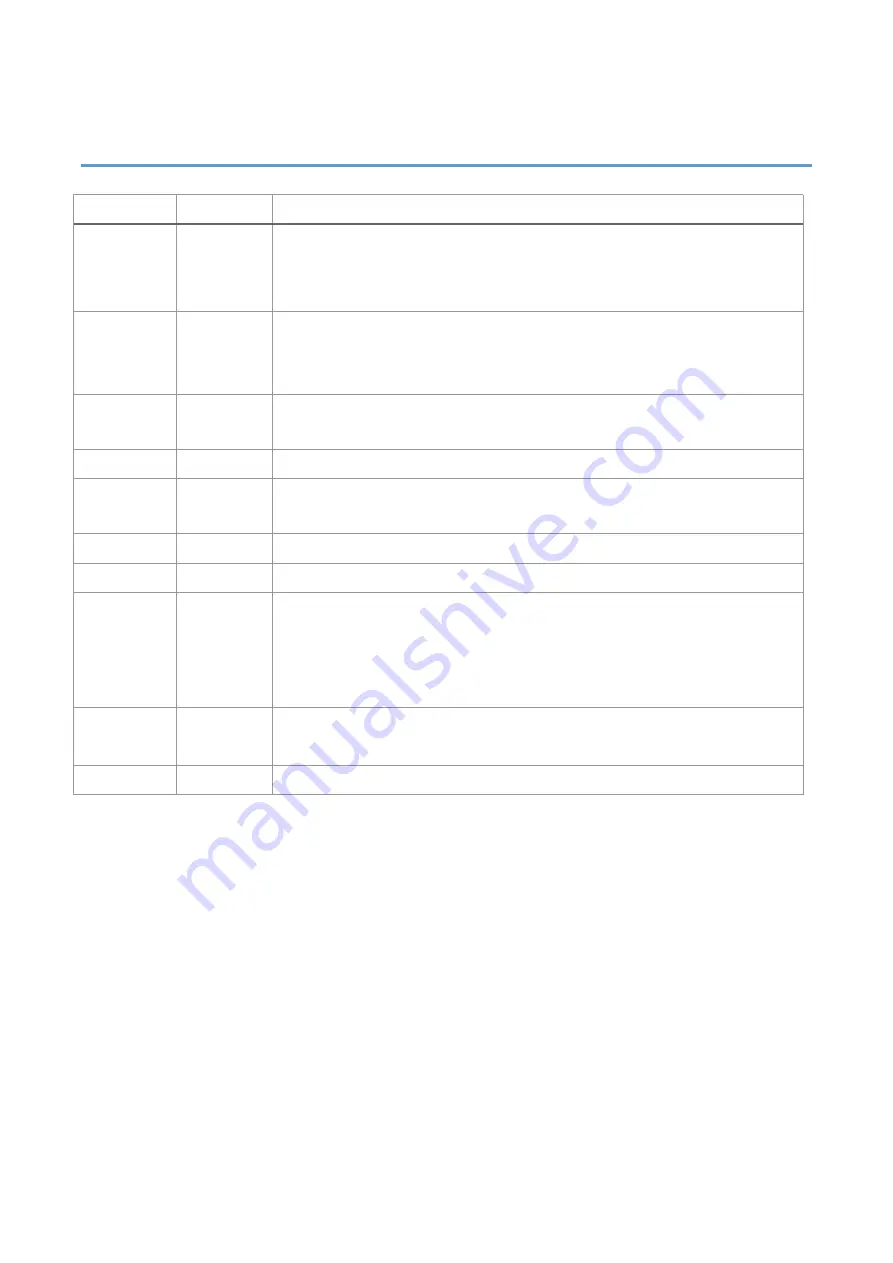
11. Revise History

Date

Version

Content

2020/8/11

Ver.1.0.1

Modify chapter 5.2 Power-on Utilities
Delete chapter 3.4.3 External Label Roll Mount Installation
(Option)

2021/1/29

Ver.1.0.2

Modify GI-2410TM / GI-3407TM renamed to GI-2410T / GI-3407T
Modify chapter 1.1 Product Introduction
Modify chapter 1.2.1 Printer Standard Features

2021/3/19

Ver.1.0.3

Modify Standard’s 104 mm (4.09“) to 104 mm (4.1“) and 106.7 mm
(4.2“) to 108.4 mm (4.27“)

2021/3/19

Ver.1.0.4

Modify Empower’s 104 mm (4.09“) to 104 mm (4.1“)

2021/3/26

Ver.1.0.5

Modify GI-2410T/GI-3407T renamed to GI-2408T/GI-3406T
Modify print speed and print width of Empower

2021/8/2

Ver.1.0.6

Modify chapter 3.3.1 Loading the Ribbon

2021/8/23

Ver.1.0.7

Add warning slogan

2021/9/27

Ver.1.0.8

Modify 3.2 Install Printer Driver (all series)
Modify 4.2 Vertical position adjustment knob on the right side of

the print head

Modify 4.3 Mechanism Fine Adjustment to Avoid Ribbon Wrinkles

2021/11/5

Ver.1.0.9

Modify addition 600 dpi specification
Modify full cut and partial to convert full cut or partial cut

2021/4/23

Ver.1.1.0

Modify add communication interfaces

Содержание GI-6404T Series

Страница 1: ...INTELLIGENT SERIES GI 2408T GI 3406T GI 6404T Series 4 Industrial Thermal Transfer Barcode Printer USER S MANUAL Ver 1 1 0...

Страница 2: ...and can radiate radio frequency energy and if not installed and used in accordance with the manufacturer s instruction manual may cause harmful interference with radio communications Operation of thi...

Страница 3: ...s 6 1 2 1 Printer Standard Features 6 1 2 2 Printer Optional Features 8 2 Operations Overview 9 2 1 Unpacking and Inspection 9 2 2 Printer Overview 10 2 2 1 Front View 10 2 2 2 Interior View 11 2 2 3...

Страница 4: ...5 3 4 2 Media loading path 26 3 5 Loading the Peeler Dealer options 27 3 5 1 Loading the Media 30 4 Adjustment Knob 31 4 1 Print Head Pressure Adjustment Knob 31 4 2 Vertical position adjustment knob...

Страница 5: ...38 6 2 Printer Function 39 7 LCD Menu Function for GI 2408T GI 3406T GI 6404T Series Empower 40 7 1 Enter the Menu 40 7 2 Menu Overview 41 8 Communication interfaces 45 9 Troubleshooting 47 9 1 Common...

Страница 6: ...ultrahigh resolution images The T Series standard printers are loaded with standard features including four color lights and two menu buttons The T Series empower printers are loaded with standard fea...

Страница 7: ...lications o Manufacturing Warehousing Work in Progress Item Labels Instruction labels Agency labels Compliance labels Logistics management labels Electronics labels Industrial duty Printing o Parcel P...

Страница 8: ...4 1 108 4 mm 4 27 104 mm 4 1 108 4 mm 4 27 105 64 mm 4 16 Max print length 2 286mm 90 1 016mm 40 2 286mm 90 1 016mm 40 1 016mm 40 CPU 400 MHZ 32 bits ARM9 Memory RAM 128 MB SDRAM 256 MB SDRAM 128 MB S...

Страница 9: ...calable font file 1D Barcode Code 11 Code 39 Code 93 Code 128 subsets A B C UPC A UPC E UCC 128 Codabar EAN JAN 8 EAN JAN 13 Interleaved 2 of 5 ITF14 MSI Pleassy PostCode Telepen 2D Barcode QR Code Mi...

Страница 10: ...glue 0 2 90 0 2 40 0 2 90 0 2 40 0 2 40 Physical dimension 425mm L 255mm W 265mm H Net Weight 9 65kg Enclosure Die cast based print mechanism Metal cover with large clear media view window Safety reg...

Страница 11: ...ing materials in case you need to reship the printer Unpacking the printer the following items are included in the carton One printer unit One quick installation guide One power cord One Windows label...

Страница 12: ...08T and GI 3406T Series Empower GI 2408T GI 3406T GI 6404T Series 1 3 2 4 1 3 2 4 1 Media view window 2 Printer cover handle 3 Paper exit chute 4 Front panel buttons and indicator 1 Media view window...

Страница 13: ...ead release lever 4 Ribbon supply spindle 5 Label roll guard 6 Label supply spindle 7 Ribbon sensor 8 Ribbon guide bar 9 Damper 10 Vertical position adjustment knob on the right side of the print head...

Страница 14: ...3406T Series Contains LED indicator s function introduction LED Indicator Event Description Thermal transfer mode ready Blue ONLINE and Green RIBBON solid and the device is ready to use 1 ONLINE 2 RIB...

Страница 15: ...Red ERROR flash Out of ribbon When out of ribbon a beep sound will be made and Red ERROR solid Green RIBBON flash Label gap black mark error When label gap black can t be found a beep sound will be m...

Страница 16: ...nge COMM flash WIFI ready When the WIFI s AP or STA mode is connected the orange COMM solid Ethernet WIFI ready When the RJ45 network cable is plugged in and the connection is normal and the WIFI s AP...

Страница 17: ...s LCD monitor operation introduction Printer status FE Ver printer firmware version Emulation Simulation instruction category ETH IP Ethernet IP address WIFI IP Wi Fi IP address time dat e Printer mod...

Страница 18: ...this button the machine will stop immediately in the error state press this button the machine will cancel the error state and restore printing function Main page icons Indicated icon Indication Ethe...

Страница 19: ...Rear view All series 1 2 3 4 5 6 7 1 Ethernet 10 100Mbps interface 2 RS 232 interface 3 USB interface 4 USB host For USB keyboard or scanner 5 Power switch 6 Power cord socket 7 External label entran...

Страница 20: ...USB cable 4 Plug the power cord into the AC power cord socket at the rear of the printer and then plug the power cord into a properly grounded power outlet NOTE Please switch OFF printer power prior...

Страница 21: ...all the printer driver model for 203 dpi please install GI 2408T 300 dpi please install GI 3406T please install GI 6404T 1 Read the license agreement click I accept the terms in license agreement and...

Страница 22: ...r and then click Next 5 Click Other and click Next 6 Select printer model name click to install and click Next 7 Please use a USB cable to connect the printer to the computer click the corresponding U...

Страница 23: ...es Printers and Scanners b Check from Control Panel Devices and Printers 12 Users can change printer interface through the following ways a In Windows 10 Windows Settings Printers and Scanners Devices...

Страница 24: ...22 right click Printer Content Port to modify it...

Страница 25: ...bbon supply spindle and ribbon rewind spindle 3 Pull the Print head release lever to open print head mechanism 4 Thread ribbon below the ribbon guide bar through ribbon sensor slot See the Ribbon Load...

Страница 26: ...echanism by pushing down the both sides of the print head release lever 3 3 2 Ribbon loading path Model specifications accessories parts and programs are mainly based on the actual machine subject to...

Страница 27: ...through the media guide bar damper media sensor and label guide to install the media See the Media Loading Path illustration below 5 Move the media sensor by adjusting the media sensor position adjus...

Страница 28: ...26 3 4 2 Media loading path Model specifications accessories parts and programs are mainly based on the actual machine subject to change without prior notice...

Страница 29: ...27 3 5 Loading the Peeler Dealer options Peeler 1 Open the printer right side cover...

Страница 30: ...the cover 3 Push the cover to the right to remove it 4 Please be careful not to break the cover outwards to avoid breaking the groove of the cover 5 After pulling out the wafer 1x3P P2 0 of the printe...

Страница 31: ...is completed groove foot on the peeler to the base iron plate near the panel and then gently push it to the left 7 Lock the two screws located on the side of the peeler 8 After the printer right side...

Страница 32: ...the red circle in the figure and pull them outward After pulling outward pass the label under the peeler and then pull it out After pulling out please push the two sides of the peeler as shown by the...

Страница 33: ...t knob inside the edge of the label as possible prevent the unnecessary friction between the print head and platen roller 4 2 Vertical position adjustment knob on the right side of the print head Beca...

Страница 34: ...ust until the pressure on both sides are equal The left side of the label is unclear The right side of the label is unclear If the right side of label is unclear it means the pressure on the left side...

Страница 35: ...ance ribbon film characteristics print darkness setting etc In case the ribbon wrinkle happens please follow the instructions below to adjust the printer parts Adjustabl e Printer Parts Print Head Pre...

Страница 36: ...e label starts from the lower left side to upper right side please do following adjustment 1 Please switch the vertical position adjustment knob on the right side of the print head per 1 level and If...

Страница 37: ...ease adjust the print head pressure adjustment knob per 1 level again to check if the wrinkle is gone print the label again to check if the wrinkle is gone 2 If the ribbon wrinkle still can t improve...

Страница 38: ...ton to print Print next When the button Demand function is activated the printer will stop after printing and wait for the user to press this button before printing the next label Pause button Print m...

Страница 39: ...aded with paper and close the printer cover C Press and hold the PAUSE and FEED buttons at the same time for two seconds then turn on the printer s power When the online Blue and the error Red are on...

Страница 40: ...rUtility 1 Please mouse over Printer Utility icon Printer Utility exe image Double click left mouse button 2 After opening the main screen you can see the following function items NOTE If you need mor...

Страница 41: ...n and close the printer general settings screen 2 Click the Load Button to bring out all printer general setting information through the selected communication interface Click the Set button to write...

Страница 42: ...40 7 LCD Menu Function for GI 2408T GI 3406T GI 6404T Series Empower 7 1 Enter the Menu...

Страница 43: ...ere are 6 categories for the menu You can easy to set the settings of the printer without connecting the computer Please refer to below for more details Button icon function This Setting option can se...

Страница 44: ...42 This Device option can set the device function This Interface option can set the interface...

Страница 45: ...43 This System option can set the system parameters This Tools option can set the printer operation tool...

Страница 46: ...44 This Information option can inquire about the printer information...

Страница 47: ...45 8 Communication interfaces 1 USB A Type 2 USB B Type Pin No Pin Name 1 VBUS 2 D 3 D 4 GND Pin No Pin Name 1 VBUS 2 D 3 D 4 GND...

Страница 48: ...me Description 1 2 TXD Transmit Data 3 RXD Receive Data 4 Connect to Pin6 Equipment to Judge 5 GND System Ground 6 Connect to Pin4 Equipment to Judge 7 CTS Clear to Send 8 RTS Request to Send 9 5VDC O...

Страница 49: ...the ribbon to reinstall Out of paper Out of paper The paper installation path is incorrect Gap black mark sensor detection is incorrect Install new paper Follow the steps for installing the paper to...

Страница 50: ...lack mark sensor by blower The printing position of small label is incorrect Media sensor sensitivity is not set properly Label size is incorrect The vertical offset setting in the driver is incorrect...

Страница 51: ...y with 100 ethanol and a cotton swab or lint free cloth Tear Bar Peel Bar Use the lint free cloth with 100 ethanol to wipe it Sensor Compressed air or vacuum Exterior Wipe it with water dampened cloth...

Страница 52: ...Modify Empower s 104 mm 4 09 to 104 mm 4 1 2021 3 26 Ver 1 0 5 Modify GI 2410T GI 3407T renamed to GI 2408T GI 3406T Modify print speed and print width of Empower 2021 8 2 Ver 1 0 6 Modify chapter 3...

Отзывы: