background image

42

Français

INSTRUCTIONS SUR LE 

CORDON ÉLECTRIQUE

A. 

Votre  appareil  est  muni  d’un  cordon  électrique  court  ou  d’un  cordon 

d’alimentation  détachable,  afin  d’éviter  de  trébucher  ou  de  s’emmêler 

avec un câble plus long.

B. 

Des cordons détachables plus longs ou bien des rallonges sont 

disponibles et ne peuvent être utilisés que si l’on prend toutes les 

précautions d’usage.

C. 

En cas d’utilisation d’un long cordon d‘alimentation détachable ou d’une 

rallonge,

1.


La tension électrique de fonctionnement marquée sur le cordon 

d’alimentation détachable ou sur la rallonge doit être au moins égale à 

celle de l’appareil.

2.


Si la fiche de l’appareil a une connexion de terre, la rallonge devrait être 

une rallonge de terre à 3 fils et

3.


La rallonge ne devra pas encombrer le plan de travail ou le dessus de table, 

afin d’éviter que les enfants la tirent ou trébuchent accidentellement.

4219-450-08051 MANUAL GAG. CAD. MILK EN-FR 120US.indd   42

23/04/2020   09:58:11

Содержание RI9603

Страница 1: ...ENGLISH FRANÇAIS RI9603 SUP 049EP GAGGIA CADORNA MILK Operating instructions Mode d emploi 4219 450 08051 MANUAL GAG CAD MILK EN FR 120US indd 1 23 04 2020 09 57 07 ...

Страница 2: ...it 120 ml Coffee Café 40 ml Espresso Coffee Café 40 ml Café au lait Coffee Café 90 ml Milk Lait 90 ml Espresso lungo Coffee Café 80 ml Latte macchiato Milk Lait 240 ml Coffee Café 40 ml Coffee Café Coffee Café 120 ml Frothed milk Lait émulsionné Milk Lait 180 ml Americano Coffee Café 40 ml Water Eau 110 ml Hot water Eau chaude Water Eau 150 ml 01 4219 450 08051 MANUAL GAG CAD MILK EN FR 120US indd...

Страница 3: ...4 1 18 19 21 20 3 9 10 11 5 8 7 2 6 24 22 23 12 26 28 27 25 17 13 14 16 15 02 4219 450 08051 MANUAL GAG CAD MILK EN FR 120US indd 3 23 04 2020 09 57 13 ...

Страница 4: ...ardness level START STOP ON OFF my favourites HOME clean setting Are you sure you want to select 2 zone red START STOP ON OFF my favourites HOME clean setting LANGUAGE LIETUVOS SLOVENIJA ENGLISH ITALIANO DEUTSCH FRANÇAIS ESPAÑOL PORTUGUÊS START STOP ON OFF my favourites HOME clean setting WATER HARDNESS 1 2 3 4 START STOP ON OFF my favourites HOME clean setting Welcome 1 sec START STOP ON OFF my f...

Страница 5: ...English 6 Français 39 4219 450 08051 MANUAL GAG CAD MILK EN FR 120US indd 5 23 04 2020 09 57 23 ...

Страница 6: ...the Capp in Cup system 19 Dispensing frothed milk based and coffee beverages 20 Dispensing Hot Water 21 Beverage Customisation and Profile Creation 21 Customisation 21 Creating a profile 22 Coffee Grind Settings 23 Cleaning and Maintenance 24 Cleaning table 24 Cleaning of the Capp in Cup system 26 Cleaning the brew group 27 Lubricating the brew group 29 Descaling 30 Descaling procedure 30 What to ...

Страница 7: ...cord or plug or after the appliance malfunctions or has been damaged in any manner Return appliance to the nearest authorized service facility for examination repair or adjustment 7 The use of accessory attachments not recommended by the appliance manufacturer may result in fire electric shock or injury to persons 8 Do not use outdoors 9 Do not let cord hang over edge of table or counter or touch ...

Страница 8: ...ied or bottled water Periodic descaling is still recommended every 2 3 months 6 Do not use caramelized or flavored coffee beans INSTRUCTIONS FOR THE POWER SUPPLY CORD A A short power supply cord or detachable power supply cord is to be provided to reduce risks resulting from becoming entangled in or tripping over a longer cord B Longer detachable power supply cords or extension cords are available...

Страница 9: ... malfunction occurs If you are not going to use the appliance for a long time Before you clean the machine Pull at the plug not at the power cord Do not touch the mains plug with wet hands Do not use the machine if the mains plug the power cord or the machine itself is damaged Do not make any modifications to the machine or its power cord Only have repairs carried out by a service center authorize...

Страница 10: ...orking properly In this case repair is not covered by your warranty Do not keep the machine at temperatures below 0 C 32 F Water left in the heating system may freeze and cause damage Do not leave water in the water tank when you are not going to use the machine for a long period of time The water can become contaminated Use fresh water every time you use the machine Never use any accessories or p...

Страница 11: ... clean the automatic milk frother by dispensing a small quantity of hot water Follow the cleaning instructions in the user manual Be careful the hot water steam dispensing spout could be hot if the machine has recently been used Do not push the rubber fitting too far on the hot water steam dispensing spout when you insert it In this case the automatic milk frother would not work correctly as it wo...

Страница 12: ...afe Congratulations on purchasing the Gaggia Cadorna Milk This easy to use machine guarantees excellent coffee drinks every day With its intuitive interface you can choose from among 10 beverages customise them and save them to the 4 available profiles where they can be instantly brought up whenever you want Before being packed each of our high quality machines undergoes rigorous testing in our la...

Страница 13: ... the beverage menu 6 CLEAN SETTING clean setting button Opens the cleaning and settings menu 7 START STOP START STOP button Starts stops the dispensing of the selected beverage or starts stops the procedure indicated on the display Note the MY FAVOURITES my favourites HOME HOME CLEAN SETTING clean setting buttons are also ESC buttons You can exit any screen shown on the display at any time by pres...

Страница 14: ...SPRESSO LUNGO START STOP ON OFF my favourites HOME clean setting 30 ml medium ESPRESSO COFFEE TEMP START STOP ON OFF my favourites HOME clean setting 30 ml medium ESPRESSO COFFEE TEMP START STOP ON OFF my favourites HOME clean setting ESPRESSO CAPPUCCINO LATTE MACCHIATO COFFEE 2 Press the button without adding pre ground coffee 3 Press the START STOP START STOP button to start dispensing the machi...

Страница 15: ...ed 3 Use the green and buttons to select the water hardness according to the table below Confirm the setting by pressing Small red squares Value to set Water hardness INTENZA 1 very soft water A 2 soft water A 3 hard water B 4 very hard water C INTENZA Water Filter We recommend using the INTENZA water filter to limit the formation of limescale This ensures the machine will last longer and the arom...

Страница 16: ...the detected water hardness see the Measuring water hardness chapter and the letters found on the filter base A soft water 1 or 2 small squares B hard water standard 3 small squares C very hard water 4 small squares Replacing the INTENZA water filter When the INTENZA water filter runs out the display will show an alarm message 1 Replace or deactivate by pressing the CLEAN SETTING clean setting but...

Страница 17: ... less than 1 cm thick It is served in a large cup Café au lait A café au lait is a beverage composed of equal parts coffee and milk This can even be enriched by a thin layer of milk froth It is served in a large cup Latte macchiato A latte macchiato is prepared with hot milk one part milk froth and a small quantity of espresso It is served in a tall transparent glass to allow the separation of the...

Страница 18: ...e START STOP START STOP button If you wish to customise the settings of a specific beverage please refer to the Beverage customisation chapter Brewing coffee Brewing coffee from whole coffee beans Warning always use whole coffee beans when making espresso Do not put any pre ground unroasted freeze dried or instant coffee in the coffee bean container as they may damage the machine Tip Preheat the c...

Страница 19: ... Preparation of frothed milk based and coffee beverages How to assemble the Capp in Cup system Note Before preparing any milk based beverage make sure that the Capp in Cup system is correctly installed on the machine 1 Fix the spout to the Capp in Cup system main body 2 Insert the Capp in Cup system in the rubber handle on the steam wand until it is locked in position Tip If you need to fill the w...

Страница 20: ...omise the settings of a specific beverage please refer to the Beverage Customisation chapter 6 After dispensing your frothed milk and coffee beverages it is best to complete the quick cleaning procedure of the milk circuit within 10 seconds However the procedure can also be carried out at a later time by opening the cleaning menu via the CLEAN SETTING clean setting button Press the CLEAN button an...

Страница 21: ...misation and Profile Creation This machine makes it possible to modify the settings of a beverage according to your preferences and save it to one of four available profiles Customisation 1 Press the HOME HOME button 2 Select your beverage 3 All the settings that can be adjusted and or selected are displayed on the screen Based on the type of beverage you can adjust and or select the amount of cof...

Страница 22: ...intensity 1 Very light 2 Light 3 Normal 4 Strong 5 Very strong Note this function is not available for pre ground coffee 9 Once the drink has been customised you can save it in a specific profile by pressing the button 10 Choose the profile where you wish to save the beverage from the 4 available Creating a profile There are two ways to create a profile Using the HOME HOME button as described in t...

Страница 23: ...ffee Grind Settings You can adjust the grind setting using the grinder adjustment knob on the coffee bean container The ceramic coffee grinder guarantees perfect even grinding for the preparation of every cup of coffee The aroma is thus preserved ensuring the perfect flavour every time Note you can only adjust the grind setting while the machine is grinding the coffee beans The difference in flavo...

Страница 24: ... process by following the instructions described in the chapter Cleaning of the Capp in Cup system with Philips milk circuit cleaner product Remove the Capp in Cup system and wash all the components under running water 3 Prepare an espresso as described in the Brewing coffee from coffee beans chapter 4 While the machine is grinding the coffee place the end of the handle of the pre ground coffee me...

Страница 25: ...ng water Coffee pucks container Whenever the machine requires it Empty the coffee pucks container and clean it under running water Ensure that the machine is switched on during this procedure or the coffee pucks container will not reset Water tank Weekly Clean it under running water Pre ground coffee compartment coffee outlet duct Weekly Clean the upper part using the handle of a spoon as shown be...

Страница 26: ...l the components by following the same procedure in reverse order Cleaning of the Capp in Cup system Capp in Cup system cleaning programs The machine has two programmes for cleaning the Capp in Cup system quick clean and deep clean Both programmes can be selected using the CLEAN SETTING clean setting button then pressing the CLEAN button Quick clean is also proposed after dispensing a milk based b...

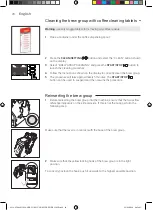
Страница 27: ...ve the coffee residues drawer 4 Press the PUSH lever 1 and pull the handle of the brew group 2 to remove it from the machine 2 1 Cleaning the brew group under running water 1 Clean the coffee outlet duct thoroughly with a spoon handle or with another round tipped kitchen utensil 2 Thoroughly rinse the brew group using lukewarm water Carefully wash the upper filter 3 Let the brew group air dry Note...

Страница 28: ...utes The START STOP START STOP button can be used to suspend and then resume the procedure Reinserting the brew group 1 Before reinserting the brew group into the machine ensure that the two yellow reference indicators on the side coincide If this is not the case perform the following step Make sure that the lever is in contact with the base of the brew group 2 Make sure that the yellow locking ho...

Страница 29: ...icate the brew group Refer to the following table for the frequency of lubrication Frequency of use Number of beverages prepared daily Frequency of lubrication Low 1 5 Every 4 months Regular 6 10 Every 2 months High 10 Every month 1 Turn off the appliance and disconnect the power cord 2 Remove the brew group and rinse it using lukewarm water see the Cleaning the brew group under running water chap...

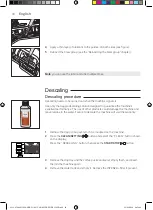
Страница 30: ...e in the water Failure to descale the machine will void the warranty 1 Remove the Capp in Cup system if it is mounted on the machine 2 Press the CLEAN SETTING clean setting button and select the CLEAN button shown on the display Press the DESCALING button then press the START STOP START STOP button START STOP ON OFF my favourites HOME clean setting QUICK MILK CLEAN DEEP MILK CLEAN BREW GROUP CLEAN...

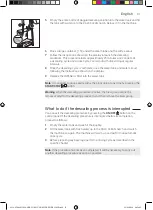
Страница 31: ...the START STOP START STOP button Warning when the descaling procedure is active the brew group cannot be removed Wait for the descaling process to end then remove the brew group What to do if the descaling process is interrupted You can exit the descaling procedure by pressing the ON OFF ON OFF button on the control panel If the descaling procedure is interrupted before its completion proceed as f...

Страница 32: ...UNITS Water filter When WATER FILTER is selected follow the instructions on the display and those described under the Installing the INTENZA water filter and Replacing the INTENZA water filter chapters Various Settings By pressing the CLEAN SETTING clean setting button and selecting SETTINGS on the display it is possible to reset or modify several machine parameters including Language Water filter...

Страница 33: ...dispensed since the first operation of the machine These numbers cannot be reset Restore factory settings It is possible to restore the machine to the default factory settings The machine will require a secondary confirmation before proceeding All the parameters will be reset except those relating to the profiles MY FAVOURITES my favourites and the beverage counter Measurement units By selecting M...

Страница 34: ...on Remove the brew group and clean it thoroughly Refer to the Cleaning the Brew Group chapter The brew group is not positioned correctly Switch off the machine using the power button Remove the brew group and reinsert it Ensure that the brew group is in the correct position before inserting it Refer to the Reinserting the brew group chapter 05 A problem occurred in the water circuit There is air i...

Страница 35: ...offee pucks container when the machine is off the coffee cycle counter does not reset In this case the display shows the icon even if the container is not full The coffee pucks container has been put back too quickly Always wait about 5 seconds when you replace the coffee pucks container This way the counter will reset to zero The machine says to empty the coffee pucks container even if the contai...

Страница 36: ...e menu settings Set the menu temperature to MAX The machine grinds the coffee beans but the coffee is not dispensed The coffee grinder is set to a too fine grinding Adjust the coffee grinder to a coarser setting The coffee dispensing spout is blocked Dispense a long coffee from pre ground coffee but without actually adding pre ground coffee The nozzles of the coffee dispensing spout are blocked Cl...

Страница 37: ...the machine The drip tray is too full and has spilled over Empty the drip tray when the red indicator emerges from the grid of the drip tray Always empty the drip tray before starting the descaling procedure GAGGIA Accessories Coffee and accessories are available through authorised centres Italy or distributors in your country Descaling product INTENZA water filter Coffee oil remover Milk circuit ...

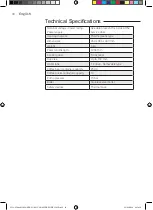
Страница 38: ...ons 260 x 380 x 440 mm Weight 9 kg Power cord length 1200 mm Control panel Front panel Cup size Up to 150 mm Water tank 1 8 litres Removable type Coffee bean container capacity 250 g Coffee pucks container capacity 10 Pump pressure 15 bar Boiler Stainless steel boiler Safety devices Thermal Fuse 4219 450 08051 MANUAL GAG CAD MILK EN FR 120US indd 38 23 04 2020 09 58 10 ...

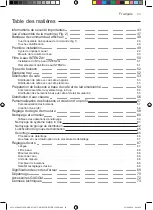
Страница 39: ...up 54 Distribution des boissons à base de café et de lait émulsionné 55 Distribution d eau chaude 56 Personnalisation des boissons et création d un profil 57 Personnalisation des boissons 57 Création d un profil 58 Réglage du degré de mouture 59 Nettoyage et entretien 60 Tableau des opérations de nettoyage 60 Nettoyage du système Capp in Cup 61 Nettoyage du groupe de distribution 62 Lubrification ...

Страница 40: ...orés après un mauvais fonctionnement de l appareil ou son endommagement de n importe quelle manière Renvoyer l appareil au centre d assistance agréé le plus proche pour tout contrôle réparation et réglage 7 L utilisation d accessoires non recommandés par le constructeur de l appareil pourrait engendrer des incendies des chocs électriques et des blessures 8 Ne pas utiliser à l extérieur 9 Ne pas la...

Страница 41: ...cations apparaissant sur la plaque signalétique 2 Ne jamais mettre de l eau tiède ou chaude dans le réservoir mais toujours de l eau froide 3 Ne pas toucher les surfaces chaudes de l appareil pendant le fonctionnement et en écarter le cordon électrique 4 Ne pas utiliser d alcool éthylique de solvants d essences de poudre à récurer et ou d objets abrasifs pour le nettoyage de la machine 5 Utiliser ...

Страница 42: ... cas d utilisation d un long cordon d alimentation détachable ou d une rallonge 1 La tension électrique de fonctionnement marquée sur le cordon d alimentation détachable ou sur la rallonge doit être au moins égale à celle de l appareil 2 Si la fiche de l appareil a une connexion de terre la rallonge devrait être une rallonge de terre à 3 fils et 3 La rallonge ne devra pas encombrer le plan de trav...

Страница 43: ...cordon d alimentation de la prise murale En cas de dysfonctionnement Si vous ne comptez pas utiliser l appareil pendant une période prolongée Avant de nettoyer la machine Tirez sur la prise et non sur le cordon d alimentation Ne touchez pas la prise secteur avec les mains humides N utilisez jamais l appareil si la fiche le cordon d alimentation ou l appareil lui même est endommagé Évitez d effectu...

Страница 44: ...pons à récurer des produits abrasifs ou des détergents agressifs tels que de l essence ou de l acétone pour nettoyer la machine Utilisez uniquement un chiffon doux humidifié avec de l eau Détartrez votre machine régulièrement La machine indiquera lorsqu un détartrage sera nécessaire Sans détartrage votre appareil cessera de fonctionner correctement Dans ce cas la réparation n est pas couverte par ...

Страница 45: ... de distribution d eau chaude de vapeur à mains nues car elle peut devenir très chaude Utilisez uniquement le manche protecteur adéquat Ne buvez jamais la solution distribuée pendant la procédure de nettoyage mensuel du mousseur à lait automatique Attention Pour des raisons d hygiène vérifiez que la surface extérieure de la buse de distribution d eau chaude de vapeur est propre Après la production...

Страница 46: ...t électroniques La mise au rebut appropriée des piles permet de protéger l environnement et la santé Garantie et assistance Si vous avez besoin d assistance contactez un point de vente local ou un centre d assistance agrée Nos contacts sont indiqués dans le dépliant de garantie fourni séparamment ou sur les sites www gaggia com ou www gaggia it 4219 450 08051 MANUAL GAG CAD MILK EN FR 120US indd 4...

Страница 47: ...s pour l achat de Gaggia Cadorna Milk Cette machine garantit une grande facilité d utilisation et toujours d excellents résultats Grâce à son interface intuitive l utilisateur pourra choisir parmi 10 boissons différentes les personnaliser et les sauvegarder dans les 4 profils disponibles afin de les retrouver à chaque utilisation Avant d être emballée chaque machine est soumise à des essais rigour...

Страница 48: ...our accéder au menu des boissons 6 Touche CLEAN SETTING clean setting Pour accéder au menu du nettoyage et des réglages 7 Touche START STOP START STOP Pour commencer arrêter la distribution de la boisson sélectionnée ou pour lancer arrêter la procédure affichée Remarque les touches MY FAVOURITES my favourites HOME HOME CLEAN SETTING clean setting sont également des touches ESC À tout moment il est...

Страница 49: ...SPRESSO LUNGO 2 Appuyer sur la touche sans ajouter de café prémoulu START STOP ON OFF my favourites HOME clean setting 30 ml medium ESPRESSO COFFEE TEMP START STOP ON OFF my favourites HOME clean setting 30 ml medium ESPRESSO COFFEE TEMP 3 Appuyer sur la touche START STOP START STOP pour commencer la distribution la machine va distribuer de l eau chaude 4 Vider le récipient et enlever le système C...

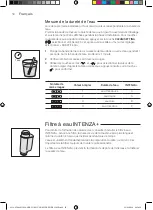
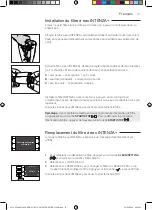
Страница 50: ...us rouges 3 Utiliser les touches vertes et pour sélectionner la valeur de la dureté à régler d après le tableau ci dessous appuyer ensuite sur la touche pour confirmer Nombre de carrés rouges Valeur à régler Dureté de l eau INTENZA 1 eau très douce A 2 eau douce A 3 eau dure B 4 eau très dure C Filtre à eau INTENZA Pour limiter la formation de calcaire il est conseillé d installer le filtre à eau ...

Страница 51: ...e filtre à eau INTENZA de l eau le régler d après la dureté de l eau mesurée voir le chapitre Mesure de la dureté de l eau en spécifiant à sa base A eau douce correspond à 1 ou 2 carrés B eau dure standard correspond à 3 carrés C eau très dure correspond à 4 carrés Remplacement du filtre à eau INTENZA Lorsque le filtre à eau INTENZA est épuisé un message d avertissement est affiché 1 Pour remplace...

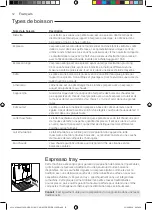
Страница 52: ...vi dans une grande tasse Café au lait Le café au lait est une boisson préparée à base de café et de lait en parts égales Il peut désormais être enrichi d une légère couche de mousse de lait Il est servi dans une grande tasse Latte macchiato Le latte macchiato est une boisson qui se prépare avec du lait chaud une part de mousse de lait et une petite quantité d expresso Il est servi dans un verre en...

Страница 53: ...RT STOP START STOP Pour personnaliser les réglages de la boisson se référer au chapitre Personnalisation des boissons Distribution du café Distribution de café avec du café en grains Attention utiliser uniquement du café en grains pour café expresso Ne pas mettre de café moulu de café non torréfié ni de café lyophilisé ou soluble dans le réservoir à café en grains car ils risqueraient d endommager...

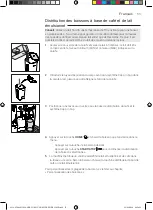
Страница 54: ...n de boissons à base de café et de lait émulsionné Comment assembler le système Capp in Cup Remarque Avant de préparer n importe quelle boisson à base de lait s assurer que le système Capp in Cup a bien été posé sur la machine 1 Assembler l embout sur le corps central du système Capp in Cup 2 Insérer le système Capp in Cup dans la poignée en caoutchouc sur la buse de vapeur jusqu à ce qu il se blo...

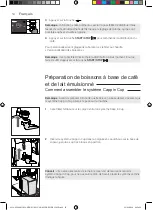
Страница 55: ...hoisir la boisson que l on désire dans le menu Appuyer sur la touche de la boisson désirée Appuyer sur la touche START STOP START STOP pour commencer la distribution de la boisson sélectionnée 5 La machine distribue un volume prédéfini de lait émulsionné et de café dans la tasse ou le verre Selon la boisson choisie la machine distribuera d abord le café ou le lait émulsionné Pour personnaliser les...

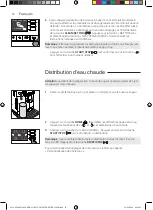
Страница 56: ... clean setting FILLING WATER CIRUIT to start press 6 Après chaque préparation de boissons à base de café et de lait émulsionné on pourra effectuer la procédure de nettoyage rapide du circuit du lait dans un délai de 10 secondes La procédure pourra dans tous les cas être effectuée à un moment ultérieur en accédant au menu du nettoyage par l intermédiaire de la touche CLEAN SETTING clean setting App...

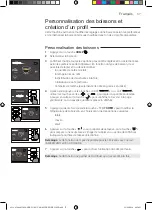
Страница 57: ... la nouvelle quantité réglée sera affichée 5 Appuyer plusieurs fois de suite la touche TEMP pour modifier la température de la boisson en choisissant une des options suivantes faible moyen élevé 6 Appuyer sur la touche pour préparer deux tasses ou la touche pour préparer une seule tasse L image de la boisson au centre de l afficheur indiquera le nombre de tasses sélectionné Remarque cette fonction...

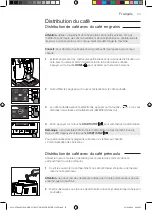
Страница 58: ...ssons seront affichées Sélectionner la boisson à mémoriser dans le profil et la personnaliser en suivant la procédure décrite au chapitre Personnalisation des boissons du point 3 au point 8 2 Sélectionner le profil de la couleur préférée 5 Appuyer sur la touche pour mémoriser la boisson personnalisée dans le profil On peut maintenant distribuer la boisson ou alternativement appuyer sur une des tou...

Страница 59: ...asses de café Attention pour éviter d abîmer le moulin à café ne pas tourner le bouton de sélection de la mouture de plus d un cran à la fois 1 Mettre une tasse sous la buse de distribution du café 2 Ouvrir le couvercle du réservoir à café en grains 3 Distribuer un expresso selon la procédure décrite au chapitre Distribution de café avec du café en grains 4 Pendant que la machine moud le café insé...

Страница 60: ... aspiration du lait comme l indique la figure Mensuellement Démarrer le cycle de NETTOYAGE APPROFONDI en suivant les instructions décrites au chapitre Nettoyage du système Capp in Cup Pour ce cycle de nettoyage utiliser le produit spécifique pour le nettoyage du circuit du lait Milk Circuit Cleaner de Philips Déposer ensuite le système Capp in Cup et laver tous les composants sous l eau courante G...

Страница 61: ... de nettoyage du système Capp in Cup La machine dispose de deux programmes pour nettoyer le système Capp in Cup le nettoyage rapide et le nettoyage approfondi Les deux programmes peuvent être sélectionnés par l intermédiaire de la touche CLEAN SETTING clean setting en appuyant ensuite sur la touche NETTOYAGE Le nettoyage rapide est également proposé à la fin de la distribution des boissons à base ...

Страница 62: ...uvercle en caoutchouc fig 29 7 Déposer la carafe à lait fig 30 8 Laver tous les composants sous l eau courante 9 Une fois le nettoyage terminé reposer tous les composants en effectuant la même procédure dans l ordre inverse Nettoyage du groupe de distribution Attention ne pas laver le groupe de distribution au lave vaisselle et ne pas utiliser de produits vaisselle ou autres détergents car cela ri...

Страница 63: ...avec de l eau tiède Nettoyer soigneusement le filtre supérieur 3 Laisser sécher le groupe de distribution à l air libre Remarque ne pas sécher le groupe de distribution avec des chiffons pour éviter l accumulation de fibres à l intérieur Nettoyage du groupe de distribution avec des tablettes pour l élimination des résidus huileux du café Attention pour le nettoyage n utiliser que des tablettes Gag...

Страница 64: ... atteinte Si le crochet est toujours en bas il n est pas correctement positionné 2 Appuyer sur la touche CLEAN SETTING clean setting et sélectionner la touche NETTOYAGE affichée 3 Sélectionner NETTOYER GROUPE DE DISTRIBUTION et appuyer sur la touche START STOP START STOP pour lancer la procédure de nettoyage 4 Suivre les instructions affichées pour nettoyer correctement le groupe de distribution 5...

Страница 65: ... 1 5 Tous les 4 mois Normale 6 10 Tous les 2 mois Élevée 10 Tous les mois 1 Éteindre l appareil et débrancher le cordon d alimentation 2 Retirer le groupe de distribution et le rincer avec de l eau tiède voir le chapitre Nettoyage du groupe de distribution à l eau courante 3 Appliquer une fine couche du lubrifiant fourni de série autour de la broche d insertion située dans la partie inférieure du ...

Страница 66: ...rser le flacon complet de solution détartrante Gaggia dans le réservoir à eau et ajouter de l eau jusqu au niveau de CALC CLEAN Réinstaller donc le réservoir dans la machine 6 Mettre un grand récipient 1 5 l sous la buse de vapeur et la buse de distribution du café 7 Suivre les instructions affichées pour lancer la procédure de détartrage Cette procédure dure environ 30 minutes et comprend un cycl...

Страница 67: ...le chapitre correspondant Remarque si la procédure n a pas été terminée dès que possible il faudra effectuer une nouvelle procédure de détartrage Réglages divers Appuyer sur la touche CLEAN SETTING clean setting et sélectionner l option RÉGLAGES sur l afficheur pour rétablir ou modifier certains paramètres de la machine tels que Langue Filtre à eau Minuteur stand by Dureté de l eau Unité de mesure...

Страница 68: ...TENZA et Remplacement du filtre à eau INTENZA Unité de mesure Sélectionner UNITÉ DE MESURE pour régler l unité de mesure sur ml ou sur onces START STOP ON OFF my favourites HOME clean setting LANGUAGE TIMER STAND BY WATER FILTER UNITS Compteur de boissons Pour chacune des boissons il est possible d afficher le nombre de tasses qui ont été distribuées depuis la première mise en service de la machin...

Страница 69: ...principal Retirer le groupe de distribution et le nettoyer soigneusement Consulter le chapitre Nettoyage du groupe de distribution Le groupe de distribution n est pas placé correctement Éteindre la machine en utilisant l interrupteur principal Retirer le groupe de distribution et le remettre en place S assurer que le groupe de distribution se trouve dans la bonne position avant de le remettre en p...

Страница 70: ...de café est vidé lorsque la machine est éteinte le compteur des cycles de café ne se remet pas à zéro Dans ce cas l afficheur visualise l icône même si le réservoir n est pas plein Le réservoir à marc de café a été remis en place trop rapidement Toujours attendre environ 5 secondes avant de remettre en place le réservoir à marc de café Ceci permet au compteur de revenir à zéro La machine demande d...

Страница 71: ...chine se règle automatiquement La conduite de sortie du café est bloquée Nettoyer la conduite de sortie du café avec une petite cuillère comme le décrit le chapitre Nettoyage du groupe de distribution à l eau courante Le café n est pas assez chaud La température réglée est trop basse Vérifier les réglages du menu Régler la température du menu sur MAX La machine moud le café en grains mais celui ci...

Страница 72: ...tre Laisser les bulles d air s échapper du filtre Le réservoir contient encore de l eau Vider le réservoir à eau avant d installer le filtre Il n y a pas de joint en caoutchouc dans le filtre INTENZA Vérifier l emballage et installer le joint dans le filtre INTENZA Il y a de l eau sous la machine Le bac d égouttement est trop plein et a débordé Vider le bac d égouttement dès que l indicateur est v...

Страница 73: ...Poids 9 kg Longueur du câble 1 200 mm Bandeau de commande En façade Dimensions des tasses Jusqu à 150 mm Réservoir à eau 1 8 litres Amovible Capacité du réservoir à café en grains 250 g Capacité du réservoir à marc de café 10 Pression de la pompe 15 bars Chaudière Chaudière Inox Dispositifs de sécurité Coupe circuit thermique 4219 450 08051 MANUAL GAG CAD MILK EN FR 120US indd 73 23 04 2020 09 58 ...

Страница 74: ...4219 450 08051 MANUAL GAG CAD MILK EN FR 120US indd 74 23 04 2020 09 58 49 ...

Страница 75: ...4219 450 08051 MANUAL GAG CAD MILK EN FR 120US indd 75 23 04 2020 09 58 49 ...

Страница 76: ...ions S p A Sede Amministrativa Administrative Office ViaTorretta 240 40041 Gaggio Montano Bologna Italia 39 0534 771111 Fax 39 0534 31025 Sede Legale Registered Office Piazza A Diaz 1 20123 Milano Italia Capitale Sociale Euro 104 000 i v REA MI1387376 R I Cod Fisc 02069680367 Part IVA IT 13054780153 www gaggia it www gaggia com COD Rev 00 14 06 19 4219 450 08051 MANUAL GAG CAD MILK EN FR 120US ind...

Отзывы: