Gaggenau VP414115 Скачать руководство пользователя страница 13

Installation instructions

 en

13

12.7 Information about flush installation

With the flush installation, the appliance and worktop
are on one level. There is no unattractive stepping
between the appliance and the worktop.
You can install the appliance in the following
temperature-resistant and waterproof worktops:

¡

Stone worktops

¡

Plastic worktops, e.g. Corian®

¡

Solid wood worktops

Coordinate with the worktop manufacturer when using
other materials.
Installation in compressed-wood worktops is not pos-
sible.
Have all cut-out work on the worktops carried out in a
specialist workshop in compliance with the installation
diagram. The cut-out must be neat and precise since
the cut edge is visible on the surface.
Clean and degrease the cut-out edges with a suitable
cleaning agent. When doing so, observe the usage in-
structions from the silicone manufacturer.

12.8 Installation accessories

Here, you can find an overview of the installation ac-
cessories.
Use the accessories only as specified. The manufac-
turer shall accept no liability if you use the accessories
incorrectly.

Accessories

Order number

Connection strip for sur-
face-mounted installation

VA420010

Connection strip for flush
installation

VA420004

Appliance cover, stainless
steel

VA440010

12.9 Combining multiple appliances

Requirement:

 You need a suitable connection strip to

combine several Vario appliances. You can obtain the
connection strip as an optional accessory.

1.

When making the unit cut-out, allow extra space for
the connecting strip between the appliances.

Observe the installation instructions for the con-
nection strip.

2.

If required, install the appliances in individual cut-
outs.

Maintain a bar width of at least 50 mm between
the individual cut-outs.

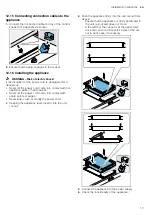
12.10 Installing the appliance flush with the
frameless induction hobs

1.

For flush installation in combination with frameless
induction hobs, cut out the support edge with
6.5 mm.

2.

Make the unit cut-out in the worktop for one or more
Vario appliances in accordance with the installation
drawing.

Observe the installation instructions for the con-
nection strip VA420004.

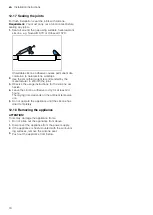
12.11 Installing the appliance cover

You can obtain a suitable appliance cover as an op-
tional accessory.

1.

Secure the appliance cover to the appliance before
installing it.

Follow the installation instructions for the appli-
ance cover.

Содержание VP414115

Страница 1: ...en User manual and installation instructions VP414115 Teppanyaki Gaggenau...

Страница 2: ...experience and or knowledge provided that they are supervised or have been instructed on how to use the appliance safely and have understood the resulting dangers Do not let children play with the app...

Страница 3: ...ood warm Remove spilled liquids before opening the appliance cover 2 Preventing material damage ATTENTION Hard or pointed objects may cause scratches or notches to form on the frying surface Do not al...

Страница 4: ...mental protection and saving energy 4 3 2 Disposing of packaging The packaging materials are environmentally compat ible and can be recycled Sort the individual components by type and dispose of them...

Страница 5: ...up Orange Appliance ON Flashing Orange Appliance OFF Residual heat indicator Flashing alternately Or ange and white Safety switch off function power failure Flashing alternately Yel low and magenta A...

Страница 6: ...these recommendations to your appliance 7 1 Tips for boiling and frying Do not place the food on the appliance until the heating display has gone out When increasing the temperature between two prepar...

Страница 7: ...ng at 160 C 1 Fry for 2 mins each side 2 Continue frying for 4 6 mins Turkey steak 1 5 cm 200 210 12 16 Poultry liver 1 cm 200 210 3 5 Fish and seafood Food Temperature in C Cooking time in mins Comme...

Страница 8: ...and servicing To keep your appliance working efficiently for a long time it is important to clean and maintain it carefully 8 1 Cleaning products You can obtain suitable cleaning products from after s...

Страница 9: ...soapy water Do not scour burnt on remains 3 Remove heavy soiling or yellow discolouration caused by heat using the stainless steel cleaner 4 Dry with a soft cloth 8 5 Cleaning the control knob Notes D...

Страница 10: ...g lights up orange on the control knob 1 Turn the right hand control knob to 0 2 Disconnect the appliance from the mains power supply 3 Wait at least 30 seconds 4 Re connect the appliance a The illumi...

Страница 11: ...available from your specialist dealer or local author ity This appliance is labelled in accord ance with European Directive 2012 19 EU concerning used elec trical and electronic appliances waste elec...

Страница 12: ...installing the ap pliance WARNING Risk of electric shock Incorrect repairs are dangerous Repairs to the appliance should only be carried out by trained specialist staff Only use genuine spare parts wh...

Страница 13: ...ctly Accessories Order number Connection strip for sur face mounted installation VA420010 Connection strip for flush installation VA420004 Appliance cover stainless steel VA440010 12 9 Combining multi...

Страница 14: ...The fitted units are heat resistant up to 90 C The worktop is level horizontal and stable 1 Follow the instructions on combining several appli ances Combining multiple appliances Page 13 2 Ensure tha...

Страница 15: ...ility of the unit particularly in the case of thin worktops Take the appliance weight including additional load into consideration Use heat resistant and moisture resistant rein forcement material Not...

Страница 16: ...control knob is in the zero setting 8 On the rear of the control knob tighten the retaining nut using the installation tool provided 9 Align the control knob precisely in the zero setting 12 14 Connec...

Страница 17: ...tact with hot appliance parts or heat sources Never let the power cord come into contact with sharp points or edges Never kink crush or modify the power cord 1 Keeping the appliance level insert it in...

Страница 18: ...t recommended by the manufacturer to smooth the joint 3 Observe the usage instructions for the silicone ad hesive 4 Leave the silicone adhesive to dry for at least 24 hours The drying time depends on...

Страница 19: ......

Страница 20: ...4 81739 M nchen GERMANY www gaggenau com 9001798024 9001798024 en 021027 Valid within Great Britain Imported to Great Britain by BSH Home Appliances Ltd Grand Union House Old Wolverton Road Wolverton...

Отзывы: