Gaggenau VI 414 610 Скачать руководство пользователя страница 12

12

Connect Electrical Supply

Refer to data plate for more information. See "Service" 
for data plate location.

The branch-circuit breakers ampacity, the wire sizes 
and the connections must be conform to the 
requirements of the National Electrical Code or 
Canadian Electrical Code and all local codes and 
ordinances.

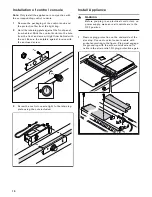
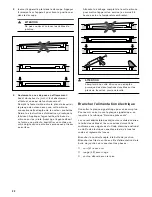
Attach flexible conduit to the junction box. Connect 
the lead wires to the junction box supply wires in 
proper phase:

black (L1) to black

red (L2) to red

green or bare to ground

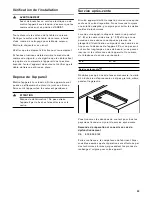
Check the Installation

9

WARNING

Before you plug in an electrical cord or turn on 
power supply, make sure all controls are in the 
OFF position.

Remove everything from the cooktop surface. Clean 
cooktop surface with cooktop cleaning creme.

Switch on the circuit breaker.

Verify that elements function properly.

When the light ring behind the control knob blinks, 
the connecting cable between the control console and 
the appliance isn't plugged in correctly. Disconnect 
the appliance from power and ensure that the 
connecting cable is correctly fitted.
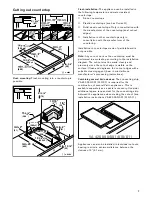
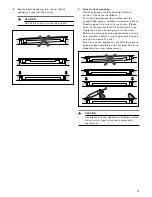
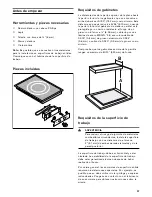
Removing appliance

Disconnect the appliance from the power supply. For 
flush-mounted appliances, remove the silicone joint. 
Push out the appliance from below.

9

CAUTION

Damage to appliance! Don't lever device out 
from above at the frame.

Customer service

If your appliance needs repairs, our customer service 
is there for you. We work hard to help solve problems 
quickly and without unnecessary service calls, getting 
your appliance back up and running correctly in the 
least amount of time possible.

When you call, please indicate the product number 
(E-Nr.) and serial number (FD-Nr.) so that we can 
support you in a qualified manner. You will find the 
type plate with these numbers on the bottom of the 
appliance. To avoid having to search for a long time 
when you need it, you can enter your appliance data 
and the customer support telephone number here.

Please read the installation instructions and use and 
care instructions provided with your appliance. Failure 
to do so may result in an error in using the appliance. 
This could  result in a service call that instead of fixing 
a mechanical issue is only needed for customer 
education. Such calls are not covered by the 
appliance warranty.

Please find the contact data of all countries in the 
enclosed customer service list.

To book an engineer visit and product advice

You can rely on the manufacturer’s expertise. Rest 
assured that the repair will be handled by trained 
service technicians who have the original replacement 
parts for your appliance.

E-Nr.

FD-Nr.

Customer Service 

O

USA

877 442 4436 
toll-free

CANADA

800 828 9165 

Содержание VI 414 610

Страница 1: ...Gaggenau Installation instructions 2 Instructions d installation 13 Instrucciones de instalaci n 24 VI 414 610 Induction wok Wok induction Wok de inducci n...

Страница 2: ...result of non observance of this warning 9 CAUTION This indicates that minor or moderate injuries may occur as a result of non observance of this warning NOTICE This indicates that damage to the appl...

Страница 3: ...tions Electric Safety WARNING Before you plug in an electrical cord or turn on power supply make sure all controls are in the OFF position If required by the National Electrical Code or Canadian Elect...

Страница 4: ...zontally a minimum of 5 inches 127 mm beyond the bottom of the cabinet Verify that cabinets above the cooktop are a maximum of 13 330 mm deep Under the stovetop no refrigerators dishwashers ovens with...

Страница 5: ...ant millboard covered with not less than no 28 gauge sheet metal 0 015 0 4 mm stainless steel 0 024 0 6 mm aluminum or 0 020 0 5 mm copper Verify that the cabinets above the cooktop are a maximum of B...

Страница 6: ...out Remove shavings after cutting Seal cut surfaces for resistance to heat and so they are watertight Pay attention to a minimum gap of 3 8 10 mm from the underside of the appliance to kitchen units T...

Страница 7: ...workshop according to the installation diagram The cut out must be made cleanly and precisely since the cut out edge is visible on the surface Clean and degrease the cut out edges with a suitable cle...

Страница 8: ...s a special accessory When creating the cut out bear in mind the additional space required for the appliance cover Flush installation Hole for control knob The built in control console can be integrat...

Страница 9: ...eld 9 CAUTION Sharp edges Use protective gloves when installing the plate For safety reasons the heat shield must be properly installed This prevents components from overheating as a result of the rec...

Страница 10: ...from behind with the nut Ensure the setplate against torsion with the enclosed screw 3 Screw the control console tight to the retaining plate using the nuts included Install Appliance 9 WARNING Before...

Страница 11: ...licone bonding agent in a color of your choice Please observe the manufacturer s instructions for use Apply the silicone bonding agent in the joints Before the silicone bonding agent starts to form a...

Страница 12: ...amage to appliance Don t lever device out from above at the frame Customer service If your appliance needs repairs our customer service is there for you We work hard to help solve problems quickly and...

Страница 13: ...entra ner la mort ou des blessures graves 9 ATTENTION Le non respect de cet avertissement peut entra ner des blessures mineures ou mod r es AVIS Vous indique que des dommages l appareil ou aux biens...

Страница 14: ...urit des cuisini res lectriques domestiques UL 507 norme pour la s curit des ventilateurs lectriques CAN CSA C22 2 No 113 M1984 Ventilateurs et soufflantes CAN CSA C22 2 No 61 M89 Cuisini res pour usa...

Страница 15: ...es de c blage ou les fixations vis antibasculement Pour liminer le risque de br lures ou d incendie lorsque l on allonge le bras au dessus des l ments de surface chauds viter d installer des placards...

Страница 16: ...m recouvert d une feulle en acier MSG N 28 en acier inoxydable de 0 4 mm d paisseur en aluminium de 0 6 mm ou en cuivre de 0 5 mm d paisseur au minimum V rifier si les armoires au dessus de la grille...

Страница 17: ...upe Apr s les op rations de d coupe liminer les copeaux Sceller les plans de coupe de fa on qu ils r sistent la chaleur et soient tanches l eau Respecter une distance minimale de 3 8 10 mm entre le de...

Страница 18: ...vail doivent tre faits dans un atelier sp cialis conform ment au sch ma de pose La d coupe doit tre nette et pr cise car le bord de coupe est visible en surface Nettoyer et d graisser les bords de cou...

Страница 19: ...cessoirie Au moment de r aliser la d coupe tenir compte de l encombrement du couvercle Pose en affleurement Trou pour manette de commande Le pupitre de commande est int grable dans le meuble bas haute...

Страница 20: ...des gants de protection pour installer la table Pour des raisons se s curit il faut installer correctement l cran pare chaleur Cet cran vite la surchauffe de composants par remise en recirculation de...

Страница 21: ...aintien avec la vis jointe afin de l emp cher de tourner 3 Au moyen des crous fournis visser le pupitre de commande la t le de maintien Pose de l appareil 9 AVERTISSEMENT Avant de brancher un cordon l...

Страница 22: ...surface Attendre le s chage complet de la colle silicone pour mettre l appareil en service au moins 24 heures selon la temp rature ambiante 9 ATTENTION L emploi d une colle silicone non adapt e provoq...

Страница 23: ...cadre Service apr s vente Si votre appareil doit tre r par notre service apr s vente est votre disposition Nous trouvons toujours une solution adapt e y compris pour viter les visites inutiles de tech...

Страница 24: ...no se cumple con esta advertencia 9 ATENCION Esto indica que pueden producirse lesiones leves o moderadas si no se cumple con esta advertencia AVISO esto indica que puede producirse un da o al electro...

Страница 25: ...7 Norma de seguridad para ventiladores el ctricos Standard for the Safety of Electric Fans CAN CSA C22 2 N 113 M1984 Ventiladores Fans and Ventilators CAN CSA C22 2 N 61 M89 Estufas de uso dom stico H...

Страница 26: ...as para cables ni soportes tornillos antivuelco Para eliminar el riesgo de quemaduras o incendio al tocar unidades de la superficie calentadas se debe evitar dejar espacio de almacenamiento en gabinet...

Страница 27: ...de acero MSG N 28 acero inoxidable de 0 015 0 4 mm de grosor aluminio de 0 024 0 6 mm o cobre de 0 020 0 5 mm de grosor como m nimo Compruebe que los gabinetes encima de la parrilla tengan un m ximo...

Страница 28: ...acas de trabajo de varias capas de ser necesario fije unos listones de madera a los lados del hueco Despu s de los trabajos de corte retire las virutas Selle las superficies de corte de forma que resi...

Страница 29: ...por debajo del borde superior de la encimera Montaje a ras de superficie El aparato se puede montar en las siguientes encimeras resistentes a la temperatura y al agua Encimeras de m rmol Encimeras de...

Страница 30: ...eden montar en recortes independientes respetando las distancias m nimas de 2 51 mm entre aparatos Para la combinaci n de aparatos con o sin cubierta de aparatos se pueden compensar las diferencias de...

Страница 31: ...r del panel frontal a 31 8 x 123 16 80 x 310 mm de manera que su anchura no sea superior a 1 26 mm Montaje a ras de superficie 2 Realice un orificio de 1 3 8 35 mm para fijar la maneta de mando en la...

Страница 32: ...balaje de la encimera desatornille el protector t rmico El protector t rmico podr girar libremente tal como se muestra en la ilustraci n Montar el panel de mandos Nota El aparato nicamente se debe mon...

Страница 33: ...el protector de conectores 2 Introduzca el aparato uniformemente en el recorte Presione el aparato firmemente en el recorte 9 ATENCION Tenga cuidado de no doblar ni enganchar el cable de conexi n 3 So...

Страница 34: ...i n de la caja de conexi n Negro L1 a negro Rojo L2 a rojo Verde o desnudo a masa Pruebe la instalaci n 9 ADVERTENCIA Antes de enchufar un cable el ctrico o apagar la fuente de alimentaci n el ctrica...

Страница 35: ...aconsejable anotarlos aqu conjuntamente con el n mero de tel fono del Servicio de atenci n al cliente Tenga en cuenta que la visita del t cnico del servicio de atenci n al cliente no es gratuito en ca...

Страница 36: ...me Appliances Ltd 1901 Main Street Suite 600 Irvine CA 92614 1 877 442 4436 USA www gaggenau usa com Gaggenau Hausger te GmbH Carl Wery Stra e 34 81739 M nchen GERMANY 9000710519 9000710519 en us es m...

Отзывы: