manualshive.com logo in svg
background image


REV. 6/23


12


GB734SRVT5 INSTALLTION TOOL


SN#1002 AND ABOVE


 BLEEDING PROCEDURE:


* FILLING & BLEEDING VIDEO AVAILABLE AT:

 http://www.gagebilt.com/rivet_tools_videos.php


Note:


• 

Air Bleeder Assembly (704153) (sold separately) is required.


WARNING:  

Do not cycle tool without air bleeder assembly (704153), or the screw and stat

-

o

-

seal, installed in tool head. Severe 


personal injury could result.


Use CAUTION when removing screws, air bleeder assembly (704153) and fill bottle (745263). Hydraulic oil may be 


  under pressure.


CAUTION: 

Before filling handle assembly (744129), air piston assembly (744121) should be all the way down.


CAUTION: 

When forcing piston rod assembly (744136) downward, with head cylinder assembly (734105) removed, hydraulic oil will 


 eject forcibly from handle assembly (744129).


CAUTION:


When bleeding tool, ensure tubing is free from kinks or other obstructions.
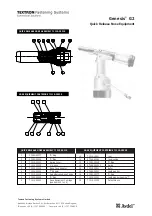


1. 


Ensure lever assembly (724017) is removed from manifold

-

head assembly (744306). 

Stand handle assembly (744129) on floor, 

stretch tool hoses and head cylinder assembly (734105) upward and lay flat on a table or bench. When bleeding tool always keep 

the head cylinder assembly (734105) higher than the handle assembly (744129).


2.


Remove Button Head Cap Screw (402482) and Stat

-

o

-

seal (S572) from manifold

-

handle (744303) hole marked #3. Attach air bleeder 

assembly (704153) to manifold

-

handle (744303) hole marked #3 in an upright position.


3.


Connect the tool to air supply and cycle tool ten times holding the actuator assembly

-

air (704130) down for 2 

-

 3 seconds between 

cycles to remove any air from the tool.


4.


  Disconnect air supply. Remove air bleeder assembly (704153) from manifold

-

handle (744303) and replace with button head cap 


screw (402482) and stat

-

o

-

seal (S572) and torque 35 

-

 40 inch lbs. (3.95 

-

 4.52 Nm). Do not over tighten.


5.    Remove button head cap screw (402482) and stat

-

o

-

seal (S572) from hole marked #4 on manifold

-

head assembly (744306) and 

attach air bleeder assembly (704153) in an upright  position.


6.


Connect air supply. Cycle tool ten times removing any air bubbles.


7.


Disconnect air supply. Remove air bleeder assembly (704153) and replace button head cap screw (402482) and stat

-

o

-

seal (S572) 

on manifold

-

head assembly (744306) and torque 35 

-

 40 inch lbs. (3.95 

-

 4.52 Nm). Do not over tighten.


8.


Connect air supply. Cycle tool ten times and check stroke of 

1.090” (27.69 

mm) using instructions a thru c and diagrams below.


  We recommend using dial calipers.


a. With the actuator assembly

-

air (704130) released, check dimension (A).


b. Holding actuator assembly

-

air (704130), check dimension (B).


c. Subtract dim 

B

” 

from dim 

A

”. 

If stroke is not consistent within 1/64" (.396 mm) repeat bleeding procedure until stroke met. 


For your consideration, Gage Bilt offers a depth gage (Pt.# A

-

1935) to help simplify and more accurately check your tool stroke. 

Please contact Gage Bilt for more information.


9.    

Re

-

attach lever assembly (724017) to manifold

-

head assembly (744306).


Hole marked #3 on 


Manifold Handle (744303)


Air Bleeder 

Assembly 

(704153)


Images may not reflect actual tool.


Содержание GB734SRVT5

Страница 1: ...YOU ORIGINAL INSTRUCTIONS 44766 Centre Court Clinton Twp MI 48038 USA Ph 1 586 226 1500 Fax 1 586 226 1505 solutions1 gagebilt com www gagebilt com GAGE BILT MADE in USA INSTALLATION TOOL GB734SRVT5...

Страница 2: ...ngs 6 Principle of Operation 7 How to set up the GB734SRVT5 8 How to use the GB734SRVT5 9 Maintenance and Hydraulic Thread Preparation 10 Filling 11 Bleeding 12 Troubleshooting How to Clean Vacuum Reg...

Страница 3: ...airing or replacing defective goods or if the goods covered by this warranty are reworked or subjected to any type of additional processing This warranty is void if Seller is not notified in writing o...

Страница 4: ...entire split handle installation tool weighs 6 75 lbs 3 06 kg It has a 1 090 27 69 mm fastener setting stroke The GB734SRVT5 split handle installation tool operates on 90 to 100 psi 6 2 6 9 bar with 9...

Страница 5: ...ON OF FUNCTIONS Evacuation Tube Air Hose Hydraulic Hose Actuator Lever Assembly Vacuum Regulator Actuator Assembly air Image may not reflect actual tool Air Inlet Bleeder Screw Bleeder Screw Hanger He...

Страница 6: ...lace the consumable inserted tool as recommended in the instruction handbook to prevent an unnecessary increase in noise 6 If the power tool has a silencer always ensure that it is in place and in goo...

Страница 7: ...n forcing hydraulic oil up and into the front side of the head cylinder causing the piston to move to the rear of the head cylinder The internal components of the attached nose assembly are also movin...

Страница 8: ...ST read and understand all warnings and cautions WARNING It is required that eye protection hearing protection and safety boots be worn at all times while handling this equipment WARNING The users or...

Страница 9: ...on Ensure there is adequate clearance for tool and operator s hands before proceeding Keep fingers clear of any moving parts Keep fingers clear from fasteners and installed materials Severe personal i...

Страница 10: ...eder assembly 704153 on a weekly basis or as needed See Filling and Bleeding procedures pgs 11 12 SEE TROUBLESHOOTING PG 13 AND OVERHAUL PGS 14 16 FOR FURTHER GUIDANCE CLEANING AND LUBRICATING PROCEDU...

Страница 11: ...r 743131 When looking at the top of the handle assembly 744129 the oil passage is the hole that has a counterbore for o ring S832 Do not overfill causing oil to go in air passage hole 3 Re install gas...

Страница 12: ...tool to air supply and cycle tool ten times holding the actuator assembly air 704130 down for 2 3 seconds between cycles to remove any air from the tool 4 Disconnect air supply Remove air bleeder ass...

Страница 13: ...ommended b Check o rings on valve sleeve 743144 valve spool assembly 743142 and valve plug 744142 If worn or damaged replace Valve sleeve removal tool 744152 is recommended 6 FASTENER STEM JAMMED IN N...

Страница 14: ...late Gage Bilt part no 402723 or other lubricant is recommended during reassembly to prevent tearing or distorting of o rings The disassembly and re assembly procedure can be accomplished by utilizing...

Страница 15: ...uator lever assembly 724017 removed insert a 5 8 open end box wrench adjustable wrench around actuator assembly air 704130 3 Loosen the actuator assembly air 704130 4 Remove wrench Unthread and remove...

Страница 16: ...49 down into top of power cylinder 743131 and into the hex of piston rod assembly 744136 While holding the piston rod wrench assembly 704149 remove flexlock nut 400559 using a 7 16 socket wrench or an...

Страница 17: ...REV 6 23 17 GB734SRVT5 INSTALLTION TOOL SN 1002 AND ABOVE PARTS LIST...

Страница 18: ...REV 6 23 18 GB734SRVT5 INSTALLTION TOOL SN 1002 AND ABOVE PARTS LIST...

Страница 19: ...d when this material undergoes combustion ACCIDENTAL RELEASE MEASURES Protective Measures Eliminate all sources of ignition in vicinity of spilled material Spill Management Stop the source of the rele...

Страница 20: ...REV 6 23 20 GB734SRVT5 INSTALLTION TOOL SN 1002 AND ABOVE SEE TABLE 1 ON PG 21 HOW TO ASSEMBLE EVACUATION TUBE VACUUM See pg 13 on how to clean vacuum...

Страница 21: ...E STRUCTURAL RIVET MONOBOLT RIVET COUNTERSUNK HEAD SERRATED STEM STRUCTURAL RIVET SEE NOTE 1 3 16 1 4 2 PLASTIC SPLIT RIVET OPEN END RIVET NON STRUCTURAL AVEX MAGNA LOK MAGNA BULB HEMLOK KLAMP TITE BU...

Страница 22: ...ATIONS Pistol Grip SHA All SRA and SHA tools require a powerunit to operate Please contact GAGE BILT for more information Inline SRA Description Image may not reflect actual tool Pistol Grip Inline Pi...

Страница 23: ...REV 6 23 23 GB734SRVT5 INSTALLTION TOOL SN 1002 AND ABOVE This page intentionally left blank...

Страница 24: ...ON TEFLON IS A REGISTERED TRADEMARK OF E I DUPONT DE NEMOURS CO SLIC TITE IS A REGISTERED TRADEMARK LA CO INDUSTRIES INC VIBRA TITE IS A REGISTERED TRADEMARK OF OAKLAND CORPORATION Gage Bilt offers a...

Отзывы: