background image


G-SATA Installation Guide 


Page 12 

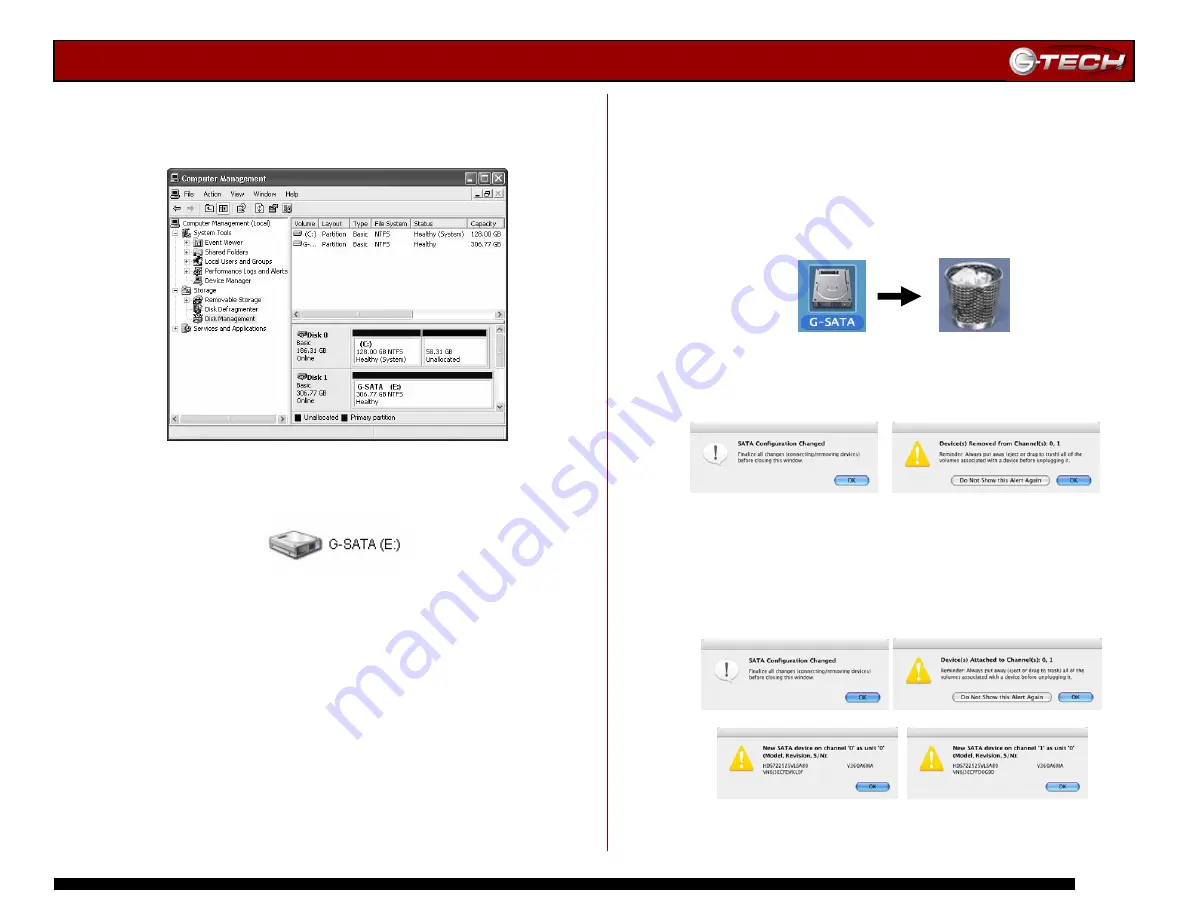
12. Windows will format the volume and then display the 
following window. Disk 1 is now identified as G-SATA (E:)

Exit the

 Computer Management 

console. 


13

.  G-SATA will now be displayed as an available hard 

disk drive under 

My Computer 

as shown below. 


G-SATA is now set up for use!! 


8. Hot-Swap Procedure for G-SATA 

A great feature of G-SATA is its ability to be connected and 

disconnected while your computer is running.  To prevent 
failures and/or data loss it is important to follow the steps 

below when hot-swapping G-SATA. 


8.1 Mac OS X Computers -Removing G-SATA


1. Drag the G-SATA icon to the TRASH located in the dock. 


2. After dragging G-SATA to the TRASH, power off G-SATA. 
3. The following dialog boxes will be displayed.  Click <OK> 

in each box to complete the hot-swap removal procedure. 


8.2


MAC OS X Computers – Reconnecting G-SATA 

1. Attach G-SATA to the G-SATA PCI adapter 
2. Power on G-SATA. Dialog boxes like that shown below will 

appear.  Click <OK> in each box to complete the hot-swap 
reconnection procedure. 


Содержание G-SATA

Страница 1: ...VIEW 6 INSTALLING G SATA 6 1 Installing the G SATA PCI Adapter 6 2 Connecting G SATA to your Computer 6 3 Attaching the SATA and Power Cables to G SATA 7 INITIALIZING G SATA 7 1 Mac OS X 10 4 7 2 Windows 2000 XP 8 HOT SWAP PROCEDURE FOR G SATA 8 1 Mac OS X Computers Removing G SATA 8 2 Mac OS X Computers Reconnecting G SATA 8 3 Windows 2000 XP Computers Removing G SATA 8 4 Windows 2000 XP Computer...

Страница 2: ...G SATA Installation Guide Page 2 ...

Страница 3: ...G SATA Installation Guide Page 3 ...

Страница 4: ...e Doing so will void the warranty If the product is returned with damage caused by improper handling the warranty will be void and liability will rest with the user 3 SYSTEM REQUIREMENTS Mac OS X 10 2 4 or higher Windows 2000 or Windows XP Available 32 bit PCI slot 4 WHAT S IN THE BOX Take a moment to ensure that the following items are included in the box If anything is missing please call G Tech...

Страница 5: ...all the G SATA PCI adapter 4 Remove the screw and detach the PCI expansion port access cover secured to the computer case 5 Remove the G SATA PCI adapter from its protective materials Note Make sure to hold the card by its bracket or around its edges to avoid touching components which might be damaged by static electricity 6 Position the PCI card bracket by facing it towards the rear of the comput...

Страница 6: ...o G SATA Make certain that the SATA cables are securely attached to G SATA 2 Connect the supplied power cord to the Power Supply brick and plug the other end in to a surge protector or wall outlet 7 INITIALIZING G SATA Now that G SATA is physically connected to your computer it must be initialized for use with your operating system For Mac OS X installations follow the instructions below For Windo...

Страница 7: ...llowing will appear The two drives contained in G SATA will be displayed in the left hand column as shown 2 Select one of the drives contained in G SATA by clicking on the entry in the left hand column as shown below 3 Select the RAID tab to view the options as shown below 4 Set the RAID set Name to G SATA Volume Format to Mac OS Extended and RAID Type to Striped RAID Set as shown below ...

Страница 8: ...p as shown below G SATA is now set up for use 7 2 Windows 2000 XP G SATA can be initialized under Windows as Two independent drive volumes two drive letters A striped volume RAID 0 for performance A mirrored RAID 1 volume for data security The following instructions will initialize G SATA in a striped RAID 0 configuration for maximum performance 1 Power on G SATA wait 10 seconds then power on your...

Страница 9: ...tion the system must be initialized for use 1 Open the Disk Management utility by right clicking on the My Computer icon on the desktop and selecting Manage from the drop down menu as shown on the following page 2 The Computer Management console will appear as shown below Click on Disk Management in the left hand panel G SATA is identified as Disk 1 in this example Right click on Disk 1 and select...

Страница 10: ... identified as Basic and Online 5 Right click on the Disk 1 Unallocated bar entry and select New Partition from the pull down menu as shown below 6 The window shown below will appear Click on the Next button to continue 7 The following window will appear Click on the Next button to continue ...

Страница 11: ...n G SATA Consult your Windows documentation for instructions on setting up multiple partitions 9 Windows will automatically assign a drive letter in this example E Accept this assignment and click on the Next button to continue 10 Enter a Volume Label in this example G SATA check the Perform a quick format box and click on the Next button to continue 11 The following window will appear Click on th...

Страница 12: ...while your computer is running To prevent failures and or data loss it is important to follow the steps below when hot swapping G SATA 8 1 Mac OS X Computers Removing G SATA 1 Drag the G SATA icon to the TRASH located in the dock 2 After dragging G SATA to the TRASH power off G SATA 3 The following dialog boxes will be displayed Click OK in each box to complete the hot swap removal procedure 8 2 M...

Страница 13: ...ng the unit as explained above you must make sure to cycle power before reconnecting G SATA 9 TECHNICAL SUPPORT If you encounter any difficulties while installing G SATA please contact G Tech Technical Support via one of the following ways Telephone 310 449 4599 Fax 310 449 4670 E mail support g technology com Internet http www g technology com When contacting Technical Support make sure to be in ...

Страница 14: ... authorized G Tech service facility or to G Tech The purchaser shall bear all shipping packing and insurance costs and all other costs excluding parts and labor necessary to effectuate repair replacement or refund under this warranty All returned product must be shipped to G Tech in the original shipping container For more information on how to obtain warranty service an RMA number or to acquire s...

Отзывы: