background image


G-RAID Installation Guide 


Page 6 

7.  INSTALLING G-RAID 

Connecting G-RAID to your computer and configuring the 

system for use is very simple…  


1) Attach the FireWire and power cables to G-RAID 
2) Cable G-RAID to your computer 

3) Initialize G-RAID for use with your choice of operating system


7.1 Attaching the FireWire and Power Cables to G-RAID 

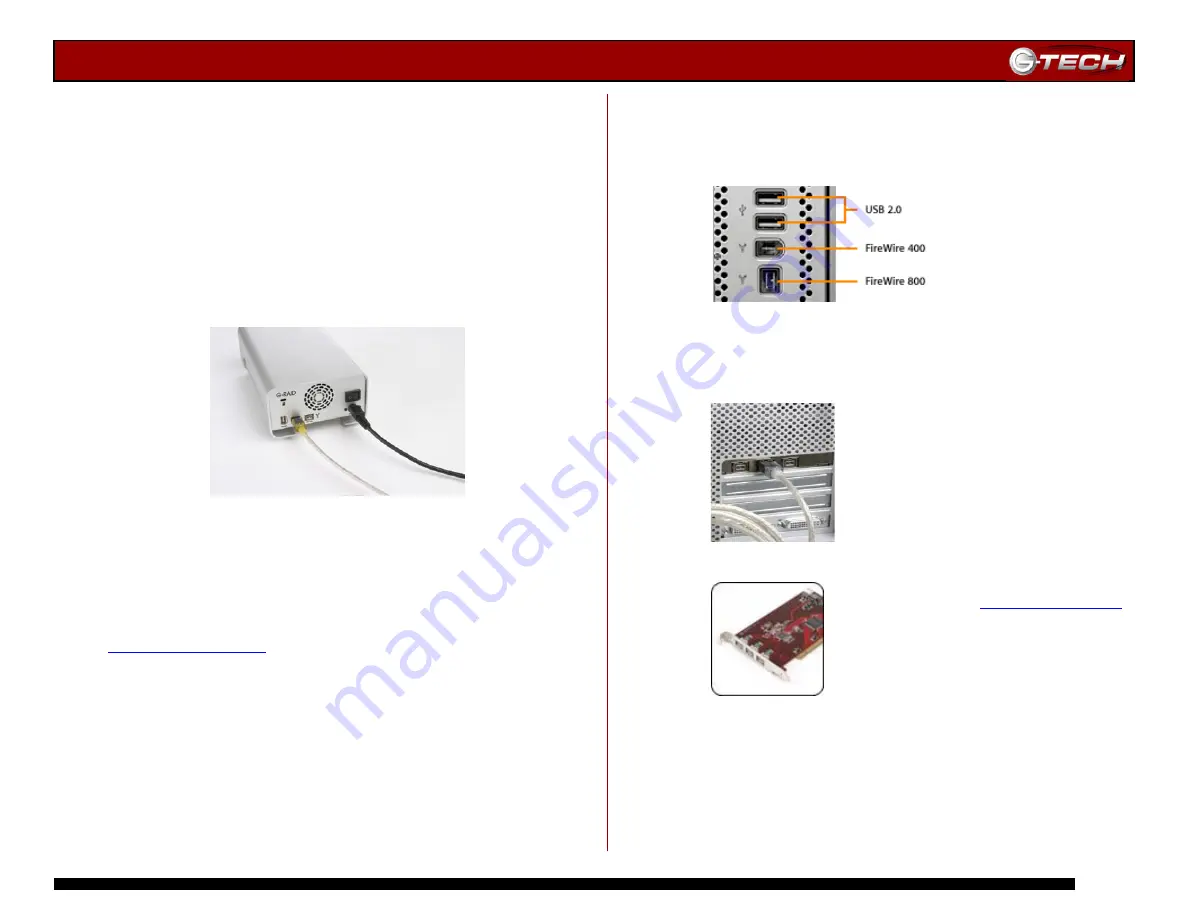
1. Attach the supplied FireWire 800 (9-pin to 9-pin) cable to 
one of the FireWire 800 ports on the back of G-RAID and 

attach the power supply cable as shown below.  


FireWire 800 connection


2. Connect the supplied power cord to the Power Supply 

“brick” and plug the other end in to a surge protector or 
wall outlet. 
 

Note:

 If you wish to connect G-RAID via a FireWire 400 port, 

contact G-Tech Sales at (310) 449-4599 or visit 


www.g-technology.com

 to purchase a 9-pin to 6-pin, 9-pin to 4-pin 

or 6-pin to 6-pin cable.


7.2


Connecting G-RAID to your Computer 


Mac G5/G4 installations, proceed to Section 7.3/7.4 


iMac G5 installations, proceed to Section 7.5 


PowerBook/iBook installations, proceed Section 7.6/7.7 


PC Desktop installations, proceed to Section 7.8 


PC Laptop installations, Proceed to Section 7.9 


7.3 Macintosh G5 Installations 
     

1. Attach G-RAID to the built-in FireWire 800 port located 
on the back of your G5 as shown below. 


  G5 Built-in Ports   


2. Alternatively, you may attach G-RAID to the G-Tech 
FireWire 800 PCI adapter as shown below 


Note:

   Visit G-Tech at 

www.g-technology.com


for more information or to purchase the G-Tech  
FireWire 800 PCI adapter. 


Содержание G-RAID Studio

Страница 1: ...5 G RAID OVERVIEW 6 OPTIMIZING DATA TRANSFER RATES 7 INSTALLING G RAID 7 1 Attaching the FireWire Cable and Power to G RAID 7 2 Connecting G RAID to your Computer 7 3 Macintosh G5 Installations 7 4 Ma...

Страница 2: ...G RAID Installation Guide Page 2...

Страница 3: ...G RAID Installation Guide Page 3...

Страница 4: ...s Please handle the unit with care Do not open the case Doing so will void the warranty If the product is returned with damage caused by improper handling the warranty will be void and liability will...

Страница 5: ...ters by contacting G Tech Sales at 310 449 4599 or simply buy online at www g technology com FireWire 800 PCI Adapter 2 FireWire 800 Ports 2 FireWire 400 ports FireWire 800 CardBus Adapter 2 FireWire...

Страница 6: ...outlet Note If you wish to connect G RAID via a FireWire 400 port contact G Tech Sales at 310 449 4599 or visit www g technology com to purchase a 9 pin to 6 pin 9 pin to 4 pin or 6 pin to 6 pin cabl...

Страница 7: ...e 400 port located on the back of your iMac G5 as shown Note G RAID cannot be attached via FireWire 800 to an iMac G5 7 6 PowerBook G4 Installations 1 Attach G RAID to the FireWire 800 port located on...

Страница 8: ...D Now that G RAID is physically connected to your computer it must be initialized for use with your operating system For Mac OS X installations follow the instructions below For Windows 2000 XP instal...

Страница 9: ...as shown below 4 Set the Volume Scheme to 1 Partition Enter a Volume Name under Volume Information in this example G RAID and set Format to Mac OS Extended as shown below Note Alternatively G RAID can...

Страница 10: ...D wait 10 seconds then power on your computer 2 Open the Disk Management utility by right clicking on the My Computer icon on the desktop and selecting Manage from the drop down menu as shown below 3...

Страница 11: ...The following window will appear G RAID Disk 1 is now identified as Basic and Online 6 Right click on the Disk 1 Unallocated bar entry and select New Partition from the pull down menu as shown below 7...

Страница 12: ...the available space on G RAID Note Multiple partitions can be created on G RAID Consult your Windows documentation for instructions on setting up multiple partitions 10 Windows will automatically ass...

Страница 13: ...button to continue 13 Windows will format the volume and then display the following window Disk 1 is now identified as G RAID E Exit the Computer Management console 14 G RAID will now be displayed as...

Страница 14: ...Computers 1 Before powering down and disconnecting G RAID you must unmount the system by simply dragging the G RAID icon to the trash located in the dock 2 It is now safe to power off and remove G RA...

Страница 15: ...tioned All replaced parts or products shall become the property of G Tech This warranty shall not apply if the product has been damaged by accident misuse abuse or as a result of unauthorized service...

Отзывы: