background image

1

2

%

3

Wrong

R i g h t

(

1

)

(

2

)

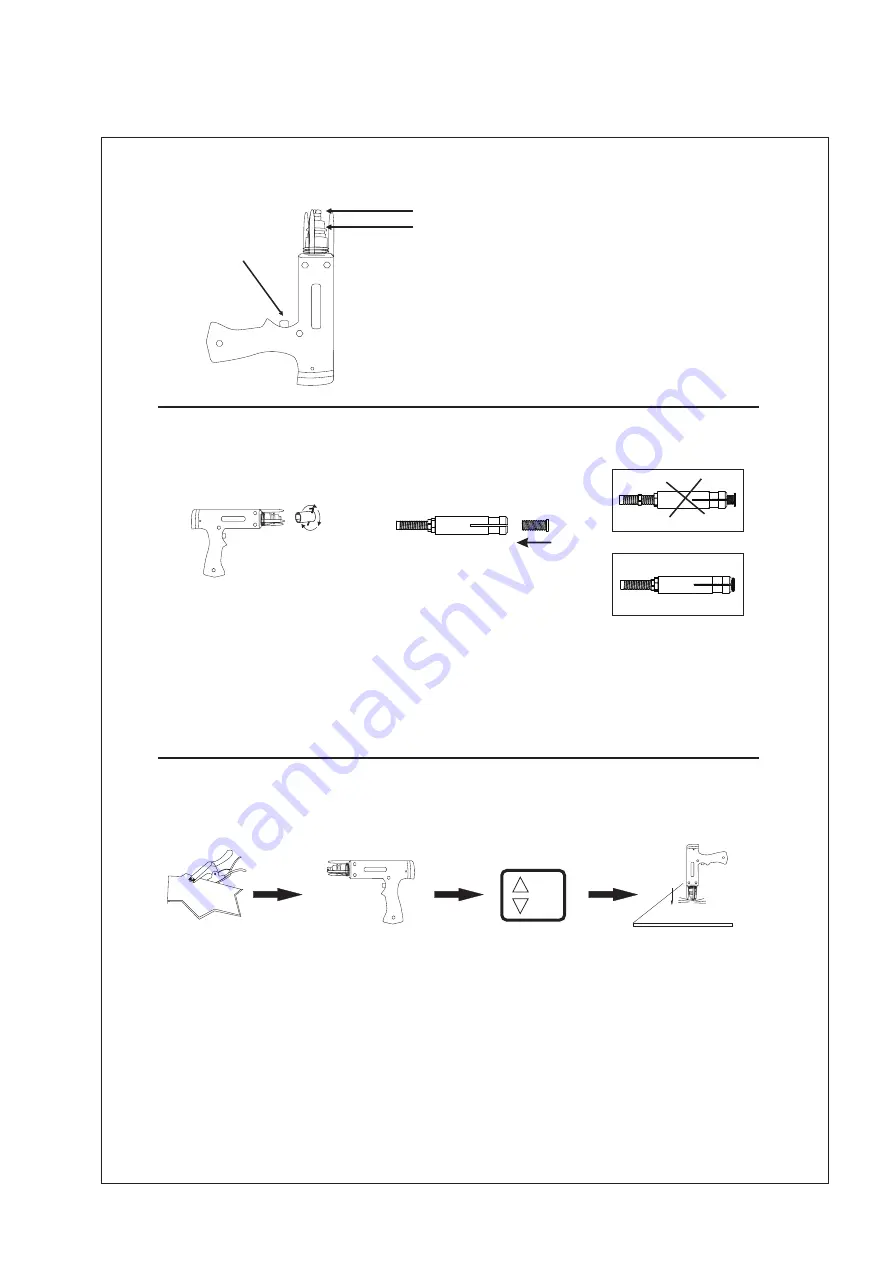
A. Aluminium welding gun

1

 Ferrule

2

 Trigger switch

3

Weld chuck

B. Aluminium welding gun setup

1.Insert a ferrule grip into the foot and tighten the frerule 
2.Insert a stud into the weld chuck.A different chuck is required for each different stud 
diameter(0.6mm chuck with 0.6mm stud,0.4mmchuck with 0.4mm stud)
3.Place  the  weld  chuck  into  the  chuck  adapter.Make  sure  that  the  chuck  is  seated 
properly in the adapter.

C. Aluminium welding gun application 

Connect ground cable to 
a clean,paintfree location 
on metal workpiece,as 
close to welding area as 
possible.

Weld gun with 
chuck and stud

Adjust current

See page 9

Place the weld gun perpendicular 
to the dent area on the workpiece.


Apply pressure to the gun.Hold 
gun steady and push trigger to 
weld..

Remark

:

1

Setting amperage too high or time too long can cause workpiece surface (vehicle


body)damage .

   Please weld other workpieces for practice before actual operations.
2

Setting correct amperage and time according to the workpiece thickness.

3

Continuing another operation is applicable after these procedures finished .If not, please

   shut off the main power supply and switch off


the


unit

.

P a g e . 1 1

3 . A l u mi n iu m W el di ng G u n A pp l ic a tio n

Содержание FY-5015L

Страница 1: ...Owner s Manual The equipment is approved by following car manufacturers China FY 5015L...

Страница 2: ...electing a location 5 Connecting Input Power 5 Operation 1 Aluminium Dent Puller Controls 2 Steel Dent Puller Controls 3 Aluminium Welding Gun Application 4 Steel Welding Gun Application 5 Pulling Ham...

Страница 3: ...ld consult their doctor before going near plasma arc cutting operations Overuse can cause overheating Allow cooling period follow rated duty cycle before starting to weld again Check the integrity of...

Страница 4: ...1 Rated maximum supply current Maximum effective supply current Degree of protection Single phase Duty cycle Direct current Constant current Temperature V S I O Suitable for some hazardous locations...

Страница 5: ...rossbar lifter Tools 12mm washer Tool box Polisher 10A fuse Waveform electrode tip NO F010 NO F013 Control transformer NO F025 Pneumatic vacuum cupule NO F001 Claw puller NO F004 Carbon Cod NO F007 St...

Страница 6: ...voltage Phases Frequency Output voltage Input power Max instantaneous current Input current Operation way Time regulation system One side welding thickness AC 220V Single phase 50 60Hz 2 0A 4A H grade...

Страница 7: ...ng If unit overheat output stops and cooling fan runs Wait fif teen minutes for unit to cool Reduce amperage or duty cycle be fore welding Page 5 Overheating Stop working Wait fifteen minutes for unit...

Страница 8: ...sories according to packing list that attached to this manual 3 Properly install this equipment as following diagram Inspect the unit for any problems If so contact your local distributor or service a...

Страница 9: ...power cord length according to its actual operation requirement Make sure that the supply cable is at 2 least 6mm in diameter 3 Do not move or operate unit where it could tip 4 Use cart or unit handle...

Страница 10: ...all National and Local Codes have only qualified persons make this installation Disconnect and lockout tagount input power before connecting input conductors from unit Select type and size of over cur...

Страница 11: ...fore use It is easy and simple to operate the stud welder even though you have no relevant experience Firstly you could turn the main power switch to the on position and adjust the current according t...

Страница 12: ...uller Controls Operation 1 2 3 4 5 6 7 8 9 10 1 LCD display 2 Current decrease 3 Current increase 4 Time decrease 5 Time increase 6 Function selection 7 Earth cable 8 Gun cable 9 Gun testing button 10...

Страница 13: ...clean paintfree location on metal workpiece as close to welding area as possible Weld gun with chuck and stud Adjust current See page 9 Place the weld gun perpendicular to the dent area on the workpie...

Страница 14: ...Weld 2 washers on metal workpiece as close to welding area as possible 3 Located the holder on the welded washers 1 Electrode holder Carbo Rod Shrinking OT Washer Welding Washer Welding Stud Welding...

Страница 15: ...Put the corresponding pulling screw on the studs and tighten up Choose crossbar lifter Make sure the crossbar lifter with pulling hook is fixed on the car body Connect the pulling hook to the pulling...

Страница 16: ...is to adjust the up and down moving range of the main axle 5 Continuing another operation is available after this procedure finished If not please shut off the main power supply and switch off the un...

Страница 17: ...nother operation is available after this procedure finished if not please shut off the main power supply and switch off the unit F017 F011 F020 a Washer Welding Set correct time Set correct amperage A...

Страница 18: ...ld other workpieces for practice before actual operations 2 Setting correct amperage and time according to the workpiece thickness 3 Triangle washer welding can replace washer welding It can pull out...

Страница 19: ...high or time too long can cause workpiece surface vehicle body damage Please weld other workpieces for practice before actual operations 2 Setting correct amperage and time according to the workpiece...

Страница 20: ...ckness 3 Continuing another operation is available after this procedure finished If not please shut off the main power supply and switch off the unit Connect negative outside wire to a clean paint fre...

Страница 21: ...out Manual operating cupule 1 Push manual cupule in to lock the cupule on the dent 2 Slide the hammer to opposite direction to pull the dent out Pneumatic vacuum cupule 1 Connect gas air supply with t...

Страница 22: ...bad contact 1 Increase amperage setting 2 Increase time setting 3 Replace input power cord 4 Change ground clamp location Piercing workpiece 1 Output amperage too high 2 Weld time too long 3 Bad cont...

Страница 23: ...6 Gun Trigger Thermal Switch AC12V AC12V AC12V AC12V Capacitor Control Silicon Fuse Rectifier 30W Transformer 500W Transformer 10A Fuse Power Switch AC 220V Control Silicon PCB 6 PCB 4 5 Gun Cable Ear...

Отзывы: