Do not remove the media player or use your stereo in a
distracting manner while operating the vessel. Check and obey
all marine laws in association with use.
The stereo accepts a variety of media players, including
smartphones and other mobile devices. You can connect a
compatible media player using a Bluetooth
®
wireless connection
or a USB connection to the integrated docking station (UD
models only), to the USB cable on the back of the stereo, or to
an optional UNI-Dock external media dock.
NOTE:
If you connect an Apple media player to the USB port on
the stereo, you must either disable Bluetooth on the media
player, or unpair the Bluetooth connection from the stereo to
avoid possible media-playback issues.
Media Player Compatibility
If you have a UD model, you can use the included adapter
cables to connect popular media players to the internal docking
station or the connector on the back of the stereo. If you have an
AV model, you can use the USB cables that came with your
media player to connect the player to the connector on the back
of the stereo.
Only media players with ports on the bottom, not on the sides, fit
in the docking station. Media players larger than 144 × 71 ×
13 mm (5.67 × 2.80 × 0.52 in.) do not fit in the docking station.
Cable Connector
in Dock
Devices
Micro-USB
connector
Supported media players. See
www.fusionentertainment.com
.
Apple 30-pin
connector
Apple iPhone 4s, and iPhone 4.
iPod touch
®
(3rd and 4th generation), iPod
classic
®
, and iPod nano
®
(4th through 6th
generation).
Apple Lightning
connector
Apple iPhone 6, iPhone 5s, iPhone 5c, and
iPhone 5.
iPod touch (5th generation) and iPod nano (7th
generation).
You also can connect a FAT32- or NTFS-formatted USB flash
drive directly to the USB port.
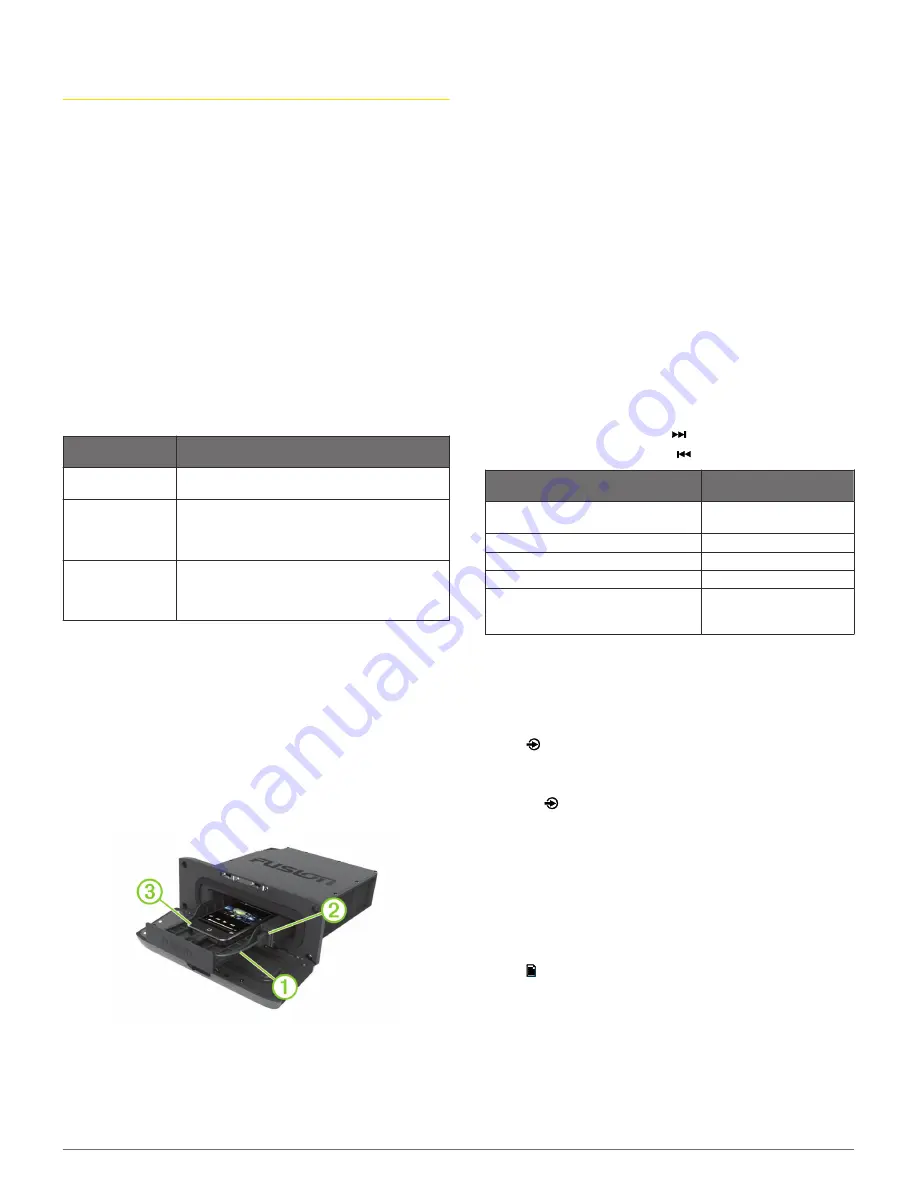
Connecting a Media Player Using the Dock
You can connect a compatible media player using the universal
dock built into the UD models.
1
Slide the button on the top of the stereo, and pull down to
open the door.
2
Slide out the device tray.
3
Insert the adapter cable
À
into the USB port
Á
.
NOTE:
You can connect a USB flash drive directly to the
USB port.
4
Connect the adapter cable to the media player
Â
, and place
it in the device tray.
NOTE:
If you are connecting an Android
™
device to the
stereo, you should unlock the device before connecting the
adapter cable.
5
Slide in the device tray, and close the door.
Connecting a USB Device Using the USB Cable
You can connect a USB device to the USB cable on the back of
the stereo.
1
Locate the USB cable on the back of the stereo.
2
Connect the USB device to the USB port.
Connecting an Auxiliary Device
You can connect various auxiliary devices to the stereo, such as
TVs, DVD players, game consoles, and media players. These
devices have either RCA connectors, a line output, or
headphone output jack.
1
Locate the auxiliary cable on the back of the stereo.
2
If necessary, connect an RCA to 3.5 mm adapter cable to the
auxiliary device.
3
Connect the auxiliary device to the RCA connectors on the
stereo.
Adjusting the Gain for the Auxiliary Device
You can adjust the gain for the connected auxiliary device to
achieve a volume level similar to that of other media sources.
You can adjust the gain in 1 dB increments.
1
Select an auxiliary source.
2
Select an option:
• To increase the gain, select .
• To decrease the gain, select .
Auxiliary Device
Recommended Gain
Setting(dB)
Portable media player with headphone
output
from -9 dB to -6 dB
CD/DVD player with line output
-6 dB
Portable media player with line output
0 dB
Game console with line output
0 dB
Older audio/visual equipment with line
output (for example, VHS or cassette
deck)
from 6 dB to 9 dB
NOTE:
To achieve the best audio quality when using a
portable media player with headphone output, it may be
necessary to adjust the volume control on the media player,
instead of adjusting the gain.
Selecting a Source
1
Select .
2
Select an option:
• Turn the dial to highlight a source.
• Select repeatedly to highlight a source.
3
Press the dial to select the source.
Adjusting the Volume
1
Use the dial to adjust the volume.
2
If necessary, press the dial to switch between zones.
TIP:
To control all zones at the same time, press the dial until
all zones are highlighted.
Adjusting the Tones
1
Select >
SETTINGS
>
TONE
.
2
Use the dial to adjust the level.
3
Press the dial to switch to a different tone.
Speaker Zones
You can group speakers in one area into speaker zones. You
can then control the audio level of the zones individually. For
example, you might want the audio quieter in the cabin and
louder on deck.
2
Getting Started


