7-1
7.
RADAR
7.1
Radar Screen Overview
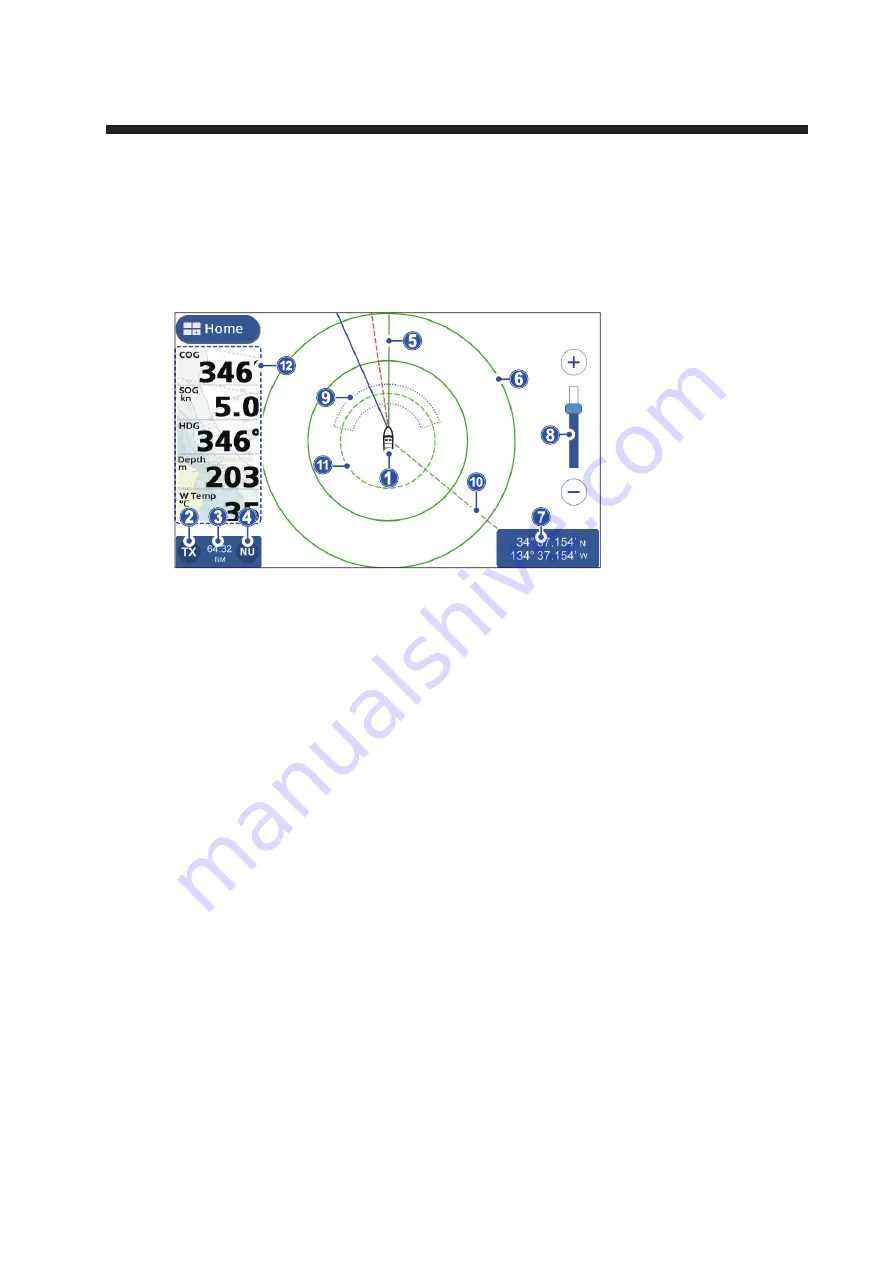
When connected to a radar, you can view the radar echoes on screen. The radar
screen also shows various navigational data in the data boxes at the left-hand side of
the screen.
7.2
Transmit/Standby
Tap the TX icon at the bottom-left of the radar screen to toggle between transmit and
standby. When the radar is set to transmit, the icon is highlighted in a yellow color.
7.3
Tune Initialize
You can tune enable or disable the automatic tuning feature. The default settings is
[ON] and the picture is automatically adjusted to give clearer echoes.
1. From the [Home] screen, tap [Settings] => [Radar] => [Initial Setup]. The menu op-
tions appear in the right-hand side of the screen.
2. Tap the toggle box at [Auto Tuning] to show [ON] or [OFF] as required. The setting
is effective once the menu is closed.
3. Tap the [x] at the top-right corner of the menu to close the menu.
7.4
How to Reduce Clutter
Rain and snow can cause “clutter” when reflecting the radar beam. Clutter appears
similar to “white noise” on the radar screen. You can use the Auto Rain feature to re-
duce this clutter.
1. Tap the radar screen to show the pop up menu.
2. Tap the [Auto Rain] toggle box to show [ON] (clutter is reduced) or [OFF] (no clut-
ter reduction) as required.
1
: Own ship icon
2
: TX/Standby button
3
: Chart range
4
: North Up/ Head Up button
5
: Heading line
6
: Range ring
7
: Own poisition data
8
: Range slider bar
9
: Sentry Zone
10
: EBL line
11
: VRM circle
12
: Data box display area
Содержание GP-1871F
Страница 1: ......
Страница 9: ...FOREWORD viii This page is intentionally left blank ...
Страница 33: ...3 TRACKS 3 4 This page is intentionally left blank ...
Страница 71: ...7 RADAR 7 8 This page is intentionally left blank ...
Страница 79: ...8 AIS DSC OPERATIONS 8 8 This page is intentionally left blank ...


