5-1
5.
DESTINATION
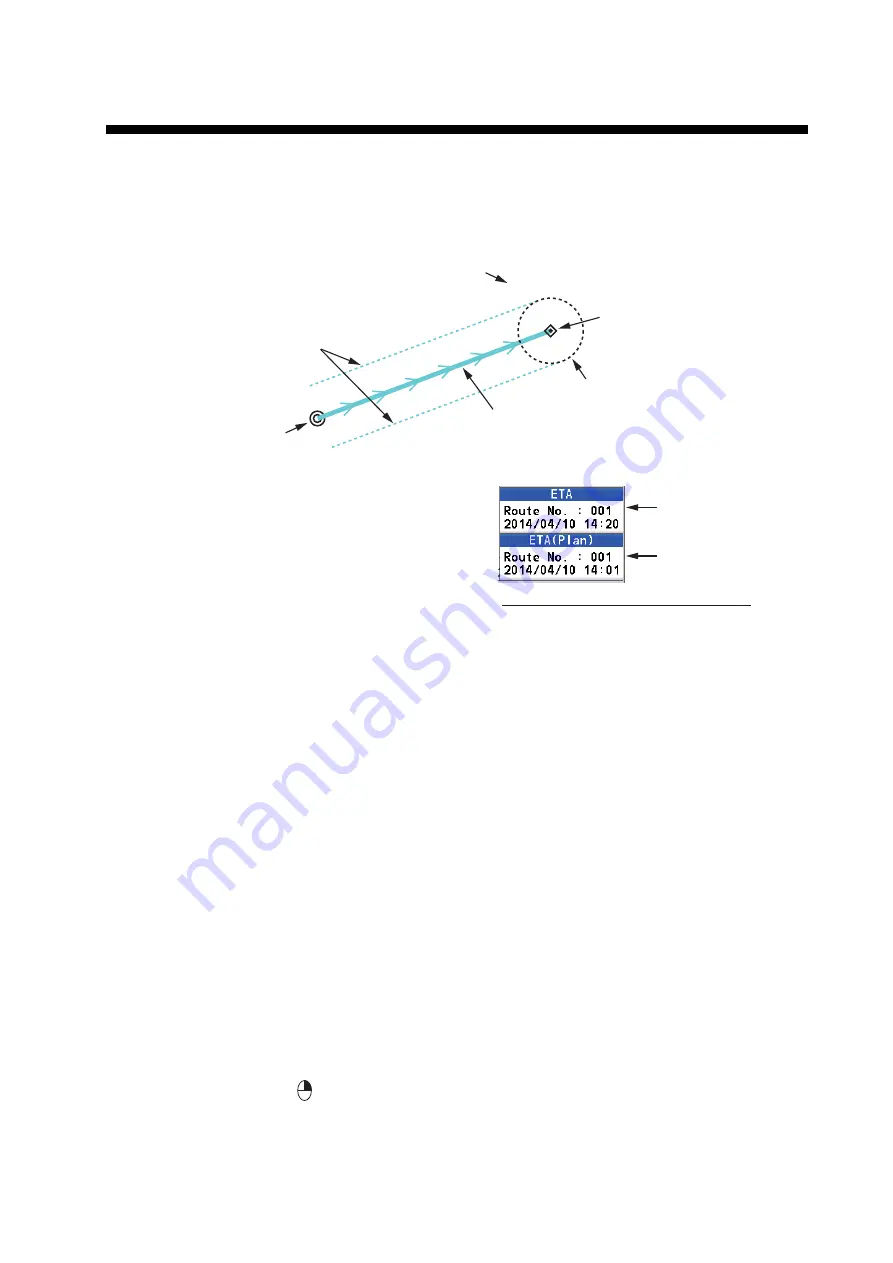
Destination can be set five ways: by cursor, by waypoint, by mark, by route and by
MOB position. The setting by MOB position is described in section 3.3. When setting
a destination, a line (shortest course) appears between own ship and the destination
selected.
Note:
When a destination is set, ETA
and ETA(Plan) are displayed instead of
COG and SOG at the bottom right of the
plotter display with the cursor off.
5.1
How to Set a Destination
Note:
When the ECDIS synchronization is on, the destination can not be set on the
GP-170 (see section 9.8).
5.1.1
How to set a cursor position as a destination
You can set a destination at the position selected with the cursor.
1. Press the
CURSOR ON/OFF
key to turn the cursor on.
2. Use the cursorpad to place the cursor on the location for a destination.
3. Press the
GO TO
key.
Note:
This destination set is erased when a new destination is entered.
5.1.2
How to set a waypoint as a destination
You can set a waypoint as a destination.
1. Press the
CURSOR ON/OFF
key to turn the cursor on.
2. Use the cursorpad to place the cursor on a waypoint as a destination.
3. Press the
key to open the context menu.
POINT0001
Own ship
Destination
XTL lines
Arrival radius
Destination name
Shortest course
Estimated time of
arrival at destination
Planned estimated
time of arrival at
destination
When setting a route as a destination
Содержание GP-170
Страница 1: ...GPS NAVIGATOR GP 170 OPERATOR S MANUAL www furuno com Model ...
Страница 107: ...AP 9 APPENDIX 3 TIME DIFFERENCES ...
Страница 114: ...FURUNO GP 170 SP 4 E4482S01C This page is intentionally left blank ...
Страница 117: ......


