background image

- 23 -

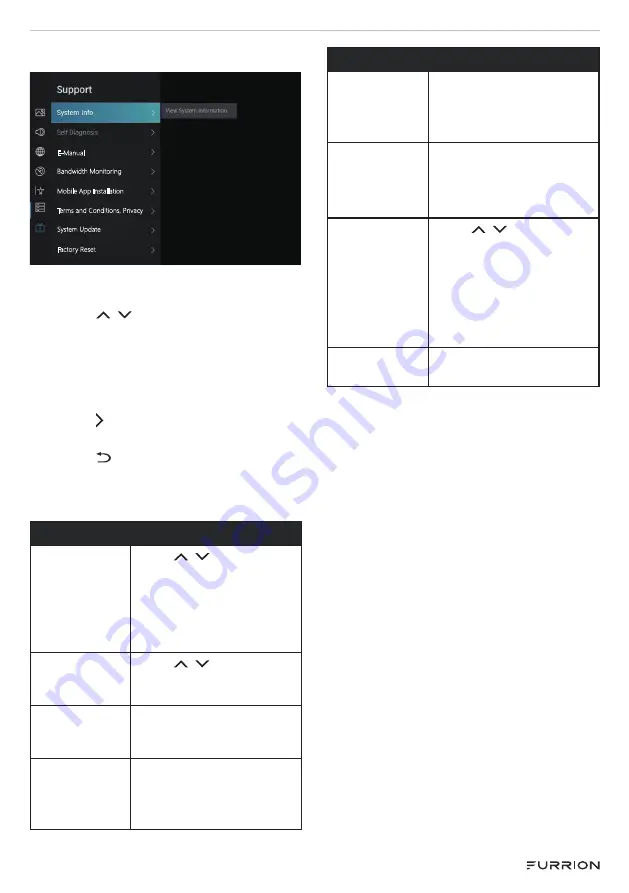
Support

E-Manual

Bandwidth Monitoring

Mobile App Installation

Terms and Conditions, Privacy 

System Update

Factory Reset

1.

Press

 Setting 

to enter the main

menu. 

2. Press  /  button to select 

System 

Info/ Self Diagnosis/ E-Manual/
Bandwidth Monitoring/Mobile App
Installation/Terms and Conditions
Privacy Policy/ System Update/
Factory Reset.

3. Press   or 

OK

 button to enter the

sub-menu.

4. Press   button to return to the

previous menu.

5. Press 

EXIT 

button at any time to exit

the setting.

Support

System Info

Press  /  button to 
select 

Signal Info/

Network Connection/ 
Input Connection/
About View System 
info.

Self-
Diagnosis

Press  /  button to 
select 

Network Test/

Input Connection Test

E-Manual

Launch E-manual and 
get to know more about 
your TV.

Bandwidth 
Monitoring

Before start the test the 
speed with third-party 
website, make sure the 
network available.

Support

Mobile App 
Installation

Scan the QR code that 
you can install mobile 
app on your smartphone 
to control your TV.

Terms and 
Conditions 
Privacy 
Policy

Press 

OK

 button to read 

TV terms and policy.

System 
Update

Press  /  button 
to select 

Auto Firm 

Upgrade/Check 
Firmware Upgrade/
System App Auto 
Upgrade/Upgrade 
from USB

.

Factory 
Reset

Reset your TV to the 
factory settings.

Содержание 2022111214

Страница 1: ...110V SMART RV TV MODEL FDHS24D3A LIPPERT NO 2022111214 USER MANUAL Product picture for reference only...

Страница 2: ...nual in a safe place for future reference This will ensure safe use and reduce the risk of injury Be sure to pass on this manual to new owners of this product The manufacturer does not accept responsi...

Страница 3: ...INSTALL 14 A Use the supplied TV stands 14 B Wall Mount 14 GETTING STARTED 14 CONNECTION 15 HDMI Device 15 HDMI CEC 15 Wired LAN 16 Wireless 17 INPUTS 17 HOME 18 SETTINGS 18 Sound Menu 19 Network Menu...

Страница 4: ...ntilation openings Install in accordance with the manufacturers instructions 8 Do not install near any heat sources such as radiators heat registers stoves or other apparatus including amplifiers that...

Страница 5: ...er grounding of the mast and supporting structure grounding of the lead in wire to an antenna discharge unit size of grounding conductors location of antenna discharge unit connection to grounding ele...

Страница 6: ...touch the liquid in the panel This may cause skin inflammation If the liquid gets in your mouth immediately gargle and consult with your doctor Also if the liquid gets in your eyes or touches your sk...

Страница 7: ...ce will not occur in a particular installation If this equipment does cause harmful interference to radio or television reception which can be determined by turning the equipment off and on the user i...

Страница 8: ...n the wall contact the retailer where you purchased the LED TV for advice and have the equipment professionally installed Incomplete or improper installation may cause injury to you and or damage to t...

Страница 9: ...ntrols may vary from model to model Control Panel 1 POWER Power on off 2 SOURCE Press to select the input source 3 MENU Press to enter the main menu 4 CH Press to skip to the previous channel 5 CH Pre...

Страница 10: ...10 FUNCTION OVERVIEW Control Panel HDMI3 ARC EARPHONE USB2 USB1 HDMI2 HDMI1 RJ45 IN IN The configuration of the connection ports may vary from model to model...

Страница 11: ...e volume 11 SLEEP Set the Sleep Timer 12 LIVE TV Press to enter live TV 13 FREE Press to enter FREE APP 14 SPORTS Press the button to change to sports mode 15 NETFLIX Press to enter Netflix APP 16 You...

Страница 12: ...this unit Smarter Entertainment on the Go WIFI enabled for streaming your favorite apps movies and shows 110V HD Smart TV works on a 110 240V 50 60Hz range using appropriate plug into your caravan or...

Страница 13: ...fied Be sure to follow the correct polarity when installing the batteries as indicated in the battery compartment Reversed batteries may cause damage to the device Do not mix different types of batter...

Страница 14: ...24 100 100 PM6 12mm 4 32 100 100 39 200 100 43 200 100 50 200 200 55 GETTING STARTED Press to power on and follow the on screen instructions to finish initial setup Press or button to select one Lang...

Страница 15: ...nnected to the TV by HDMI cable The external devices need to support HDMI CEC Function HDMI CEC Connecting an external device through HDMI CEC Function Press button Use button to select Settings then...

Страница 16: ...enter the sub menu select Network Configuration Press OK button to enter then select Wired LAN Automatically obtain an IP address 1 If you connect to the wired network the TV will automatically obtain...

Страница 17: ...r button enter the sub menu select Network Configuration Set the TV network by selecting Configuration and press the OK or button to enter the sub menu Network Configuration Connection Type Choose a w...

Страница 18: ...ime setup you can enter HOME screen 1 2 3 4 5 Press MENU button to select HOME screen Press button to select No Button Function SEARCH Press to search the videos or apps INPUTS Icon for Input select a...

Страница 19: ...Icon for Support Enter to have operations on Sound Picture Menu Picture Size Wide Accessibility 1 Press Setting to enter the main menu 2 Press to select Picture Mode Picture Size Picture Mode Setting...

Страница 20: ...o Out Digital Audio Delay Lip Sync Balance Sound Mode Settings Press button to select Auto Volume Control Mounting position Sound Headphone It s only available on headphone is inserted It can set the...

Страница 21: ...kip Press button to select a channel to skip Channel Favorite List Press button to select the channel you like in the list Accessibility Menu Add A Channel Channel Skip Favorite List Accessibility Clo...

Страница 22: ...ntrol Create Pin number to turn on parental control to block children from being able to view certain programs Language and Location Press button to select the Language Keyboard Layout Location System...

Страница 23: ...utton to select Signal Info Network Connection Input Connection About View System info Self Diagnosis Press button to select Network Test Input Connection Test E Manual Launch E manual and get to know...

Страница 24: ...ticks and digital cameras for browsing photos listening to music 1 Support the USB Storage 4G 8G 16G 32G 64G 128G and other common market sizes 8T hard drive is currently supported 2 Support format NT...

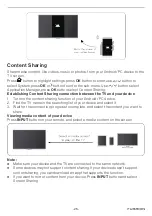
Страница 25: ...ing function of your Android PC device 2 Find the TV name in the searching list of your device and select it 3 Wait for the connection progress to complete and select the content you want to share Vie...

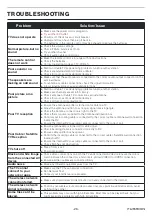
Страница 26: ...angle Check the Antenna connection is tight to the TV Check there is power supplied to the Antenna distribution box Confirm your incoming cable is connected to the correct cable antenna wall connecti...

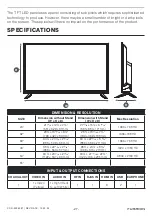
Страница 27: ...6 11 16 551 x 381 x 171 mm 1366 x 768 HD 32 28 3 4 x 16 13 16 x 3 1 4 730 x 427 x 83mm 28 3 4 x 18 7 16 x 7 3 8 730 x 469 x 188mm 1366x768 HD 39 34 7 8 x 20 1 16 x 2 5 16 886 x 509 x 68 mm 34 7 8 x 2...

Страница 28: ...en provided Any unauthorized use shall void any applicable warranty The information contained in this manual is subject to change without notice and at the sole discretion of Lippert Revised editions...

Отзывы: