background image

10

Bef
o

re Y

o

u S
tart

EN

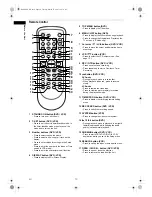
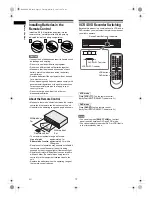
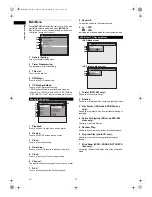
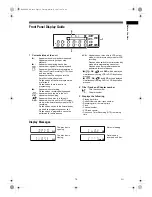
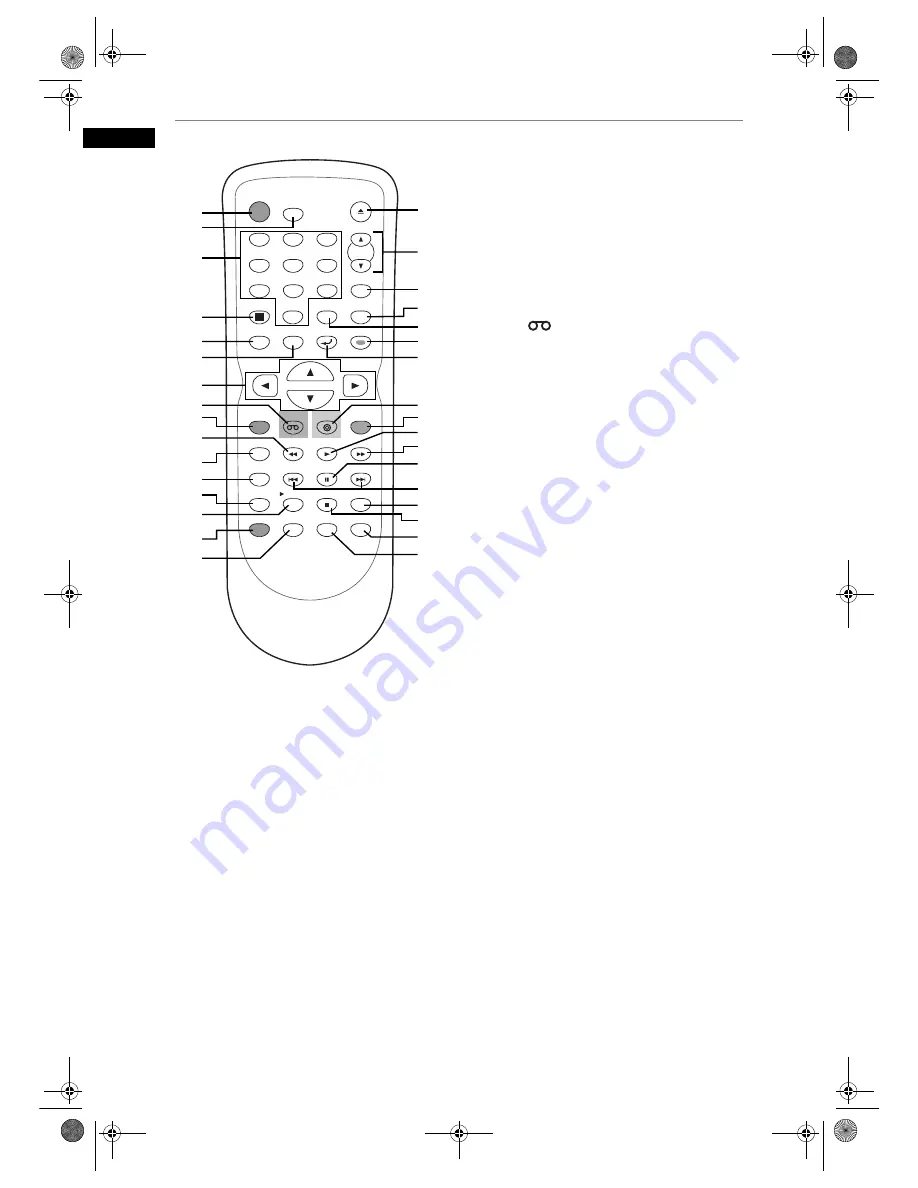
Remote Control

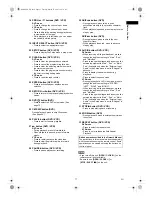
1 STANDBY-ON button (DVD / VCR)

• Press to turn on or off the unit.

2 T-SET button (DVD / VCR)

• Press to set the unit in timer-standby mode. In 

the timer-standby mode, press to cancel the 
mode and to turn on the unit.

3 Number buttons (DVD / VCR)

• Press to select channel numbers.
• Press to select a title / chapter / track on the 

display.

• Press to enter values for settings in the Setup 

menu.

• Press to enter the number in the Index or Time 

search in VCR mode.

• Press to enter the characters in edit function.

4 DISPLAY button (DVD / VCR)

• Press to display the On-Screen Display.

5 TOP MENU button (DVD)

• Press to display the Title menu.

6 MENU / LIST button (DVD)

• Press to display the Disc menu during playback.
• Press to change the Original and Playlist on the 

TV screen. (VR mode only)

7 Cursor 

U

 / 

D

 / 

L

 / 

P

 buttons (DVD / VCR)

• Press to move the cursor and determine items 

or settings.

8 VCR  

button 

(VCR)

• Press to select the VCR output mode. (See 

page 12.)

9 REC / OTR button (DVD / VCR)

• Press once to start a recording.
• Press repeatedly to start a One-touch Timer 

Recording.

10

r

 button (DVD / VCR)

DVD mode

• During playback, press to reverse fast.
• When playback is paused, press to reverse 

slowly.

VCR mode

• Press to rewind the video tape. 
• Press to view the picture rapidly in reverse 

during the playback mode.

11 TIMER PROG. button (DVD / VCR)

• Press to display the timer programme setting 

menu.

12 REC SPEED button (DVD / VCR)

• Press to switch the recording speed.

13 SYSTEM button (VCR)

• Press to change the video colour system.

14

P

x1.3/0.8 button (DVD)

• During playback, press to playback in a slightly 

faster/slower speed while keeping the audio 
quality just as normal playback.

15 DUBBING button (DVD / VCR)

• Press to start VCR to DVD (DVD to VCR) 

duplication which you set in the Setup menu.

16 SEARCH button (VCR)

• Press to call up the index or time search menu.

17 OPEN / CLOSE 

O

 button (DVD / VCR)

• Press to open or close the disc tray.
• Press to remove the tape from the unit.

STANDBY-ON

T-SET

DISPLAY

SETUP

TOP MENU MENU/LIST

TIMER PROG.

REC SPEED

SYSTEM

PAUSE

SEARCH

SKIP

PLAY

AUDIO

INPUT SELECT

OPEN/CLOSE

CLEAR

1

2

3

4

5

6

7

8

9

SPACE

0

ENTER

PROG.

RETURN

.@/:

ABC

DEF

GHI

JKL

MNO

PQRS

TUV

WXYZ

STOP

DUBBING

REC/OTR

CM SKIP

DVD

VCR

SKIP

REPEAT

ZOOM

X1.3/0.8

9

1

17

18

20
21

19

23

25

24

29

33

3

4

5

12

11

2

6

7
8

13
14

10

27

15
16

28

26

32

31

30

22

E9G04ED_EN.book  Page 10  Tuesday, March 27, 2007  10:27 AM

Содержание W4D-D4180DB

Страница 1: ...onnections Refer to Connections on pages 16 18 Accessories Supplied Remote control RF cable Owner s Manual Quick Setup Guide with two R6 AA batteries Owner s Manual DVD Recorder with Video Cassette Re...

Страница 2: ...unit If liquid is spilled and enters the unit consult qualified service personnel 7 Do not stand the unit vertically Use the unit in a horizontal flat position only 8 Before attempting to operate the...

Страница 3: ...ering or disassembly is prohibited Notice for the Progressive Scan Outputs Consumers should note that not all high definition television sets are fully compatible with this product and may cause artif...

Страница 4: ...t does not perform correctly even though you have referred to Troubleshooting and the relevant sections in the Owner s Manual the laser optical pickup unit may be dirty Consult your dealer or an autho...

Страница 5: ...er Recording OTR 29 Timer Recording 30 Satellite Link 33 Settings for External Equipment 34 Dubbing Mode 35 Setting a Disc to Protect 37 Finalising Discs 37 Playback 39 Information on Playing Back DVD...

Страница 6: ...oder compatible with Dolby Digital you can enjoy theatre quality surround sound from discs recorded with the surround sound system Quick search You can easily find the part you want to watch using the...

Страница 7: ...e conventional interlace scanning the progressive scan system provides less flickering and images in higher resolution than that of traditional television signals Guide to the Owner s Manual Symbols U...

Страница 8: ...CR Refer to Front Panel Display Guide on page 15 16 RECORD button VCR Press once to start recording Press repeatedly to start a One touch Timer Recording 17 PLAY P button VCR Press to start playback P...

Страница 9: ...ble 6 S VIDEO OUT jack DVD Connect to the S Video input jack on your TV Use a commercially available S Video cable 7 COMPONENT VIDEO OUT jacks DVD Connect to the component video input jacks on your TV...

Страница 10: ...DVD mode During playback press to reverse fast When playback is paused press to reverse slowly VCR mode Press to rewind the video tape Press to view the picture rapidly in reverse during the playback...

Страница 11: ...hapter or track When playback is paused press to play reverse step by step SKIP F button DVD During playback press to skip to the next chapter or track When playback is paused press to advance step by...

Страница 12: ...when using remote controls for other equipment located close to the unit Replace the batteries when the operating range of the remote control reduces VCR DVD Recorder Switching Because this product i...

Страница 13: ...ation or File Name Information Title Name Information only when VR mode DVD RW R or unfinalised Video mode DVD RW R disc is in playback File Name Information only when a CD with MP3 JPEG DivX files is...

Страница 14: ...ault 9 DVD VCR Indicates the available mode for the selected function DVD Menu menu CD Playback Mode menu 1 Format DVD RW only Allows you to format the disc 2 Finalise Allows you to finalise a disc co...

Страница 15: ...standby mode while programming cannot set Flashes when a programme cannot be performed for some reasons VCR Appears when this unit is in VCR output mode or the timer standby mode for VCR recording Fla...

Страница 16: ...DEO OUT jacks of the unit and set Video Out setting to Component Progressive P in the setup menu See page 66 Next set your TV to the progressive scan mode If your TV is not compatible with progressive...

Страница 17: ...AV3 Digital Audio for Better Sound Quality Only for DVD The connections illustrated above are optional for better sound 1 For clear digital sound quality use the DIGITAL AUDIO OUT OPTICAL or COAXIAL j...

Страница 18: ...MD or DAT deck as a digital sound If not connected to a Dolby Digital decoder set Dolby Digital to PCM in the Audio Out menu Playing back a DVD using incorrect settings may generate noise distortion a...

Страница 19: ...Channel using U D then press ENTER 3 Select Auto Tuning using U D then press ENTER The unit will start storing channels available in your area Wait for several minutes to finish channel storing 4 Pres...

Страница 20: ...channel you want press L This unit can receive the Hyper and Oscar frequency bands If Skip is set to ON select Skip using U D then press P Select OFF using U D then press L If you want to decode scra...

Страница 21: ...4 Select the position number of which you want to change the channel using U D then press ENTER You cannot select a position number where appears next to the number because Skip is set to ON for that...

Страница 22: ...he unit and that of your TV screen 4 3 standard or 16 9 wide screen TV 1 In stop mode press SETUP Select General Setting using U D then press ENTER 2 Select Video using U D then press ENTER 3 Select T...

Страница 23: ...age appears on the screen You can only record Copy once only video using a DVD RW disc in VR mode with Content Protection for Recordable Media CPRM When recording a TV broadcast or an external input y...

Страница 24: ...e unit automatically starts to initialise the disc DVD RW disc will be formatted either Video or VR mode according to the recording format mode setting of the unit Before insert a brand new DVD RW dis...

Страница 25: ...Auto Chapter off select OFF using U D then press ENTER If you wish to change the time period for Auto Chapter select the required time period using U D then press ENTER 5 Press SETUP to exit Note The...

Страница 26: ...ting External Input Audio When the external input audio is a bilingual broadcast you can choose Stereo or Bilingual to record on a DVD 1 In stop mode press SETUP Select General Setting using U D then...

Страница 27: ...ct Recording using U D then press ENTER 3 Select Recording Audio Select 1H using U D then press ENTER 4 Select PCM or Dolby Digital using U D then press ENTER PCM Records PCM audio for the best qualit...

Страница 28: ...REC pause mode Note Recording starts immediately and continues until the disc is full or you stop recording If the clock is not set the space for a date and time of title names will be 01 01 07 and 0...

Страница 29: ...The remaining recording time will be displayed on the front panel display during One touch Timer Recording Unlike the timer recording you can perform the following operations during One touch Timer Re...

Страница 30: ...f you have not set the clock the clock setting window will appear instead of the Timer Programming list Continue from step 3 in Manual Clock Setting on page 22 before programming the timer Use L P to...

Страница 31: ...mmings To Stop the Timer Recording in Progress On the front panel of the unit press STOP S to stop the disc recording or STOP EJECT SO to stop the tape recording Note STOP S on the remote control is n...

Страница 32: ...e the recording will start immediately after you press T SET If a videotape ends during the timer recording the unit will automatically stop eject the videotape and turn itself off To continue recordi...

Страница 33: ...ess U D to correct them 8 Press ENTER To Standby Mode is highlighted 9 Press ENTER again In a second the unit will be turned off automatically as it goes into the Satellite Link standby mode Until the...

Страница 34: ...3 Select Select Video using U D then press ENTER 4 Select the input jack type to be used using U D then press ENTER If you want to use VIDEO input jack Composite select Video In If you want to use S...

Страница 35: ...C recording is paused If you want to monitor the programme that you are recording make sure the device such as a Satellite Box is turned off when it is connected to AV2 Dubbing Mode You can copy a DVD...

Страница 36: ...ded VR mode You can select audio modes during playback If you want to watch the duplicated material after the VCR to DVD duplication press DVD first then press PLAY P 4 Select DVD VCR using U D then p...

Страница 37: ...recording period on the disc will require a longer time period for finalisation Do not unplug the mains cable during finalisation Insert a recordable disc before finalising 1 In stop mode press SETUP...

Страница 38: ...ace runs out if you set this in the Setup menu 1 In stop mode press SETUP Select General Setting using U D then press ENTER 2 Select Recording using U D then press ENTER 3 Select Auto Finalise using U...

Страница 39: ...s using other colour systems such as NTSC Region Codes This unit has been designed to play back DVDs for Region Two 2 It is only possible to play back DVDs in this unit that are labelled for Region 2...

Страница 40: ...D RW Video mode discs that are already finalised a Title menu will be displayed instead of thumbnails You can resume playback from where you stopped playing back the disc Resume playback See page 45 f...

Страница 41: ...an MD or DAT deck Files with extensions other than mp3 MP3 or jpg jpeg JPEG will not be listed in the File List Some folders or tracks listed in the File List may be unplayable due to their recording...

Страница 42: ...is required every time you get the new file from the DivX VOD services Refer to DivX VOD on page 44 Some DivX VOD files are restricted with the limited playable times you cannot play them back beyond...

Страница 43: ...ke awhile for audio and images to be output after you inserted a disc and pressed PLAY P When playing back the files recorded in high bit rates the images can be interrupted in some occasions Although...

Страница 44: ...e disc menu Note Menus vary among discs Refer to the information accompanying the disc for details DivX VOD This unit allows you to play back the files purchased or rented from DivX Video On Demand VO...

Страница 45: ...Press PLAY P In a few seconds playback will resume from the point at which you stopped it before Even if you turn off the unit you can resume playback at the same point after turning back on the unit...

Страница 46: ...playback Note Audio language setting cannot be changed while using this mode This feature may not work at some point in a disc Audio is PCM during Rapid play mode When you select PAL in TV System see...

Страница 47: ...selected the zoom area is not displayed You cannot slide the zoomed picture on some JPEG files Marker Setup You can assign a specific point on a disc to return later 1 During playback press DISPLAY 2...

Страница 48: ...ed chapter are also displayed Track Search Using SKIP B F buttons 1 During playback press SKIP F to skip the current track and move to the next The unit moves to the next track one after the other To...

Страница 49: ...repeatedly DVD only Chapter The current chapter will be played back repeatedly DVD only All The current disc will be played back repeatedly DVD RW VR mode Audio CD MP3 JPEG and DivX only A B The A B...

Страница 50: ...er 1 Follow steps 1 and 2 in Random Playback 2 Select Program Play using U D then press ENTER 3 Select the desired track using U D then press ENTER or P 4 Press PLAY P to start programme playback Hint...

Страница 51: ...audio CD skip to step 2 or press AUDIO and skip to step 3 1 During playback press DISPLAY Or press AUDIO during playback and follow from step 3 2 Select the icon using L P then press ENTER within 1 s...

Страница 52: ...ear only when the disc is played back and the Display menu appears See page 64 Even when the icon is not displayed you can select the angle if the currently played back title has at least two multi an...

Страница 53: ...Playlist Erasing all Playlist Setting or releasing the title protection Adding or deleting chapter marks Deleting titles or parts of titles Possible editing functions depend on the recording format a...

Страница 54: ...ETURN R or STOP S to exit Writing on the disc starts It may take awhile to write the data on a disc Note You cannot overwrite on the Empty Editing Title Name You can edit the title names from this men...

Страница 55: ...r marker anywhere you want You cannot set more than 999 chapter markers in the Playlist Press DVD first 1 Follow the steps 1 to 3 in Editing Title Name on page 54 2 Select Chapter Mark using U D then...

Страница 56: ...es You cannot select a chapter marker interval that exceeds the length of a title The length of chapters may slightly deviate from the one specified at the step 3 A chapter marker may be delayed depen...

Страница 57: ...ess DVD first 1 Follow steps 1 to 3 in Editing Title Name on page 54 2 Select Title Combining using U D then press ENTER 3 Select another title to combine using U D L P then press ENTER 4 Select Yes u...

Страница 58: ...no longer needed Press DVD first 1 Press SETUP Main menu will appear 2 Select DVD Menu using U D then press ENTER 3 Select Delete All Playlists using U D then press ENTER 4 Select Yes using U D then p...

Страница 59: ...ENTER Are you sure will appear Select Yes using U D and then press ENTER The part of the title is deleted 6 Press RETURN R and then RETURN R or STOP S to exit Writing on the disc starts It may take a...

Страница 60: ...lgarian Other Set the language for Disc Menu Audio Language page 63 English German Russian Czech Hungarian Polish Romanian Bulgarian Other Set the language for audio Subtitle Language page 63 English...

Страница 61: ...Aspect Ratio Video mode page 25 4 3 16 9 Set a aspect ratio for Video mode recording Dubbing Mode page 35 DVD VCR Set the dubbing selection Bilingual Recording Audio page 27 Sub Set the audio type for...

Страница 62: ...ss ENTER Enter a new password using the Number buttons then press ENTER Your setting is activated If you select No press SETUP to exit Enter the current password using the Number buttons If you want t...

Страница 63: ...that you can switch to main audio L sub audio R or a combination of both L R using your amplifier decoder Select a setting using U D then press ENTER Your setting is activated PCM Converts MPEG into...

Страница 64: ...lect Frame to display relatively motionless pictures in higher resolution Frame improves the picture quality although it may unstabilise the pictures due to simultaneous output of two Field data Note...

Страница 65: ...fault 10 minutes Set the screen saver time delay Select a setting using U D then press ENTER Your setting is activated 3 FL Dimmer Default Bright Set the front panel display brightness Select a settin...

Страница 66: ...esired setting using U D then press ENTER If you select Component Progressive P proceed to step 2 below If you select SCART RGB or Component Interlace I your setting is activated Refer to pages 16 and...

Страница 67: ...ENTER 3 Select Yes using U D then press ENTER Are you sure will appear Select Yes using U D and then press ENTER 4 When you finish with the setting press SETUP to exit Note The settings listed below w...

Страница 68: ...or PROG K L on the remote control There is a tape with a record tab in the unit Refer to page 30 for instructions on timer recording 1 Turn on the unit and insert a recordable tape Make sure that the...

Страница 69: ...ff the unit will switch to the timer standby mode automatically if a timer recording has been programmed Press T SET to cancel the timer standby mode in order to use the unit continuously Search Index...

Страница 70: ...a pre recorded video tape during playback or the input signal from the tuner or external devices To change the video colour system manually press SYSTEM Each time you press SYSTEM the colour system w...

Страница 71: ...t it directly to your TV Nothing was recorded even though you set the timer setting correctly There was a power failure during recording The unit s internal clock stopped due to a power failure that l...

Страница 72: ...perform some of those operations See the instruction manual supplied with the disc The language for the sound track cannot be changed Multilingual tracks are not recorded on the DVD Video or DVD RW R...

Страница 73: ...back the tape No video tape is inserted Recording does not start immediately after pressing REC OTR Make sure the video tape has a record tab when you record to a video tape If needed cover the hole w...

Страница 74: ...at is not compatible with CPRM Insert a ver 1 1 or ver 1 2 DVD RW disc compatible with CPRM Recording Error This disc is protected and not recordable You are trying to record onto a disc that is set a...

Страница 75: ...0 Korean 5761 Kurdish 5767 Laothian 5861 Latin 5847 Latvian Lettish 5868 Lingala 5860 Language Code Lithuanian 5866 Macedonian 5957 Malagasy 5953 Malay 5965 Malayalam 5958 Maltese 5966 Maori 5955 Mara...

Страница 76: ...sing files You can copy MP3 files on CD RW R discs from a computer and play back the files on this unit PCM Pulse Code Modulation PCM is a format that converts audio into digital data It is mainly use...

Страница 77: ...eight x depth 435 x 99 5 x 260 mm Operating temperature 5 C to 40 C Operating humidity Less than 80 no condensation TV format PAL SECAM BG DK Recording Recording format Video Recording VR format DVD R...

Страница 78: ...78 EN E9G04ED_EN book Page 78 Tuesday March 27 2007 10 27 AM...

Страница 79: ...79 EN E9G04ED_EN book Page 79 Tuesday March 27 2007 10 27 AM...

Страница 80: ...uct DVD Recorder with Video Cassette Recorder Model W4D D4180DB Trade Name Funai is in compliance with following Regulations EN55013 2001 A1 2003 EN55020 2002 A1 2003 A2 2005 EN61000 3 2 2003 A2 2005...

Отзывы: