6
P
REPARATION
Getting Started
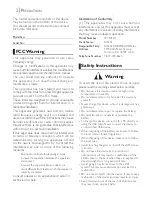
Attaching the hand strap
Before use, attaching the supplied hand strap is
recommended to avoid dropping this device.
1
Straighten the thinner strap loop and
lace it through the holes at the bottom
right corner of the device.
2
Push the end of the strap through the
loop.
3
Pull the strap tightly until it stops.
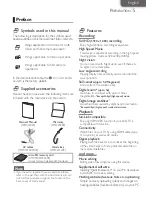
Charging the battery
The battery can only be charged via a USB connector
with bus-powered voltage provided by the PC.
1
Turn off the device, then open the USB
connector cover at the top of the device.
2
Push and then slide up the USB lever
located on the upper left side of the
device.
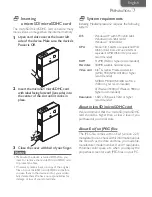
3
Attach the USB connector to your PC's
USB terminal.
- Hold the USB lever until the USB connector is
inserted all the way into the PC's USB terminal.
If this device cannot be on a solid surface after
plugging in the USB connector then use a USB
extension cable (not included) to connect the
Camera to the PC to avoid damage to the
device's USB connector.
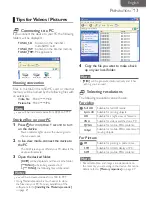
4
Your PC starts to supply the power to
the battery automatically.
- The CHARGE indicator lights up. If CHARGE
indicator does not light up see Notes below.
5
Wait for
more than 3 and a half hours
(approx. 200 minutes) until the battery is
fully charged.
- The CHARGE indicator light turns Off when
completed.
Notes
• This device must be turned Off when you charge
the battery. You can not charge and use it on your
PC at the same time.
• Make sure the PC is turned On and is not in
stand-by or sleep mode while charging the battery.
• The CHARGE indicator will be blinking if the
battery could not charge properly due to the
charging time exceeding 12 hours. Contact an
authorized service center to solve the problem.


