background image

24

Settings for the Device

Firmware updating

You need to insert the microSD / microSDHC card 

to the device and format it before your update. To 

format the microSD / microSDHC card, refer to 

[Formatting  device / microSD / microSDHC  card]

on the next page.

 Note 

• The device's internal memory doesn't support

the 

fi

 rmware updating.

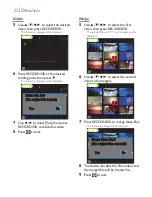
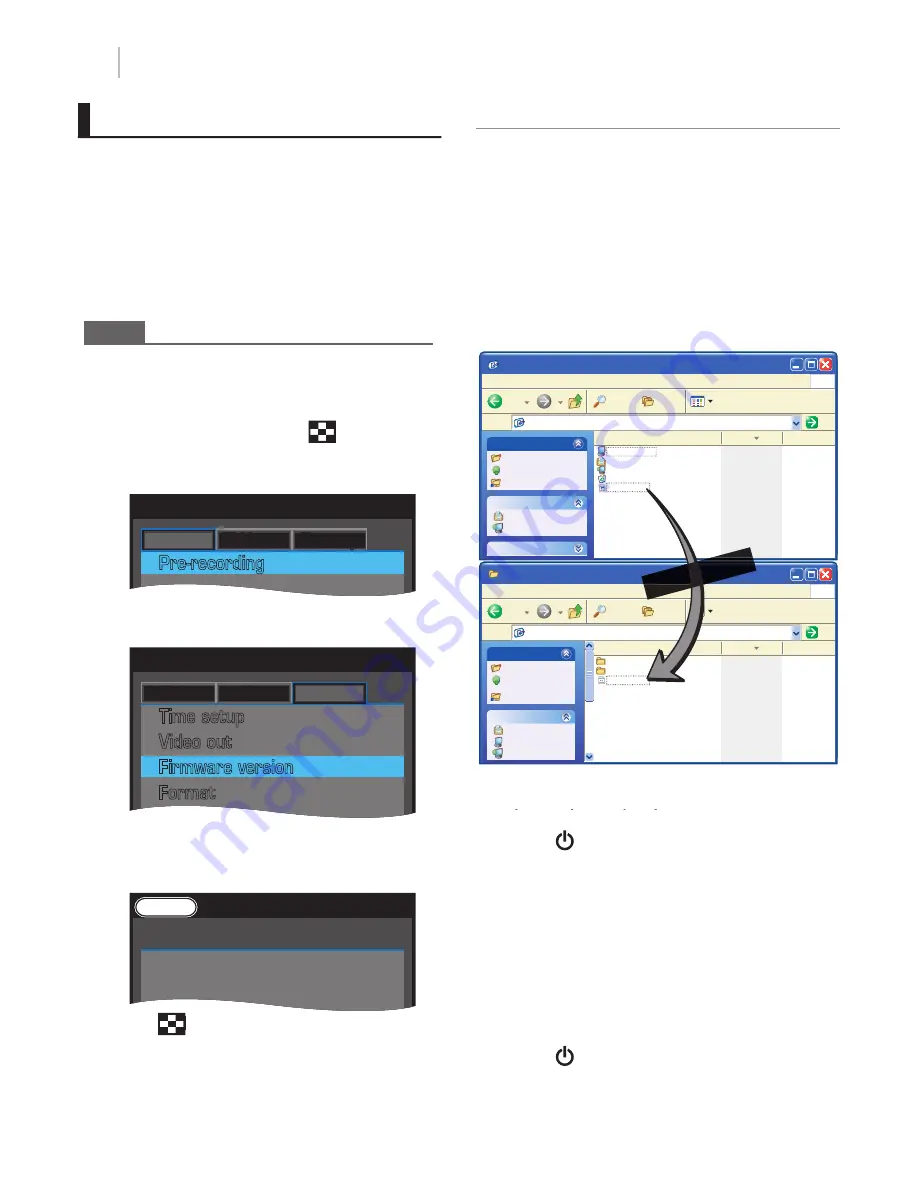
1

To con

fi

 rm what version of 

fi

 rmware is 

used in the device press 

in any mode 

except during recording.

- The setting menu will be displayed.

Video

Effect Setup

Pre-recording

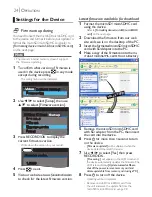
2

Use 

/

 to select [Setup], then use

/

 to select [Firmware version].

Video Effect

Setup

Time setup
Video out
Firmware version
Format

Press RECORD/OK to display the 

current 

fi

 rmware version.

- Write down the version for your record.

Firmware version

Firmware version

1.0000

1.0000

Rec

PreRec

Video

Video

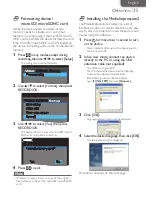
Press 

to exit.


Visit our web site at 

www.funaiamerica.com

to check for the latest 

fi

 rmware version.

Latest 

fi

 rmware available for download

1  

Format the microSD / microSDHC card

using the device.

- Refer to 

[Formatting device / microSD / microSDHC 

card]

on the next page.

2

Download the 

fi

 rmware from our web

site and save it on the desktop of the PC.

3  

Insert the formatted microSD / microSDHC 

card with SD Adaptor into the PC.

4  

Make a copy of the 

fi

 rmware onto the mi-

croSD / microSDHC card's Root Directory.

Desktop

Desktop

File   Edit   View   Favorites   Tools   Help

Desktop

Address

Go

Folders

Search

My computer 
My document 
My network 
Recycle bin 
fnvc_000.fw 2010/12/30 

11:24

Name

Modified

Back

File and Folder Tasks

Other Places

Make a new folder

My Document

Publish this folder to the web

My Network Places

Details

Share this folder

FUNAI_SD

FUNAI_SD

File   Edit   View   Favorites   Tools   Help

E:\

Address

Go

Folders

Search

DCIM 2010/10/11 

12:03

MISC 2010/10/03 

9:57

fnvc_000.fw 2010/12/30 

11:24

Name

Modified

Back

File and Folder Tasks

Other Places

Create a new folder

Publish this folder to the
web
Share this folder

My Document

My Computer

My Network Places

Make a cop

y!

5  

Remove the microSD / microSDHC card

with SD adaptor from the PC, then insert 

the card into the device.

pp

6  

Press

for more than 1 second to turn 

on the device.

-

[Firmware update?]

will be displayed when the 

device detects the latest 

fi

 rmware.

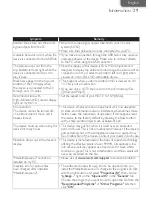
7  

Use 

/

 to select [Yes

[[

] then press

RECORD/OK.

-

[Processing..]

 will appear on the LCD screen and

the device automatically updates the 

fi

 rmware. The 

LCD screen displays 

[Update successful. Please 

shut off the power, remove memory card and 

delete update 

fi

 le from memory card using a PC.]

.

8  

Press

to turn off the device.

- Updating will be completed.
- Remove microSD / microSDHC card from 

the unit and erase the update 

fi

 le from the 

microSD / microSDHC card using a PC.

O

PERATION

Содержание fun-link SV310FX1

Страница 1: ...SV310FX1 English Espa ol EN Owner s Manual ES Manual del Propietario 2010 Funai Electric Co Ltd...

Страница 2: ...connected Consult a dealer or an experienced radio TV technician for help Declaration of Conformity 1 This apparatus may not cause harmful interference and 2 this apparatus must accept any interferenc...

Страница 3: ...n of such changes with the design is a registered trademark of Funai Electric Co Ltd and may not be used in any way without the express written consent of Funai All other trademarks used herein remain...

Страница 4: ...etting date and time 12 Setting the video out t 12 Tips forVideos Pictures 13 Connecting to a PC C 13 Selecting resolutions 13 OPERATION Recording 14 Recording a video 14 Taking a picture 14 Advanced...

Страница 5: ...ecording in the high speed moving picture mode as 320x240p 120fps Night vision You can record with Night vision even if there are no lights or in a dark place Low angle recording Flipping display over...

Страница 6: ...the way into the PC s USB terminal If this device cannot be on a solid surface after plugging in the USB connector then use a USB extension cable not included to connect the Camera to the PC to avoid...

Страница 7: ...he following system OS Windows XP with SP3 32bit 64bit Windows Vista 32bit 64bit Windows 7 32bit 64bit CPU Pentium IV 1 6GHz or equivalent AMD Athlon Intel Core 2 Duo 2 0GHz or equivalent AMD Athlon X...

Страница 8: ...sensor Invisible IR LED s light up when the Night vision is active 5 USB lever Make sure the USB connector cover 1 is opened before you slide this lever Push in and slide the lever 5 upward to expose...

Страница 9: ...supplied AV cables to this jack 9 Power indicator 10 power button 11 review button 12 delete button 13 HDMI output jack 14 cursor buttons 15 Strap hole 16 Reset button Press this button to initialize...

Страница 10: ...ersing while paused goes forward by one frame goes reverse by one frame Current mode Video quality y Playback status see below for more details Progress bar Battery level Playback status Folder number...

Страница 11: ...de or live view mode To call up the indicators press and hold it again Zoom does not work when you record video in HiSpd High speed mode Zoom can only be adjusted in live view mode or during recording...

Страница 12: ...leted This setting menu also displays automatically when you turn on this device after you pressed Reset button To change the date and or time later press to call up the menu and then use to select Ti...

Страница 13: ...ddress Go Folders Search FNVC0001 JPG 2010 10 22 8 11 FNVC0002 JPG 2010 10 22 8 15 FNVC0003 JPG 2010 10 22 8 23 FNVC0004 JPG 2010 11 30 9 02 FNVC0005 JPG 2010 12 02 9 55 FNVC0006 JPG 2010 12 08 7 18 F...

Страница 14: ...nge the video quality during recording Objects should be 28 inches 70 cm away from the device when you record It may cause a blur when the device is too close to the object Taking a picture 1 Press fo...

Страница 15: ...e may goes whitish when you record in a bright place This is not a malfunction Pre recording Pre recording for 5 seconds can be set right before you start an actual recording 1 In live view mode press...

Страница 16: ...h12m 01 21 01 21 M 00 M 00 In video mode press RECORD OK to stop K recording 10 To return to the normal direction press once Rec PreRec HD 00h07m Video Various portraits You can choose various colors...

Страница 17: ...ch time is pressed during the pause mode The video goes slow reverse or slow forward by 1 64x 1 32x 1 16x 1 8x 1 4x and 1 2x each time is pressed and held for more than 3 seconds during the pause mode...

Страница 18: ...e then press RECORD OK to start playback K 5 To return to the index menu press Notes Please purchase an HDMI cable that has type A male to type C male connectors at your local store Use an HDMI cable...

Страница 19: ...turn to the normal playback press RECORD OK 6 To return to the index menu press Adding chapter marks in video Chapter marks can be added at specific points when recording or playing back You can recal...

Страница 20: ...001 001 001 001 100 0003 100 0003 Still Still Yes Yes Delete this le Delete this le No No To return to the index menu press Editing a recorded video You can easily edit the recorded videos on this de...

Страница 21: ...M 00 M 00 8 Use to select Yes then press RECORD OK to crop the video K 9 Press to exit Partial delete 5 Use to select the desired video then press RECORD OK The following message will be displayed Rec...

Страница 22: ...Use to select Yes then press RECORD OK to divide this video K 8 Press to exit Merge 5 Use to select the first video then press RECORD OK The selected file with 1 in a red square will be displayed Rec...

Страница 23: ...iSpd 05 37 05 37 002 004 002 004 100 0019 100 0019 Video Video Rec PreRec C pic C pic Yes Yes Create pictures of marked frames Create pictures of marked frames No No 6 Use to select Yes then press REC...

Страница 24: ...the firmware onto the mi croSD microSDHC card s Root Directory Desktop Desktop File Edit View Favorites Tools Help Desktop Address Go Folders Search My computer My document My network Recycle bin fnv...

Страница 25: ...card Format No 4 Press to exit Note If necessary make a back up copy of the original files before you format the microSD microSDHC card Installing the MediaImpression2 The MediaImpression2 provides yo...

Страница 26: ...bar goes to the end 9 Associated File Formats window will appear then click Next t 10 Click Finish Installation has been completed Restart your PC Uploading the file to video picture hosting websites...

Страница 27: ...27m 34s 11h 10m 05s 15h 23m 16s 30h 17m 54s 60h 10m 48s HiSpd 56 s 30m 45s 1h 02m 40s 2h 06m 08s 3h 08m 48s 4h 20m 15s 8h 32m 30s 16h 58m 01s Picture 5M 19 663 1352 2723 4075 5619 11067 21983 1 9M 54...

Страница 28: ...pace Faulty microSD microSDHC card may be inserted Try other microSD microSDHC card Use the microSD microSDHC card which is higher than class 2 Cannot playback Folder file names may have been changed...

Страница 29: ...r This device employs precision equipment which is susceptible to static environmental noise or interference Sometimes those factors cause the suspension of operation If this happens reset the device...

Страница 30: ...essary files or use another microSD microSDHC card If necessary make a back up copy of the original files before you delete them We have no responsibilities for damage or loss of your data Memory is f...

Страница 31: ...iSpd mode ISO IEC 10918 1 baseline ComponentYCbCr 4 2 2 LCD screen Resolutions 5 0M 2 592 x 1 944 TFT color LCD 2 0 inches 1 9M 1 600 x 1 200 153 600 dots 640x240 0 3M 640 x 480 Terminal General speci...

Страница 32: ...in China QA320UA_QA321UA 1 1SM322003 EN Need help Please call toll free or visit our web site below ES Necesita ayuda Llame por favor sin costo o visite nuestro sitio web en 1 877 39FUNAI www funaiame...

Отзывы: