background image

13

Introduction

Quick Guide

Let’s try to print images by connecting the printer with the camera.

z

Refer to the pages below for the details.

Inserting the Ink cartridge.

 p.23

Setting the paper.

 p.2526

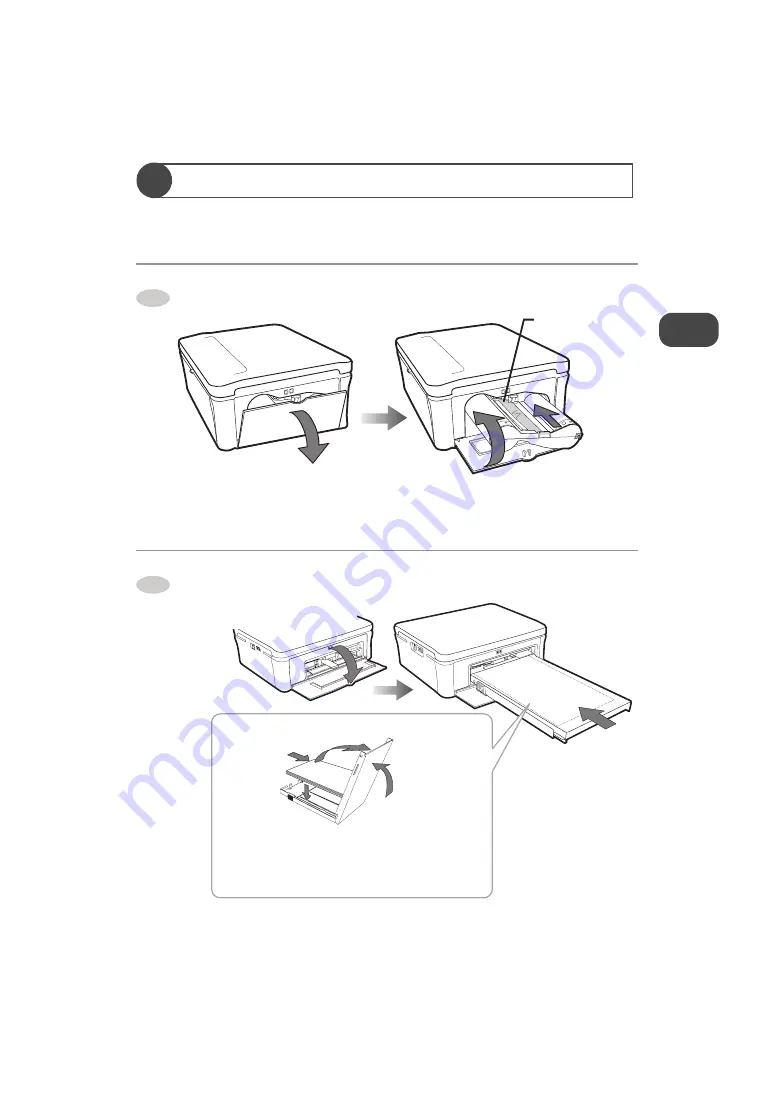
1

a

Open the Ink cartridge 
compartment door.

Make sure there is 
no slack in the Ink 
cartridge.

c

Close the 
cover.

b

Insert the Ink 
cartridge until it 
clicks.

2

b

Slide and open the top cover.

c

Set the paper in the 
Paper tray with the 
print side (glossy side) 
facing upwards.

d

Close the top 
cover.

Paper tray

e

Insert the Paper 
tray with the top 
cover slid.

a

Open the Paper tray 
compartment door.

Содержание FDP-100

Страница 1: ... would like to take this opportunity to thank you for purchasing this Photo Printer Please read this User s guide carefully and keep it for future reference Introduction Prepare Printing from the camera Printing from the computer appendix ...

Страница 2: ...S 15 CAUTIONS 16 Usage Handling Note 17 Location Notes 17 Handling Maintenance Notes 17 Notes in Printing 18 Paper Paper Tray Notes 18 Prints Notes 19 Ink Cartridge Notes 19 Condensation Notes 19 Controls and Components 20 Paper Ink cartridge 22 Prepare Set the Ink Cartridge in the Printer 23 How to Eject the Ink Cartridge 24 Set the Paper in the Paper Tray 25 Set the Paper Tray in the Printer 26 ...

Страница 3: ...iver 31 Windows 31 Macintosh 32 Connecting the Printer to a Computer 33 Printing from the Computer 34 Uninstalling the Printer Driver 35 Windows 35 Macintosh 35 Appendix If Errors have Occurred 36 Error Messages 36 ERROR Lamp 37 Before Requesting Services 38 Troubleshooting 38 If Paper Jam has Occurred 40 Using the Cleaner 41 Specifications 42 Main Specifications 42 FUNAI SOFTWARE LICENSE AGREEMEN...

Страница 4: ... damage to the appliance Use only with a cart stand tripod bracket or table recommended by the manufacturer or sold with the unit Any mounting of the appliance should follow the manufacturer s instructions and should use a mounting accessory recommended by the manufacturer 9 Cart An appliance and cart combination should be moved with care Quick stops excessive force and uneven surfaces may cause t...

Страница 5: ...k Never spill liquid of any kind on the unit 16 Servicing Do not attempt to service this unit yourself as opening or removing covers may expose you to dangerous voltage or other hazards Refer all servicing to qualified service personnel 17 Damage Requiring Service Unplug this unit from the wall outlet and refer servicing to qualified service personnel under the following conditions a When the powe...

Страница 6: ...se harmful interference unless the modifications are expressly approved in the instruction manual The user could lose the authority to operate this equipment if an unauthorized change or modification is made This equipment has been tested and found to comply with the limits for a Class B digital device pursuant to Part15 of the FCC Rules These limits are designed to provide reasonable protection a...

Страница 7: ...N61000 3 3 Following the provisions of 73 23 EEC 89 336 EEC and 93 68 EEC Directive About Recycling z This product and the accessories packed together are the applicable product to the WEEE directive z This product s packaging materials are recyclable and can be reused z Please dispose of any materials in accordance with your local recycling regulations When discarding the unit comply with your lo...

Страница 8: ...fety read the following instructions carefully before attempting to connect this unit to mains The wires in this mains lead are coloured in accordance with the following code BLUE NEUTRAL BROWN LIVE Important As the colours of the wires in the mains lead of this appliance may not correspond with the coloured markings identifying the terminals in your plug proceed as follows The wire which is colou...

Страница 9: ...ces such as digital cameras or digital video cameras which are compatible with PictBridge standard z No person shall duplicate photocopy or reproduce any part of the User s guide z All information included herein is subject to change without notice z We shall not be responsible for any loss damages direct or indirect arising from or related to improper use of this product Paper tray Ink cartridge ...

Страница 10: ...rademarks or trademarks of Apple Computer Inc in the United States and or other countries z Adobe is registered trademark or trademark of Adobe Systems Incorporated in the United States and or other countries z Adobe Reader and Adobe Photoshop Album Starter Edition are free version of Adobe products z Other names and products mentioned in this User s guide may be registered trademarks or trademark...

Страница 11: ...ame images can be printed on one sheet of paper Index print Images in the camera are printed as view format 42 images can be printed on one sheet of paper Image correction Brightness contrast and color saturation of the images can be adjusted to print from the computer DPOF print Only the images specified with DPOF settings on the camera can be printed automatically Date print Images can be printe...

Страница 12: ...ed below Insert the Ink cartridge p 23 Set the paper p 25 26 Camera printing Computer printing Plug the power cord p 27 Connect the camera with the printer p 28 Print images from the camera p 29 Install the printer driver p 31 Plug the power cord p 27 Connect the computer with the printer p 33 Print images from the computer p 34 ...

Страница 13: ...25 26 1 a Open the Ink cartridge compartment door Make sure there is no slack in the Ink cartridge c Close the cover b Insert the Ink cartridge until it clicks 2 b Slide and open the top cover c Set the paper in the Paper tray with the print side glossy side facing upwards d Close the top cover Paper tray e Insert the Paper tray with the top cover slid a Open the Paper tray compartment door ...

Страница 14: ...camera models Refer to the user s guide of the camera 3 c Plug the power cord d Connect to the printer b Connect to the AC adapter e Connect to the camera USB cable supplied with the camera a Connect to the printer To power outlet 4 a Turn on the camera b Operate the camera to print images ...

Страница 15: ...objects z Do not touch the power plug during thunderstorms to avoid electric shock z Do not damage the power cord Unplug the power cord immediately if it becomes damaged and consult your dealer Do not handle the power cord in the following manner Pulls the power cord forcibly Binds up the power cord Converts the power cord Bends or twists the power cord excessively Heats the power cord Rests heavy...

Страница 16: ...ring to the power plug periodically z Confirm that the power cord is plugged into the power outlet firmly z Do not plug unplug the power cord with the wet hands z Do not block the air vents on the printer z Do not reach into internal parts of the printer other than those specified in the User s guide z Do not install the printer in narrow or ill ventilated places Do not install the printer on the ...

Страница 17: ...tridge and the Paper tray from the printer Paper may deteriorate due to dust or damp Remove the unused paper from the Paper tray put it into the original bag and store the bag horizontally Use the supplied cleaner before printing if the printer has not been used for extended period p 41 z When using insecticides or other volatile solvents in the vicinity of the printer keep the printer off these s...

Страница 18: ...n the following cases a When printing continuously b When ambient temperature is excessively high c When the air vents on the backside of the printer are blocked or ventilation is inadequate Paper Paper Tray Notes z Use the specified types of paper for the printer z Set the paper in the Paper tray with the print side the glossy side facing upwards Fan a stack of paper to remove static cling and se...

Страница 19: ...Rotate the screw hole of the Ink cartridge in the direction of the arrow with the screw hole pressed to remove slack of the Ink ribbon and then insert the Ink cartridge z Confirm the direction of the Ink cartridge and insert all the way into the Ink cartridge slot z Do not reuse the Ink cartridge that has already been consumed Condensation Notes z If condensation forms inside the printer stop usin...

Страница 20: ...Introduction 20 Controls and Components POWER POWER ACCESS ACCESS ERROR ERROR i j k a b c d e f g h l m Printer Front view Printer Back view ...

Страница 21: ...t Inserts the Ink cartridge into this slot g Ink Cartridge Eject Lever Presses up the lever to remove the Ink cartridge h Ink Cartridge Compartment Door Opens this door to insert remove the Ink cartridge Close it when using the printer i Air Vent Prevents the printer from rising its internal temperature excessively j Paper handling Slot Protrudes the paper from this slot during printing Do not tou...

Страница 22: ... Use the Ink cartridge included in the print set Postcard size paper 100 x 148 mm Print set FCP 40P Postcard size paper 40 sheets Ink cartridge for 40 prints z Do not disassemble the Ink cartridge z Do not open the print set paper Ink cartridge until you use it ...

Страница 23: ...he arrow pressing a in until the Ink ribbon is strained You cannot print allotted sheets of paper in the print set if you turn around a too much Open the Ink cartridge compartment door Insert the Ink cartridge all the way into the Ink cartridge slot until it clicks z Confirm that the direction of the Ink cartridge is correct before inserting it Close the Ink cartridge compartment door 1 Ink ribbon...

Страница 24: ...idge is flipped out of the Ink cartridge slot Pull out the Ink cartridge horizontally Close the Ink cartridge compartment door z Never reuse the Ink cartridge that has been already consumed It may cause malfunction z Do not touch the Ink ribbon or pull it out of the Ink cartridge z Exchange a new Ink cartridge if it has worn out 1 2 3 4 ...

Страница 25: ...w Open the top cover Set the paper in the Paper tray with the print side glossy side facing upwards z Do not set more than 20 sheets of the paper in the Paper tray z Do not have the paper stuck out of the Paper tray z Do not touch the print side of the paper p 18 z Do not tear or bend the paper s perforated line before printing p 18 Close the top cover 1 2 3 4 ...

Страница 26: ...ver of the Paper tray to the direction of the arrow Open the Paper tray compartment door Insert the Paper tray horizontally into the Paper tray slot How to reject the Paper Tray Pull the Paper Tray out horizontally and close the Paper tray compartment door 1 2 3 ...

Страница 27: ...ot during printing Connect the power cord to the AC adapter Connect the AC adapter to the DC IN terminal of the printer Plug the power cord connected to the AC adapter into a power outlet z The printer turns on and the POWER lamp lights How to turn off the power Disconnect the power cord from the power outlet so the POWER lamp goes out and turn off the power 1 20cm 20cm 2 3 To power outlet 4 ...

Страница 28: ...e Camera Set the paper and the Ink cartridge p 23 26 Connect the printer to the camera Turn the camera s power on z The ACCESS lamp lights z Images can be printed by operating the camera 1 Use the USB cable supplied with the camera Connect the AC adapter p 27 To power outlet 2 z For the details refer to the user s guide of the camera z Some camera models automatically turn the power on when the ca...

Страница 29: ... cannot be selected depending on the camera models In that case images are printed as follows the default settings of the printer a Paper size Images are printed in accordance with the size of paper set in the Paper tray b Layout specification Images are printed with Borderless c Date Date is not printed Date is printed if it is set to ON in the camera 1 z When the error occurs while printing the ...

Страница 30: ...Service Pack 1 and Service Pack 2 Windows 2000 Service Pack 4 Computer Model The above OS should be pre installed on computers with a built in USB port CPU Pentium 500 MHz or higher processor RAM 256 MB or more Interface USB Free Hard Disk Space 500 MB or more Display 1 024 768 pixels High color 16bit or better OS Mac OS X v10 2 v10 3 Computer Model The above OS should be pre installed on computer...

Страница 31: ...nistrator privileges computer system administrator when installing the printer driver Close any programs that are running Place the CD ROM disc in the CD ROM drive z The pop up menu appears automatically If the pop up menu does not automatically appear display the pop up menu in the following steps For Windows XP click the start button and select My computer then double click the CD ROM icon in th...

Страница 32: ...cial item and turn on the printer z Be sure to log on with administrator privileges when installing the printer driver And enter password if it is required Close any programs that are running Place the CD ROM disc in the CD ROM drive Select Mac folder in the CD ROM disc and double click FunaiFDP100 dmg Double click FunaiFDP100 pkg Follow the screen messages to proceed 1 2 3 4 5 z When printing on ...

Страница 33: ...o your computer make sure that the connectors on the ends of the USB cable match the ports on the printer and on your computer For the location and the terminal form of the USB port on your computer refer to the user s guide of your computer Confirm that the ACCESS lamp lights 1 z Connect the printer directly to the USB port of your computer with the USB cable Do not connect to the USB port on the...

Страница 34: ...same images are printed on one sheet of paper by the specified number of splits z Split specification cannot be selected when selecting Borderless z Selectable split number is as follows Click Image processing setting and drag the to manipulate an image Click OK z The print screen is displayed Brightness Adjust brightness Contrast When sliding it to the strong side the image becomes distinct and w...

Страница 35: ...dows Place the CD ROM disc in the CD ROM drive Click Uninstall of the Printer Driver Follow the screen messages to proceed Macintosh Click Applications Utilities folder and double click Printer Setup Utility Printer Center icon Select FDP 100 and click Delete 7 z Refer to Error Messages if error messages are displayed p 36 z Depending on dimensions of an image the whole image may not be printed No...

Страница 36: ...er or Ink ribbon is not set Check that the specified paper and Ink cartridge are set 22 26 The ribbon cartridge is depleted z The Ink ribbon in the Ink cartridge has been consumed Insert a new Ink cartridge 23 Mismatch between printed data and loaded paper z Paper in the Paper tray or the Ink cartridge does not match the printing data Use the specified paper or Ink cartridge for the printing data ...

Страница 37: ...shes Other paper errors z More than 2 sheets of paper are sent inside of the printer at a time as the paper sticks together and like that Turn off the printer and turn on again so the paper is discharged from the printer z Paper jam has occurred Turn off the printer and turn on again so the paper is discharged from the printer 40 File error z The printer failed to get DPOF setting information Chec...

Страница 38: ... Condensation forms inside the printer Leave it for a while approx 1 2 hours 19 It takes long time to print images z High resolution images are tried to be printed It takes long time to read such images z The internal temperature of the printer is too high Wait for a while The printer will resume printing Images cannot be printed clearly z Specified paper is not set 22 z The paper is not set corre...

Страница 39: ...he Ink ribbon out may cause the printer to miss printing the allotted number of sheets z If the paper s perforated line is torn or bent that paper cannot be used for printing Symptom Possible cause page Print fails z The printer is not connected with the camera correctly Use the USB cable supplied with the camera 28 z Your camera does not support PictBridge printing 28 z It may be necessary to swi...

Страница 40: ... can be printed only if the date print function of the camera is activated 29 Symptom Possible cause page Print fails z The printer is not connected with the computer correctly Use the USB cable for the computer 33 z The printer driver is not installed on the computer Install the printer driver in the supplied CD ROM and then connect the printer with the computer 31 32 z Another printer is selecte...

Страница 41: ...sty Clear the printer out of dust or dirt in the following steps Press up the Ink cartridge eject lever and remove the Ink cartridge p 24 Insert the supplied cleaner as indicated and move the cleaner in and out z Even if images cannot be printed clearly after cleaning internal part of the printer consult your dealer 1 2 ...

Страница 42: ...olor Image format DPOF compatible Exif Ver 2 1 2 2 JPEG 4 4 4 4 2 2 4 2 0 Paper Postcard size 100 148 mm 100 177 mm before cutting out Ink Dedicated Ink cartridge Y M C overcoating Print size Postcard size 100 148 mm without borders 91 4 121 3 mm with borders Print speed Postcard size approx 78 sec Print mode Full image print with without borders Multiple image print Index print Signal transfer me...

Страница 43: ...d is hereby conveyed or granted by FUNAI to you for any intellectual property of FUNAI 3 RESTRICTIONS 1 You may not modify remove or delete any and all copyright notices i which are contained in the Software including any copy thereof and ii which are on the original CD ROM and on the medium of a back up copy made pursuant to Section 1 above if any 2 You shall not use copy or transfer the Software...

Страница 44: ...BSIDIARIES AND AFFILIATES THEIR DISTRIBUTORS AND DEALERS SHALL ASSUME NO OBLIGATION TO INDEMNIFY YOU AGAINST ANY CLAIM OR SUIT BROUGHT BY A THIRD PARTY ALLEGING THAT THE SOFTWARE OR USE THEREOF INFRINGES ANY INTELLECTUAL PROPERTY OF SUCH THIRD PARTY 6 EXPORT RESTRICTIONS You agree to comply with all export laws and restrictions and regulations of the country involved and not to export or re export...

Страница 45: ...te any other provision and all other provisions of this Agreement will be in full force and effect 10 GOVERNING LAW The terms and conditions of this Agreement are governed by the laws of Japan Any litigation arising from the interpretation or execution of this license shall be submitted to Osaka District Court 2005 2006 FUNAI EUROPE GMBH All rights reserved JA321EA ...

Отзывы: