


6
RELAY ACTIVATION PROCEDURES FOR FA1 UNITS
CAUTION
DO NOT WORK ON PANEL WITH POWER APPLIED!
1. Disconnect all power sources from FA1 unit.
2. Remove the 8 screws securing the bottom panel and gently pry bottom panel loose.
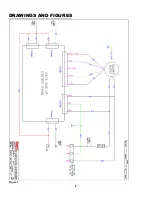
3. Locate relay activation switch on the rear of the control panel as shown in Figure 2.
4. Flip the Relay Activation Switch to the “ON” position as indicated in Figure 3.
5. Reinstall bottom panel using the 8 screws removed in step 2.
6. Apply incoming power to the unit by connecting the power cord and turning the power switch located near
the power cord on. Make sure the blower is not running and the green power light is off. This is called the
“Soft On” state.
7. Now that the physical switch is activated and the unit is in the “Soft On” state, the software will need to be
reprogramed via a flash drive with a configuration file and the USB port on the control board. (Contact Fumex
to acquire the correct configuration file for your unit).
8. Reprogram the software by changing the “remoteSwitchOnly” setting in the configuration file to “1”. This
will lock out the Control Board power button. The ON/OFF function will only be able to be controlled
remotely.
9. After changing and saving the configuration file, plug the flash drive into the USB port on the front of the
control board. (Make sure the unit is in the “Soft On” state before plugging in the flash drive.)
10. After the reprogramming is complete the light above the USB port will turn green and remain lit until the flash
drive is removed from the USB port.
11. Remove the flash drive and apply 0-24 VDC to the start relay according to the wiring diagram in Figure 3 to
start the unit.
Once the relay activation switch is turned on and the configuration file has been
reprogrammed the unit will only start by applying the proper voltage to the
start/stop relay.