


2
GETTING STARTED
I n i t i a l s e t - u p
1. Open all cartons and locate inlet, hose, hose clamps and wheels. Refer to Table 1 for the applicable part
numbers for your model.
2. Remove ALL filters and packing materials from cartons and the unit cabinet.
3. Place the unit on its side and install wheels in the bottom plate.
4. Attach the inlet to the top of the lid with the six screws provided.
5. Remove plastic wrap from gas/odor filter.
6. Carefully remove perforated cardboard from top and bottom of FA101D filter to expose “Green” media.
7. Place FA101D gas/odor filter into bottom of cabinet (NOTE: Pay attention to direction of airflow arrow).
8. Place FA100 HEPA filter on top of gas/odor filter (NOTE: Pay attention to direction of airflow arrow).
9. Place the FA102B pre-filter on top of the HEPA filter.
10. Close and latch the lid.
11. Attach power cord to the power receptacle located on the lower rear of the cabinet.
L o c a t i n g t h e a i r c l e a n e r
Placing the FA1 unit as close as possible to the pollution source reduces the amount of ducting needed, reduces
back-pressure, lowers power consumption, and improves overall performance. Placement should minimize hose
length and the number of bends. Use capture hoods with high efficiency entry whenever possible. The unit
exhausts through the bottom panel make sure to allow for adequate ventilation.
I n l e t h o s e a t t a c h m e n t
The FA1 unit ships standard with a 1 x 2”, 2 x 2” or 1 x 3” inlet. Attach flex hose over the metal air inlet tube and
tighten securely with the stainless-steel clamp. Connect the hose to a Fumex suction hood or place as close as
possible to the pollution source.
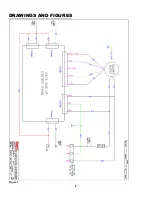
E l e c t r i c p o w e r
FA1 is manufactured with a universal blower/motor assembly (90-250/1/50-60) and must only use a 10-Amp fuse.
Default power cord/plug is US (120V). Contact Fumex for additional information or options.
Confirm that correct power supply is available.