Fujitsu SMARTCASE S500 Скачать руководство пользователя страница 18

Assembly Instructions

 SMARTCASE S500 

__________________________________________________________________________________________________________________________________________________________ 

Page 18 of 18 


  www.fujitsu.com 


Contact 

FUJITSU  

Fujitsu Technology Solutions Gmbh 

Address: Bürgermeister-Ulrich-Straße 100 

86199 Augsburg, Germany 

Phone:  

+49 821 804 0 

Fax : +49 821 804 3329 

E-mail: [email protected] 

Website: www.fujitsu.com/[Country Code] 

YYYY-MM-DD [Region Code] [Language Code] 


© 2018 Fujitsu Technology Solutions GmbH. Fujitsu, the Fujitsu logo are 

trademarks or registered trademarks of Fujitsu Limited in Japan and other 

countries. Other company, product and service names may be trademarks 

or registered trademarks of their respective owners. Technical data subject 

to modification and delivery subject to availability. Any liability that the 

data and illustrations are complete, actual or correct is excluded. 

Designations may be trademarks and/or copyrights of the respective 

manufacturer, the use of which by third parties for their own purposes may 

infringe the rights of such owner. 


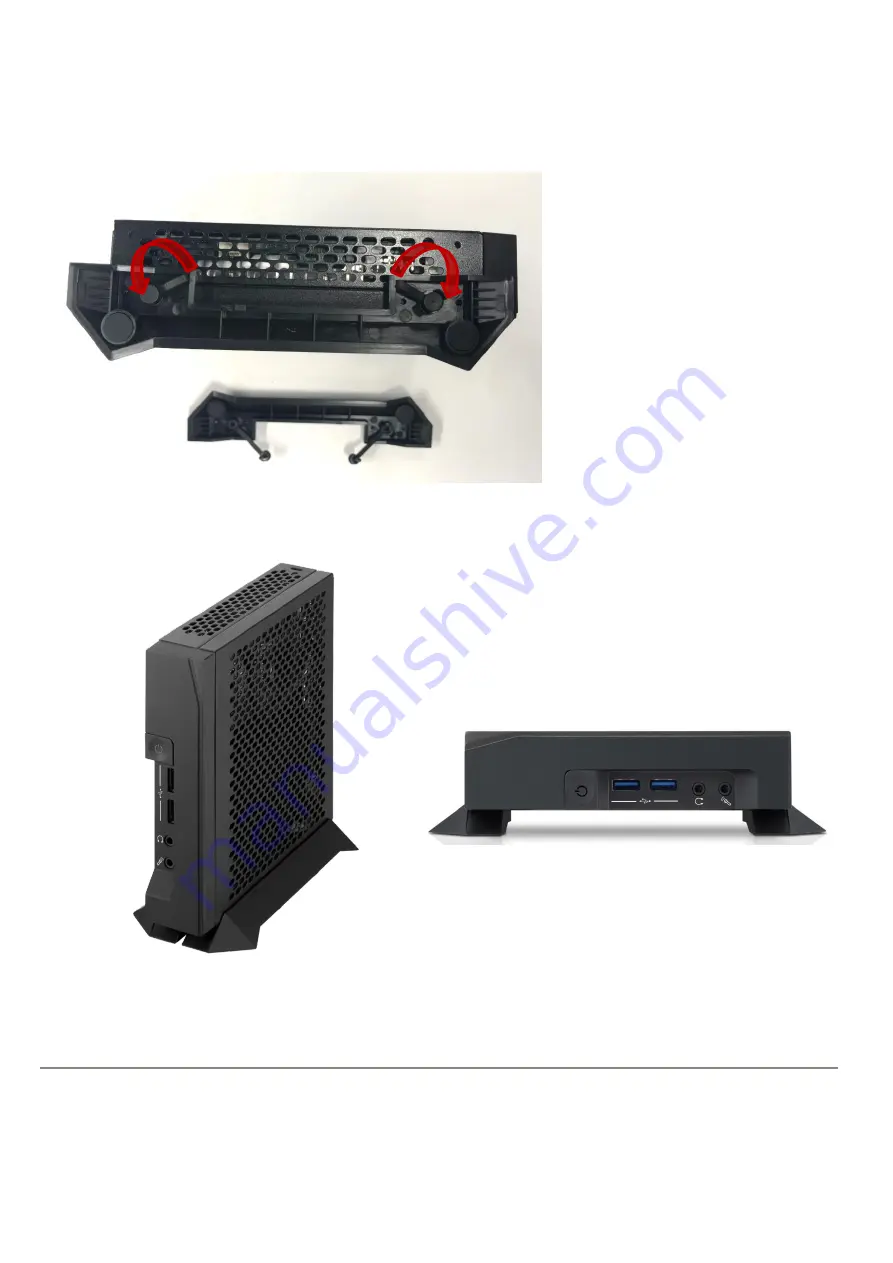
Install the stand to the chassis and fix them by the clips. 
Optionally, the stands can be secured by the screws. 


                                                                                                                           Horizontal Stand Position 
 
 
                       Vertical Stand Position   

Содержание SMARTCASE S500

Страница 1: ..._________________________________________________________________________________________________________ Page 1 of 18 www fujitsu com Assembly Instructions SMARTCASE S500 D3544 Sx _ ________________________________________________________________________________________________________ ...

Страница 2: ..._______________ Page 2 of 18 www fujitsu com Table of Contents Step 1 Preparing the Chassis 3 Step 2 Installing the Heatsink 4 Step 3 Inserting additional Modules Memory M 2 7 Step 4 Mainboard Assembly 10 Step 5 Optional Components 12 Installing WLAN Antennas 12 Speaker Assembly 13 Installing USB Type C Extension Cable 14 Step 6 Closing the Chassis 15 Step 7 Adding Stands 17 ...

Страница 3: ...___________________________________________________________ Page 3 of 18 www fujitsu com Step 1 Preparing the Chassis Open the chassis with two hands by putting some pressure on your thumbs to push the cover reverse Remove top cover and unpack the accessories Chassis kit content Rear Cover Remove protective foil of heat spreader pad ...

Страница 4: ...g the Heatsink Fujitsu provides both a passive and an active heatsink solution and a common mounting backplate Before assembling the mainboard into the chassis it is recommended to install the optional onboard components like cooler RAM M 2 etc Mounting Backplate Do not remove the insulating foil of the backplate otherwise the mainboard may be damaged due to possible short circuit backplate positi...

Страница 5: ...he screws Assemble all 4 screws according to the order shown Each screw can be tightened immediately Finally remove the coloured plastic part by turning it carefully clockwise This coloured plastic part is used for secure assembly of the heatsink in order not to damage the CPU die die crack protection After assembly this part can be scrapped Note Recommended mounting torque for heatsink screws 0 6...

Страница 6: ... max 0 8Nm Active heatsink positioning Heatsink must be positioned according to picture Mounting Backplate Do not remove the insulating foil of the backplate otherwise the mainboard may be damaged due to possible short circuit Hold the heatsink with one hand so that it doesn t tilt while installing the screws Assemble all 4 screws according to the order shown Each screw can be tightened immediatel...

Страница 7: ...ention Do not touch any pins Touch the memory at the outside edges only Do not stick a barcode onto any modules The following procedure is recommended in order to ensure secure electrical contact Insert the memory angular and pay attention to the notch Remove the memory again completely from the DIMM socket Insert memory again Press down the memory until it clicks into place Do not press in the mi...

Страница 8: ...ch Both modules as shown in the picture have to be touched on the outside edges only For the M 2 SSD left socket the assembly nut and screw are pre installed for a 2240mm module In order to install a 2260 module the 2240 assembly nut has to be moved to the 2260 position first For a 2280 module the 2240 assembly nut has to be removed and the pre installed M 2 WLAN 2230 nut is used for both M 2 2230...

Страница 9: ...______________________________________________________________________________________________________________________________ Page 9 of 18 www fujitsu com Sample installation M 2 2280 SSD module and M 2 2230 M 2 WLAN module Both modules are fixed by one common screw ...

Страница 10: ...___________________ Page 10 of 18 www fujitsu com Step 4 Mainboard Assembly 1 Swing in the mainboard rear chassis side 2 Move it carefully to the final position Take care for the heat spreader pad Protective foil must be removed first Insert the chassis rear cover as shown above Push down the mainboard carefully while the four mounting holes fit onto the chassis nuts 1 2 ...

Страница 11: ...__________________________________________________________________________________________________________________________________________ Page 11 of 18 www fujitsu com Assemble the four mounting screws included in the chassis kit Recommeded torque 0 6Nm ...

Страница 12: ...spectively gray Please note that the plastic front bezel has to be removed first Push the antenna cables completely through the opening in the housing and pay attention to the antenna cable notch see red circles Carefully install the WLAN antennas The metal plate must not be bent Insert the black antenna cable in the hooks see red circles and then plug the black antenna cable to socket 1 of the M ...

Страница 13: ..._____________ Page 13 of 18 www fujitsu com Speaker Assembly Please note that the plastic front bezel has to be removed first Insert speaker into rubber Install speaker rubber in fronbezel Speaker cable is led to mainboard via appropriate chassis aperture Re assemble plastic front bezel carefully and install speaker connector to mainboard Speaker Rubber Speaker speaker location ...

Страница 14: ..._______________________________________________________________________ Page 14 of 18 www fujitsu com Installing USB Type C Extension Cable Install the USB Type C bracket to the chassis rear cover Then connect the USB cable connector to the appropriate mainboard connector The USB cable should be bent slightly as required ...

Страница 15: ...____________________________________________________________________________________________________________________________ Page 15 of 18 www fujitsu com Step 6 Closing the Chassis Slide the cover on top of the chassis pushing it forward Some pressure may be required ...

Страница 16: ...________________________________________________________________________________________________________________________________________________ Page 16 of 18 www fujitsu com Close the chassis rear cover using the screws included in the kit delivery ...

Страница 17: ..._________________________________________________ Page 17 of 18 www fujitsu com Step 7 Adding Stands The desk stands included in the chassis kit can be used either for horizontal or vertical use They can be fixed by plastic clips in addition there are screws included for more secure stand assembly Insert the clips into the holes of the stands ...

Страница 18: ...ujitsu the Fujitsu logo are trademarks or registered trademarks of Fujitsu Limited in Japan and other countries Other company product and service names may be trademarks or registered trademarks of their respective owners Technical data subject to modification and delivery subject to availability Any liability that the data and illustrations are complete actual or correct is excluded Designations ...

Отзывы: