SK-91465X-100PMC User Guide
Chapter 3 Jumpers and Switches
© Fujitsu Microelectronics Europe GmbH
- 23 -
UG-910056-11
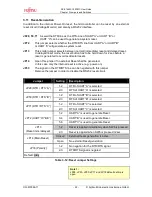
3.12 Buttons SW1, SW2, SW3, SW4, SW5, SW6, SW7
JP4, JP6, JP9, JP10, JP12
Five user push buttons SW1-SW5 can be connected to the microcontroller.
JP14
External reset circuit and button SW6 can be connected to the microcontroller.
JP70
Button SW7 can be connected to FlexRay Transceiver Local WAKE pin.
Jumper
Setting
Description
Closed
Pin 74 (INT0) of the MCU is connected to “SW1”
JP4(SW1)
Open
No connection to the microcontroller
Closed
Pin 77 (INT1) of the MCU is connected to “SW2”
JP6 (SW2)
Open
No connection to the microcontroller
Closed
Pin 53 (ATGX) of the MCU is connected to “SW3”
JP9 (SW3)
Open
No connection to the microcontroller
Closed
Pin 2 (ICU0/TIN0) of the MCU is connected to “SW4”
JP10 (SW4)
Open
No connection to the microcontroller
Closed
Pin 4 (ICU2/TIN2) of the MCU is connected to “SW5”
JP12 (SW5)
Open
No connection to the microcontroller
Closed
INITX is connected to the reset IC and SW6
JP14(Reset)
Open
No connection to INITX
1-2
WAKE of FlexRay Transceiver Ch. A is connected to SW7
JP70 (WAKE)
3-4
WAKE of FlexRay Transceiver Ch. B is connected to SW7
Default: grey
Table 3-13: Buttons Jumper settings
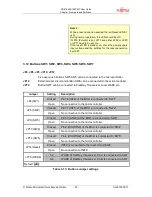
Note 2:
While a reset signal is asserted the red Reset-LED D1
is lit.
During normal operation, this LED should be off!
If JP33 (Polarity) is set, JP72 and either JP28 or JP50
or JP71 have to be set, too.
If the reset LED is steadily on, check the power supply
input voltage and the settings for the reset-generation
by UART.

