background image

504

Upgrade and Maintenance Manual

 RX2540 M4

System board and components

Ê

"Removing the air duct" on page 88

Ê

If applicable, remove the riser module 1, see sectio

"Handling riser 

modules" on page 71

.

16.3.1.2 Installing the TPM

I

The onboard position of the TPM connector can be found in section 

"Connectors and indicators" on page 549

.

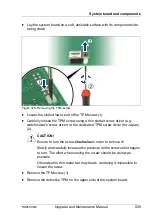
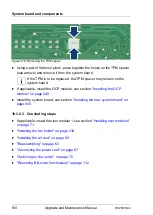
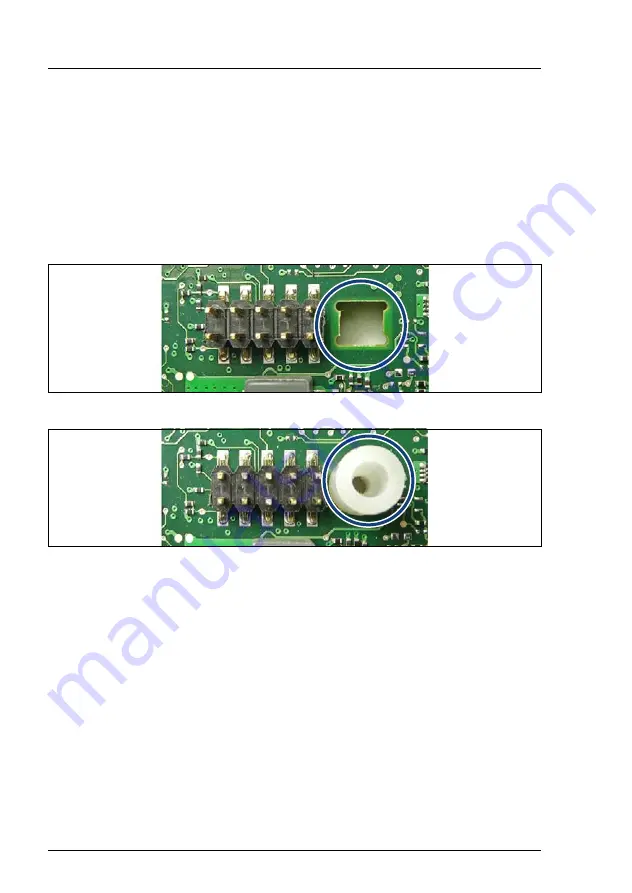
Figure 374: Position for the TPM spacer

Figure 375: Inserting the TPM spacer on the system board

Ê

Insert the TPM spacer into the hole on the system board.

Содержание PRIMERGY RX2540 M4

Страница 1: ...Upgrade and Maintenance Manual English FUJITSU Server PRIMERGY RX2540 M4 Upgrade and Maintenance Manual December 2018 ...

Страница 2: ...kumentation mbH www cognitas de Copyright 2018 FUJITSU LIMITED All rights reserved Delivery subject to availability right of technical modifications reserved All hardware and software names used are trademarks of their respective manufacturers The contents of this manual may be revised without prior notice Fujitsu assumes no liability for damages to third party copyrights or other rights arising f...

Страница 3: ...rcuit board assemblies of the product and in the mouse and keyboard are limited life components Use of these components beyond their operating life may result in electrolyte leakage or depletion potentially causing emission of foul odor or smoke As a guideline in a normal office environment 25 C operating life is not expected to be reached within the maintenance support period 5 years However oper...

Страница 4: ...roduct for high safety use Measures against momentary voltage drop This product may be affected by a momentary voltage drop in the power supply caused by lightning To prevent a momentary voltage drop the use of an uninterruptible power supply is recommended This notice follows the guidelines of Voltage Dip Immunity of Personal Computer issued by JEITA the Japan Electronics and Information Technolo...

Страница 5: ...nterfaces Please note that the usage and operation conditions differ depending on the type of HDD used For more information on the usage and operation conditions of each available type of HDD see the following internet address http jp fujitsu com platform server primergy harddisk Only for Japan Shielded LAN cables should be used in this product ...

Страница 6: ...inserted 3 0 March 2018 Variant 2 of DC PSU added new PCIe backplane front and rear upgrading up to 24x 2 5 inch HDD SSD modules EP5x0i Retimer memory Dual microSD 64GB Enterprise new chapter Liquid cooling LC 4 0 December 2018 new element definition LC chapter memory chapter expansion card chapter EEE mode inserted changes to unify the documents OCP description ...

Страница 7: ...nd 37 2 4 Documentation overview 37 3 Important information 41 3 1 Safety instructions 41 3 2 CE conformity 49 3 3 FCC Class A Compliance Statement 50 3 4 Environmental protection 51 4 Basic hardware procedures 53 4 1 Using diagnostics information 53 4 1 1 Locating the defective server 53 4 1 2 Determining the error class 54 4 1 3 Locating the defective component 54 4 2 Shutting down the server 55...

Страница 8: ...4 8 2 Riser modules for expansion cards HL 74 4 8 2 1 Removing the riser module 1 HL 74 4 8 2 2 Installing the riser module 1 HL 75 4 8 2 3 Removing the riser module 2 HL 78 4 8 2 4 Installing the riser module 2 HL 79 4 8 3 Riser modules for GPGPU cards FL 82 4 8 3 1 Removing the riser module 1 FL 82 4 8 3 2 Installing the riser module 1 FL 83 4 8 3 3 Removing the riser module 2 FL 85 4 8 3 4 Inst...

Страница 9: ... Verifying the memory mode 108 5 2 11 Verifying the system time settings 109 5 2 12 Viewing and clearing the System Event Log SEL 110 5 2 12 1 Viewing the SEL 110 5 2 12 2 Clearing the SEL 111 5 2 13 Updating the NIC configuration file in a Linux and VMware environment 112 5 2 14 Resuming BitLocker functionality 112 5 2 15 Performing a RAID array rebuild 113 5 2 16 Looking for MAC WWN GUID and SAS...

Страница 10: ...6 2 3 3 Installing the new hot plug PSU 135 6 2 3 4 Concluding steps 135 7 Hard disk drives HDD and solid state drives SSD 137 7 1 Basic information 138 7 2 Handling HDDs or SSDs without installation frame 139 7 2 1 2 5 inch HDD SSD and 2 5 inch installation frame 139 7 2 2 2 5 inch HDD SSD and 3 5 inch installation frame 141 7 2 3 3 5 inch HDD and 3 5 inch installation frame 143 7 3 3 5 inch HDD ...

Страница 11: ...o four to up to eight 3 5 inch HDDs 161 7 3 9 1 Preliminary steps 161 7 3 9 2 Installing the second 3 5 inch HDD backplane 161 7 3 9 3 Connecting the SAS cables two 3 5 inch HDD backplanes 162 7 3 9 4 Concluding steps 163 7 3 10 Replacing the 12x 3 5 inch HDD backplane 164 7 3 10 1 Preliminary steps 164 7 3 10 2 Removing the SAS expander board 165 7 3 10 3 Removing the defective 12x 3 5 inch HDD b...

Страница 12: ...ling a 2 5 inch dummy module 186 7 4 7 4 Concluding steps 186 7 4 8 Replacing a 2 5 inch HDD SSD module 187 7 4 8 1 Preliminary steps 188 7 4 8 2 Removing a 2 5 inch HDD SSD module 188 7 4 8 3 Installing a 2 5 inch HDD SSD module 188 7 4 8 4 Concluding steps 188 7 4 9 Replacing a 8 x 2 5 inch HDD backplane 189 7 4 9 1 Preliminary steps 189 7 4 9 2 Disconnecting the HDD backplane 189 7 4 9 3 Removi...

Страница 13: ...dditional PCIe SSD modules 208 7 4 12 6 Concluding steps 209 7 5 Rear HDD SSD or PCIe SSD extension box 209 7 5 1 Replacing the backplane of the extension box 209 7 5 1 1 Preliminary steps 209 7 5 1 2 Types of rear backplanes 210 7 5 1 3 Disconnecting cables from the rear backplane 211 7 5 1 4 Removing the rear backplane 211 7 5 1 5 Installing the rear backplane 213 7 5 1 6 Connecting cables to th...

Страница 14: ...r modules 238 9 1 1 1 Population rules 238 9 2 Handling slot brackets 239 9 2 1 Installing a slot bracket 239 9 2 2 Removing a slot bracket 240 9 3 Handling SFP transceiver modules 241 9 3 1 Installing SFP transceiver modules 241 9 3 2 Removing an SFP transceiver module 244 9 4 OCP Open Compute Project modules 247 9 4 1 Installing an OCP module 248 9 4 1 1 Preliminary steps 248 9 4 1 2 Removing th...

Страница 15: ...nnecting a FBU to the expansion card 267 9 5 3 6 Concluding steps 267 9 6 Handling slot covers on the riser card holder 268 9 6 1 Installing the slot cover 268 9 6 2 Removing the slot cover 269 9 7 Handling slot covers for the riser modules 270 9 7 1 Handling slot covers for the riser module 1 270 9 7 1 1 Installing the slot cover for the riser module 1 270 9 7 1 2 Removing the slot cover for the ...

Страница 16: ...module 2 284 9 9 3 3 Installing the air grid extension to the riser module 2 284 9 9 3 4 Remove the slot cover for the riser module 2 284 9 9 3 5 Remove the rear air grid riser module 2 285 9 9 3 6 Concluding steps 285 9 9 4 Removing an expansion card from riser module 2 285 9 9 4 1 Preliminary steps 285 9 9 4 2 Removing the expansion card 286 9 9 4 3 Installing the slot cover in the riser card ho...

Страница 17: ...riser module 1 298 9 10 2 8 Installing the air duct 298 9 10 2 9 Concluding steps 299 9 10 3 Installing a GPGPU card in riser module 2 299 9 10 3 1 Preliminary steps 299 9 10 3 2 Installing a GPGPU card in a riser module 299 9 10 3 3 Installing the air grid extension to riser module 2 299 9 10 3 4 Replacing the heat sink FL 300 9 10 3 5 Removing the rear air grid riser module 2 300 9 10 3 6 Removi...

Страница 18: ...e defective TFM 309 9 11 1 3 Installing the new TFM 311 9 11 1 4 Concluding steps 313 9 11 2 Installing an FBU on the air duct 313 9 11 2 1 Preliminary steps 313 9 11 2 2 Preparing the FBU 314 9 11 2 3 Installing the FBU with the holder 315 9 11 2 4 Concluding steps 316 9 11 3 Installing an FBU on the riser card holder FL 317 9 11 3 1 Preliminary steps 317 9 11 3 2 Preparing the FBU 317 9 11 3 3 I...

Страница 19: ...reliminary steps 339 10 2 2 Selecting the memory slot 339 10 2 3 Installing a memory module 339 10 2 4 Concluding steps 340 10 3 Removing a memory module 341 10 3 1 Preliminary steps 341 10 3 2 Removing a memory module 341 10 3 3 Concluding steps 342 10 4 Replacing a memory module 342 10 4 1 Preliminary steps 342 10 4 2 Removing the defective memory module 343 10 4 3 Installing a new memory module...

Страница 20: ...g the CPU 372 12 2 4 Installing the CPU 374 12 2 5 Installing the LC device 376 12 2 6 Concluding steps 381 12 3 Applying the thermal paste to the CPU surface 382 12 4 Main memory for LC 384 12 4 1 Installing memory modules 384 12 4 1 1 Preliminary steps 384 12 4 1 2 Preparing the memory modules 384 12 4 1 3 Installing a memory module 385 12 4 1 4 Concluding steps 386 12 4 2 Removing a memory modu...

Страница 21: ...DD 403 13 2 3 3 Installing the new ODD 403 13 2 3 4 Concluding steps 404 13 3 Optical disk drive ODD for the 3 5 inch version 404 13 3 1 Installing the ODD 404 13 3 1 1 Preliminary steps 404 13 3 1 2 Removing the ODD dummy cover 405 13 3 1 3 Installing the ODD 405 13 3 1 4 Concluding steps 409 13 3 2 Removing the ODD 410 13 3 2 1 Preliminary steps 410 13 3 2 2 Removing the ODD 411 13 3 2 3 Install...

Страница 22: ...2 Removing the RDX drive 432 13 5 2 1 Preliminary steps 433 13 5 2 2 Removing the RDX drive 433 13 5 2 3 Concluding steps 435 13 5 3 Replacing a RDX drive 435 13 5 3 1 Preliminary steps 435 13 5 3 2 Removing the defective RDX drive 435 13 5 3 3 Installing the new RDX drive 436 13 5 3 4 Concluding steps 436 14 Front panel 437 14 1 Basic information 437 14 2 Front panel module 2 5 inch version 438 1...

Страница 23: ...dule 454 14 3 3 6 Concluding steps 454 14 4 Front USB3 0 connector 2 5 inch version 454 14 4 1 Installing the front USB3 0 connector 454 14 4 1 1 Preliminary steps 455 14 4 1 2 Removing the front panel module 455 14 4 1 3 Preparing the front USB3 0 connector 455 14 4 1 4 Installing the front USB3 0 connector 456 14 4 1 5 Installing the front panel module 457 14 4 1 6 Concluding steps 457 14 4 2 Re...

Страница 24: ...3 5 inch version 474 14 7 1 Installing the front VGA connector 474 14 7 1 1 Preliminary steps 474 14 7 1 2 Removing the front panel module 474 14 7 1 3 Preparing the front panel module 475 14 7 1 4 Installing the front VGA board 476 14 7 1 5 Installing the front panel module 476 14 7 1 6 Concluding steps 476 14 7 2 Removing the front VGA board 477 14 7 2 1 Preliminary steps 477 14 7 2 2 Removing t...

Страница 25: ...onnector 485 14 8 3 4 Installing the new front USB3 0 connector 485 14 8 3 5 Installing the front panel module 485 14 8 3 6 Concluding steps 486 15 Additional interfaces 487 15 1 Serial connector optional 487 15 1 1 Installing the serial connector 487 15 1 1 1 Preliminary steps 487 15 1 1 2 Breaking off the metal cover 488 15 1 1 3 Installing the serial connector 488 15 1 1 4 Concluding steps 490 ...

Страница 26: ...the TPM 507 16 3 2 1 Preliminary steps 507 16 3 2 2 Removing the TPM 508 16 3 2 3 Concluding steps 510 16 3 3 Replacing the TPM 511 16 3 3 1 Preliminary steps 511 16 3 3 2 Removing the defective TPM 512 16 3 3 3 Installing the new TPM 512 16 3 3 4 Concluding steps 512 16 4 iRMC microSD card 513 16 4 1 Installing the iRMC microSD card 513 16 4 1 1 Preliminary steps 513 16 4 1 2 Installing the iRMC ...

Страница 27: ...524 16 6 1 1 Preliminary steps 524 16 6 1 2 Installing the Dual microSD 64GB Enterprise 524 16 6 1 3 Concluding steps 528 16 6 2 Removing the Dual microSD 64GB Enterprise 529 16 6 2 1 Preliminary steps 529 16 6 2 2 Removing the Dual microSD 64GB Enterprise 529 16 6 2 3 Concluding steps 532 16 6 3 Replacing the Dual microSD 64GB Enterprise 532 16 6 3 1 Preliminary steps 532 16 6 3 2 Replacing the D...

Страница 28: ... the system board 549 17 2 1 1 Onboard connectors 549 17 2 1 2 Onboard indicators and controls 551 17 2 2 Server front 554 17 2 2 1 Indicators on the front panel 554 17 2 2 2 Indicator on the ODD 558 17 2 2 3 Indicators on the hot plug HDD SSD module 559 17 2 3 Server rear 560 17 2 3 1 Connectors on the I O panel 560 17 2 3 2 Indicators on the I O panel 561 17 2 3 3 Indicator on hot plug PSU 566 1...

Страница 29: ...acing defective hardware components This manual focuses on on site maintenance tasks It is recommended to prepare each service assignment following remote diagnostics procedures as described in the ServerView Suite Local Service Concept LSC manual see section Documentation overview on page 37 V CAUTION The document at hand comprises procedures of a wide range of complexity Check the profile of qua...

Страница 30: ... emphasized Ê Describes activities that must be performed in the order shown Abc Indicates keys on the keyboard V CAUTION Pay particular attention to texts marked with this symbol Failure to observe this warning may endanger your life destroy the system or lead to the loss of data I Indicates additional information notes and tips Indicates the procedure category in terms of complexity and qualific...

Страница 31: ...ature range either of 5 C to 40 C or 5 C to 45 C depending on your system and configuration V CAUTION In a system that is configured with ATD only certain components which support the respectively increased higher operating temperature range may be installed and used For applicable restrictions see the official configurator tool Installing optional components The operating manual of your server gi...

Страница 32: ...ponent The Global Error indicator on the front of the server reports defective hardware components that need to be replaced For more information on the controls and indicators of your server see the operating manual of your server and section Connectors and indicators on page 549 If the system has been powered off in order to replace a non hot plug unit a system of PRIMERGY diagnostic indicators g...

Страница 33: ...re intended for customer self service and may be installed or replaced as hot plug components during operation I Components that the customer is entitled to replace may differ according to the service form in his country For Japan http www fujitsu com jp products computing servers primergy support r epair html Hot plug components increase system availability and guarantee a high degree of data int...

Страница 34: ...tic indicators on the front panel and system board will report defective Upgrade and Repair Units as customer replaceable CSS components Upgrade and repair procedures involve shutting down and opening the server V CAUTION The device may be seriously damaged or cause damage if it is opened without authorization or if repairs are attempted by unauthorized and untrained personnel Components that are ...

Страница 35: ...g Field Replaceable Units must be performed exclusively by Fujitsu service personnel or technicians trained by Fujitsu Please note that unauthorized interference with the system will void the warranty and exempt the manufacturer from all liability Components that are handled as Field Replaceable Units CPU replacement SAS SATA backplanes SAS expander board Front panel module System board Trusted Pl...

Страница 36: ...ce see section Starting the maintenance task on page 91 Rack removal disassembly yes Making the server available removing the server from the rack if applicable Transport no Transporting the server to the service table where required depends on local customer conditions Maintenance procedures yes Maintenance procedures including preliminary and concluding software tasks Transport no Returning the ...

Страница 37: ...ttp manuals ts fujitsu com under x86 Servers For Japan http www fujitsu com jp products computing servers primergy man ual Document Description Safety Notes and Regulations manual 安全上のご注意 for Japan Important safety information available online or as a printed copy FUJITSU Server PRIMERGY RX2540 M4 Operating Manual Information how to install set up and operate your server available online FUJITSU S...

Страница 38: ...t eLCM user guide Illustrated Spares catalog Spare parts identification and information system not valid for Japan available for online use or download Windows OS at http manuals ts fujitsu com illustrated_sp ares or from the CSS component view of the ServerView Operations Manager Glossary Contains abbreviations and explanations available online Warranty manual 保証書 for Japan Important information ...

Страница 39: ...e online at http manuals ts fujitsu com under x86 Servers Expansion Cards Storage Adapters For Japan http www fujitsu com jp products computi ng servers primergy manual Third party documentation Operating system documentation online help Peripherals documentation Document Description Table 2 Documentation overview ...

Страница 40: ...40 Upgrade and Maintenance Manual RX2540 M4 Before you start ...

Страница 41: ...bed in this manual shall be performed by technical specialists A technical specialist is a person who is trained to install the server including hardware and software Repairs to the server that do not relate to CSS failures shall be performed by service personnel Please note that unauthorized interference with the server will void the warranty and exempt the manufacturer from all liability Any fai...

Страница 42: ...ly with the requirements for non industrial power supply networks for type A connectors The server automatically adjusts itself to a mains voltage see the type label of your server Ensure that the local mains voltage lies within these limits This server must only be connected to properly grounded power outlets or connected to the grounded rack internal power distribution server with tested and app...

Страница 43: ...k short circuit In emergencies e g damaged casing controls or cables penetration of liquids or foreign bodies contact the server administrator or your customer service team Only disconnect the server from the mains power supply if there is no risk of harming yourself Proper operation of the server in accordance with IEC 60950 1 resp EN 60950 1 is only ensured if the server is completely assembled ...

Страница 44: ...urer from all liability The circuit boards and soldered parts of internal options are exposed and can be damaged by static electricity To ensure reliable protection you must wear an earthing band on your wrist when working with this type of module and connect it to an unpainted conducting metal part of the server Do not touch the circuitry on boards or soldered parts Hold the metallic areas or the...

Страница 45: ...ns must be followed V CAUTION Only use CDs DVDs BDs that are in perfect condition in order to prevent data loss equipment damage and injury Check each CD DVD BD for damage cracks breakages etc before inserting it in the drive Note that any additional labels applied may change the mechanical properties of a CD DVD BD and cause imbalance and vibrations Damaged and imbalanced CDs DVDs BDs can break a...

Страница 46: ...e CD DVD BD surface Keep the CDs DVDs BDs away from heat sources Do not bend or place heavy objects on CDs DVDs BDs Do not write with ballpoint pen or pencil on the label printed side Do not attach stickers or similar to the label side Doing so may cause rotational eccentricity and abnormal vibrations When a CD DVD BD is moved from a cold place to a warm place moisture condensation on the CD DVD B...

Страница 47: ... Devices ESD modules ESD modules are identified by the following sticker Figure 1 ESD label I The ESD label can be different When you handle ESD modules you must always observe the following points Switch off the server and remove the power plugs from the power outlets before installing or removing ESD modules The circuit boards and soldered parts of internal options are exposed and can be damaged...

Страница 48: ...ackaging does not apply Do not unpack the server until it is at its installation location If you need to lift or transport the server ask other people to help you Never lift or carry the server by the handles or the Quick Release Levers QRLs on the front panel Notes on installing the server in the rack V CAUTION For safety reasons at least 2 people are required to install the server in the rack be...

Страница 49: ...ts for non industrial power supply networks for the type A connector Other important information During cleaning observe the instructions in the corresponding Operating Manual chapter Starting up and operation Cleaning the server Keep all manuals close to the server All documentation must be included if the equipment is passed on to a third party 3 2 CE conformity The system complies with the requ...

Страница 50: ...nterference will not occur in a particular installation If this equipment does cause harmful interference to radio or television reception which can be determined by turning the equipment off and on the user is encouraged to try to correct the interference by one or more of the following measures Reorient or relocate the receiving antenna Increase the separation between equipment and the receiver ...

Страница 51: ...hed on should be switched off until they are needed as well as during long breaks and after completion of work Packaging information This packaging information does not apply in Japan and APAC Do not throw away the packaging You may need it later for transporting the server If possible the equipment should only be transported in its original packaging Information on handling consumables Please dis...

Страница 52: ...d consumables within Europe can also be found in the Returning used devices manual via your local Fujitsu branch or at http ts fujitsu com recycling The device must not be disposed of with domestic waste This device is labeled in compliance with European directive 2012 19 EU on waste electrical and electronic equipment WEEE This directive sets the framework for returning and recycling used equipme...

Страница 53: ...alog to identify the required spare part and obtain technical data and order information Illustrated Spares catalogs are available online at http manuals ts fujitsu com illustrated_spares I In Japan the Fujitsu Illustrated Spares Catalog is not used 4 1 1 Locating the defective server For easy identification of the server switch on the ID indicator especially when working in a datacenter environme...

Страница 54: ...server restart due to a power failure Ê Check the Global Error indicator and the CSS indicator 4 1 3 Locating the defective component After determining the error class by the CSS indicator or the Global Error indicator see section Determining the error class on page 54 indicators on the components and onboard indicators on the system board allow you to identify the defective component I For more i...

Страница 55: ...components see section Using the CSS button on the system board on page 55 The indicator next to the defective component lights up 4 2 Shutting down the server V CAUTION For more information see chapter Important information on page 41 I This step is only required when upgrading or replacing non hot plug components Ê Inform the system administrator that the server will be shut down and put offline...

Страница 56: ... 4 3 Disconnecting the power cord 4 3 1 Disconnecting the power cord AC PSU Figure 2 Unlocking the cable clamp of a PSU Ê Press the cable clamp down until it disengages 1 Ê Open the cable clamp 2 Ê Disconnect the power cord from the PSU and remove it from the cable clamp ...

Страница 57: ... 2 Disconnecting the power cord DC PSU Example DC PSU 48 V Figure 3 Disconnecting the server from the dc voltage example DC PSU 48 V Ê Remove the two screws see circles Ê Disconnect the power cord from the PSU see arrow V CAUTION See the cable label for terminal information ...

Страница 58: ... Getting access to the component V CAUTION Only for non hot plug components Before removing or installing covers turn off the server and all peripheral devices Also unplug all power cables from the outlet Failure to do so can cause electric shock In order to comply with applicable EMC regulations regulations on electromagnetic compatibility and satisfy cooling requirements the server must not run ...

Страница 59: ...information see chapter Important information on page 41 Ê Remove all remaining external cables from the I O panel and expansion cards I Note for installations with expansion cards in slot 5 and slot 11 If there is a cable installed to an expansion card in the upper slot see section Note for installation with expansion cards in slot 5 and slot 11 on page 71 Figure 5 Extending the server out of the...

Страница 60: ...the rack cabinet For Japan please refer to 安全上のご注意 Additionally a lifter is required in the following cases The server weighs more than 50 kg The server weighs more than 21 kg and is installed above the height of 25 U When using a lifter this removal procedure needs to be carried out by maintenance personnel For configurations below 32 kg At least two people are needed to lift the server out of th...

Страница 61: ...r from the rack Ê Release the locking bars on both rack rails 1 Ê Lift up the front of the server as shown so that the front and middle rack mounting bolts are disengaged from the mounting points on the rack rails 2 Ê Lift the server out of the rear mounting points 3 and place it on an even surface ...

Страница 62: ... Manual RX2540 M4 Basic hardware procedures 4 4 3 Removing the top cover Figure 7 Removing the top cover Ê Open the locking lever 1 This will slide the top cover back disengaging the locking mechanism 2 Ê Remove the top cover 3 ...

Страница 63: ...ing requirements the server must not run while the top cover is removed For more information see chapter Important information on page 41 4 5 1 Installing the top cover Figure 8 Installing the top cover Ê Open the locking lever on the top cover Ê Fit the top cover on the chassis aligning it according to the edge guide marking on the upper server surface Ê Lower the top cover onto the chassis 1 Ê C...

Страница 64: ...n 50 kg The server weighs more than 21 kg and is to be installed above the height of 25 U When using a lifter this installation procedure needs to be carried out by maintenance personnel For configurations below 32 kg At least two people are needed to lift the server into the rack cabinet For configurations below 55 kg At least three people are needed to lift the server into the rack cabinet For c...

Страница 65: ...ace 1 I The rack rails must click into place so that they can no longer be moved Ê At a slight angle lower the server onto the rear mounting point on the rack rails 2 Ê Fold down the server while pressing the rail to the server side 3 Ensure that all six rack mounting bolts are properly seated in the mounting points on the rack rails 4 and that the locking bars engage 5 ...

Страница 66: ...r into the rack Ê Release the locking mechanism of both rails 1 Ê Push the server as far as it will go into the rack 2 until the quick release levers engage V CAUTION Be careful with your fingers You can pinch them when the quick release levers change to the release position Ê Connect all cables except the power cord to the server rear ...

Страница 67: ...able connect the mains plugs to power outlets of the rack socket strip I To provide true phase redundancy the second PSU should be connected to a different AC power source from the other PSU If one AC power source should fail the server will still continue to run Ê Ensure that the status indicator on the PSU is lit green see section Indicator on hot plug PSU on page 566 Figure 11 Locking the cable...

Страница 68: ...ver to the DC voltage example DC PSU 48 V Ê Connect the power cord to the PSU see arrow Ê Fasten the two screws see circles Ê Ensure that the status indicator on the PSU is lit green see section Indicator on hot plug PSU on page 566 Ê If necessary make a permanent connection to the distribution board V CAUTION If the server rack is intended for permanent connection to the mains only an authorized ...

Страница 69: ... power cord plug into the PSU connector until it clicks in The nose of the power cord plug A engages in the recess of the PSU connector B Ê Ensure that the status indicator on the PSU is lit green see section Indicator on hot plug PSU on page 566 Ê If necessary make a permanent connection to the distribution board V CAUTION If the server rack is intended for permanent connection to the mains only ...

Страница 70: ...ver is closed In order to comply with applicable EMC regulations regulations on electromagnetic compatibility and satisfy cooling requirements the server must not run while the top cover is removed For more information see chapter Important information on page 41 Ê Press the On Off button to start up the server Ê Ensure that the power on indicator is lit green ...

Страница 71: ...es Note for installation with expansion cards in slot 5 and slot 11 Figure 15 Removing a connector from an expansion card in a riser in slot 5 or 11 Ê Insert a small tool e g a small slotted screw driver in the gap between the connector and the housing to press down the locking mechanism see circle Riser module 1 Riser module 2 ...

Страница 72: ...e Manual RX2540 M4 Basic hardware procedures 4 8 1 Riser cards 4 8 1 1 Removing the riser card Figure 16 Removing the riser card Ê Remove the four screws see circles Ê Carefully remove the expansion card from its slot see arrow ...

Страница 73: ...nd Maintenance Manual 73 Basic hardware procedures 4 8 1 2 Installing the riser card Figure 17 Installing the riser card Ê Insert the riser card in the holder see arrow Ê Fasten the riser card with four screws see circles ...

Страница 74: ...ocedures 4 8 2 Riser modules for expansion cards HL 4 8 2 1 Removing the riser module 1 HL Figure 18 Removing the riser module 1 Ê If applicable Removing an SFP transceiver module on page 244 Ê Remove five screws see circles Ê Carefully take out the riser module ...

Страница 75: ...2540 M4 Upgrade and Maintenance Manual 75 Basic hardware procedures 4 8 2 2 Installing the riser module 1 HL Figure 19 Positions of the recesses Ê Take note of the two recesses in the crossbar see circles ...

Страница 76: ...sert the riser module I Ensure that the riser module engages properly in the recesses see figure 19 on page 75 Ensure that the bracket of the riser card holder is positioned outside the chassis see close up Ê Carefully push down the riser module until the contacts of the riser card are fully seated in the PCIe socket ...

Страница 77: ...cles Ê If applicable install SFP transceiver modules into the new expansion card see section Installing SFP transceiver modules on page 241 Ê If applicable connect internal cables to the expansion card I For the cable plan see chapter Appendix B on page 573 Ê If applicable connect an FBU cable to the expansion card see section Installing the new TFM on page 311 ...

Страница 78: ...ic hardware procedures 4 8 2 3 Removing the riser module 2 HL Ê If applicable Removing an SFP transceiver module on page 244 Figure 22 Removing the riser module 2 B Ê Remove five screws see circles and close up Ê Carefully take out the riser module ...

Страница 79: ...2540 M4 Upgrade and Maintenance Manual 79 Basic hardware procedures 4 8 2 4 Installing the riser module 2 HL Figure 23 Positions of the recesses Ê Take note of the two recesses in the crossbar see circles ...

Страница 80: ...es Figure 24 Installing the riser module 2 A Ê Insert the riser module I Ensure that the riser module engages properly in the recesses see circles Ê Carefully push down the riser module until the contacts of the riser card are fully seated in the PCIe socket see arrow ...

Страница 81: ...Ê If applicable install SFP transceiver modules into the new expansion card see section Installing SFP transceiver modules on page 241 Ê If applicable connect internal cables to the expansion card I For the cable plan see chapter Appendix B on page 573 Ê If applicable connect an FBU cable to the expansion card see section Installing an FBU on the air duct on page 313 ...

Страница 82: ...Manual RX2540 M4 Basic hardware procedures 4 8 3 Riser modules for GPGPU cards FL 4 8 3 1 Removing the riser module 1 FL Figure 26 Removing the riser module 1 Ê Remove five screws see circles Ê Carefully take out the riser module ...

Страница 83: ...2540 M4 Upgrade and Maintenance Manual 83 Basic hardware procedures 4 8 3 2 Installing the riser module 1 FL Figure 27 Positions of the recesses Ê Take note of the two recesses in the crossbar see circles ...

Страница 84: ...sure that the riser module engages properly in the recesses see picture before Ensure that the bracket of the riser card holder is positioned outside the chassis see close up Ê Carefully push down the riser module until the contacts of the riser card are fully seated in the PCIe socket Ê Fasten the riser module with five screws see circles ...

Страница 85: ...ade and Maintenance Manual 85 Basic hardware procedures 4 8 3 3 Removing the riser module 2 FL Figure 29 Removing the riser module 2 Ê Remove five screws see circles and close up Ê Carefully take out the riser module ...

Страница 86: ... Upgrade and Maintenance Manual RX2540 M4 Basic hardware procedures 4 8 3 4 Installing the riser module 2 FL Figure 30 Position of the recesses Ê Take note of the two recesses in the crossbar see circles ...

Страница 87: ...le 2 Ê Insert the completely prepared riser module I Ensure that the riser module engages properly in the recesses see figure 30 on page 86 Ê Carefully push down the riser module until the contacts of the riser card are fully seated in the PCIe socket Ê Fasten the riser module with five screws see circles ...

Страница 88: ... ducts 4 9 1 Removing the air duct Figure 32 Removing the air duct V CAUTION Be careful with the FBU cable If there is an FBU installed follow the procedure that is described in section Removing the FBU with the holder on page 320 first Ê Remove the air duct vertically upwards see arrow ...

Страница 89: ... the air duct Figure 33 Air duct guiding points Figure 34 Installing the air duct Ê Insert the air duct I Regard that the air duct engages in the guiding points I If there is an FBU installed follow the procedure that is described in section Installing the FBU with the holder on page 315 ...

Страница 90: ...90 Upgrade and Maintenance Manual RX2540 M4 Basic hardware procedures ...

Страница 91: ...e Encryption documentation page at http technet microsoft com library cc731549 aspx Suspending BitLocker Drive Encryption is a temporary method for removing BitLocker protection without decrypting the drive Windows is installed on Suspend BitLocker before modifying the server s hardware configuration or startup files Resume BitLocker again after the maintenance procedure is complete V CAUTION With...

Страница 92: ...roup Policy settings For more information on how to suspend BitLocker drive encryption see the Microsoft TechNet library at http technet microsoft com library cc731549 aspx For more information see the Fujitsu web pages 5 1 2 Disabling the boot watchdog The boot watchdog determines whether the operating system boots within a preset time frame If the watchdog timer expires the system will automatic...

Страница 93: ...tup Utility reference manual Disabling the boot watchdog using the iRMC web interface Ê Log in to the ServerView iRMC web interface Ê Select the Settings menu Ê Open the Server Management page Ê In the Boot Watchdog group check the Enable Boot Watchdog option The Enable Boot Watchdog option must be selected Ê Select Continue from the Watchdog Action list Ê Click Apply for the changes to take effec...

Страница 94: ...tsu service partners from the following https address https partners ts fujitsu com com service ps Servers PRIMERGY Pages TapeFacts aspx For Japan Please contact Fujitsu support if forcible tape ejection is necessary I Fujitsu does not assume responsibility for any damage to the tape drive the data cartridge tape or for the loss of any data resulting from manual tape extraction procedures 5 1 4 Ve...

Страница 95: ...MC user guides Using the ID button on the front panel Ê Press the ID button on the front panel to switch on the system identification LEDs I For more information see section Indicators on the front panel on page 554 Using the ID icon in the iRMC web interface Ê Log in to the iRMC S5 web interface The icon that represents the ID indicator LED resides on the right of the menu bar Its color symbolize...

Страница 96: ...I Note on the boot watchdog Before updating or recovering the BIOS and iRMC ensure that the boot watchdog is disabled see section Disabling the boot watchdog on page 92 After updating or recovering the BIOS and iRMC enable the boot watchdog again see section Enabling the boot watchdog on page 107 I Fujitsu does not assume responsibility for any damage done to the server or for the loss of any data...

Страница 97: ...wing options from the update tool menu to start the iRMC update process Normal Choose this option to update an existing system board Initial Choose this option if the system board has been replaced prior to the iRMC update procedure This option will perform all relevant flash procedures in a row including the iRMC firmware and bootloader V CAUTION Do not interrupt the iRMC upgrade process after it...

Страница 98: ...D indicator are flashing to indicate that the server is entering the iRMC recovery state Ê Press the Power On Off button The system will start the POST process Ê During POST press F12 and select the connected USB stick as boot device The system will detect the USB stick Ê Choose the Recovery_L option from the update tool menu to start the iRMC update process V CAUTION Do not interrupt the iRMC upg...

Страница 99: ...w Operations Manager see also section Viewing and clearing the System Event Log SEL on page 110 After replacing the system board Ê Check the SEL log files as described in section Viewing and clearing the System Event Log SEL on page 110 to verify whether the backup data on the Chassis ID EPROM has been restored to the system board Chassis IDPROM Motherboard Exchange detected Chassis IDPROM BMC FW ...

Страница 100: ...oot watchdog again see section Enabling the boot watchdog on page 107 I Fujitsu does not assume responsibility for any damage done to the server or for the loss of any data resulting from firmware updates Using the ServerView Update Manager For more information on how to update the expansion card firmware using the ServerView Update Manager or Update Manager Express UME see the following manuals S...

Страница 101: ...boot and can be entered and configured Option ROM can be enabled permanently e g in case of a boot controller that may require frequent setup or temporarily for one time configuration When permanently enabling a controllers s Option ROM keep in mind that only two Option ROMs can be activated in the BIOS at a time Ê Enter the BIOS Ê From the Advanced menu select Option ROM Configuration Ê Identify ...

Страница 102: ...ation on suitable backup software solutions and related documentation is available from the Fujitsu web pages Re enabling backup drives If a backup drive has been disabled or deleted from the backup software drive list as described in section Verifying and configuring the backup software solution on page 94 it has to be re enabled to complete the maintenance task Ê Re enable backup drives and revi...

Страница 103: ...boot attempt the boot retry counter will automatically be reset to its default value Please take into account that the specified number of boot attempts can only be determined after this period of time If the customer knows about the original boot retry values proceed as follows to reset or configure the boot retry counter Resetting the boot retry counter in the BIOS Ê Enter the BIOS Ê Select the ...

Страница 104: ...ter the current number of remaining boot attempts is displayed Overwrite this value with the maximum number of boot attempts specified above in order to reset the boot retry counter Ê Click Apply for the changes to take effect I For more information on iRMC settings see the iRMC user guides 5 2 7 Resetting the error status after replacing memory modules or CPUs 5 2 7 1 Memory modules ServerView Op...

Страница 105: ...lear utility which is part of the ServerView agents for Linux I meclear Memory Module Error Counter Reset Utility allows to reset the error count collected for a memory module for example after it has been replaced For more Information see the meclear manual pages Ê Log in as root Ê Enter the command below followed by ENTER usr sbin meclear Ê Select the number of a memory module with a status othe...

Страница 106: ...ot Ê Enter the command below followed by ENTER For rack and floorstand servers RX and TX server series usr sbin eecdcp c oc 0609 oi CPU For blade and scale out servers BX and CX server series usr sbin eecdcp c oc 0609 oi CPU cab cabinet nr To identify the cabinet number enter the following command usr sbin eecdcp c oc E204 I CPU parameters are 0 for CPU 1 and 1 for CPU 2 Ê If the error status cann...

Страница 107: ... iRMC web interface Enabling the boot watchdog in the BIOS Ê Enter the BIOS Ê Select the Server Mgmt menu Ê Under Boot Watchdog set the Action setting to Reset Ê Save your changes and exit the BIOS I For more information on how to access the BIOS and modify settings see the corresponding BIOS Setup Utility reference manual Enabling the boot watchdog using the iRMC web interface Ê Log in to the Ser...

Страница 108: ...nents to Enable Ê Save your changes and exit the BIOS I For more information on how to access the BIOS and modify settings see the corresponding BIOS Setup Utility reference manual 5 2 10 Verifying the memory mode If a memory module fails the server will reboot and the defective module will be disabled As a result the current operation mode e g Mirrored Channel mode may no longer be available due ...

Страница 109: ...as been configured as UTC Universal Time Coordinated in the operating system the BMC local time may not be mapped correctly Ê After replacing the system board ask the system administrator whether the RTC or UTC time standard is to be used as system time I If the system time RTC is set to UTC the SEL System Event Log time stamps may differ from the local time Ê Enter the BIOS Ê Select the Main menu...

Страница 110: ...itor view gives you an overview of the monitored components as well as the associated events contained in the system event log on the managed server Under Monitored Components the monitored components are listed If a component has the status Warning or Error you can select it in the list and click Acknowledge This confirms the event on the server side You may have to log on to the server beforehan...

Страница 111: ...columns I For more information on iRMC settings see the iRMC user guides 5 2 12 2 Clearing the SEL You can clear the System Event Log SEL using the ServerView iRMC web interface Ê Log in to the ServerView iRMC web interface Ê Open the Logs menu Ê Click System Event Log to open the System Event Log page All events concerning the system are displayed ina table in the Event Log Content group Ê Click ...

Страница 112: ...Mware OS or the definition file on the client system Use the following information as reference Ask the system administrator to change the definition file Ê After replacing a network controller or the system board switch on and boot the server as described in section Switching on the server on page 70 The hardware configuration tool for Red Hat Linux will launch at boot and detect the new and or c...

Страница 113: ...he BitLocker Drive Encryption control panel item Ê Click Start Control Panel System and Security BitLocker Drive Encryption to open the BitLocker Drive Encryption Ê Select the system volume and click Resume Protection I For more information on how to resume BitLocker drive encryption see the Microsoft TechNet library at http technet microsoft com library cc731549 aspx For more information see the ...

Страница 114: ...rray rebuild V CAUTION The system is now operational however data redundancy will not be available until the RAID array rebuild is complete Depending on the HDD capacity the overall process can take up to several hours in some cases even days I You may notice a slight performance impact during rebuild ...

Страница 115: ...ler SAS Serial Attached SCSI address 5 2 16 1 Looking for the MAC address of a LAN controller There are several possible locations where these addresses can be found Ê Inform the customer about the new or changed MAC address Checking the label Ê If available check the label on the controller Beside the part number you may find the MAC address Using an UEFI BIOS Ê Enter the BIOS setup menu Ê Select...

Страница 116: ...driver package Using the vendor tools in a Legacy BIOS Ê Enter the BIOS setup menu Ê Select the Advanced menu Ê Under CSM Configuration set the Boot option filter to Legacy only Ê Save your changes and exit the BIOS Ê Reboot your system Your system will now start with Legacy Boot When starting your system with Legacy Boot the different vendor tools will be displayed on the screen Ê Press the requi...

Страница 117: ...found Ê Inform the customer about the new or changed GUID address Checking the label Ê If available check the label on the controller Beside the part number you may find the GUID address Using the vendor tools in a Legacy BIOS To get the GUID address use the vendor tools see Using the vendor tools in a Legacy BIOS on page 116 5 2 16 4 Looking for SAS addresses of SAS controllers for external devic...

Страница 118: ...llation Manager system data needs to be complete and correct After replacing the Chassis ID EPROM system information has to be entered using the Chassis ID Prom tool The tool and further instructions are available to maintenance personnel from the Fujitsu web pages https partners ts fujitsu com com service ps Servers PRIMERGY Ê Select your PRIMERGY system from the main area of the page Ê From the ...

Страница 119: ... their components Choose a LAN team to display further details LAN Team Properties Properties of the selected LAN team LAN Team Statistics Available statistics about the selected LAN team I For more information see the ServerView Operations Manager Server Management user guide 5 2 18 1 After replacing upgrading LAN controllers Ê You need to restore the configuration for the LAN Teaming using the L...

Страница 120: ... section Locating the defective server on page 53 or the ServerView Suite Local Service Concept LSC and iRMC S5 Web Interface user guides Using the ID button on the front panel Ê Press the ID button on the front panel to switch off the ID indicators Using the ID icon in the RMC web interface Ê Log in to the iRMC S5 web interface The icon that represents the ID indicator LED resides on the right of...

Страница 121: ...pen the Cooling page Ê Expand the Cooling Devices group Ê Click Start Fan Test I For more information on iRMC settings see the iRMC user guides Executing the fan test via ServerView Operations Manager Ê Open the ServerView Operations Manager and log in Ê Under Administration select Server Configuration Ê In the hierarchy tree of the Server list tab select the server to be configured Ê In the right...

Страница 122: ...cedures Ê After the fan test is complete restore the time setting to its initial value and click Save Page In case of maintenance done by Fujitsu engineers in Japan Executing the fan test via Chassis ID Prom Tool I Please follow the instructions provided separately ...

Страница 123: ... PSU may remain extremely hot after shutdown After shutting down the server wait for hot components to cool down before removing the PSU When installing a PSU ensure that the connector of the PSU is not damaged or bent The PSU is heavy so handle it carefully If you drop it by mistake injuries may result For more information see chapter Important information on page 41 ...

Страница 124: ...te the server if its rated voltage range corresponds to the local mains voltage DC PSU The server can be equipped with up to two DC PSUs In its basic configuration the server has one PSU that adjusts automatically to any mains voltage in the range of 40 5 V 57 V DC PSU 48 V 800 W or 200 V 380 V HVDC PSU 380 V 1300 W Besides the PSU a second PSU can be installed optionally to serve as a redundant p...

Страница 125: ...urations Figure 36 Example types of PSUs I All different PSUs can be installed removed or replaced in the same way Power class Number in figure Power PSU 1 1 450 W AC PSU Platinum 2 2 800 W AC PSU 3 800 W AC PSU Titanium 4 800 W DC PSU 48 V 3 5 1200 W AC PSU 4 6 1300 W HVDC PSU 380 V ...

Страница 126: ...um and Titanium PSUs within same class e g class 2 within a system is not supported Mixing of Platinum PSUs within same class and different manufacturer e g class 1 within a system is supported Always install a dummy cover into an unused PSU bay to comply with applicable EMC regulations and satisfy cooling requirements For a redundant power supply configuration you need always two PSUs with the sa...

Страница 127: ...gure 37 PSU bays 6 2 1 Installing a hot plug PSU I The procedure of installing an AC PSU or a DC PSU differs only in connecting the power cord 6 2 1 1 Preliminary steps No steps needed Customer Replaceable Unit CRU Hardware 5 minutes Tools Phillips PH1 No 1 screw driver for DC PSU 48 V PSU 1 PSU 2 ...

Страница 128: ...PSU dummy cover 2 V CAUTION Keep the dummy cover for future use If a PSU is removed and not immediately replaced by a new one a dummy cover must be installed in the bay again to comply with applicable EMC regulations and satisfy cooling requirements 6 2 1 3 Installing a hot plug PSU Figure 39 Folding up the handle Ê Push the handle of the PSU halfway upward in the direction of the arrow ...

Страница 129: ...ace Ê Fold down the handle on the PSU 2 I Ensure that the PSU engages correctly in the bay and is locked in position This is the only way to prevent the PSU from sliding out of its bay and being damaged during transportation Figure 41 Installing the cable clamp Ê Push the cable clamp into the corresponding hole until it clicks in Ê If applicable configure the redundant power supply ...

Страница 130: ...er cord Note for servers using CMA Cable Management Arm Regarding of removing PSUs additional tasks are needed due to an interference between CMA stopper and the PSUs Figure 42 Unlocking the CMA stopper Ê Push the lock spring inward to unlock the CMA stopper V CAUTION In case of not enough space at the under side unlock the CMA stopper of the server below and pull out the CMA to the rear side Cust...

Страница 131: ...e CMA stopper the crossbar and the CMA including cables in the one hand Figure 44 Removing the PSU Ê Remove the PSU and install the dummy cover carefully I Note for PSU1 Remove the PSU1 carefully while lifting PSU1 and bringing PSU1 to the right in order to avoid interference Ê Mount the complete assembly CMA stopper the crossbar and the CMA again into the rail ...

Страница 132: ...connecting the power cord on page 56 6 2 2 2 Removing a hot plug PSU Figure 45 Removing the PSU Ê Push the handle of the PSU halfway upward in the direction of the arrow 1 Ê Press in on the green locking latch 2 Ê While keeping the green locking latch pressed pull the PSU out of its bay 3 V CAUTION Never leave the bay for the hot plug PSU empty for more than two minutes during operation Otherwise ...

Страница 133: ...U dummy cover into its bay until it locks in place V CAUTION Always install dummy covers into unused bays to comply with applicable EMC regulations and satisfy cooling requirements 6 2 2 4 Concluding steps Ê No steps needed 6 2 3 Replacing a hot plug PSU I The procedure of replacing an AC PSU or a DC PSU differs only in disconnecting connecting the power cord Customer Replaceable Unit CRU Hardware...

Страница 134: ...mounted crossbar see figure 43 Ê Hold the CMA stopper the crossbar and the CMA including cables in the one hand Ê Remove the PSU see figure 44 and install the new PSU carefully I Note for PSU1 Remove the PSU1 carefully while lifting PSU1 and bringing PSU1 to the right in order to avoid interference Ê Mount the complete assembly CMA stopper the crossbar and the CMA again into the rail 6 2 3 1 Preli...

Страница 135: ... 3 3 Installing the new hot plug PSU Ê Install the PSU see section Installing a hot plug PSU on page 128 6 2 3 4 Concluding steps Ê Connect the power cord to the new PSU and secure it with a cable tie see section Connecting the power cord on page 67 Ê Only when replacing a PSU in a non redundant configuration Switching on the server on page 70 Ê Performing a fan test on page 121 ...

Страница 136: ...136 Upgrade and Maintenance Manual RX2540 M4 Power supply unit PSU ...

Страница 137: ...u can configure the write cache settings for the HDDs If a power failure should occur while the write cache is enabled cached data may be lost When disposing of transferring or returning an HDD or SSD wipe out the data on the drive for your own security Rough handling of HDDs may damage the stored data To cope with any unexpected problems always back up important data When backing up data to anoth...

Страница 138: ...ch HDD SSD subsystem Up to eight 16 or 24 2 5 inch SAS SATA HDD SSD modules can be installed The HDD SSD modules are connected to the HDD backplane wirelessly This allows HDD SSD modules to be plugged in or pulled out easily If the server has a corresponding RAID configuration defective HDD SSD modules can also be replaced during operation Hybrid configurations of SAS and SATA SSD BC SAS and BC SA...

Страница 139: ...2 5 inch HDD SSD and 2 5 inch installation frame Installing a 2 5 inch HDD SSD in a 2 5 inch installation frame Figure 47 Installing the 2 5 inch HDD SSD in the 2 5 inch installation frame A Ê Lay the 2 5 inch HDD SSD into the 2 5 inch HDD installation frame as shown Customer Replaceable Unit CRU Hardware 5 minutes Tools Phillips PH1 No 1 screw driver ...

Страница 140: ...ives HDD and solid state drives SSD Figure 48 Installing the 2 5 inch HDD SSD in the 2 5 inch installation frame B Ê Fasten the 2 5 inch HDD SSD with four screws Removing a 2 5 inch HDD SSD from a 2 5 inch installation frame Ê Please proceed in reversed order ...

Страница 141: ...5 inch HDD SSD you can install a 2 5 inch HDD SSD in the 3 5 inch installation frame Installing a 2 5 inch HDD SSD in a 3 5 inch installation frame Figure 49 2 5 inch HDD SSD and 3 5 inch installation frame Ê Lay the 2 5 inch HDD SSD into the 3 5 inch HDD installation frame as shown Customer Replaceable Unit CRU Hardware 5 minutes Tools Phillips PH1 No 1 screw driver ...

Страница 142: ...re 50 Installing the 2 5 inch HDD SSD in the 3 5 inch installation frame A Figure 51 Installing the 2 5 inch HDD SSD in the 3 5 inch installation frame B Ê Fasten the 2 5 inch HDD SSD with four screws Removing a 2 5 inch HDD SSD from a 3 5 inch installation frame Ê Please proceed in reversed order ...

Страница 143: ... 5 inch installation frame Installing a 3 5 inch HDD in a 3 5 inch installation frame Figure 52 Installing the 3 5 inch HDD in the 3 5 inch installation frame A Ê Lay the 3 5 inch HDD into the 3 5 inch HDD installation frame as shown Customer Replaceable Unit CRU Hardware 5 minutes Tools Phillips PH1 No 1 screw driver ...

Страница 144: ...isk drives HDD and solid state drives SSD Figure 53 Installing the 3 5 inch HDD in the 3 5 inch installation frame B Ê Fasten the 3 5 inch HDD with four screws Removing a 3 5 inch HDD from a 3 5 inch installation frame Ê Please proceed in reversed order ...

Страница 145: ... modules or 2 5 inch HDD SSD modules see section 2 5 inch HDD SSD and 3 5 inch installation frame on page 141 7 3 2 Configuration with up to four HDD modules Figure 54 Configuration with up to four 3 5 inch HDDs Position Logical drive number ServerView RAID Manager display name Enclosure number Port number one SAS controller 0 0 Vendor Product 0 1 1 Vendor Product 1 2 2 Vendor Product 2 3 3 Vendor...

Страница 146: ...r ServerView RAID Manager display name Enclosure number Port number one SAS controller two SAS controllers 0 0 Vendor Product 0 Vendor Product 0 0 1 1 Vendor Product 1 Vendor Product 0 1 2 2 Vendor Product 2 Vendor Product 0 2 3 3 Vendor Product 3 Vendor Product 0 3 4 4 Vendor Product 4 Vendor Product 1 0 5 5 Vendor Product 5 Vendor Product 1 1 6 6 Vendor Product 6 Vendor Product 1 2 7 7 Vendor Pr...

Страница 147: ...inch HDDs Position Logical drive number ServerView RAID Manager display name Enclosure number Port number one SAS controller 0 0 Vendor Product 0 1 1 Vendor Product 1 2 2 Vendor Product 2 3 3 Vendor Product 3 4 4 Vendor Product 4 5 5 Vendor Product 5 6 6 Vendor Product 6 7 7 Vendor Product 7 8 8 Vendor Product 8 9 9 Vendor Product 9 10 10 Vendor Product 10 11 11 Vendor Product 11 ...

Страница 148: ...Removing a 3 5 inch dummy module I In configuration with only one 4x 3 5 inch HDD backplane dummy locks are installed to make it impossible to equip the bays with no HDD backplane behind Figure 57 Removing the dummy lock Ê Only valid after upgrading the server with the second HDD backplane pull the dummy lock out of the dummy cover Please be aware that the dummy lock can be damaged Customer Replac...

Страница 149: ...l the dummy module out of its bay 2 V CAUTION Save the dummy module for future use Always replace dummy modules into unused HDD bays to comply with applicable EMC regulations and satisfy cooling requirements 7 3 5 3 Installing a 3 5 inch HDD module Figure 59 Opening the 3 5 inch HDD module locking lever Ê Pinch the green locking clip 1 and open the locking lever 2 ...

Страница 150: ...e bay and carefully push back as far as it will go 1 Ê Close the locking lever to lock the HDD module in place 2 Ê When using a RAID array add the additional HDD to the RAID array I Configuring the RAID array refer to the documentation of the RAID controller used in your configuration see section Documentation overview on page 37 7 3 5 4 Concluding steps Ê No steps needed ...

Страница 151: ... RAID array Be sure to back up your data before deleting a RAID array For more information see the ServerView Suite RAID Management user guide Customer Replaceable Unit CRU Hardware 5 minutes Tools tool less RAID level Procedure RAID 0 V CAUTION RAID 0 provides no data redundancy In case of an HDD module is defect all data are lost RAID 1 RAID 5 Removing an HDD module from a RAID 1 or RAID 5 array...

Страница 152: ...e has been removed and for the HDD to come to a stop Ê Pull the HDD module completely out of its bay 7 3 6 3 Installing a 3 5 inch dummy module V CAUTION If the removed HDD module is not replaced immediately always replace a dummy module into the unused HDD bay to comply with applicable EMC regulations and satisfy cooling requirements Figure 61 Installing a 3 5 inch dummy module Ê Push the dummy m...

Страница 153: ...nd 50 are supported for internal HDD configurations Modular RAID 5 6 controller with MegaRAID functionality MegaRAID RAID levels 0 1 10 5 50 6 and 60 are supported for internal HDD configurations As an option a flash backup unit FBU can save the memory content even if the power fails Cache memory size of up to 8 GB is available RAID configuration without a RAID controller Please follow the instruc...

Страница 154: ...Ê If applicable install the HDD in the installation frame see section Handling HDDs or SSDs without installation frame on page 139 Ê Install the HDD module see section Installing 3 5 inch HDD modules on page 148 7 3 7 4 Concluding steps Ê If the HDD SSD is configured using a RAID controller with a RAID level higher than 0 the rebuild will start automatically see section Performing a RAID array reb...

Страница 155: ... into their original bays Ê Release all dummy modules and pull them out a few centimeters see section Removing a 3 5 inch dummy module on page 148 Ê Removing the fan holder on page 233 7 3 8 2 Disconnecting the first 3 5 inch HDD backplane Figure 62 Disconnecting cables from the first 3 5 inch HDD backplane Ê Disconnect the following cables from the HDD backplane Ê Remove the three screws see circ...

Страница 156: ...lid state drives SSD 7 3 8 3 Removing the 3 5 inch HDD backplane Figure 63 Removing the 3 5 inch HDD backplane A Ê Tilt out the HDD backplane I Take care that the OOB connector will not be damaged Figure 64 Removing the 3 5 inch HDD backplane B Ê Take out the HDD backplane ...

Страница 157: ... 65 Jumper on a 3 5 inch HDD backplane I If there is a jumper installed on the HDD backplane remove the 2 pins connector X13 Figure 66 Installing the 3 5 inch HDD backplane Ê At a slight angle insert the HDD backplane between the punching and the centering pin I Take care that the OOB connector will not be damaged 1 Ê Fold back the HDD backplane ...

Страница 158: ... backplane is seated in the centering pins 1 and the recesses 2 7 3 8 5 Connecting the 3 5 inch HDD backplane Figure 68 Connecting cables to the 3 5 inch HDD backplane Ê Fasten the HDD backplane with the three screws see circles Ê Connect the following cables to the HDD backplane 1 SAS cable 2 Power cable 3 If applicable OOB cable 4 If applicable ODD power cable ...

Страница 159: ...d state drives SSD 7 3 8 6 Connecting the SAS cable one 3 5 inch HDD backplane Cabling with onboard SATA Figure 69 Connecting the first 3 5 inch HDD backplane to the system board Ê Connect the cable of the first HDD backplane to the system board connector SATA 0 3 1 SATA 0 3 ...

Страница 160: ...AID controller 1 I For the cable plan see chapter Appendix B on page 573 7 3 8 7 Concluding steps Ê Installing the fan holder on page 234 Ê Insert all HDD modules see section Installing a 3 5 inch HDD module on page 149 I Ensure that you install the HDD module in the bay it was located before the HDD backplane replacement Ê Reassembling on page 63 Ê Installing 3 5 inch HDD modules on page 148 Ê Co...

Страница 161: ...hutting down the server on page 55 Ê Disconnecting the power cord on page 56 Ê Getting access to the component on page 58 Ê Removing the fan holder on page 233 Ê Remove all HDD modules see section Removing 3 5 inch HDD modules on page 151 7 3 9 2 Installing the second 3 5 inch HDD backplane Ê Install the second HDD backplane in the same way see section Installing the 3 5 inch HDD backplane on page...

Страница 162: ...state drives SSD 7 3 9 3 Connecting the SAS cables two 3 5 inch HDD backplanes Cabling with onboard SATA Figure 71 Connecting the second 3 5 inch HDD backplane to the system board Ê Connect the cable of the second HDD backplane to the system board connector SATA 4 7 1 SATA 4 7 ...

Страница 163: ...AID controller 1 I For the cable plan see chapter Appendix B on page 573 7 3 9 4 Concluding steps Ê Installing the fan holder on page 234 Ê Install all removed HDD modules see section Installing 3 5 inch HDD modules on page 148 I For detailed information on HDD mounting order see section 3 5 inch HDD configurations on page 145 Ê Reassembling on page 63 Ê Connecting the power cord on page 67 Ê Swit...

Страница 164: ...dules and pull them out a few centimeters see section Removing 3 5 inch HDD modules on page 151 I The HDD modules need not to be removed But if you want to remove them nevertheless check if all HDD SSD modules are uniquely identified so that you can reinsert them into their original bays Ê Release all dummy modules and pull them out a few centimeters see section Removing a 3 5 inch dummy module on...

Страница 165: ...moving the SAS expander board Figure 73 Disconnecting SAS cables Ê Disconnect the two SAS cables from the SAS expander board 1 2 Ê If applicable disconnect the OOB cable from the backplane 3 Figure 74 Removing the SAS expander board holder A Ê Remove the screw from the SAS expander board holder see circle ...

Страница 166: ... the connector card from the three connectors of the HDD backplane see circles and remove it I Lift up the SAS expander board holder and take care of the stand off in the chassis 7 3 10 3 Removing the defective 12x 3 5 inch HDD backplane Figure 76 Disconnecting power cables from the HDD backplane Ê Disconnect the two power cables from the HDD backplane 1 2 ...

Страница 167: ... I For the first time remove also three screws on the lower edge of the HDD backplane These screws are only used as a transportation lock Ê Take out the HDD backplane at a slight angle 45 7 3 10 4 Installing the new 12x 3 5 inch HDD backplane Figure 78 Installing the 12x 3 5 inch HDD backplane A Ê Position the HDD backplane behind the four stampings into the chassis see circles ...

Страница 168: ...he 12x 3 5 inch HDD backplane B Ê Fasten the HDD backplane with 4 screws see circles Figure 80 Connecting power cables to the HDD backplane Ê Connect the two power cables to the HDD backplane 1 from connector PWR1 on the system board to the connector X41 2 from connector PWR2 on the system board to the connector X40 ...

Страница 169: ...1 Installing the assembled SAS expander board holder A Ê Insert the connector card into the three connectors of the HDD backplane see circles I Lift up the SAS expander board holder and take care of the stand off in the chassis Figure 82 Installing the SAS expander board holder B Ê Fasten the SAS expander board holder with one screw see circle ...

Страница 170: ...Concluding steps Ê Installing the fan holder on page 234 Ê Reassembling on page 63 Ê Insert all HDD SSD modules see section Installing 3 5 inch HDD modules on page 148 I Ensure that you install the HDD SSD module in the bay it was located before the HDD backplane replacement Ê Connecting the power cord on page 67 Ê Switching on the server on page 70 Ê Resuming BitLocker functionality on page 112 1...

Страница 171: ...ng the power cord on page 56 Ê Getting access to the component on page 58 Ê Removing the fan holder on page 233 7 3 11 2 Removing the SAS expander board holder Ê Remove the SAS expander board holder see section Removing the SAS expander board on page 165 7 3 11 3 Removing the defective SAS expander board Figure 84 Removing the mounted SAS expander board A Ê Remove the two screws see circles Field ...

Страница 172: ...4 Hard disk drives HDD and solid state drives SSD Figure 85 Removing the mounted SAS expander board B Ê Remove the mounted SAS expander board Figure 86 Disconnecting the connector card Ê Disconnect the connector card from the SAS expander board ...

Страница 173: ...4 Installing the new SAS expander board Figure 87 Connecting the connector card Ê Connect the connector card with the SAS expander board Figure 88 Installing the mounted SAS expander board Ê Position the mounted SAS expander board in the two recesses see circles of the SAS expander board holder 1 햲 햳 ...

Страница 174: ... the SAS expander board holder Ê Fasten the mounted SAS expander board with two screws on the SAS expander board holder see circles 7 3 11 5 Installing the SAS expander board Ê Install the SAS expander board see section Installing the SAS expander board on page 169 7 3 11 6 Concluding steps Ê Installing the fan holder on page 234 Ê Reassembling on page 63 Ê Connecting the power cord on page 67 Ê S...

Страница 175: ...ity on page 91 Ê Shutting down the server on page 55 Ê Disconnecting the power cord on page 56 Ê Getting access to the component on page 58 Ê Removing the fan holder on page 233 7 3 12 2 Removing the SAS expander board Ê Remove the assembled SAS expander board holder see section Removing the SAS expander board on page 165 Field Replaceable Unit FRU Hardware 10 minutes Tools Phillips PZ2 No 2 screw...

Страница 176: ... Ê Remove the two screws see circles Ê Disconnect the connector card from the SAS expander board 7 3 12 4 Installing the new connector card Figure 91 Installing the connector card Ê Match the two screw holes of the connector card with the holes in the SAS expander board holder Ê Fasten the mounted SAS expander board with two screws on the SAS expander board holder see circles ...

Страница 177: ...ng BitLocker functionality on page 112 7 4 2 5 inch HDD SSD configurations 7 4 1 Configuration with up to eight HDD SSD modules Figure 92 Configuration with up to eight 2 5 inch HDDs SSDs Position Logical drive number ServerView RAID Manager display name Enclosure number Port number one SAS controller 0 0 Vendor Product 0 1 1 Vendor Product 1 2 2 Vendor Product 2 3 3 Vendor Product 3 4 4 Vendor Pr...

Страница 178: ... Vendor Product 0 1 2 2 Vendor Product 2 Vendor Product 0 2 3 3 Vendor Product 3 Vendor Product 0 3 4 4 Vendor Product 4 Vendor Product 0 4 5 5 Vendor Product 5 Vendor Product 0 5 6 6 Vendor Product 6 Vendor Product 0 6 7 7 Vendor Product 7 Vendor Product 0 7 8 8 Vendor Product 8 Vendor Product 1 0 9 9 Vendor Product 9 Vendor Product 1 1 10 10 Vendor Product 10 Vendor Product 1 2 11 11 Vendor Prod...

Страница 179: ...r and SAS expander board 0 0 Vendor Product 1 0 1 1 Vendor Product 1 1 2 2 Vendor Product 1 2 3 3 Vendor Product 1 3 4 4 Vendor Product 1 4 5 5 Vendor Product 1 5 6 6 Vendor Product 1 6 7 7 Vendor Product 1 7 8 8 Vendor Product 1 8 9 9 Vendor Product 1 9 10 10 Vendor Product 1 10 11 11 Vendor Product 1 11 12 12 Vendor Product 1 12 13 13 Vendor Product 1 13 14 14 Vendor Product 1 14 15 15 Vendor Pr...

Страница 180: ... 95 Configuration with up to 8x 2 5 inch PCIe SSDs front 20 20 Vendor Product 1 20 21 21 Vendor Product 1 21 22 22 Vendor Product 1 22 23 23 Vendor Product 1 23 Position Logical drive number ServerView RAID Manager display name Enclosure number Port number one SAS controller 0 0 Vendor Product 1 0 1 1 Vendor Product 1 1 2 2 Vendor Product 1 2 3 3 Vendor Product 1 3 4 4 Vendor Product 1 4 5 5 Vendo...

Страница 181: ...nfigurations are available 4x 2 5 inch SAS HDD SSDs connected to a SAS3 0 controller 4x PCIe SSD SFFs connected to a Retimer controller Figure 96 4x 2 5 inch SAS HDD SSDs or PCIe SSDs rear Position Logical drive number ServerView RAID Manager display name Enclosure number Port number one SAS controller 0 0 Vendor Product 1 0 1 1 Vendor Product 1 1 2 2 Vendor Product 1 2 3 3 Vendor Product 1 3 ...

Страница 182: ...6 2 Removing a 2 5 inch dummy module I In configuration with only one 8x 2 5 inch HDD backplane dummy locks are installed to make it impossible to equip the bays with no HDD backplane behind Figure 97 Removing the dummy lock Ê Only valid after upgrading the server with the second HDD backplane pull the dummy lock out of the dummy cover Please be aware that the dummy lock can be damaged Customer Re...

Страница 183: ...dummy module out of its bay 2 V CAUTION Save the dummy module for future use Always replace dummy modules into unused HDD SSD bays to comply with applicable EMC regulations and satisfy cooling requirements 7 4 6 3 Installing a 2 5 inch HDD SSD module Figure 99 Opening the 2 5 inch HDD SSD module locking lever Ê Pinch the green locking clips 1 and open the locking lever 2 ...

Страница 184: ...ve bay and carefully push back as far as it will go 1 Ê Close the locking lever to lock the HDD SSD module in place 2 Ê When using a RAID array add the additional HDD SSD to the RAID array I Configuring the RAID array see the documentation of the RAID controller used in your configuration see section Documentation overview on page 37 7 4 6 4 Concluding steps Ê No steps needed ...

Страница 185: ...ting the RAID array Be sure to back up your data before deleting a RAID array For more information see the ServerView Suite RAID Management user guide Customer Replaceable Unit CRU Hardware 5 minutes Tools tool less RAID level Procedure RAID 0 V CAUTION RAID 0 provides no data redundancy In case of an HDD module is defect all data are lost RAID 1 RAID 5 Removing an HDD module from a RAID 1 or RAID...

Страница 186: ...od is necessary for the RAID controller to recognize that an HDD module has been removed and for the HDD to come to a stop Ê Pull the HDD SSD module completely out of its bay 7 4 7 3 Installing a 2 5 inch dummy module V CAUTION If the removed HDD SSD module is not replaced immediately always replace a dummy module into the unused HDD SSD bay to comply with applicable EMC regulations and satisfy co...

Страница 187: ...els 0 1 10 5 and 50 are supported for internal HDD configurations Modular RAID 5 6 controller with MegaRAID functionality MegaRAID RAID levels 0 1 10 5 50 6 and 60 are supported for internal HDD configurations As an option a flash backup unit FBU can save the memory content even if the power fails Cache memory size of up to 8 GB is available RAID configuration without a RAID controller Please foll...

Страница 188: ...from the installation frame see section Handling HDDs or SSDs without installation frame on page 139 7 4 8 3 Installing a 2 5 inch HDD SSD module Ê If applicable install the HDD SSD in the installation frame see section Handling HDDs or SSDs without installation frame on page 139 Ê Install the HDD SSD module see section Installing 2 5 inch HDD SSD modules on page 182 7 4 8 4 Concluding steps Ê If ...

Страница 189: ...pull them out a few centimeters see section Removing 2 5 inch HDD SSD modules on page 185 I The HDD SSD modules need not to be removed But if you want to remove them nevertheless check if all HDD SSD modules are uniquely identified so that you can reinsert them into their original bays Ê Release all dummy modules and pull them out a few centimeters see section Removing a 2 5 inch dummy module on p...

Страница 190: ...k drives HDD and solid state drives SSD Figure 102 Disconnecting cables from the HDD backplane Ê Disconnect the following cables from the HDD backplane 1 SA SATA cable 2 SA SATA cable 3 Power cable 4 If applicable ODD power cable 5 If applicable OOB cable ...

Страница 191: ...ckplane Figure 103 Removing the 8x 2 5 inch SAS HDD SSD backplane Ê Press down the two hooks 1 with a flat screw driver and tilt out the backplane 2 Ê Take out the HDD backplane 7 4 9 4 Installing the HDD backplane Figure 104 Recesses at the top for the 2 5 inch SAS HDD SSD backplane Ê Regard the six recesses at the top ...

Страница 192: ...SSD backplane Ê At a slight angle insert the backplane in the six recesses see figure 104 on page 191 at the top Ê Fold back the backplane on the bottom 1 until it rests in the two hooks 2 7 4 9 5 Connecting the HDD backplane Ê If applicable remove the SAS expander board holder see section Removing the SAS expander board holder on page 201 ...

Страница 193: ...he following cables from the HDD backplane 7 4 9 6 Connecting the SAS cables one 2 5 inch HDD backplane I Different cabling is possible depending on your configuration Some examples are described here I For the cable plan see chapter Appendix B on page 573 1 SA SATA cable 2 SA SATA cable 3 Power cable 4 If applicable ODD power cable 5 If applicable OOB cable ...

Страница 194: ... disk drives HDD and solid state drives SSD Cabling with onboard SATA Figure 107 Connecting cables with onboard controller Ê Connect the two SAS SATA cables to the system board 1 To the connector SATA 0 3 2 To the connector SATA 4 7 SATA 0 3 SATA 4 7 ...

Страница 195: ... RAID controller 1 7 4 9 7 Connecting the SAS cables two 2 5 inch HDD backplanes Cabling without SAS expander board Ê Connect the cables to the HDD backplanes see section Connecting the HDD backplane on page 192 Ê Connect the SAS cables of the first HDD backplane see section Connecting the SAS cables one 2 5 inch HDD backplane on page 193 1 To the connector MLC1 2 To the connector MLC2 MLC 1 MLC 2...

Страница 196: ...he two SAS SATA cables to the RAID controller 2 Cabling with SAS expander board Figure 110 Connecting cables with SAS expander board backplane 1 Ê Connect the two SAS SATA cables to the backplane 1 1 To the connector MLC1 2 To the connector MLC2 1 Cable C31 to backplane connector X10 2 Cable C33 to backplane connector X9 Controller 2 Controller 1 MLC 1 MLC 2 ...

Страница 197: ...nect the power cables to the backplane 1 7 4 9 8 Connecting the SAS cables three 2 5 inch HDD backplanes Cabling with SAS expander board Ê Connect the cables to the HDD backplanes 1 and 2 see section Cabling with SAS expander board on page 196 3 Power cable 4 If applicable ODD power cable 5 If applicable OOB cable 1 Cable C30 to backplane connector X10 2 Cable C30 to backplane connector X9 3 Power...

Страница 198: ... Installing the SAS expander board holder on page 203 Ê If applicable install the SAS expander board holder see section Connecting the SAS expander board on page 204 7 4 9 10 Concluding steps Ê Installing the fan holder on page 234 Ê Reassembling on page 63 Ê Installing 2 5 inch HDD SSD modules on page 182 Ê Connecting the power cord on page 67 Ê Switching on the server on page 70 Ê Resuming BitLo...

Страница 199: ...nsure that all HDDs are uniquely identified so that you can reinsert them into their original bays after replacing the HDD backplane Ê Getting access to the component on page 58 Ê Removing the fan holder on page 233 7 4 10 2 Removing the front panel cage Ê Remove the front panel cage see section Removing the front panel module on page 485 7 4 10 3 Installing the front panel on QRL Ê Install the fr...

Страница 200: ...e cables to the second third backplane see section Cabling with SAS expander board on page 196 or Cabling with SAS expander board on page 197 Ê If applicable install the SAS expander board see section Installing the new SAS expander board on page 202 Ê If applicable install the SAS expander board holder see section Connecting the SAS expander board on page 204 I For the cable plan see chapter Appe...

Страница 201: ...ing down the server on page 55 Ê Disconnecting the power cord on page 56 Ê Getting access to the component on page 58 Ê Removing the fan holder on page 233 7 4 11 2 Removing the SAS expander board holder Ê Disconnect all cables from the SAS expander board Figure 113 Removing the SAS expander board holder Ê Loosen the screw 1 and remove the screw 2 Field Replaceable Unit FRU Hardware 10 minutes Too...

Страница 202: ...AS expander board Figure 114 Removing the SAS expander board Ê Remove one screw see circle Ê Push the SAS expander board in the direction of the arrow Ê Take off the SAS expander board from the SAS expander board holder 7 4 11 4 Installing the new SAS expander board Figure 115 Positioning the SAS expander board Ê Position the SAS expander board on the SAS expander board holder see circles ...

Страница 203: ...board in the direction of the arrow Ê Fasten the SAS expander board with one screw see circle 7 4 11 5 Installing the SAS expander board holder Figure 117 Installing the SAS expander board holder Ê Slide the SAS expander board holder in the chassis until the recess fits under the screw see close up 1 Ê Fasten the SAS expander board holder with the two screws 1 2 ...

Страница 204: ...Ê 7 Connect the power cable to SAS expander board connector X3 1 From backplane 1 connector X9 to SAS expander board connector X10 2 From backplane 1 connector X10 to SAS expander board connector X11 3 From backplane 2 connector X9 to SAS expander board connector X12 4 From backplane 2 connector X10 to SAS expander board connector X13 5 From backplane 3 connector X9 to SAS expander board connector...

Страница 205: ... SATA cables to the SAS expander board 7 4 11 7 Concluding steps Ê Installing the fan holder on page 234 Ê Reassembling on page 63 Ê Connecting the power cord on page 67 Ê Switching on the server on page 70 Ê Resuming BitLocker functionality on page 112 1 From SAS controller connector MLC1 to connector X1 2 From SAS controller connector MLC2 to connector X2 MLC 1 MLC 2 Controller 1 ...

Страница 206: ...1 Ê Shutting down the server on page 55 Ê Disconnecting the power cord on page 56 Ê Remove all HDD SSD modules from the server see section Removing 2 5 inch HDD SSD modules on page 185 V CAUTION Ensure that all HDDs are uniquely identified so that you can reinsert them into their original bays after replacing the HDD backplane Ê Getting access to the component on page 58 Ê Removing the fan holder ...

Страница 207: ...h PCIe SSD backplane Ê Regard the three recesses at the top Figure 121 Installing the 2 5 inch PCIe SSD backplane Ê At a slight angle insert the backplane in the three recesses see figure 120 on page 207 at the top Ê Fold back the backplane on the bottom 1 until it rests in the hook 2 7 4 12 3 Connecting a 4x 2 5 inch PCIe SSD backplane I For the cable plan see chapter Appendix B on page 573 ...

Страница 208: ... cables 2 to the PCIe SSD backplane If applicable the OOB cable 3 from the PCIe SSD backplane to the system board connector OOB Front 7 4 12 4 Installing the controller Ê If applicable install the controller see section Installing an expansion card on page 253 7 4 12 5 Installing additional PCIe SSD modules Ê Remove the dummy locks see section Removing a 2 5 inch dummy module on page 182 Ê Insert ...

Страница 209: ...Rear HDD SSD or PCIe SSD extension box 7 5 1 Replacing the backplane of the extension box 7 5 1 1 Preliminary steps Ê Locating the defective server on page 53 Ê Suspending BitLocker functionality on page 91 Ê Shutting down the server on page 55 Ê Disconnecting the power cord on page 56 Ê Remove all HDD SSD modules from the server see section Removing 2 5 inch HDD SSD modules on page 185 V CAUTION ...

Страница 210: ...moving the fan holder on page 233 7 5 1 2 Types of rear backplanes There are three different types of backplanes available Rear HDD SSD backplane Figure 123 Rear HDD SSD backplane Rear PCIe SSD backplane type 1 Figure 124 Rear PCIe SSD backplane type 1 1 Connector for the SAS cable 2 Connector for the power cable 3 Connector for the OOB cable ...

Страница 211: ...ear backplane Ê Disconnect all cables from the backplane one SAS cable or the color coded Oculink cables the power cable 7 5 1 4 Removing the rear backplane I Removing the backplane is the same for all three types 1 4 Connector for the PCIe cables 5 Connector for the power cable 6 Connector for the OOB cable 1 4 Connectors for the PCIe cables 5 Connector for the power cable 6 Connector for the OOB...

Страница 212: ...X2540 M4 Hard disk drives HDD and solid state drives SSD Figure 126 Example Removing the 4x 2 5 inch rear PCIe SSD backplane type 1 Ê Remove the screw see circle and the fixing clip Ê Take the backplane out of the rear HDD cage see arrow ...

Страница 213: ...Installing the backplane is the same for all three types Figure 127 Example Installing the 4x 2 5 inch rear PCIe SSD backplane type 1 A Ê Position the backplane behind the three hooks see circles Figure 128 Example Installing the 4x 2 5 inch rear PCIe SSD backplane type 1 B Ê Position the clip and fasten it with one screw see circle ...

Страница 214: ...r the PCIe SSD backplane type 1 see figure 124 on page 210 1 4 The color coded Oculink cables for the PCIe SSD backplane type 2 see figure 125 on page 211 1 4 The power cable see figure 123 2 or figure 124 5 or figure 125 5 If applicable the OOB cable see figure 123 3 or figure 124 6 or figure 125 6 Color Connector on PCIe SSD backplane red P0_X1 yellow P1_X2 green P2_X3 black P3_X4 Color Connecto...

Страница 215: ...lane type 1 connected I For the cable plan see chapter Appendix B on page 573 7 5 1 7 Concluding steps Ê Installing the fan holder on page 234 Ê Reassembling on page 63 Ê Installing 2 5 inch HDD SSD modules on page 182 see also figure 96 on page 181 Ê Connecting the power cord on page 67 Ê Switching on the server on page 70 Ê Resuming BitLocker functionality on page 112 ...

Страница 216: ...ing the power cord on page 56 Ê Remove all HDD SSD modules from the rear side see figure 96 on page 181 see section Removing 2 5 inch HDD SSD modules on page 185 V CAUTION Ensure that all HDDs are uniquely identified so that you can reinsert them into their original bays after replacing the HDD backplane Ê Getting access to the component on page 58 Ê Removing the fan holder on page 233 Field Repla...

Страница 217: ...he rear air grid left hand Figure 130 Removing the rear air grid Ê Remove three screws see circles Ê Remove the rear air grid V CAUTION Keep the rear air grid for future use Always replace rear air grids into unused installation locations to comply with applicable EMC regulations and satisfy cooling requirements ...

Страница 218: ...ate drives SSD 7 5 2 3 Installing the rear HDD cage I In this description the PCIe SSD backplane type 1 is already installed Figure 131 Positioning the rear HDD cage Ê Position and align the rear HDD cage into the chassis 1 Ê Push the rear HDD cage in the direction of the arrow 2 ...

Страница 219: ...RX2540 M4 Upgrade and Maintenance Manual 219 Hard disk drives HDD and solid state drives SSD Figure 132 Rear HDD cage 3 screws on the top Ê Fasten the rear HDD cage with 3 screws on the top see circles ...

Страница 220: ...ling the rear backplane on page 213 7 5 2 5 Installing the controller Ê If applicable install the controller see section Installing an expansion card on page 253 7 5 2 6 Connecting cables to the rear extension box I For the cable plan see chapter Appendix B on page 573 I The cabling of the backplane depends on the backplane and the controller installed Connecting the cables to the rear backplane Ê...

Страница 221: ... 134 Connecting cables to the rear PCIe SSD backplane type 1 Ê Connect the power cable to the system board connector PWR4 1 Ê Connect the color coded Oculink cables 2 Ê If applicable connect the OOB cable to the system board connector OOB Color Connector on PCIe SSD backplane Connector Retimer controller red P0 X1 X1 yellow P1 X2 X2 green P2 X3 X3 black P3 X4 X4 ...

Страница 222: ...Ê Connecting the power cord on page 67 Ê Switching on the server on page 70 Ê Resuming BitLocker functionality on page 112 7 5 3 Removing the rear extension box 7 5 3 1 Preliminary steps Ê Locating the defective server on page 53 Ê Suspending BitLocker functionality on page 91 Ê Shutting down the server on page 55 Ê Disconnecting the power cord on page 56 Field Replaceable Unit FRU Hardware 15 min...

Страница 223: ...h HDD SSD modules on page 185 V CAUTION Ensure that all HDDs are uniquely identified so that you can reinsert them into their original bays after replacing the HDD backplane Ê Getting access to the component on page 58 Ê Removing the fan holder on page 233 7 5 3 2 Disconnecting cables from the rear backplane Ê Disconnecting cables from the rear backplane on page 211 ...

Страница 224: ...ade and Maintenance Manual RX2540 M4 Hard disk drives HDD and solid state drives SSD 7 5 3 3 Removing the rear HDD cage Figure 135 Rear HDD cage 3 screws on the top Ê Remove the 3 screws on the top see circles ...

Страница 225: ...RX2540 M4 Upgrade and Maintenance Manual 225 Hard disk drives HDD and solid state drives SSD Figure 136 Rear HDD cage 2 screws on the side Ê Remove the 2 screws on the side see circles ...

Страница 226: ...aintenance Manual RX2540 M4 Hard disk drives HDD and solid state drives SSD Figure 137 Removing the rear HDD cage Ê Push the rear HDD cage in the direction of the arrow 1 Ê Take off the rear HDD cage from the chassis 2 ...

Страница 227: ...re 138 Installing the rear air grid Ê Insert the rear air grid Ê Fasten the rear air grid with three screws see circles and close up 7 5 3 5 Concluding steps Ê Installing the fan holder on page 234 Ê Reassembling on page 63 Ê Connecting the power cord on page 67 Ê Switching on the server on page 70 Ê Resuming BitLocker functionality on page 112 ...

Страница 228: ...228 Upgrade and Maintenance Manual RX2540 M4 Hard disk drives HDD and solid state drives SSD ...

Страница 229: ...amaged by static electricity Always discharge static build up e g by touching a grounded object before handling electrostatic sensitive devices ESDs Do not touch the circuitry on boards or soldered parts Hold circuit boards by their metallic areas or edges If devices are installed or disassembled using methods other than those outlined in this chapter the warranty will be invalidated The procedure...

Страница 230: ...230 Upgrade and Maintenance Manual RX2540 M4 Fans 8 1 1 Numbering of the fan modules Figure 139 Numbering of the fan modules ...

Страница 231: ...server on page 53 Ê Getting access to the component on page 58 Ê Locating the defective component on page 54 8 2 2 Removing the fan module Figure 140 Removing the fan module Ê Take the fan module by the two handles 1 Ê Lift the fan module out of the fan holder 2 Customer Replaceable Unit CRU Hardware 5 minutes Tools tool less ...

Страница 232: ...locks 8 2 4 Concluding steps Ê Reassembling on page 63 I When a system fan module fails the remaining fans will start operating at full speed After the defective fan module has been replaced all fans will continue to run at full speed for a couple of minutes before resetting to a lower speed Ensure that all system fans reset to a normal operating speed Ê Performing a fan test on page 121 ...

Страница 233: ...cting the power cord on page 56 Ê Getting access to the component on page 58 8 3 2 Removing the fan holder Ê Remove the fan module 1 2 and the fan module 5 6 see section Removing the fan module on page 231 Figure 142 Removing the fan holder Ê Lift the fan holder out of the chassis see arrow Upgrade and Repair Unit URU Hardware 5 minutes Tools Phillips PZ2 screw driver hexagon screw driver 5 mm ...

Страница 234: ... holder into the chassis see arrow Ensure that the fan holder properly snaps in place V CAUTION Do not pitch the power and OOB cables Ê Install the fan module 1 2 and the fan module 5 6 see section Installing the fan module on page 232 8 3 4 Concluding steps Ê Reassembling on page 63 Ê Connecting the power cord on page 67 Ê Switching on the server on page 70 ...

Страница 235: ...ing or removing internal options Circuit boards and soldered parts of internal options are exposed and can be damaged by static electricity Always discharge static build up e g by touching a grounded object before handling electrostatic sensitive devices ESDs Do not touch the circuitry on boards or soldered parts Hold circuit boards by their metallic areas or edges If devices are installed or disa...

Страница 236: ...ttp ts fujitsu com products standard_servers index htm For Japan http www fujitsu com jp products computing servers primergy iRMC S5 external connectors TPM LAN 1 Slot 3 CPU1 Riser slot 1 SATA 0 3 Slot 1 CPU1 Slot 9 CPU2 Riser slot 2 COM 1 SATA 4 7 SATA ODD Slot OCP module Micro SD LAN M USB3 0 1 2 LAN 2 M 2 SSD1 M 2 SSD2 HDD LED2 LAN 1 M Slot 8 CPU2 Slot 7 CPU2 Riser slot ext Slot 2 CPU1 RAID Ris...

Страница 237: ...y LP 3 PCIe Gen 3 1 x16 mech x16 HL only LP riser slot 4 PCIe Gen 3 1 x16 mech x16 full length FL full heigth FH with D3390 x8 mech x8 FL FH with D3390 5 PCIe Gen 3 1 x8 mech x8 FL FH only available with riser D3390 6 not available 7 PCIe Gen 3 2 x8 mech x8 HL only LP 8 PCIe Gen 3 2 x16 mech x16 HL only LP 9 PCIe Gen 3 2 x16 mech x16 HL only LP riser slot 10 PCIe Gen 3 2 x16 mech x16 FL full heigh...

Страница 238: ...er FL means cards with full length 312 mm 9 1 1 1 Population rules Only riser modules of the same type can be used Up to two riser modules can be installed If only one riser module is installed it must be installed on the right side Figure 146 Installation locations of the riser modules For details see section Expansion cards in riser modules HL on page 280 and section GPGPU cards in riser modules...

Страница 239: ...ller in slot 1 of riser module 1 Figure 147 Perforated and non perforated slot brackets Installing the slot bracket Ê Place the controller on the mounting tabs on the slot bracket Ê Fasten the slot bracket to the controller with two screws Upgrade and Repair Unit URU Hardware 5 minutes Tools Phillips PH2 No 2 screw driver hexagon screw driver 5 mm 1 Full height bracket non perforated 2 Full height...

Страница 240: ...he slot bracket see arrow Ê Secure the slot bracket to the expansion card with two screws see circles 9 2 2 Removing a slot bracket Removing the slot bracket Ê Remove the two screws Ê Remove the controller from the mounting tabs on the slot bracket Upgrade and Repair Unit URU Hardware 5 minutes Tools Phillips PH2 No 2 screw driver hexagon screw driver 5 mm ...

Страница 241: ...aring the SFP transceiver module Figure 149 Removing the protective optical port plug Ê Remove the SFP transceiver module from its protective packaging Ê Remove the optical port plug from the new additional SFP transceiver module V CAUTION Always keep the protective port plugs attached to the transceiver optical bores and fiber optic cable connectors until you are ready to make a connection Save t...

Страница 242: ...l Ê Carefully unlatch and fold down the locking bail on the SFP transceiver module Figure 151 Inserting the SFP transceiver module Ê Insert and slide the SFP transceiver module into the socket connector as far as it will go I If only one slot is equipped with a SFP transceiver module use the left connector as shown ...

Страница 243: ...kup units Figure 152 Latching the locking bail Ê Carefully fold up and latch the locking bail Figure 153 Installing the protective cap Ê If the SFP transceiver module is not immediately connected to an LC connector attach the protective cap to the SFP transceiver module ...

Страница 244: ...e secondary SFP transceiver module Ê If applicable install the secondary SFP transceiver module accordingly 9 3 2 Removing an SFP transceiver module A network adapter is equipped with one or two SFP small form factor pluggable transceiver modules SFP transceiver modules are hot pluggable Upgrade and Repair Unit URU Hardware 5 minutes Tools tool less ...

Страница 245: ... port plug Ê If present remove the protective optical port plug from the SFP transceiver module V CAUTION Save the protective port plug for future use Figure 156 Unlatching the locking bail Ê Carefully unlatch and fold down the locking bail on the SFP transceiver module to eject the transceiver from the socket connector ...

Страница 246: ...Figure 157 Removing the SFP transceiver module Ê Pull the SFP transceiver module out of its socket connector Ê Attach the protective optical port plug to the transceiver optical bores I Place the removed SFP transceiver module in an antistatic bag or other protective environment ...

Страница 247: ...laced by default values This applies to all static IP address and LAN teaming configurations Figure 159 Position of OCP module at rear side Some OCP modules can be equipped with SFP modules For the installation of the SFP modules see section Handling SFP transceiver modules on page 241 1 OCP module iRMC S5 nal connectors TPM LAN 1 SATA 0 3 COM 1 SATA 4 7 SATA ODD Slot OCP module Micro SD LAN M USB...

Страница 248: ...er module 1 see section Handling riser modules on page 71 9 4 1 2 Removing the dummy cover Figure 160 Removing the dummy cover Ê Grip the handle and pull out the dummy cover V CAUTION Keep the dummy cover for future use If an OCP module is removed and not immediately replaced by a new one a dummy cover must be reinstalled in the bay to comply with applicable EMC regulations and satisfy cooling req...

Страница 249: ...four screws part of OCP kit on the four bolts 2 9 4 1 4 Concluding steps Ê If applicable install the riser module 1 see section Handling riser modules on page 71 Ê Reassembling on page 63 Ê Connecting the power cord on page 67 Ê Switching on the server on page 70 Ê Inform the customer about changed WWN and MAC addresses For more information see section Looking for MAC WWN GUID and SAS addresses on...

Страница 250: ...Ê Getting access to the component on page 58 Ê If applicable remove the riser module 1 see section Handling riser modules on page 71 9 4 2 2 Removing the OCP module Figure 162 Removing the OCP module Ê Remove the four screws 1 I When replacing an OCP module keep the screws for installing the new OCP module Ê Remove the OCP module 2 Upgrade and Repair Unit URU Hardware 5 minutes Tool Phillips PH1 N...

Страница 251: ...ndle 9 4 2 4 Concluding steps Ê If applicable install the riser module 1 see section Handling riser modules on page 71 Ê Reassembling on page 63 Ê Connecting the power cord on page 67 Ê Switching on the server on page 70 9 4 3 Replacing the OCP module I WWN and MAC addresses will not be changed by replacing an OCP module Upgrade and Repair Unit URU Hardware 10 minutes Tool Phillips PH1 No 1 screw ...

Страница 252: ...50 The four bolts remain installed 9 4 3 3 Installing the new OCP module Ê Install the OCP module see section Removing the OCP module on page 250 9 4 3 4 Concluding steps Ê If applicable install the riser module 1 see section Handling riser modules on page 71 Ê Reassembling on page 63 Ê Connecting the power cord on page 67 Ê Switching on the server on page 70 Ê Inform the customer about changed WW...

Страница 253: ... a 2port module to a 4port module or the system board has been replaced inform the customer about the new WWN MAC addresses see section Looking for MAC WWN GUID and SAS addresses on page 115 9 5 Expansion cards in standard slots 9 5 1 Installing an expansion card 9 5 1 1 Preliminary steps Ê Suspending BitLocker functionality on page 91 Ê Shutting down the server on page 55 Ê Disconnecting the powe...

Страница 254: ... openings to comply with applicable EMC regulations and satisfy cooling requirements 9 5 1 3 Installing an expansion card Ê Remove the expansion card from its protective packaging I For further instructions regarding controller settings see the accompanying documentation Ê If applicable install the slot bracket to the expansion card see section Installing a slot bracket on page 239 Ê If applicable...

Страница 255: ...esired PCI slot and press down firmly until it is fully seated in the slot Ê Fasten the expansion card with the screw see circle Ê If applicable install SFP transceiver modules into the new expansion card see section Installing SFP transceiver modules on page 241 Ê If applicable connect an FBU cable to the expansion card see section Installing the new TFM on page 311 ...

Страница 256: ...Maintenance Manual RX2540 M4 Expansion cards and backup units Example PRAID EP5x0i Figure 166 Connecting the cables to the PRAID EP5x0i Ê Connect the cables to the PRAID EP5x0i 1 If applicable FBU cable 2 HDD LED cable ...

Страница 257: ...D EP5x0i in slot 1 or 2 2 see section Installing an expansion card on page 253 Ê Connect the color coded Oculink cables to the corresponding PCIe backplane see section Connecting a 4x 2 5 inch PCIe SSD backplane on page 207 I More configurations can be found in the cable plan see chapter Appendix B on page 573 Example one Retimer controller in slot 3 I To connect the HDD backplane 1 install the Re...

Страница 258: ... the Retimer controller in slot 3 see arrow Ê Connect the VPP cable to the connector VPP CPU1 on the system board see close up 2 Ê Connect the color coded Oculink cables to the corresponding HDD backplane see section Connecting a 4x 2 5 inch PCIe SSD backplane on page 207 Example configuration with one Retimer controller in slot 9 I To connect the rear PCIe SSD backplane install the Retimer contro...

Страница 259: ...nnect the VPP cable to the connector CON5 on the Retimer controller 1 Ê Install the Retimer controller in slot 9 see arrow Ê Connect the VPP cable to the connector VPP CPU2 on the system board 2 Ê Connect the color coded Oculink cables to the corresponding HDD backplane see section Connecting cables to the rear backplane on page 214 ...

Страница 260: ...up units Example configuration with two Retimer controllers in slot 8 and 9 Figure 170 Connecting the cables to the Retimer controllers Ê Connect the VPP cable to the connector CON5 on each Retimer controller 1 Ê Connect the Retimer cables to the Retimer controllers 2 3 ...

Страница 261: ...oller in slot 9 2 Ê Connect the color coded Oculink cables to the corresponding HDD backplane see section Connecting cables to the rear backplane on page 214 Ê Connect the VPP cable to the connector VPP CPU2 on the system board see close up 3 Example configuration with three Retimer controllers Ê Install the first Retimer controller in slot 3 1 see section Example one Retimer controller in slot 3 ...

Страница 262: ...ding steps Ê Reassembling on page 63 Ê If applicable connect all external cables to the expansion card s Ê Connecting the power cord on page 67 Ê Switching on the server on page 70 Ê If applicable Updating expansion card firmware on page 100 Ê If applicable Enabling Option ROM scan on page 101 Ê Resuming BitLocker functionality on page 112 ...

Страница 263: ...wn the server on page 55 Ê Disconnecting the power cord on page 56 Ê If applicable disconnect external cables from the expansion card Ê Getting access to the component on page 58 9 5 2 2 Removing an expansion card Ê If applicable disconnect internal cables from the expansion card Upgrade and Repair Unit URU Hardware 5 minutes Tools Phillips PH2 No 2 screw driver only for removing the slot bracket ...

Страница 264: ...plicable Removing an SFP transceiver module on page 244 Ê Remove the screw see circle Ê Carefully remove the expansion card from its slot see arrow 9 5 2 3 Installing a PCI slot cover V CAUTION Always replace slot covers into unused PCI slot openings to comply with applicable EMC regulations and satisfy cooling requirements ...

Страница 265: ...pening Ê Fasten slot cover with the screw see circle 9 5 2 4 Concluding steps Ê Reassembling on page 63 Ê Connecting the power cord on page 67 Ê Switching on the server on page 70 Ê Resuming BitLocker functionality on page 112 9 5 3 Replacing an expansion card Upgrade and Repair Unit URU Hardware 5 minutes Software 5 minutes Tools Phillips PH2 No 2 screw driver ...

Страница 266: ...ge 91 Ê Shutting down the server on page 55 Ê Disconnecting the power cord on page 56 Ê Remove all external cables from the expansion card to be replaced Ê Getting access to the component on page 58 Ê Locate the defective expansion card using the onboard Local Diagnostic LEDs see section Onboard indicators and controls on page 551 9 5 3 2 Removing an expansion card Ê If applicable Removing an SFP ...

Страница 267: ...Ê Switching on the server on page 70 Ê Enabling replaced components in the BIOS on page 108 Ê Inform the customer about changed WWN MAC and SAS addresses see section Looking for MAC WWN GUID and SAS addresses on page 115 Ê Updating expansion card firmware on page 100 Ê Resuming BitLocker functionality on page 112 Ê If applicable reconfigure your network settings in the operation system according t...

Страница 268: ... holder 9 6 1 Installing the slot cover Figure 175 Installing the slot cover Ê Insert the slot cover V CAUTION Take care that the EMC spring remains in its place Ê Fasten the slot cover with one screw see circle Upgrade and Repair Unit URU Hardware 5 minutes Tools Phillips PH2 No 2 screw driver hexagon screw driver 5 mm ...

Страница 269: ...76 Removing the slot cover Ê Remove the screw see circle Ê Remove the slot cover V CAUTION Take care that the EMC spring remains in its place V CAUTION Keep the slot cover for future use Always replace slot covers into unused PCI slot openings to comply with applicable EMC regulations and satisfy cooling requirements ...

Страница 270: ...ot covers for the riser module 1 9 7 1 1 Installing the slot cover for the riser module 1 Figure 177 Installing the slot cover for the riser module 1 Ê Insert the slot cover see arrow Ê Fasten the slot cover with one screw see circle Upgrade and Repair Unit URU Hardware 5 minutes Tools Phillips PH2 No 2 screw driver hexagon screw driver 5 mm ...

Страница 271: ...he riser module 1 Figure 178 Removing the slot cover for the riser module 1 Ê Remove the screw see circle Ê Remove the slot cover see arrow V CAUTION Keep the slot cover for future use Always replace slot covers into unused PCI slot openings to comply with applicable EMC regulations and satisfy cooling requirements ...

Страница 272: ...ver Ê Insert the slot cover see arrow Ê Fasten the slot cover with one screw see circle 9 7 2 2 Removing the slot cover for the riser module 2 Figure 180 Installing the slot cover Ê Remove the screw see circle Ê Remove the slot cover see arrow V CAUTION Keep the slot cover for future use Always replace slot covers into unused PCI slot openings to comply with applicable EMC regulations and satisfy ...

Страница 273: ...ling the rear air grids for the riser module 1 9 8 1 1 Installing the rear air grid riser module 1 Figure 181 Removing the rear air grid Ê Insert the rear air grid see arrow Ê Fasten the rear air grid with three screws see circles Upgrade and Repair Unit URU Hardware 5 minutes Tools Phillips PH2 No 2 screw driver hexagon screw driver 5 mm ...

Страница 274: ...d riser module 1 Figure 182 Removing the rear air grid Ê Remove three screws see circles Ê Remove the rear air grid see arrow V CAUTION Keep the rear air grid for future use Always replace rear air grids into unused installation locations to comply with applicable EMC regulations and satisfy cooling requirements ...

Страница 275: ...ling the rear air grids for the riser module 2 9 8 2 1 Installing the air grid extension to riser module 2 Figure 183 Example Installing the air grid extension to riser module 2 HL Upgrade and Repair Unit URU Hardware 5 minutes Tools Phillips PH2 No 2 screw driver hexagon screw driver 5 mm ...

Страница 276: ...its Figure 184 Example Installing the air grid extension to riser module 2 GPGPU Ê Position the air grid extension 1 I Ensure that the bracket of the riser card holder is positioned outside the air grid extension see close up Ê Fasten the air grid extension with two screws 2 ...

Страница 277: ...0 M4 Upgrade and Maintenance Manual 277 Expansion cards and backup units 9 8 2 2 Removing the air grid extension from riser module 2 Figure 185 Example Removing the air grid extension from riser module 2 HL ...

Страница 278: ...enance Manual RX2540 M4 Expansion cards and backup units Figure 186 Example Removing the air grid extension from riser module 2 GPGPU Ê Remove the two screws 1 Ê Remove the air grid extension in the direction of the arrow 2 ...

Страница 279: ... air grid riser module 2 Figure 187 Installing the rear air grid Ê Insert the rear air grid see arrow Ê Fasten the rear air grid with three screws see circles and close up 9 8 2 4 Removing the rear air grid riser module 2 Figure 188 Removing the rear air grid Ê Remove three screws see circles and close up ...

Страница 280: ...nsion cards in riser modules HL I HL means cards with half length about 130 mm 9 9 1 Installing an expansion card in riser module 1 9 9 1 1 Preliminary steps Ê Suspending BitLocker functionality on page 91 Ê Shutting down the server on page 55 Ê Disconnecting the power cord on page 56 Ê Getting access to the component on page 58 Ê If applicable Installing the riser card on page 73 Upgrade and Repa...

Страница 281: ... Ê Carefully insert the expansion card into the desired PCI slot and press down firmly until it is fully seated in the slot Ê Fasten the expansion card with the screw see circle 9 9 1 3 Remove the slot cover for the riser module 1 Ê Remove the slot cover for the riser module 1 see section Removing the slot cover for the riser module 1 on page 271 9 9 1 4 Remove the rear air grid riser module 1 Ê R...

Страница 282: ...module 1 9 9 2 1 Preliminary steps Ê If applicable Locating the defective server on page 53 Ê Suspending BitLocker functionality on page 91 Ê Shutting down the server on page 55 Ê Remove all external cables from the expansion card to be removed I If there is a cable installed to an expansion card in the upper slot see section Note for installation with expansion cards in slot 5 and slot 11 on page...

Страница 283: ...the screw see circle Ê Carefully remove the expansion card from its slot 9 9 2 3 Installing the slot cover in the riser card holder Ê Install the slot cover in the riser card holder see section Installing the slot cover on page 268 V CAUTION Always replace slot covers into unused PCI slot openings to comply with applicable EMC regulations and satisfy cooling requirements 9 9 2 4 Concluding steps Ê...

Страница 284: ...ble Installing the riser card on page 73 9 9 3 2 Installing an expansion card in a riser module 2 Ê Install the expansion card see section Installing an expansion card in a riser module on page 281 9 9 3 3 Installing the air grid extension to the riser module 2 Ê Install the air grid extension to the riser module 2 see section Installing the air grid extension to riser module 2 on page 275 9 9 3 4...

Страница 285: ...dating expansion card firmware on page 100 Ê If applicable Enabling Option ROM scan on page 101 Ê Resuming BitLocker functionality on page 112 9 9 4 Removing an expansion card from riser module 2 9 9 4 1 Preliminary steps Ê If applicable Locating the defective server on page 53 Ê Suspending BitLocker functionality on page 91 Ê Shutting down the server on page 55 Ê Remove all external cables from t...

Страница 286: ... module on page 283 9 9 4 3 Installing the slot cover in the riser card holder Ê Install the slot cover in the riser card holder see section Installing the slot cover on page 268 V CAUTION Always replace slot covers into unused PCI slot openings to comply with applicable EMC regulations and satisfy cooling requirements 9 9 4 4 Concluding steps Ê Install the riser module 2 see section Installing th...

Страница 287: ... on page 53 Ê Shutting down the server on page 55 Ê Disconnecting the power cord on page 56 Ê Remove all external cables from the expansion card to be replaced Ê Getting access to the component on page 58 Ê If applicable disconnect internal cables from the expansion card Ê Locate the defective expansion card using the onboard Local Diagnostic LEDs see section Onboard indicators and controls on pag...

Страница 288: ... FBU cable to the expansion card see section Installing the new TFM on page 311 9 9 5 6 Concluding steps Ê Reassembling on page 63 Ê Connect all external cables to the replaced expansion card Ê Connecting the power cord on page 67 Ê Switching on the server on page 70 Ê Enabling replaced components in the BIOS on page 108 Ê Inform the customer about changed WWN MAC and SAS addresses see section Loo...

Страница 289: ... page 58 Ê If applicable disconnect internal cables to the expansion card Ê Locate the defective riser card using the onboard Local Diagnostic LEDs see section Onboard indicators and controls on page 551 9 9 6 2 Removing the riser card Ê If applicable remove the riser module 1 see section Removing the riser module 1 HL on page 74 Ê If applicable remove the riser module 2 see section Removing the r...

Страница 290: ...o the expansion card Ê If applicable connect internal cables to the expansion card I For the cable plan see chapter Appendix B on page 573 9 9 6 5 Connecting a FBU to the expansion card Ê If applicable connect an FBU cable to the expansion card see section Installing the new TFM on page 311 9 9 6 6 Concluding steps Ê Reassembling on page 63 Ê Connect all external cables to the replaced expansion c...

Страница 291: ... Disconnecting the power cord on page 56 Ê Getting access to the component on page 58 Ê If applicable Installing the riser card on page 73 9 10 1 2 Installing a GPGPU card in a riser module Ê If applicable remove the slot cover from the riser card holder see section Removing the slot cover on page 269 Upgrade and Repair Unit URU Hardware 5 minutes Software 5 minutes Tools side cutter Phillips PH2 ...

Страница 292: ...gure 191 Installing a GPGPU card in a riser module Ê Carefully insert the GPGPU card into the PCI slot and press down firmly until it is fully seated in the slot see arrow Figure 192 Removing the rubber pad from the protection foil Ê Peel off the rubber pad from the protective foil ...

Страница 293: ... on page 292 9 10 1 3 Replacing the heat sink FL Ê Replace the standard CPU heat sink with the CPU heat sink for GPGPU card see section Installing the CPU and heat sink on page 351 9 10 1 4 Removing the slot cover for the riser module 1 Ê Remove the slot cover for the riser module 1 see section Removing the slot cover for the riser module 1 on page 271 9 10 1 5 Removing the rear air grid riser mod...

Страница 294: ...re 194 Connecting the power cable Ê Connect the power cable C20 Ê Run the cables as shown 9 10 1 7 Installing the FBU Ê Install the FBU on the riser card holder FL see section Installing an FBU on the riser card holder FL on page 317 1 Connector P4 to the GPGPU M60 P100 P40 V100 2 Connector P1 to connector PWR3 on the system board 3 Connector P3 to connector PWR2 on the system board 4 Connector P5...

Страница 295: ... units 9 10 1 8 Installing the air duct riser module 1 Figure 195 Preparing the air duct for riser module 1 Ê Break out the blind cover on the right side from the air duct using a side cutter see circles Ê Install the air duct see section Installing the air duct on page 89 ...

Страница 296: ...Ê Run the cables as shown 9 10 1 9 Concluding steps Ê Reassembling on page 63 Ê Connecting the power cord on page 67 Ê Switching on the server on page 70 Ê If applicable Updating expansion card firmware on page 100 Ê If applicable Enabling Option ROM scan on page 101 Ê Resuming BitLocker functionality on page 112 ...

Страница 297: ...rds in slot 5 and slot 11 on page 71 Ê Disconnecting the power cord on page 56 Ê Getting access to the component on page 58 Ê If applicable disconnect internal cables from the GPGPU card 9 10 2 2 Removing the air duct Ê Remove the air duct see section Removing the air duct on page 88 9 10 2 3 Removing the FBU Ê Remove the FBU see section Removing an FBU from the riser card holder FL on page 322 9 ...

Страница 298: ...e slot cover for the riser module 1 see section Installing the slot cover for the riser module 1 on page 270 9 10 2 7 Installing the rear air grid riser module 1 Ê Install the rear air grid riser module 1 see section Installing the rear air grid riser module 1 on page 273 9 10 2 8 Installing the air duct I If no GPGPU card is installed you have to order a new air duct to direct the airflow directl...

Страница 299: ...he component on page 58 Ê If applicable Installing the riser card on page 73 9 10 3 2 Installing a GPGPU card in a riser module Ê If applicable remove the slot cover from the riser card holder see section Removing the slot cover on page 269 Ê Install the GPGPU card in the riser module see section Installing a GPGPU card in a riser module on page 291 9 10 3 3 Installing the air grid extension to ri...

Страница 300: ...ar air grid see section Removing the rear air grid riser module 2 on page 279 9 10 3 6 Removing the slot cover riser module 2 Ê Remove the slot cover see section Removing the slot cover for the riser module 2 on page 272 9 10 3 7 Installing the riser module 2 FL Ê Install the riser module 2 see section Installing the riser module 2 FL on page 86 Cabling GPGPU M60 P100 P40 V100 Figure 198 Connectin...

Страница 301: ...e section Installing an FBU on the riser card holder FL on page 317 9 10 3 9 Installing the air duct riser module 2 Figure 199 Preparing the air duct for riser module 1 Ê Break out the blind cover on the right side from the air duct using a side cutter see circles Ê Install the air duct see section Installing the air duct on page 89 ...

Страница 302: ...led RAID controller must be removed see section Removing an expansion card on page 263 and Installing an expansion card on page 254 Ê Run the cables as shown 9 10 3 11 Concluding steps Ê Reassembling on page 63 Ê Connecting the power cord on page 67 Ê Switching on the server on page 70 Ê If applicable Updating expansion card firmware on page 100 Ê If applicable Enabling Option ROM scan on page 101...

Страница 303: ... for installation with expansion cards in slot 5 and slot 11 on page 71 Ê Disconnecting the power cord on page 56 Ê Getting access to the component on page 58 Ê If applicable disconnect internal cables from the GPGPU card 9 10 4 2 Removing the air duct Ê Remove the air duct see section Removing the air duct on page 88 9 10 4 3 Removing the FBU Ê If applicable remove the FBU see section Removing th...

Страница 304: ...ear air grid riser module 2 Ê Install the rear air grid see section Installing the rear air grid riser module 2 on page 279 9 10 4 8 Installing the air duct I If no GPGPU card is installed in riser module 2 you have to order a new air duct to direct the airflow directly onto the CPU heat sinks and memory slots Ê Install the air duct see section Installing the air duct on page 89 9 10 4 9 Concludin...

Страница 305: ...ocal Diagnostic LEDs see section Onboard indicators and controls on page 551 9 10 5 2 Removing the defective GPGPU card Ê If applicable remove the riser module 1 see section Removing the riser module 1 FL on page 82 Ê If applicable remove the riser module 2 see section Removing the riser module 2 FL on page 85 Ê Remove the GPGPU card see section Removing a GPGPU card FL on page 298 9 10 5 3 Instal...

Страница 306: ...pter Appendix B on page 573 9 10 5 5 Connecting a FBU to the expansion card Ê If applicable connect an FBU to the GPGPU card riser module 1 or riser module 2 see section Installing the FBU with the holder on page 318 9 10 5 6 Concluding steps Ê Reassembling on page 63 Ê Connecting the power cord on page 67 Ê Switching on the server on page 70 Ê Enabling replaced components in the BIOS on page 108 ...

Страница 307: ...ction Onboard indicators and controls on page 551 9 10 6 2 Removing the defective riser card Ê If applicable remove the riser module 1 see section Removing the riser module 1 on page 297 Ê If applicable remove the riser module 2 see section Removing the riser module 2 on page 303 Ê Remove the GPGPU card see section Removing a GPGPU card FL on page 298 Ê Remove the riser card see section Removing t...

Страница 308: ...or the cable plan see chapter Appendix B on page 573 9 10 6 5 Connecting a FBU to the expansion card Ê If applicable connect an FBU to the GPGPU card riser module 1 or riser module 2 see section Installing the FBU with the holder on page 318 9 10 6 6 Concluding steps Ê Reassembling on page 63 Ê Connect all external cables to the replaced expansion card Ê Connecting the power cord on page 67 Ê Swit...

Страница 309: ...er HL is installed The position for the FBU is on the air duct If a riser card holder FL is installed The position for the FBU is on the riser card holder 9 11 1 Replacing a TFM 9 11 1 1 Preliminary steps Ê Locating the defective server on page 53 Ê Shutting down the server on page 55 Ê Disconnecting the power cord on page 56 Ê Getting access to the component on page 58 9 11 1 2 Removing the defec...

Страница 310: ...M4 Expansion cards and backup units Example RAID controller PRAID EP4x0i Figure 201 Disconnecting the FBU adapter cable from the TFM Ê Disconnect the FBU adapter cable from the TFM Figure 202 Removing the TFM Ê Remove the two screws see circles ...

Страница 311: ...the TFM see arrow I Note for replacing the TFM The two spacer bolts can remain on the RAID controller 9 11 1 3 Installing the new TFM Example RAID controller PRAID EP4x0i Figure 203 Installing the TFM A Ê If no TFM has been installed before fit the two spacer bolts on the RAID controller ...

Страница 312: ...TFM Ê Fasten the TFM to the RAID controller with the two screws from the TFM kit Figure 205 Connecting the FBU adapter cable to the TFM Ê Connect the FBU adapter cable to the TFM see circle Ê Install the expansion card with the defective TFM installed see section Installing an expansion card on page 253 ...

Страница 313: ...wer cord on page 67 Ê Switching on the server on page 70 9 11 2 Installing an FBU on the air duct Figure 206 FBU mounting positions 9 11 2 1 Preliminary steps Ê Shutting down the server on page 55 Ê Disconnecting the power cord on page 56 Upgrade and Repair Unit URU Hardware 10 minutes Tools tool less 1 FBU 1 2 FBU 2 or Dual microSD 64GB Enterprise ...

Страница 314: ... on page 58 9 11 2 2 Preparing the FBU Figure 207 Installing the FBU in the holder A Ê At a slight angle fit the FBU under both retaining brackets of the holder Ê Push in the FBU until it locks in place Figure 208 Installing the FBU in the holder B Ê Ensure that the FBU is properly seated in the holder as shown ...

Страница 315: ...gure 209 Connecting the FBU cable to the FBU Ê Connect the cable end on the FBU to the FBU cable as shown 9 11 2 3 Installing the FBU with the holder Figure 210 Installing the FBU A I Note the positions of the shoulder screw caps on the air duct and keyhole slots on the FBU holder ...

Страница 316: ... narrow ends of the keyhole slots on the holder Ê Ensure that the locking handle on the holder properly snaps in place see circle 3 Ê If applicable install the TFM see section Installing the new TFM on page 311 Ê Connect the FBU cable to the TFM see section Installing the new TFM on page 311 Ê Install the RAID controller see section Installing an expansion card on page 253 9 11 2 4 Concluding step...

Страница 317: ...page 55 Ê Disconnecting the power cord on page 56 Ê Getting access to the component on page 58 9 11 3 2 Preparing the FBU Figure 212 Installing the FBU in the holder Ê At a slight angle fit the FBU under both retaining brackets of the holder I Insert the FBU in the direction as shown Ê Push in the FBU until it locks in place Ê Ensure that the FBU is properly seated in the holder as shown ...

Страница 318: ...talling the FBU with the holder Figure 213 Position of the shoulder screw caps Figure 214 Installing the FBU with the holder Ê Insert the holder onto the riser card holder so that the three shoulder screw caps on the riser card holder rest in the wide ends of the keyhole slots on the holder ...

Страница 319: ...311 Ê Connect the cable end on the FBU to the FBU cable see figure 214 on page 318 3 Ê Install the RAID controller see section Installing an expansion card on page 253 9 11 3 4 Concluding steps Ê Reassembling on page 63 Ê Connecting the power cord on page 67 Ê Switching on the server on page 70 Ê If applicable Updating expansion card firmware on page 100 9 11 4 Removing an FBU from the air duct V ...

Страница 320: ... the component on page 58 9 11 4 2 Removing the FBU with the holder Figure 215 Removing the FBU holder from the air duct PRAID EP5xxi Ê Lift up the green locking handle on the FBU holder 1 while sliding the FBU holder to the left as far as it will go 2 I After that the shoulder screw caps on the air duct will rest in the wide ends of the keyhole slots on the holder Ê Lift the holder from the air d...

Страница 321: ... 9 11 4 3 Disconnecting the FBU cable from the FBU Figure 216 Disconnecting the FBU cable from the FBU Ê Disconnect the FBU cable from the FBU 9 11 4 4 Removing the FBU from the holder Figure 217 Removing the FBU from the holder Ê Pull the FBU at a slight angle out of the holder ...

Страница 322: ... 70 9 11 5 Removing an FBU from the riser card holder FL V CAUTION Dispose of used battery properly Keep away from children Do not throw flash backup units into the trash can Batteries must be disposed of in accordance with local regulations concerning special waste 9 11 5 1 Preliminary steps Ê Shutting down the server on page 55 Ê Disconnecting the power cord on page 56 Ê Getting access to the co...

Страница 323: ...he green locking handle on the FBU holder 2 while sliding the FBU holder in the direction of the arrow as far as it will go 3 I After that the hooks on the air duct will rest in the wide ends of the keyhole slots on the holder Ê Lift the FBU holder from the riser card holder 9 11 5 3 Disconnecting the FBU cable from the FBU Ê Disconnect the FBU cable from the FBU see section Disconnecting the FBU ...

Страница 324: ...the holder Figure 219 Removing the FBU from the holder Ê Pull the FBU at a slight angle out of the holder 9 11 5 5 Concluding steps Ê If there is no FBU to install again the FBU cable can be removed carefully Ê Reassembling on page 63 Ê Connecting the power cord on page 67 Ê Switching on the server on page 70 ...

Страница 325: ...ps Ê Locating the defective server on page 53 Ê Shutting down the server on page 55 Ê Disconnecting the power cord on page 56 Ê Getting access to the component on page 58 9 11 6 2 Removing the defective FBU Ê Remove the FBU with the holder see section Removing the FBU with the holder on page 320 from the air duct or section Removing the FBU with the holder on page 323 from the riser card holder FL...

Страница 326: ...on page 314 to the air duct or Preparing the FBU on page 317 to the riser card holder FL Ê Install the FBU with the holder see section Installing the FBU with the holder on page 315 to the air duct or section Installing the FBU with the holder on page 318 to the riser card holder FL 9 11 6 4 Concluding steps Ê Reassembling on page 63 Ê Connecting the power cord on page 67 Ê Switching on the server...

Страница 327: ...onents to cool down before installing or removing memory modules to prevent burns Do not insert and remove memory modules repeatedly Doing so may cause failures If the memory module has not been correctly inserted it may cause a fire Insert the memory module with attention Pressing out the securing clips on the memory module connector will eject the installed memory module To prevent damage and in...

Страница 328: ...IMM 1A CPU 1 DIMM 2A PWR ODD OOB FRONT FP2 USB3 0 Front SATA ODD USB3 0 INT1 PSU1 PSU2 JP2 JP1 1 1 2 CPU 2 DIMM 2J CPU 2 DIMM 1H CPU 2 DIMM 1G CPU 2 DIMM 2G CPU 2 DIMM 1J CPU 2 DIMM 2H CPU 2 DIMM 1K CPU 2 DIMM 2L CPU 2 DIMM 2M CPU 2 DIMM 1M CPU 2 DIMM 2K CPU 2 DIMM 1L CPU 1 DIMM 2D CPU 1 DIMM 1D CPU 1 DIMM 2E CPU 1 DIMM 1E CPU 1 DIMM 2F CPU 1 DIMM 1F LC2 LC1 CPU2 CPU1 M 2 SSD1 M 2 SSD2 VPP CPU1 sl...

Страница 329: ...uires lockstep mode but lockstep mode is not supported Channel mirroring is supported within a CPU socket HW memory scrubbing is supported Rank Level Sparing is supported The notation of the CPUs memory channels and DIMM sockets correspond to the silk print on the system board On second CPU the memory channels are named G H J K L and M and placed accordingly Figure 221 Memory slots of CPU 1 I For ...

Страница 330: ...has to be placed in slot 1 of a channel e g 1A 1B If DIMMs with different ranks are installed in one channel the DIMM with the higher rank has to be placed in slot 1 of a channel e g 1A 1B If DIMMs with different ranks are installed on one CPU socket follow memory module population order Figure 222 Mixing of DIMM types within a channel Memory module population order DDR4 only If two DIMMs with dif...

Страница 331: ...identical DIMMs capacity rank Use a balanced platform configuration all available memory channels populated equally identical DIMMs in all locations size speed rank Marked quantity of DIMMs are not recommended because of unbalanced configurations Unbalanced configurations can lead to significantly reduced bandwidth because the system will fracture the memory space into multiple regions ...

Страница 332: ... 3 x x x 4 x x x x 5 x x x x x 6 x x x x x x 7 x x x x x x x 8 x x x x x x x x 9 x x x x x x x x x 10 x x x x x x x x x x 11 x x x x x x x x x x x 12 x x x x x x x x x x x x 13 x x x x x x x x x x x x x 14 x x x x x x x x x x x x x x 15 x x x x x x x x x x x x x x x 16 x x x x x x x x x x x x x x x x 17 x x x x x x x x x x x x x x x x x 18 x x x x x x x x x x x x x x x x x x 19 x x x x x x x x x x...

Страница 333: ...equally identical DIMMs in each row but different sized DIMMs in row 1 and row 2 Marked quantity of DIMMs are not recommended because of unbalanced configurations Unbalanced configurations can lead to significantly reduced bandwidth because the system will fracture the memory space into multiple regions Same quantity of both DIMMs are required on each CPU x must always be DIMM with more ranks than...

Страница 334: ... 8 z z z z x x x x 9 10 z z z z z x x x x x 11 12 z z z z z z x x x x x x DIMMs 2 CPUs populated 2 x z 3 4 z x z x 5 6 z z x x z x 7 8 z z x x z z x x 9 10 z z z x x x z z x x 11 12 z z z x x x z z z x x x 13 14 8 6 z z z z x x x x z z z x x x 15 16 12 4 z z z z x x x x z z z z x x x x 17 18 z z z z z z x x x x x x z z z x x x 19 20 z z z z z z x x x x x x z z z z x x x x 21 22 z z z z z z x x x x...

Страница 335: ...2A 1A 2B 1B 2C 1C 1M 2M 1L 2L 1K 2K 2G 1G 2H 1H 2J 1J DIMMs 1 CPU populated 2 x x 3 x x x 4 x x x x 6 x x x x x x 8 x x x x x x x x 9 x x x x x x x x x 12 x x x x x x x x x x x x DIMMs 2 CPUs populated 4 x x x x 5 x x x x x 6 x x x x x x 7 x x x x x x x 8 x x x x x x x x 9 x x x x x x x x x 10 x x x x x x x x x x 11 x x x x x x x x x x x 12 x x x x x x x x x x x x 14 x x x x x x x x x x x x x x 15...

Страница 336: ...apacity CPU CPU1 CPU2 ctrl iMC1 iMC0 iMC1 iMC0 channel F E D A B C M F L E K D G A H B J C socket 1F 2F 1E 2E 1D 2D 2A 1A 2B 1B 2C 1C 1M 2M 1L 2L 1K 2K 2G 1G 2H 1H 2J 1J DIMMs 1 CPU populated 2 x x 4 x x x x 6 x x x x x x 8 x x x x x x x x 10 x x x x x x x x x x 12 x x x x x x x x x x x x DIMMs 2 CPUs populated 4 x x x x 6 x x x x x x 8 x x x x x x x x 10 x x x x x x x x x x 12 x x x x x x x x x x...

Страница 337: ... quad rank octal rank DIMMs Same letter represents identical DIMMs capacity rank In Rank Sparing mode only one DIMM capacity per CPU is allowed x must always be DIMM with more ranks than z If both DIMMs have same number of ranks x represents DIMM with higher capacity ...

Страница 338: ... 3 x x x 4 x x x x 5 x x x x x 6 x x x x x x 7 x x x x x x x 8 x x x x x x x x 9 x x x x x x x x x 10 x x x x x x x x x x 11 x x x x x x x x x x x 12 x x x x x x x x x x x x 13 x x x x x x x x x x x x x 14 x x x x x x x x x x x x x x 15 x x x x x x x x x x x x x x x 16 x x x x x x x x x x x x x x x x 17 x x x x x x x x x x x x x x x x x 18 x x x x x x x x x x x x x x x x x x 19 x x x x x x x x x x...

Страница 339: ...e 58 Ê If applicable remove the riser module see section Riser modules for GPGPU cards FL on page 82 10 2 2 Selecting the memory slot Ê Choose the memory slot according to the configuration rules in Basic information on page 328 10 2 3 Installing a memory module Figure 223 Opening the securing clips Ê Press the securing clips on both sides of the memory slot concerned outward Upgrade and Repair Un...

Страница 340: ...Press down on the memory module until the securing clips snap into the cutouts at each end of the module 10 2 4 Concluding steps Ê If applicable install the riser module see section Riser modules for GPGPU cards FL on page 82 Ê Reassembling on page 63 Ê Connecting the power cord on page 67 Ê Switching on the server on page 70 Ê Resuming BitLocker functionality on page 112 ...

Страница 341: ...rd on page 56 Ê Getting access to the component on page 58 Ê If applicable remove the riser module see section Riser modules for GPGPU cards FL on page 82 10 3 2 Removing a memory module Figure 225 Removing memory modules A Ê Eject the desired memory module by pressing out the securing clips at each end of the memory slot Upgrade and Repair Unit URU Hardware 5 minutes Tools Phillips PH2 No 2 screw...

Страница 342: ...er cord on page 67 Ê Switching on the server on page 70 Ê Resuming BitLocker functionality on page 112 10 4 Replacing a memory module 10 4 1 Preliminary steps Ê Locating the defective server on page 53 Ê Suspending BitLocker functionality on page 91 Ê Shutting down the server on page 55 Ê Disconnecting the power cord on page 56 Ê Getting access to the component on page 58 Upgrade and Repair Unit U...

Страница 343: ...10 4 3 Installing a new memory module Ê Install the memory module see section Installing a memory module on page 339 10 4 4 Concluding steps Ê If applicable install the riser module see section Riser modules for GPGPU cards FL on page 82 Ê Reassembling on page 63 Ê Connecting the power cord on page 67 Ê Switching on the server on page 70 Ê Resetting the error status after replacing memory modules ...

Страница 344: ...344 Upgrade and Maintenance Manual RX2540 M4 Main memory ...

Страница 345: ...ge static build up e g by touching a grounded object before handling electrostatic sensitive devices ESDs Do not touch the circuitry on boards or soldered parts Hold circuit boards by their metallic areas or edges When removing or installing CPUs be careful not to touch or bend the spring contacts on the CPU sockets Never touch the underside of the CPUs Even minor soiling such as grease from the s...

Страница 346: ... CPU 1 DIMM 2A PWR ODD OOB FRONT FP2 USB3 0 Front SATA ODD USB3 0 INT1 PSU1 PSU2 JP2 JP1 1 1 2 CPU 2 DIMM 2J CPU 2 DIMM 1H CPU 2 DIMM 1G CPU 2 DIMM 2G CPU 2 DIMM 1J CPU 2 DIMM 2H CPU 2 DIMM 1K CPU 2 DIMM 2L CPU 2 DIMM 2M CPU 2 DIMM 1M CPU 2 DIMM 2K CPU 2 DIMM 1L CPU 1 DIMM 2D CPU 1 DIMM 1D CPU 1 DIMM 2E CPU 1 DIMM 1E CPU 1 DIMM 2F CPU 1 DIMM 1F LC2 LC1 CPU2 CPU1 M 2 SSD1 M 2 SSD2 VPP CPU1 slot ext...

Страница 347: ... 3647 supported CPUs up to 205 W core frequencies of more than 3 5 GHz both CPUs must be of the same type I For system relevant information see the hardware configurator of your server available online at the following address http ts fujitsu com products standard_servers index htm For Japan http www fujitsu com jp products computing servers primergy ...

Страница 348: ...1016 V1 S26361 F4051 E234 XEON GOLD 6134 130W B1014 V1 B1014 V2 B1014 V2 B1014 V1 B1016 V1 S26361 F4051 E226 XEON GOLD 6126 125W B1014 V1 B1014 V2 B1014 V2 B1014 V1 B1016 V1 S26361 F4051 E232 XEON GOLD 6132 140W B1014 V2 B1014 V2 B1014 V2 B1014 V1 B1016 V1 S26361 F4051 E153 XEON PLATINUM 8153 125W B1014 V1 B1014 V2 B1014 V2 B1014 V1 B1016 V1 S26361 F4051 E334 XEON GOLD 6134M 130W B1014 V1 B1014 V2...

Страница 349: ...figuration V CAUTION CPUs are modules which are extremely sensitive to electro static discharges and therefore must always be handled with care After a CPU has been removed from its protective sleeve or from its socket place it with its smooth side down on a non conducting antistatic surface Never push a CPU over a surface Upgrade and Repair Unit URU Hardware 15 minutes Software 5 minutes Tools Ph...

Страница 350: ...the same For dual operation use a suitable multiprocessor operating system 11 2 1 Preliminary steps Ê Suspending BitLocker functionality on page 91 Ê Shutting down the server on page 55 Ê Disconnecting the power cord on page 56 Ê Getting access to the component on page 58 Ê Removing the air duct on page 88 11 2 2 Removing the socket cover Figure 230 Removing the socket cover Ê Remove the socket co...

Страница 351: ...amages Contact spring is bent backwards upon itself Contact spring tip position is shifted or out of alignment Never try to fix bent contact springs Doing so may result in loss of electrical performance and reliability Ê Confirm that the CPU model number printed on the top of the CPU fits with the requirements Figure 231 Installing the CPU in the CPU frame Ê Click the CPU into the CPU frame see ar...

Страница 352: ... protective cover from the heat sink Ê If re using a heat sink clean residual thermal paste from the heat sink surface using a lint free cloth Figure 233 Installing the CPU frame on the heat sink A Ê Place the CPU frame onto the heat sink Ensure that the triangle marks on heat sink A and on CPU frame B are on the same edge B A ...

Страница 353: ...nce Manual 353 Processor CPU Figure 234 Installing the CPU frame on the heat sink B Ê Press down the CPU frame see arrows The frame must click into place see circles Figure 235 Position pins 1 Thin pin 2 Empty CPU socket 3 Thick pin ...

Страница 354: ...on the heat sink 1 to 4 by hand by proceeding as follows Torque 1 4 Nm not used in Japan Ê At first fasten the captive screws 1 and 2 completely Ê Fasten the captive screws 3 and 4 completely 11 2 4 Upgrading the main memory Ê Select an adequate memory configuration for 2 CPUs populated see section Basic information on page 328 Ê Install memory modules see section Installing a memory module on pag...

Страница 355: ...ey to enter the BIOS If a password is assigned enter the password and press Enter Ê Select the Save Exit menu Ê Select Save Changes and Exit or Save Changes and Reset Ê Verify that the Global Error indicator stops flashing Ê Resuming BitLocker functionality on page 112 11 3 Replacing a CPU or heat sink V CAUTION CPUs are modules which are extremely sensitive to electrostatic discharges and therefo...

Страница 356: ... to the component on page 58 Ê Removing the air duct on page 88 Ê If applicable remove the riser module see section Removing the riser module 1 FL on page 82 11 3 2 Removing the heat sink Figure 237 Removing the heat sink Ê Loosen the captive screws circles following the sequence described below and using a 2 screw driver V CAUTION Please don t use an electric screw driver 1 Loosen the four captiv...

Страница 357: ... the screws 2 and 1 are completely loosened Ê Lift the heat sink together with the CPU frame out of the chassis V CAUTION Pay special attention not to damage any system board components surrounding the CPU socket 11 3 3 Removing the CPU Figure 238 Removing the CPU frame Ê Release the four hooks see circles Ê Carefully twist the CPU back and forth to detach the CPU frame from the heat sink see arro...

Страница 358: ...lean residual thermal paste from the CPU and the heat sink surface using a lint free cloth and store the CPU in a save place V CAUTION CPUs are extremely sensitive to electrostatic discharge and must be handled with care After a CPU has been removed from its protective sleeve or from its socket place it upside down on a nonconducting antistatic surface Never push a CPU over a surface ...

Страница 359: ...mpound has already been pre applied to its lower surface In this case it isn t necessary to apply thermal paste to the CPU surface Figure 240 Thermal paste syringe One thermal compound syringe FTS FSP P304000004 contains thermal paste for three CPUs In order to determine the correct amount of thermal paste equal to 1 0 gram divide the grey area of the syringe up into three equal segments I Add gra...

Страница 360: ...ng the CPU and heat sink Ê Confirm that the CPU model number printed on the top of the CPU fits with the requirements Ê If applicable remove the protective cap from the bottom side of the new CPU Ê Install the CPU and heat sink see section Installing the CPU and heat sink on page 351 11 3 6 Concluding steps Ê If applicable install the riser module see section Installing the riser module 2 FL on pa...

Страница 361: ...en altered There is no technical problem Proceed as follows Ê Restart your server Ê As soon as the startup screen appears press the F2 function key to enter the BIOS If a password is assigned enter the password and press Enter Ê Select the Save Exit menu Ê Select Save Changes and Exit or Save Changes and Reset Ê Verify that the Global Error indicator stops flashing Ê Resetting the error status aft...

Страница 362: ...362 Upgrade and Maintenance Manual RX2540 M4 Processor CPU ...

Страница 363: ...y static electricity Always discharge static build up e g by touching a grounded object before handling electrostatic sensitive devices ESDs Do not touch the circuitry on boards or soldered parts Hold circuit boards by their metallic areas or edges When removing or installing CPUs be careful not to touch or bend the spring contacts on the CPU sockets Never touch the underside of the CPUs Even mino...

Страница 364: ... DIMM 2C CPU 1 DIMM 1B CPU 1 DIMM 2B CPU 1 DIMM 1A CPU 1 DIMM 2A PWR ODD OOB FRONT FP2 USB3 0 Front SATA ODD USB3 0 INT1 PSU1 PSU2 JP2 JP1 1 1 2 Micro SD CPU 2 DIMM 2J CPU 2 DIMM 1H CPU 2 DIMM 1G CPU 2 DIMM 2G CPU 2 DIMM 1J CPU 2 DIMM 2H CPU 2 DIMM 2M CPU 2 DIMM 1M CPU 2 DIMM 2K CPU 2 DIMM 1K CPU 2 DIMM 2L CPU 2 DIMM 1L CPU 1 DIMM 2D CPU 1 DIMM 1D CPU 1 DIMM 2E CPU 1 DIMM 1E CPU 1 DIMM 2F CPU 1 DI...

Страница 365: ...han 3 5 GHz both CPUs must be of the same type I For system relevant information see the hardware configurator of your server available online at the following address http ts fujitsu com products standard_servers index htm For Japan http www fujitsu com jp products computing servers primergy Parts of the LC kit The LC kit consists of the following parts LC device Adhesive memory pads Memory space...

Страница 366: ...cooling units 2 Control cable for each pump 3 Pump for CPU 2 4 Pump for CPU 1 5 Protective covers for the heat sinks 6 Flexible tubes 7 Quick connector block with slot cover 8 Quick connector with blue marking water inlet 9 Protective cap orange for the quick connector 10 Quick connector with red marking water outlet ...

Страница 367: ...odules that point to a cooling fin see arrows of a memory cooling unit 1 must be covered with an adhesive memory pad see figure above I For Japan Product and spare part are shipped attached with the adhesive memory pads on both sides of the memory module Regardless of the memory position use the memory modules as they are with two adhesive memory pads when installing or replacing a memory module ...

Страница 368: ...sary to adjust the memory cooling units at the right position Figure 247 Positions of the memory spacers The memory spacers must be installed between the following memory slots 1J and 2J 1G and 2G 2K and 1K 1A and 2A 2D and 1D 2F and 1F see also figure 242 on page 364 Memory covers Figure 248 Memory covers bottom view CPU 1 CPU 2 ...

Страница 369: ...rface 12 2 1 Preliminary steps Ê Locating the defective server on page 53 Ê Suspending BitLocker functionality on page 91 Ê Shutting down the server on page 55 Ê Disconnecting the power cord on page 56 Ê Getting access to the component on page 58 Ê Removing the air duct on page 88 Ê If applicable remove the riser module see section Removing the riser module 1 FL on page 82 12 2 2 Removing the LC d...

Страница 370: ... Upgrade and Maintenance Manual RX2540 M4 Liquid cooling LC Figure 249 Removing the memory covers Ê Pull up the three memory covers Figure 250 Removing the slot bracket with the tubes Ê Remove the screw 1 ...

Страница 371: ...system board see figure 242 on page 364 Figure 251 Removing the captive screws of the CPUs Ê Pull up the tube see arrow to get access to the screws 2 and 3 Ê Remove the four captive screws for CPU 1 in a crossover pattern 4 to 1 Ê Remove the four captive screws for CPU 2 in a crossover pattern 4 to 1 Figure 252 Removing the LC device Ê Carefully lift up the three memory cooling units see arrows ...

Страница 372: ...vice together with the CPUs 12 2 3 Removing the CPU Figure 253 Removing the CPU from the pump Ê Release the four hooks see circles Ê Carefully twist the CPU back and forth to detach the CPU frame from the pump see arrows I This may be necessary due to the adhesive quality of the thermal paste located between the heat sink and CPU ...

Страница 373: ...rame 2 Ê Clean residual thermal paste from the CPU and the heat sink surface using a lint free cloth and store the CPU in a save place V CAUTION CPUs are extremely sensitive to electrostatic discharge and must be handled with care After a CPU has been removed from its protective sleeve or from its socket place it upside down on a nonconducting antistatic surface Never push a CPU over a surface ...

Страница 374: ...ments Figure 255 Installing the CPU in the CPU frame Ê Click the CPU into the CPU frame see arrows Ensure that the triangle marks on CPU A and on CPU frame B are on the same edge Ê Ensure that the CPU fits in its place When replacing the CPU Ê When replacing the CPU apply the thermal paste onto the CPU see section Applying the thermal paste to the CPU surface on page 382 A B ...

Страница 375: ...40 M4 Upgrade and Maintenance Manual 375 Liquid cooling LC When replacing the LC device Figure 256 Removing the protective cover Ê When replacing the LC device remove the protective cover from the heat sink ...

Страница 376: ...Place the CPU frame onto the heat sink of the LC device I Ensure that you position the CPU frame in the right position There is only one position which fits Ê Press down the CPU frame see arrows The frame must click into place see circles 12 2 5 Installing the LC device Ê If applicable install the memory spacers see section Installing a memory spacer on page 389 ...

Страница 377: ...align it with the memory slots Ê Carefully press down the memory cooling units see arrows Figure 259 Removing the captive screws of the CPUs Ê Fasten the four captive screws in a crossover pattern 1 to 4 by hand by proceeding as follows Torque 1 4 Nm not used in Japan Ê At first fasten the captive screws 1 and 2 completely Ê Fasten the captive screws 3 and 4 completely CPU 1 CPU 2 ...

Страница 378: ...ing LC Ê Connect the two control cables from the LC device to the system board see figure 242 on page 364 Pump 1 to connector LC1 Pump 2 to connector LC2 Ê Install the crossbar see figure 404 on page 538 Figure 260 Routing the tubes Ê Run the tubes as shown ...

Страница 379: ...lling the memory covers Ê Position the memory covers over the memory modules and press them carefully down Figure 262 Installing the slot bracket with the tubes Ê Push the slot bracket with the tubes in the direction of the arrow Ê Fasten the slot bracket with the screw see circle ...

Страница 380: ...ly installed Ê If applicable remove the two orange protective caps from the tubes I Keep the protective caps for future use Ê If you have replaced the LC device install the two orange protective caps onto the quick connectors of the defective LC device see position 9 in figure 243 on page 366 ...

Страница 381: ...ng with the message CPU has been changed This only indicates that the CPU configuration has been altered There is no technical problem Proceed as follows Ê Restart your server Ê As soon as the startup screen appears press the F2 function key to enter the BIOS If a password is assigned enter the password and press Enter Ê Select the Save Exit menu Ê Select Save Changes and Exit or Save Changes and ...

Страница 382: ...ompound has already been pre applied to its lower surface In this case it isn t necessary to apply thermal paste to the CPU surface Figure 264 Thermal paste syringe One thermal compound syringe FTS FSP P304000004 contains thermal paste for three CPUs In order to determine the correct amount of thermal paste equal to 1 0 gram divide the grey area of the syringe up into three equal segments I Add gr...

Страница 383: ...tenance Manual 383 Liquid cooling LC Figure 265 Applying thermal paste Ê Apply a small streak of thermal paste see description above to the center of the CPU surface as shown V CAUTION Do not mix different types of thermal paste ...

Страница 384: ... the server on page 55 Ê Disconnecting the power cord on page 56 Ê Getting access to the component on page 58 Ê If applicable remove the riser module see section Riser modules for GPGPU cards FL on page 82 12 4 1 2 Preparing the memory modules I Before installing new memory modules prepare the memory modules with the adhesive memory pads The adhesive memory pads must be ordered separately Upgrade ...

Страница 385: ...ose the memory slot according to the configuration rules in Basic information on page 328 12 4 1 3 Installing a memory module Ê Pull up the required memory cover s see figure 249 on page 370 Figure 267 Opening the memory cooling units Ê Open the required memory cooling unit Swing the left right memory cooling unit s in the direction of the pump see arrows Swing the central memory cooling unit in t...

Страница 386: ...ser module see section Riser modules for GPGPU cards FL on page 82 Ê Reassembling on page 63 Ê Connecting the power cord on page 67 Ê Switching on the server on page 70 Ê Resuming BitLocker functionality on page 112 12 4 2 Removing a memory module 12 4 2 1 Preliminary steps Ê Suspending BitLocker functionality on page 91 Ê Shutting down the server on page 55 Ê Disconnecting the power cord on page ...

Страница 387: ...ry module on page 341 Ê If applicable install the memory spacers see section Installing a memory spacer on page 389 Ê Close the required memory cooling unit s Ê Position the memory cover s over the memory modules and press them carefully down see figure 261 on page 379 12 4 2 3 Concluding steps Ê If applicable install the riser module see section Riser modules for GPGPU cards FL on page 82 Ê Reass...

Страница 388: ...dules see section Preparing the memory modules on page 384 Ê Remove the memory modules see section Removing a memory module on page 387 Ê Install the memory modules see section Installing a memory module on page 385 12 4 3 3 Concluding steps Ê If applicable install the riser module see section Riser modules for GPGPU cards FL on page 82 Ê Reassembling on page 63 Ê Connecting the power cord on page...

Страница 389: ... of the memory spacer install the memory spacers between empty memory slots Figure 268 Installing a memory spacer for memory covers Ê Press down the memory spacer 1 until it fits into place Number 2 shows an installed memory spacer Ê Insert all memory spacers in their designated positions see section Memory spacer on page 368 ...

Страница 390: ...390 Upgrade and Maintenance Manual RX2540 M4 Liquid cooling LC ...

Страница 391: ...he top of the casing may cause failures When disposing of transferring or returning a backup drive ensure that all backup media has been removed from the drive Circuit boards and soldered parts of internal options are exposed and can be damaged by static electricity Always discharge static build up e g by touching a grounded object before handling electrostatic sensitive devices ESDs Do not touch ...

Страница 392: ...GY RX2540 M4 server offers one 5 25 inch accessible drive bays for ODDs one bay optional for a LTO drive or a RDX drive I LTO drive or RDX drive are not available for 3 5 inch HDD versions Figure 269 Accessible drive in front panel module 3 5 inch HDD version Figure 270 Accessible drives in front panel module 2 5 inch HDD version 1 ODD 2 RDX drive LTO drive ...

Страница 393: ...1 Preliminary steps Ê Suspending BitLocker functionality on page 91 Ê Shutting down the server on page 55 Ê Disconnecting the power cord on page 56 Ê Getting access to the component on page 58 Ê Removing the fan holder on page 233 Ê Removing the front panel cage on page 439 Upgrade and Repair Unit URU Hardware 10 minutes Tools Phillips PH1 No 1 screw driver Phillips PZ2 No 2 screw driver front pan...

Страница 394: ...dummy cover Figure 271 Removing the ODD dummy module Ê Unlock the ODD dummy cover 1 Ê Remove the ODD dummy cover 2 V CAUTION Save the ODD dummy cover for future use Always replace dummy modules into unused drive bays to comply with applicable EMC regulations and satisfy cooling requirements ...

Страница 395: ...X2540 M4 Upgrade and Maintenance Manual 395 Accessible drives 13 2 1 3 Installing an ODD Figure 272 Remove the ODD latch Ê Remove the two screws see circles Ê Remove ODD latch from the front panel module ...

Страница 396: ...ce Manual RX2540 M4 Accessible drives Figure 273 Installing the ODD latch Ê Turn the ODD latch 180o 2 Ê Attach the ODD latch to rear side of ODD drive 3 Figure 274 Fastening the ODD latch Ê Fasten the ODD latch with two screws ...

Страница 397: ...ont panel cable C1 and USB cable C2 through the bay of the chassis Ê Insert the ODD module Figure 276 Installing the ODD B Ê Press on the latch from topside see arrow 1 while sliding in the ODD drive to make the engagement of ODD latch easier Ê Push the ODD latch upward so that ODD latch is engaged firmly 2 ...

Страница 398: ... C Ê Connect the cables to the ODD 13 2 1 4 Concluding steps Ê Installing the front panel cage on page 445 Ê Installing the fan holder on page 234 Ê Reassembling on page 63 Ê Connecting the power cord on page 67 Ê Resuming BitLocker functionality on page 112 1 ODD SATA cable 2 ODD power cable ...

Страница 399: ...ore removing it from the server Ê Suspending BitLocker functionality on page 91 Ê Shutting down the server on page 55 Ê Disconnecting the power cord on page 56 Ê Getting access to the component on page 58 Ê Removing the fan holder on page 233 Ê Removing the front panel cage on page 439 Upgrade and Repair Unit URU Hardware 10 minutes Tools Phillips PH1 No 1 screw driver Phillips PZ2 No 2 screw driv...

Страница 400: ...rade and Maintenance Manual RX2540 M4 Accessible drives 13 2 2 2 Removing the ODD Figure 278 Removing the cables from the ODD Ê Disconnect both cables 1 2 Figure 279 Removing the ODD A Ê Unlock the ODD latch 1 ...

Страница 401: ...RX2540 M4 Upgrade and Maintenance Manual 401 Accessible drives Figure 280 Removing the ODD B Ê Remove ODD Figure 281 Removing the ODD latch Ê Remove the two screws see arrows ...

Страница 402: ... drives Figure 282 Installing ODD latch to the front cage Ê Turn the ODD latch 180o as shown 1 Ê Fasten the ODD latch with two screws as shown 2 13 2 2 3 Installing the ODD dummy cover Figure 283 Installing the ODD dummy cover Ê Install the ODD dummy cover ...

Страница 403: ...kup or optical media from the backup or ODD before removing it from the server Ê Suspending BitLocker functionality on page 91 Ê Shutting down the server on page 55 Ê Disconnecting the power cord on page 56 Ê Getting access to the component on page 58 Ê Removing the fan holder on page 233 Ê Removing the front panel cage on page 439 13 2 3 2 Removing the defective ODD Ê Removing the ODD on page 400...

Страница 404: ...age 112 13 3 Optical disk drive ODD for the 3 5 inch version 13 3 1 Installing the ODD 13 3 1 1 Preliminary steps Ê Suspending BitLocker functionality on page 91 Ê Shutting down the server on page 55 Ê Disconnecting the power cord on page 56 Ê Getting access to the component on page 58 Ê Removing the fan holder on page 233 Ê Removing the front panel module on page 469 Upgrade and Repair Unit URU H...

Страница 405: ...DD dummy cover Ê Remove the ODD dummy cover V CAUTION Save the ODD dummy cover for future use Always replace dummy modules into unused drive bays to comply with applicable EMC regulations and satisfy cooling requirements 13 3 1 3 Installing the ODD Figure 285 Removing the cover plate Ê Disconnect the front panel cable Ê Remove the three screws see circles ...

Страница 406: ...cessible drives Ê Remove the cover plate of the front panel module see arrow Figure 286 Installing the ODD in the holder Ê Insert the ODD at a slight angle into the holder and align it with the marked edge 1 Ê Push down the ODD until it clicks in 2 ...

Страница 407: ...anual 407 Accessible drives Figure 287 Installing the cover plate Ê Position the cover plate of the front panel module at a slight angle into the two recesses and push it down 1 Ê Fasten the three screws 2 Ê Connect the front panel cable ...

Страница 408: ... drives Figure 288 Installing the ODD Ê Connect the cables to the ODD Figure 289 Installing the front panel module A Ê Run the SATA and power cables through the ODD bay opening as shown 1 Ê Insert the front panel module 2 1 ODD power cable 2 ODD SATA cable ...

Страница 409: ...wn Ê Connect the cables to the system board I For the cable plan see chapter Appendix B on page 573 13 3 1 4 Concluding steps Ê Installing the front panel module on page 471 Ê Installing the fan holder on page 234 Ê Reassembling on page 63 Ê Connecting the power cord on page 67 Ê Resuming BitLocker functionality on page 112 ODD power cable ODD SATA cable ...

Страница 410: ...up or ODD before removing it from the server Ê Suspending BitLocker functionality on page 91 Ê Shutting down the server on page 55 Ê Disconnecting the power cord on page 56 Ê Getting access to the component on page 58 Ê Removing the fan holder on page 233 Ê Removing the front panel module on page 469 Upgrade and Repair Unit URU Hardware 10 minutes Tools Phillips PZ2 screw driver hexagon screw driv...

Страница 411: ...rives 13 3 2 2 Removing the ODD Figure 291 Removing the ODD Ê Disconnect both cables 1 2 Figure 292 Removing the cover plate Ê Disconnect the front panel cable Ê Remove the three screws see circles Ê Remove the cover plate of the front panel module see arrow ...

Страница 412: ... Maintenance Manual RX2540 M4 Accessible drives Figure 293 Removing the ODD Ê Pull the ODD upward see arrow 13 3 2 3 Installing the ODD dummy module Figure 294 Installing the dummy cover Ê Insert the ODD dummy module ...

Страница 413: ...ate of the front panel module at a slight angle into the two recesses and push it down 1 Ê Fasten the three screws 2 Ê Connect the front panel cable 13 3 2 4 Concluding steps Ê Installing the fan holder on page 234 Ê Reassembling on page 63 Ê Connecting the power cord on page 67 Ê Resuming BitLocker functionality on page 112 ...

Страница 414: ...ing access to the component on page 58 Ê Removing the fan holder on page 233 Ê Removing the front panel module on page 469 13 3 3 2 Removing the defective ODD Ê Removing the ODD on page 411 13 3 3 3 Installing the new ODD Ê Installing the ODD on page 405 13 3 3 4 Concluding steps Ê Installing the front panel module on page 471 Ê Installing the fan holder on page 234 Ê Reassembling on page 63 Ê Con...

Страница 415: ...13 4 1 1 Preliminary steps Ê Suspending BitLocker functionality on page 91 Ê Shutting down the server on page 55 Ê Disconnecting the power cord on page 56 Ê Getting access to the component on page 58 Ê Removing the fan holder on page 233 Ê Installing the front panel cage on page 445 Upgrade and Repair Unit URU Hardware 10 minutes Tools Phillips PH2 No 2 screw driver ...

Страница 416: ...oving the air grid Ê Remove the 4 screws I Keep the 4 screws they will be reused for fixing the LTO drive Ê Remove the air grid V CAUTION Save the dummy cover air gird for future use Always replace dummy modules into unused drive bays to comply with applicable EMC regulations and satisfy cooling requirements ...

Страница 417: ...RX2540 M4 Upgrade and Maintenance Manual 417 Accessible drives 13 4 1 3 Installing an LTO drive Figure 297 Installing the LTO drive A Ê Push in the LTO drive in the bay ...

Страница 418: ...enance Manual RX2540 M4 Accessible drives Figure 298 Installing the LTO drive B Ê If applicable fasten the LTO drive with 4 screws see blue and orange circles Ê In case of an LTO7 drive fasten with 3 screws see blue circles ...

Страница 419: ...e and Maintenance Manual 419 Accessible drives Figure 299 Installing the LTO B Ê Thread the cables of the front panel see section Installing the ODD on page 393 Ê Carefully slide in the front panel module into its bay ...

Страница 420: ...note of the marked recess in the locking lever see close up V CAUTION Only for installations with LTO drive The front of the front panel is not flat with the housing of the server because the drive is too long Ê Push in the front panel cage until it is engaged firmly 1 Ê Fasten the front panel cage with one screw 2 ...

Страница 421: ...ting the cables to the LTO drive Ê Connect the cable PWR SAS C36 to the LTO drive 1 Ê Connect the power connector of the cable C36 to the power cable C17 2 Figure 302 Connecting the cables to the PSAS controller Ê Connect the SAS connector of cable C36 to the MLC1 connector of the PSAS controller 1 ...

Страница 422: ... drive 13 4 2 1 Preliminary steps Ê Ask the system administrator to eject all remaining backup or optical media from the backup or ODD before removing it from the server Ê Suspending BitLocker functionality on page 91 Ê Shutting down the server on page 55 Ê Disconnecting the power cord on page 56 Ê Getting access to the component on page 58 Ê Removing the fan holder on page 233 Upgrade and Repair ...

Страница 423: ...e 4 5 6 7 Figure 303 Disconnecting the cables from the LTO drive Ê Disconnect the PWR SAS cable C36 from the LTO drive 1 and the power cable C17 2 Figure 304 Disconnecting the cables from the PSAS controller Ê Disconnect the SAS connector of the cable C36 from the MLC1 connector of the PSAS controller 1 ...

Страница 424: ...ual RX2540 M4 Accessible drives Figure 305 Removing a LTO drive Ê Remove the screw Figure 306 Removing the LTO drive Ê Unlock the front panel cage see section Removing the front panel cage on page 439 Ê Pull out the front panel cage ...

Страница 425: ...M4 Upgrade and Maintenance Manual 425 Accessible drives Figure 307 Removing the LTO drive Ê If applicable remove 4 screws see blue and orange circles Ê in case of an LTO7 drive remove 3 screws see blue circles ...

Страница 426: ...rives Figure 308 Removing the LTO drive Ê Pull out the LTO drive Figure 309 Installing ODD latch to the front cage Ê Insert the air grid Ê Fasten the air grid with 4 screws Ê Install the front panel cage see section Installing the front panel cage on page 445 ...

Страница 427: ...ptical media from the backup or ODD before removing it from the server Ê Suspending BitLocker functionality on page 91 Ê Shutting down the server on page 55 Ê Disconnecting the power cord on page 56 Ê Getting access to the component on page 58 Ê Removing the fan holder on page 233 Ê Removing the front panel cage on page 439 13 4 3 2 Removing the defective LTO drive Ê Removing the LTO drive on page...

Страница 428: ... drive I For the cable plan see chapter Appendix B on page 573 13 5 1 Installing the RDX drive 13 5 1 1 Preliminary steps Ê Suspending BitLocker functionality on page 91 Ê Shutting down the server on page 55 Ê Disconnecting the power cord on page 56 Ê Getting access to the component on page 58 Ê Removing the fan holder on page 233 Ê Removing the front panel cage on page 439 Ê Removing the air grid...

Страница 429: ...s 13 5 1 2 Preparing an RDX drive Figure 310 Installing the rails to the RDX drive A Ê Fasten the rails with each two screws fillister head screw M3x 5mm PZ2 0 6 Nm 4 screws are parts of RDX adapter set The screws must be fasten in the middle of the slotted holes ...

Страница 430: ...e and Maintenance Manual RX2540 M4 Accessible drives Figure 311 Installing the RDX drive B Ê Insert the RDX drive with the bottom upward Ê Fasten the 4 screws use the screws that are used for fixing the air grid ...

Страница 431: ...ting the cables to the RDX drive Ê Connect the cables to the RDX drive Ê Connect power adapter cable C18 to the power cable C17 3 Ê Connect the power cable C17 to HDD backplane connector X17 Figure 313 Connecting the USB cable to the system board Ê Connect the USB cable C37 to the connector USB3 0 Front on the system board 1 1 Power adapter cable C18 2 USB cable C37 ...

Страница 432: ...uidance Ê Run the USB cable as shown 13 5 1 4 Concluding steps Ê Installing the fan holder on page 234 Ê Reassembling on page 63 Ê Connecting the power cord on page 67 Ê Resuming BitLocker functionality on page 112 13 5 2 Removing the RDX drive Upgrade and Repair Unit URU Hardware 10 minutes Tools Phillips PH2 No 2 screw driver ...

Страница 433: ...1 Ê Shutting down the server on page 55 Ê Disconnecting the power cord on page 56 Ê Getting access to the component on page 58 Ê Removing the fan holder on page 233 13 5 2 2 Removing the RDX drive Figure 315 Disconnecting the cables from the RDX drive Ê Disconnect both cables 1 2 I If you do not want to replace the RDX drive but remove it you can remove the USB cable C37 from the system board and ...

Страница 434: ...grade and Maintenance Manual RX2540 M4 Accessible drives Figure 316 Removing the RDX drive Ê Remove the 4 screws Ê Pull out the RDX drive Figure 317 Installing air grid to the front cage Ê Insert the air grid ...

Страница 435: ...minary steps Ê Ask the system administrator to eject all remaining backup or optical media from the backup or ODD before removing it from the server Ê Suspending BitLocker functionality on page 91 Ê Shutting down the server on page 55 Ê Disconnecting the power cord on page 56 Ê Getting access to the component on page 58 Ê Removing the fan holder on page 233 Ê Removing the front panel cage on page ...

Страница 436: ...g the new RDX drive Ê Installing the RDX drive on page 428 13 5 3 4 Concluding steps Ê Installing the front panel cage on page 445 Ê Installing the fan holder on page 234 Ê Reassembling on page 63 Ê Connecting the power cord on page 67 Ê Resuming BitLocker functionality on page 112 ...

Страница 437: ...re information see chapter Important information on page 41 14 1 Basic information In case of a defective ambient temperature sensor please replace the front panel Front panel module The front panel module consists of a holder and a front panel board These components are already pre assembled The USB connector of the front USB cable must be installed in the dependant recesses of the holder As an o...

Страница 438: ...oard a backup copy of important system configuration data is automatically stored from the system board NVRAM to the Chassis ID EPROM V CAUTION For that reason the front panel and system board must not be replaced simultaneously In this case restoring the system configuration data on the system board would fail When replacing the front panel the system information like server name and model housin...

Страница 439: ...ting access to the component on page 58 Ê Removing the fan holder on page 233 Ê If applicable remove the riser module see section Riser modules for GPGPU cards FL on page 82 14 2 1 2 Removing the front panel cage Ê Remove the ID card see figure 408 on page 544 Figure 318 Disconnecting the front panel cables Ê Disconnect the following cables from the system board 1 Front panel cable 2 If applicable...

Страница 440: ...panel Figure 319 Removing the front panel cage A Ê Press down the lever to unlock the front panel cage 1 Ê Push the front panel cage in the direction of the arrow 2 Figure 320 Removing the front panel cage B Ê Remove the front panel cage out of its bay ...

Страница 441: ...RX2540 M4 Upgrade and Maintenance Manual 441 Front panel 14 2 1 3 Removing the front panel module Figure 321 Removing the front panel module Ê Remove the screw see circle ...

Страница 442: ...442 Upgrade and Maintenance Manual RX2540 M4 Front panel Figure 322 Removing the front panel module Ê Push from the rear side of the front panel module in the direction of the arrow ...

Страница 443: ...Manual 443 Front panel Ê Take the front panel module out of its bay Figure 323 Removed front panel module Ê Remove the cable from the desired component Ê If applicable remove the cable tie 1 Front panel module 2 Front VGA 3 Front USB3 0 ...

Страница 444: ...le Ê Connect the following cables to the front panel module Ê If applicable fasten the front panel cable with two cable ties and VGA cable one cable tie V CAUTION The cable tie 1 is necessary to avoid that the front panel cable is disconnected when an ID card is inserted 1 Front panel cable 2 If applicable front VGA cable 3 Front USB3 0 cable ...

Страница 445: ...Insert the front panel module into the front panel cage see arrow Ê Fasten the fully inserted front panel module with one screw 14 2 1 5 Installing the front panel cage Figure 326 Installing the front panel cage Ê Run the cables through the opening Ê Insert the front panel cage into the chassis see arrow Ê Insert the ID card see figure 408 on page 544 ...

Страница 446: ...or GPGPU cards FL on page 82 Ê Carefully pull the front panel module into its bay and regard that the locking mechanism snaps in see circle and figure 328 on page 447 329 on page 447 V CAUTION Ensure that none of the cables are strained or damaged I The locking mechanism differs for the installations with LTO drives because the drive need more place so that an other locking recess point is needed ...

Страница 447: ...l For Installations with LTO drive Figure 328 Lock and screw for installations with LTO drive For installations without LTO drive Figure 329 Lock for installations without LTO drive 1 Lock 2 screw to fasten the front panel cage when a LTO drive is installed ...

Страница 448: ...your server s system information on the Chassis ID EPROM integrated into the front panel board For more information on how to obtain and use the ChassisId_Prom Tool see section Using the Chassis ID Prom Tool on page 118 Ê Resuming BitLocker functionality on page 112 14 3 Front VGA board 2 5 inch version 14 3 1 Installing the front VGA board Upgrade and Repair Unit URU Hardware 10 minutes Tools fla...

Страница 449: ...ge 56 Ê Getting access to the component on page 58 Ê Removing the fan holder on page 233 14 3 1 2 Removing the front panel module Ê Remove the front panel module see section Replacing the front panel module on page 438 14 3 1 3 Preparing the front panel module Figure 330 Removing the front VGA cover plate Ê Insert a flat screw driver to disengage VGA cover plate from the front panel cover 1 Ê Pull...

Страница 450: ...ont panel 14 3 1 4 Installing the front VGA board Figure 331 Installing the front VGA board Ê Insert the front VGA board as shown with the longer connector downward Figure 332 Mounting the front VGA board Ê Fasten the front VGA board with two screws ...

Страница 451: ...y on page 112 14 3 2 Removing the front VGA board 14 3 2 1 Preliminary steps Ê Suspending BitLocker functionality on page 91 Ê Locating the defective server on page 53 Ê Shutting down the server on page 55 Ê Disconnecting the power cord on page 56 Ê Getting access to the component on page 58 Ê Removing the fan holder on page 233 14 3 2 2 Removing the front panel module Ê Remove the front panel mod...

Страница 452: ...ing the front VGA board Figure 333 Removing the front VGA board Ê Remove the two screws of the front VGA board Ê Remove the front VGA board Figure 334 Installing the front VGA cover plate Ê Insert the front VGA cover plate from the front until it snaps in place see circle ...

Страница 453: ...y on page 112 14 3 3 Replacing the front VGA board 14 3 3 1 Preliminary steps Ê Suspending BitLocker functionality on page 91 Ê Locating the defective server on page 53 Ê Shutting down the server on page 55 Ê Disconnecting the power cord on page 56 Ê Getting access to the component on page 58 Ê Removing the fan holder on page 233 14 3 3 2 Removing the front panel module Ê Remove the front panel mo...

Страница 454: ...Ê Install the front panel module see section Replacing the front panel module on page 438 14 3 3 6 Concluding steps Ê Installing the fan holder on page 234 Ê Reassembling on page 63 Ê Connecting the power cord on page 67 Ê Switching on the server on page 70 Ê Resuming BitLocker functionality on page 112 14 4 Front USB3 0 connector 2 5 inch version I The maximum external cable length is limited to ...

Страница 455: ... page 55 Ê Disconnecting the power cord on page 56 Ê Getting access to the component on page 58 Ê Removing the fan holder on page 233 14 4 1 2 Removing the front panel module Ê Remove the front panel module see section Replacing the front panel module on page 438 14 4 1 3 Preparing the front USB3 0 connector Figure 335 Sticking the gaskets Ê Stick the self adhesive gaskets on the front USB3 0 conn...

Страница 456: ...lling the front USB3 0 connector Figure 336 Installing the front USB3 0 connector Ê Push the front USB3 0 connector into the front panel module Ê Fasten the front USB3 0 connector with two screws see circles V CAUTION Do not fasten the screw too firmly screw torque 0 4 Nm ...

Страница 457: ...nctionality on page 112 14 4 2 Removing the front USB3 0 connector 14 4 2 1 Preliminary steps Ê Suspending BitLocker functionality on page 91 Ê Locating the defective server on page 53 Ê Shutting down the server on page 55 Ê Disconnecting the power cord on page 56 Ê Getting access to the component on page 58 Ê Removing the fan holder on page 233 14 4 2 2 Removing the front panel module Ê Remove th...

Страница 458: ...onnect the front USB3 0 connector 2 14 4 2 4 Installing the front panel module Ê Install the front panel module see section Replacing the front panel module on page 438 14 4 2 5 Concluding steps Ê Installing the fan holder on page 234 Ê Reassembling on page 63 Ê Connecting the power cord on page 67 Ê Switching on the server on page 70 Ê Resuming BitLocker functionality on page 112 ...

Страница 459: ... Ê Remove the front panel module see section Replacing the front panel module on page 438 14 4 3 3 Removing the front USB3 0 connector Ê Remove the front USB3 0 connector see section Removing the front USB3 0 connector on page 458 14 4 3 4 Installing the new front USB3 0 connector Ê Install the new front USB3 0 connector see section Installing the front USB3 0 connector on page 454 14 4 3 5 Instal...

Страница 460: ...ial number and manufacturing data To avoid the loss of non default settings when replacing the system board a backup copy of important system configuration data is automatically stored from the system board NVRAM to the Chassis ID EPROM V CAUTION For that reason the front panel and system board must not be replaced simultaneously In this case restoring the system configuration data on the system b...

Страница 461: ...ng down the server on page 55 Ê Disconnecting the power cord on page 56 Ê Getting access to the component on page 58 Ê Removing the fan holder on page 233 14 5 1 2 Removing the front panel on QRL I The front panel on QRL and the front panel cable are combined in one spare part Figure 338 Disconnecting the front panel cable Ê Pull up the locking bar 1 Ê Remove the front panel cable 2 ...

Страница 462: ... Manual RX2540 M4 Front panel Figure 339 Removing the front panel on QRL A Ê Remove the two screws see circles Figure 340 Removing the front panel on QRL B Ê Remove the front panel Ê Pull the front panel cable out of the opening ...

Страница 463: ... the front panel on QRL Figure 341 Installing the front panel on QRL A Ê Thread the front panel cable through the opening Figure 342 Installing the front panel on the QRL B Ê Position the front panel on the ear Ê Fasten the front panel with two screws see figure 339 on page 462 ...

Страница 464: ... routing Ê Insert the front panel cable 1 Please ensure that the front panel cable is assembled as shown blue marking Ê Press down the locking bar 2 Figure 344 Routing the front panel cable on QRL Ê Run the front panel cable through the cable clamp as shown 14 5 1 4 Concluding steps Ê Installing the fan holder on page 234 Ê Reassembling on page 63 ...

Страница 465: ...ocker functionality on page 112 14 5 2 Replacing the ID card holder 14 5 2 1 Preliminary steps Ê Suspending BitLocker functionality on page 91 Ê Locating the defective server on page 53 Ê Shutting down the server on page 55 Ê Disconnecting the power cord on page 56 Ê If applicable Removing 2 5 inch HDD SSD modules on page 185 Ê Getting access to the component on page 58 Ê Removing the fan holder o...

Страница 466: ...anual RX2540 M4 Front panel Figure 345 Removing the ID card holder A Ê Press the ID card holder down 1 and push it in the direction of the arrow 2 Figure 346 Removing the ID card holder B Ê Pull the ID card holder out of its place ...

Страница 467: ...ID card see figure 408 on page 544 14 5 2 4 Concluding steps Ê Install the backplane 3 see section Installing the HDD backplane on page 191 Ê Installing the fan holder on page 234 Ê Reassembling on page 63 Ê If applicable Installing 2 5 inch HDD SSD modules on page 182 Ê Connecting the power cord on page 67 Ê Switching on the server on page 70 Ê Resuming BitLocker functionality on page 112 ...

Страница 468: ...AUTION For that reason the front panel and system board must not be replaced simultaneously In this case restoring the system configuration data on the system board would fail When replacing the front panel the system information like server name and model housing type serial number and manufacturing data are not restored automatically So never forget to restore it manually by Chassis ID Prom Tool...

Страница 469: ...ure 348 Disconnecting the front panel cable Ê Disconnect the following cables from the system board Ê Push the locking latch upward 4 to disengage the locking mechanism Ê Carefully push the front panel module out of its bay 5 V CAUTION Ensure that none of the cables are strained or damaged 1 Front panel cable 2 If applicable front VGA cable 3 Front USB3 0 cable 4 Power ODD cable 5 Data ODD cable ...

Страница 470: ...l Figure 349 Cables on the front panel module Ê Remove the cable from the desired component 1 Front panel cable 2 Front USB3 0 cable 3 Location for the optional front VGA connector including the front VGA board with cable 4 Power ODD cable 5 Data ODD cable ...

Страница 471: ...e Manual 471 Front panel Figure 350 Cable ties Ê Open the cable tie from the desired component 14 6 1 3 Installing the front panel module Figure 351 Cable ties Ê If applicable fasten the cable of the changed component with a cable tie ...

Страница 472: ...el Figure 352 Installing the front panel module Ê Connect the following cables to the front panel module Ê Insert the front panel module 1 Front panel cable 2 If applicable front USB3 0 cable 3 Power ODD cable 4 Data ODD cable If applicable Front VGA cable ...

Страница 473: ...dule into its bay and regard that the locking mechanism snaps in see circle V CAUTION Ensure that none of the cables are strained or damaged 14 6 1 4 Concluding steps Ê If applicable install the riser module see section Riser modules for GPGPU cards FL on page 82 Ê Installing the fan holder on page 234 1 Front panel cable 2 If applicable front VGA cable 3 Front USB3 0 cable If applicable power ODD...

Страница 474: ...e 118 Ê Resuming BitLocker functionality on page 112 14 7 Front VGA board 3 5 inch version 14 7 1 Installing the front VGA connector 14 7 1 1 Preliminary steps Ê Suspending BitLocker functionality on page 91 Ê Locating the defective server on page 53 Ê Shutting down the server on page 55 Ê Disconnecting the power cord on page 56 Ê Getting access to the component on page 58 Ê Removing the fan holde...

Страница 475: ...nce Manual 475 Front panel 14 7 1 3 Preparing the front panel module Figure 354 Removing the front VGA cover plate Ê Insert a flat screw driver to disengage VGA cover plate from the front panel cover 1 Ê Remove the VGA cover plate 2 ...

Страница 476: ...arrow Ê Fasten the front VGA board with the two screws see circles 14 7 1 5 Installing the front panel module Ê Install the front panel module see section Installing the front panel module on page 471 14 7 1 6 Concluding steps Ê Installing the fan holder on page 234 Ê Reassembling on page 63 Ê Connecting the power cord on page 67 Ê Switching on the server on page 70 Ê Resuming BitLocker functional...

Страница 477: ...sconnecting the power cord on page 56 Ê Getting access to the component on page 58 Ê Removing the fan holder on page 233 14 7 2 2 Removing the front panel module Ê Remove the front panel module see section Removing the front panel module on page 469 14 7 2 3 Removing the front VGA board Figure 356 Removing the front VGA board Ê Remove the two screws of the front VGA board Upgrade and Repair Unit U...

Страница 478: ...over plate 14 7 2 4 Installing the front panel module Ê Install the front panel module see section Installing the front panel module on page 471 14 7 2 5 Concluding steps Ê Installing the fan holder on page 234 Ê Reassembling on page 63 Ê Connecting the power cord on page 67 Ê Switching on the server on page 70 Ê Resuming BitLocker functionality on page 112 ...

Страница 479: ...Removing the front panel module Ê Remove the front panel module see section Removing the front panel module on page 469 14 7 3 3 Removing the front VGA board Ê Remove the front VGA board see section Removing the front VGA board on page 477 14 7 3 4 Installing the new front VGA board Ê Install the new front VGA board see section Installing the front VGA board on page 476 14 7 3 5 Installing the fro...

Страница 480: ...o 3 m 14 8 1 Installing the front USB3 0 connector 14 8 1 1 Preliminary steps Ê Suspending BitLocker functionality on page 91 Ê Locating the defective server on page 53 Ê Shutting down the server on page 55 Ê Disconnecting the power cord on page 56 Ê Getting access to the component on page 58 Ê Removing the fan holder on page 233 14 8 1 2 Removing the front panel module Ê Remove the front panel mo...

Страница 481: ...4 8 1 3 Preparing the front USB3 0 connector Figure 358 Sticking the gaskets Ê Stick the self adhesive gaskets on the front USB3 0 connector as shown Figure 359 Inserting the front USB3 0 connector Ê Push the front USB3 0 connector into the front panel module ...

Страница 482: ...TION Do not fasten the screw too firmly screw torque 0 4 Nm 14 8 1 5 Installing the front panel module Ê Install the front panel module see section Installing the front panel module on page 471 14 8 1 6 Concluding steps Ê Installing the fan holder on page 234 Ê Reassembling on page 63 Ê Connecting the power cord on page 67 Ê Switching on the server on page 70 Ê Resuming BitLocker functionality on ...

Страница 483: ...on page 53 Ê Shutting down the server on page 55 Ê Disconnecting the power cord on page 56 Ê Getting access to the component on page 58 Ê Removing the fan holder on page 233 14 8 2 2 Removing the front panel module Ê Remove the front panel module see section Removing the front panel module on page 469 Upgrade and Repair Unit URU Hardware 10 minutes Tools Phillips PZ2 screw driver hexagon screw dri...

Страница 484: ... Disconnect the front USB3 0 connector 14 8 2 4 Installing the front panel module Ê Install the front panel module see section Installing the front panel module on page 471 14 8 2 5 Concluding steps Ê Installing the fan holder on page 234 Ê Reassembling on page 63 Ê Connecting the power cord on page 67 Ê Switching on the server on page 70 Ê Resuming BitLocker functionality on page 112 ...

Страница 485: ...ng the front panel module Ê Remove the front panel module see section Removing the front panel module on page 469 14 8 3 3 Removing the front USB3 0 connector Ê Removing the front USB3 0 connector on page 484 14 8 3 4 Installing the new front USB3 0 connector Ê Install the new front VGA connector see section Installing the front USB3 0 connector on page 480 14 8 3 5 Installing the front panel modu...

Страница 486: ...RX2540 M4 Front panel 14 8 3 6 Concluding steps Ê Installing the fan holder on page 234 Ê Reassembling on page 63 Ê Connecting the power cord on page 67 Ê Switching on the server on page 70 Ê Resuming BitLocker functionality on page 112 ...

Страница 487: ...nformation on page 41 15 1 Serial connector optional 15 1 1 Installing the serial connector 15 1 1 1 Preliminary steps Ê Shutting down the server on page 55 Ê Disconnecting the power cord on page 56 Ê Getting access to the component on page 58 Upgrade and Repair Unit URU Hardware 5 minutes Tool flat screw driver hexagon screw driver 5 mm ...

Страница 488: ...off the metal cover Figure 362 Removing the metal cover Ê Twist and break off the metal cover Use a flat screw driver to break off the metal cover see close up 15 1 1 3 Installing the serial connector Figure 363 Removing the bolts from the serial connector Ê Remove the two hexagon bolts ...

Страница 489: ...rade and Maintenance Manual 489 Additional interfaces Figure 364 Installing the serial connector A Ê Insert the serial connector into the slot cover 1 Ê Connect the cable to the connector COM 1 on the system board 2 ...

Страница 490: ...onal interfaces Figure 365 Installing the serial connector B Ê Fasten the serial connector with two hexagon bolts see circles 15 1 1 4 Concluding steps Ê Reassembling on page 63 Ê Connecting the power cord on page 67 Ê Switching on the server on page 70 ...

Страница 491: ...ps Ê Shutting down the server on page 55 Ê Disconnecting the power cord on page 56 Ê Getting access to the component on page 58 15 1 2 2 Removing the serial connector Figure 366 Removing the serial connector A Ê Remove the two hexagon bolts see circles Upgrade and Repair Unit URU Hardware 5 minutes Tool hexagon screw driver 5 mm ...

Страница 492: ... interfaces Figure 367 Removing the serial connector B Ê Remove the serial connector 1 Ê Remove the cable from the system board 2 15 1 2 3 Concluding steps Ê Reassembling on page 63 Ê Connecting the power cord on page 67 Ê Switching on the server on page 70 ...

Страница 493: ...etting access to the component on page 58 15 1 3 2 Removing the serial connector Ê Removing the serial connector on page 491 15 1 3 3 Installing the serial connector Ê Installing the serial connector on page 488 15 1 3 4 Concluding steps Ê Reassembling on page 63 Ê Connecting the power cord on page 67 Ê Switching on the server on page 70 Upgrade and Repair Unit URU Hardware 5 minutes Tool hexagon ...

Страница 494: ...iminary steps Ê Shutting down the server on page 55 Ê Disconnecting the power cord on page 56 Ê Getting access to the component on page 58 15 2 1 2 Removing the rear VGA connector Figure 368 Removing the rear VGA connector A Ê Remove the two hexagon bolts see circles Upgrade and Repair Unit URU Hardware 5 minutes Tool hexagon screw driver 5 mm ...

Страница 495: ...RX2540 M4 Upgrade and Maintenance Manual 495 Additional interfaces Figure 369 Removing the rear VGA connector B Ê Remove the rear VGA connector 1 Ê Remove the cable from the system board 2 ...

Страница 496: ...540 M4 Additional interfaces 15 2 1 3 Installing the rear VGA connector Figure 370 Installing the rear VGA connector A Ê Insert the rear VGA connector into the slot cover 1 Ê Connect the cable to the connector Rear VGA on the system board 2 ...

Страница 497: ...al interfaces Figure 371 Installing the rear VGA connector B Ê Fasten the rear VGA connector with two hexagon bolts see circles 15 2 1 4 Concluding steps Ê Reassembling on page 63 Ê Connecting the power cord on page 67 Ê Switching on the server on page 70 ...

Страница 498: ...498 Upgrade and Maintenance Manual RX2540 M4 Additional interfaces ...

Страница 499: ... installing or removing internal options Circuit boards and soldered parts of internal options are exposed and can be damaged by static electricity Always discharge static build up e g by touching a grounded object before handling electrostatic sensitive devices ESDs Do not touch the circuitry on boards or soldered parts Hold circuit boards by their metallic areas or edges For more information see...

Страница 500: ...ograms from third party manufacturers to store key information for example drive encryption using Windows Bitlocker Drive Encryption iRMC microSD card The iRMC microSD card is necessary for using the embedded Lifecycle Management eLCM functionality of the iRMC M 2 SSD The system board offers two M 2 slots Key M with support for 42 mm 60 mm 80 mm and 110 mm long M 2 SSDs With the M 2 SSD an interna...

Страница 501: ...ithium batteries must be disposed of in accordance with local regulations concerning special waste For more information see section Environmental protection on page 51 Ensure to insert the CMOS battery with the positive pole facing up 16 2 1 1 Preliminary steps Ê Locating the defective server on page 53 Ê Shutting down the server on page 55 Ê Disconnecting the power cord on page 56 Ê Getting acces...

Страница 502: ...ht damage system board components in case of slipping If the CMOS battery cannot be ejected without the help of a tool it is recommended to use a tooth pick Ê Insert a new CMOS battery of the same type into the socket 3 and 4 16 2 1 3 Concluding steps Ê Dispose of the CMOS battery in accordance with local regulations concerning special waste Ê Installing the air duct on page 89 Ê Reassembling on p...

Страница 503: ...cker functionality on page 91 Ê Shutting down the server on page 55 Ê Disconnecting the power cord on page 56 Ê Getting access to the component on page 58 1 TPM SPI Trusted Platform Module 3 Special screw for TPM 2 TPM spacer 4 TPM bit insert for TPM special screw Field Replaceable Unit FRU Hardware 5 minutes Software 5 minutes Tools Bit screw driver TPM bit insert For Japan TPM module fixing tool...

Страница 504: ... module 1 see section Handling riser modules on page 71 16 3 1 2 Installing the TPM I The onboard position of the TPM connector can be found in section Connectors and indicators on page 549 Figure 374 Position for the TPM spacer Figure 375 Inserting the TPM spacer on the system board Ê Insert the TPM spacer into the hole on the system board ...

Страница 505: ...r Figure 377 Installing the TPM Ê Connect the TPM to the system board 1 Ê Fasten the TPM with the special screw for the TPM using the TPM bit insert or TPM module fixing tool Japan 2 V CAUTION Do not fasten the screw too firmly Stop it by extent where the head of the screw lightly touches the TPM torque value of 0 6 Nm the description of this torque value doesn t apply to Japan ...

Страница 506: ...ker functionality on page 112 Ê Enable TPM in the system board BIOS Proceed as follows Ê Switch on or restart your server Ê As soon as the startup screen appears enter the BIOS setup menu Ê Select the Advanced menu Ê Select the Trusted Computing submenu Ê Set the TPM Support and TPM State settings to Enabled Ê Under Pending TPM operation select the desired TPM operation mode Ê Save your changes an...

Страница 507: ...r and to decrypt the volume Ask the system administrator to turn off BitLocker protection using the BitLocker setup wizard available either from the Control Panel or Windows Explorer Ê Open Bitlocker Drive Encryption by clicking the Start button clicking Control Panel clicking Security and then clicking Bitlocker Drive Encryption I Administrator permission required If you are prompted for an admin...

Страница 508: ...Select the Advanced menu Ê Select the Trusted Computing submenu Ê Set the TPM Support and TPM State settings to Disabled Ê Save your changes and exit the BIOS I For detailed information on how to access the BIOS and modify settings see the corresponding BIOS Setup Utility reference manual Ê Suspending BitLocker functionality on page 91 Ê Shutting down the server on page 55 Ê Disconnecting the powe...

Страница 509: ...a thin slotted screw driver e g watchmaker s screw driver or the dedicated TPM screw driver for Japan 2 V CAUTION Ensure to turn the screw clockwise in order to remove it Slowly and carefully increase the pressure on the screw until it begins to turn The effort when loosing the screw should be as low as possible Otherwise the thin metal bar may break rendering it impossible to loosen the screw Ê R...

Страница 510: ...Ê If applicable install the OCP module see section Installing the OCP module on page 249 Ê Install the system board see section Installing the new system board on page 540 16 3 2 3 Concluding steps Ê If applicable install the riser module 1 see section Handling riser modules on page 71 Ê Installing the fan holder on page 234 Ê Installing the air duct on page 89 Ê Reassembling on page 63 Ê Connecti...

Страница 511: ...ver on page 55 Ê Disconnecting the power cord on page 56 Ê Getting access to the component on page 58 Ê Removing the air duct on page 88 Ê Removing the fan holder on page 233 Ê If applicable remove the riser module 1 see section Handling riser modules on page 71 Field Replaceable Unit FRU Hardware 40 minutes Tools Removing the system board Phillips PH2 No 2 screw driver hexagon screw driver 5 mm R...

Страница 512: ...ystem board Ê Install the TPM see section Installing the TPM on page 503 16 3 3 4 Concluding steps Ê Installing the fan holder on page 234 Ê If applicable install the riser module 1 see section Handling riser modules on page 71 Ê Installing the air duct on page 89 Ê Reassembling on page 63 Ê Connecting the power cord on page 67 Ê Switching on the server on page 70 Ê Resuming BitLocker functionalit...

Страница 513: ...ugh the iRMC web interface For more information see the ServerView embedded Lifecycle Management eLCM user guide 16 4 1 Installing the iRMC microSD card 16 4 1 1 Preliminary steps Ê Shutting down the server on page 55 Ê Disconnecting the power cord on page 56 Ê Getting access to the component on page 58 Ê If applicable remove the riser module 1 see section Handling riser modules on page 71 16 4 1 ...

Страница 514: ...d indicators on the system board on page 549 16 4 1 3 Concluding steps Ê If applicable install the riser module 1 see section Handling riser modules on page 71 Ê Reassembling on page 63 Ê Connecting the power cord on page 67 Ê Switching on the server on page 70 16 4 2 Removing the iRMC microSD card 16 4 2 1 Preliminary steps Ê Shutting down the server on page 55 Ê Disconnecting the power cord on p...

Страница 515: ...the iRMC microSD card straight out of its slot 2 V CAUTION The iRMC microSD card contains customer information After removing the iRMC microSD card hand the card over to the customer 16 4 2 3 Concluding steps Ê If applicable install the riser module 1 see section Handling riser modules on page 71 Ê Reassembling on page 63 Ê Connecting the power cord on page 67 Ê Switching on the server on page 70 ...

Страница 516: ...RMC microSD card on page 514 V CAUTION The microSD card contains customer information After replacing the microSD card hand the defective card over to the customer If the customer requests disposal of the defective microSD card proceed as follows Ê Using a pair of side cutting pliers cut the microSD card in half Ê Install the new iRMC microSD card see section Installing the iRMC microSD card on pa...

Страница 517: ...boot device or data storage device 16 5 1 Installing an M 2 SSD 16 5 1 1 Preliminary steps Ê Shutting down the server on page 55 Ê Disconnecting the power cord on page 56 Ê Getting access to the component on page 58 Ê If applicable remove the riser module 1 see section Handling riser modules on page 71 16 5 1 2 Installing the M 2 SSD Figure 383 Example M 2 SSD Upgrade and Repair Unit URU Hardware ...

Страница 518: ...SD has been installed before Ê Remove the screw see orange circles in figure 384 I If the hexagon stand off is unscrewed as well remove the screw from the hexagon stand off Ê Install the hexagon stand off on the right position depending on the length of the M 2 SSD 1 M 2 slot 1 2 M 2 slot 2 iRMC S5 external connectors TPM LAN 1 Slot 3 CPU 1 Riser slot 1 SATA 0 3 Slot 1 CPU 1 Slot 9 CPU 2 Riser slo...

Страница 519: ...he M 2 SSD into the M 2 slot at a slight angle Figure 386 Fastening the M 2 SSD Ê Fasten the M 2 SSD with the screw see circle 16 5 1 3 Concluding steps Ê If applicable install the riser module 1 see section Handling riser modules on page 71 Ê Reassembling on page 63 Ê Connecting the power cord on page 67 Ê Switching on the server on page 70 ...

Страница 520: ...The server will boot from the installer CD Ê Follow the on screen instructions to install the ESXi When the installation is complete you will be asked to reboot the server Ê While the server is rebooting enter the BIOS setup menu again and select the M 2 SSD as primary boot device The installation of the ESXi to the M 2 SSD is complete I For more information on how to access the BIOS and modify se...

Страница 521: ...rd on page 56 Ê Getting access to the component on page 58 Ê If applicable remove the riser module 1 see section Handling riser modules on page 71 16 5 2 2 Removing the M 2 SSD Figure 387 Removing the M 2 SSD A Ê Remove the screw see circle Upgrade and Repair Unit URU Hardware 5 minutes Tools Phillips PH1 No 1 screw driver Hexagon screw driver for moving the screw to another hexagon stand off ...

Страница 522: ...8 16 5 2 3 Concluding steps Ê If applicable install the riser module 1 see section Handling riser modules on page 71 Ê Reassembling on page 63 Ê Connecting the power cord on page 67 Ê Switching on the server on page 70 16 5 3 Replacing the M 2 SSD 16 5 3 1 Preliminary steps Ê Shutting down the server on page 55 Ê Disconnecting the power cord on page 56 Ê Getting access to the component on page 58 ...

Страница 523: ...Removing the M 2 SSD on page 521 Ê Install the new M 2 SSD see section Installing an M 2 SSD on page 517 16 5 3 3 Concluding steps Ê If applicable install the riser module 1 see section Handling riser modules on page 71 Ê Reassembling on page 63 Ê Connecting the power cord on page 67 Ê Switching on the server on page 70 16 5 3 4 Software configuration I To install the ESXi to the M 2 SSD see secti...

Страница 524: ...rd on page 56 Ê Getting access to the component on page 58 Ê Removing the air duct on page 88 16 6 1 2 Installing the Dual microSD 64GB Enterprise Figure 389 Position on the system board Upgrade and Repair Unit URU Hardware 5 minutes Tools tool less Front Panel1 Front VGA FAN 5 6 SYS FP2 USB3 0 Front USB3 0 INT1 PSU1 PSU2 CPU 2 DIMM 2J CPU 2 DIMM 1H CPU 2 DIMM 1G CPU 2 DIMM 2G CPU 2 DIMM 1J CPU 2 ...

Страница 525: ...64GB Enterprise into the holder Ê Insert the Dual microSD 64GB Enterprise into a slight angle into the holder Ê Push down the Dual microSD 64GB Enterprise until it clicks in see arrow Figure 391 Connecting cables to the Dual microSD 64GB Enterprise Ê Connect the cable C46 to the Dual microSD 64GB Enterprise 1 Ê Connect the cable C47 to the Dual microSD 64GB Enterprise 2 ...

Страница 526: ...onnecting the cables to the system board Ê Connect the two cables to the system board Installing the Dual microSD 64GB Enterprise onto the air duct Figure 393 Mounting positions onto the air duct Ê The mounting position is located on the air duct 1 Cable C46 to the connector USB3 0 INT1 2 Cable C47 to the connector ROC 1 FBU 1 ...

Страница 527: ...SD 64GB Enterprise onto the air duct Ê Place the holder on the shoulder screw caps of the air duct 1 Ê Push the holder in direction of the arrow until it engages 2 Installing the Dual microSD 64GB Enterprise on the riser card holder Figure 395 Mounting positions on the riser modules Ê The mounting position is located on the riser module 2 2 FBU 2 or Dual microSD 64GB Enterprise ...

Страница 528: ...le 2 see section Installing the riser module 2 FL on page 86 Figure 396 Installing the Dual microSD 64GB Enterprise onto the riser card holder Ê Place the holder on the shoulder screw caps of the riser card holder 1 Ê Push the holder in direction of the arrow until it engages 2 Ê Install the air duct see section Installing the air duct on page 89 16 6 1 3 Concluding steps Ê Reassembling on page 63...

Страница 529: ...ry steps Ê Shutting down the server on page 55 Ê Disconnecting the power cord on page 56 Ê Getting access to the component on page 58 16 6 2 2 Removing the Dual microSD 64GB Enterprise Removing the Dual microSD 64GB Enterprise from the air duct Figure 397 Removing the Dual microSD 64GB Enterprise from the air duct Upgrade and Repair Unit URU Hardware 5 minutes Tools tool less ...

Страница 530: ... 64GB Enterprise from the riser card holder Figure 398 Removing the Dual microSD 64GB Enterprise from the riser card holder Ê Remove the air duct see section Removing the air duct on page 88 Ê Lift up the green locking handle on the holder see circle and push the holder in the direction of the arrow as it will go 1 Ê Remove the holder from the riser card holder 2 Ê Remove the riser module 2 see se...

Страница 531: ...9 Disconnecting the cables from the Dual microSD 64GB Enterprise Ê Disconnect both cables C46 C47 from the Dual microSD 64GB Enterprise 1 2 Figure 400 Removing the Dual microSD 64GB Enterprise from the holder Ê Push on the green locking handle see circle and remove the Dual microSD 64GB Enterprise in a slight angle from the holder see arrow ...

Страница 532: ...fective server on page 53 Ê Shutting down the server on page 55 Ê Disconnecting the power cord on page 56 Ê Getting access to the component on page 58 16 6 3 2 Replacing the Dual microSD 64GB Enterprise Ê Remove the defective Dual microSD 64GB Enterprise see section Removing the Dual microSD 64GB Enterprise on page 529 Ê Remove both microSD cards from the defective Dual microSD 64GB Enterprise Pro...

Страница 533: ...t the microSD card into the microSD slot on the controller 1 until it locks in place 2 Ê Install the new Dual microSD 64GB Enterprise see section Installing the Dual microSD 64GB Enterprise on page 524 16 6 3 3 Concluding steps Ê If applicable Installing the air duct on page 89 Ê Reassembling on page 63 Ê Connecting the power cord on page 67 Ê Switching on the server on page 70 16 6 4 Replacing th...

Страница 534: ... The microSD card contains customer information After replacing the microSD card hand the defective card over to the customer If the customer requests disposal of the defective microSD card proceed as follows Ê Using a pair of side cutting pliers cut the microSD card in half Ê Install the new microSD card on the Dual microSD 64GB Enterprise Proceed as described in the following Ê With the label fa...

Страница 535: ...m board and connected to the new system board For a detailed description see section Replacing the TPM on page 511 The TPM is activated in the system BIOS Field Replaceable Unit FRU Hardware 50 minutes Software 10 minutes Tools Replacing the system board Phillips PH2 No 2 screw driver hexagon screw driver 5 mm for OCP bolts Magnifying glass for inspecting CPU socket springs recommended Replacing t...

Страница 536: ...oard a backup copy of important system configuration data is automatically stored from the system board NVRAM to the Chassis ID EPROM V CAUTION For that reason the front panel and system board must not be replaced simultaneously In this case restoring the system configuration data on the system board would fail After replacing the system board the backup data is restored from the Chassis ID board ...

Страница 537: ... the replacement Ê If applicable remove the riser modules see section Handling riser modules on page 71 Ê Expansion cards see section Removing an expansion card on page 263 I Before removing the expansion cards take a note on the installation slot number for each card Ensure that you install the card in the slot it was located before the replacement Ê Remove the OCP module if applicable see sectio...

Страница 538: ...odules Ê Remove the four OCP bolts see circles Figure 404 Removing the crossbar Ê Remove the three screws of the crossbar see circles Ê Remove the crossbar iRMC S5 connectors TPM LAN 1 SATA 0 3 COM 1 SATA 4 7 SATA ODD Slot OCP module Micro SD LAN M USB3 0 1 2 LAN 1 M Slot 8 CPU2 Slot 7 CPU2 PWR4 VROC ...

Страница 539: ...the I O panel see arrow V CAUTION Always take the system board with both hands Never lift the system board one sided or at a heat sink because the solder connections between the socket and the system board come under tension and increase the risk of damage and malfunction Don t damage the EMI springs which are essential to comply with applicable EMC regulations and satisfy cooling requirements and...

Страница 540: ...n the new system board with a new CMOS battery see section CMOS battery on page 501 because charging of CMOS battery might be reduced during stocked in warehouse Ê Remove the heat sink with the CPU from the defective system board see section Removing the heat sink on page 356 Ê Remove the protective plastic cover from the CPU socket of the new system board and fit it onto the socket of the defecti...

Страница 541: ...nstalling an expansion card on page 253 I Ensure that you install each card in the slots it was located before the replacement Ê Installing the fan holder on page 234 Ê Installing the air duct on page 89 Ê Reassembling on page 63 Ê Install the PSUs see section Installing a hot plug PSU on page 128 Ê Connecting the power cord on page 67 Ê Connect all external cables Ê Switching on the server on pag...

Страница 542: ...anual Ê Verifying system information backup restore on page 99 Ê Verifying the system time settings on page 109 Ê Looking for MAC WWN GUID and SAS addresses on page 115 Ê Updating the NIC configuration file in a Linux and VMware environment on page 112 Ê Resuming BitLocker functionality on page 112 Ê If applicable reconfigure your network settings in the operation system according to the original ...

Страница 543: ...7 1 Mechanical overview 17 1 1 Server front 17 1 1 1 3 5 inch HDD versions Figure 406 Front side 3 5 inch HDDs up to 8 HDDs Figure 407 Front side 3 5 inch HDDs up to 12 HDDs Pos Component 1 Front panel module 2 ODD 3 Space for HDDs depending on the configuration ...

Страница 544: ...endix A 17 1 1 2 2 5 inch HDD versions Figure 408 Front side 2 5 inch HDDs up to 16 HDDs Figure 409 Front side 2 5 inch HDDs up to 24 HDDs Pos Component 1 Front panel module 2 ODD 3 Space for LTO drive 4 Space for HDDs depending on the configuration ...

Страница 545: ...cation for riser module 2 optional 2 Optional expansion cards Slot 7 9 3 Installation location for riser module 1 optional 4 PCI slots 2 3 for optional expansion cards 5 PCI slot 1 dedicated slot for modular RAID controller 6 I O panel 7 OCP module The OCP module is an option if no OCP module has been ordered you find a dummy cover installed in this place 8 Up to 2 PSUs dummy cover ...

Страница 546: ...2 optional 2 Optional expansion cards Slot 7 9 3 Installation location for riser module 1 optional 4 PCI slots 2 3 for optional expansion cards 5 PCI slot 1 dedicated slot for modular RAID controller 6 I O panel 7 OCP module The OCP module is an option if no OCP module has been ordered you find a dummy cover installed in this place 8 Up to 2 PSUs dummy cover 9 Adapters for the liquid cooling ...

Страница 547: ...PRIMERGY RX2540 M4 interior example 2 5 inch HDD model The OCP module is an option Pos Component 1 Up to 2 PSUs dummy cover 2 Front panel module front VGA option dummy cover 3 ODD option dummy cover 4 Up to 24x 2 5 inch HDDs dummy modules 5 Fan modules 6 CPUs 7 Main memory 8 PCI slots 9 OCP module 10 PCIe SSD rear ...

Страница 548: ...ample 2 5 inch HDD model The OCP module is an option Pos Component 1 Up to 2 PSUs dummy cover 2 Front panel module front VGA option dummy cover 3 ODD option dummy cover 4 Up to 24x 2 5 inch HDDs dummy modules 5 Fan modules 6 CPUs with LC 7 Main memory with memory covers 8 PCI slots 9 Location for the OCP module 10 PCIe SSD rear ...

Страница 549: ...1B CPU 1 DIMM 2B CPU 1 DIMM 1A CPU 1 DIMM 2A PWR ODD OOB FRONT FP2 USB3 0 Front SATA 4 7 SATA ODD USB3 0 INT1 PSU1 PSU2 JP2 JP1 1 1 2 Slot OCP module Micro SD CPU 2 DIMM 2J CPU 2 DIMM 1H CPU 2 DIMM 1G CPU 2 DIMM 2G CPU 2 DIMM 1J CPU 2 DIMM 2H CPU 2 DIMM 1K CPU 2 DIMM 2L CPU 2 DIMM 2M CPU 2 DIMM 1M CPU 2 DIMM 2K CPU 2 DIMM 1L CPU 1 DIMM 2D CPU 1 DIMM 1D CPU 1 DIMM 2E CPU 1 DIMM 1E CPU 1 DIMM 2F CPU...

Страница 550: ...oling connector CPU1 12 PWR ODD ODD power connector 13 OOB FRONT Out Of Band HDD status connector 14 VPP CPU1 Connector for PCIe SSD SSF signalling CPU1 15 TPM Connector for Trusted Platform Module TPM 16 SATA ODD ODD data connector 17 HDD LED2 LED activity connector 2 18 Intrusion Intrusion switch connector 19 HDD LED1 LED activity connector 1 20 Rear VGA Rear VGA connector 21 SATA 4 7 SATA HDD c...

Страница 551: ...U 1 DIMM 1C CPU 1 DIMM 2C CPU 1 DIMM 1B CPU 1 DIMM 2B CPU 1 DIMM 1A CPU 1 DIMM 2A PWR ODD OOB FRONT FP2 USB3 0 Front SATA 4 7 SATA ODD USB3 0 INT1 PSU1 PSU2 JP2 JP1 1 1 2 Slot OCP module Micro SD CPU 2 DIMM 2J CPU 2 DIMM 1H CPU 2 DIMM 1G CPU 2 DIMM 2G CPU 2 DIMM 1J CPU 2 DIMM 2H CPU 2 DIMM 1K CPU 2 DIMM 2L CPU 2 DIMM 2M CPU 2 DIMM 1M CPU 2 DIMM 2K CPU 2 DIMM 1L CPU 1 DIMM 2D CPU 1 DIMM 1D CPU 1 DI...

Страница 552: ...blue flashing The server has been highlighted for easy identification using the iRMC AVR with disabled local VGA output B CSS Customer Self Service off No critical event detected CSS component orange on Prefailure event detected CSS component orange flashing CSS component failure detected C GEL Global Error LED off No critical event detected non CSS component orange on Prefailure event detected no...

Страница 553: ...ing iRMC S5 okay K System fan off system fan running orange on system fan failure L Battery orange on Battery failure M Standby Power orange on All standby voltages ok N Main Power green on All main voltages ok O MBC green on PSU power ok P MBC orange on MBC error T M 2 SSD orange on M 2 SSD faulty U LC Pump orange on LC Pump faulty Indicator Status Description ...

Страница 554: ...54 Upgrade and Maintenance Manual RX2540 M4 Appendix A 17 2 2 Server front 17 2 2 1 Indicators on the front panel Figure 416 Indicators on the front panel Figure 417 Indicators on the front panel on QRL ...

Страница 555: ...dicator off No critical event detected CSS component orange on Prefailure event detected CSS component For HDDs SSDs see also HDD SSD prefailure detection on page 557 flashing orange CSS component failure detected 3 Global Error indicator see also iRMC related status signals on page 557 off No critical event detected non CSS component orange on Prefailure event detected non CSS component flashing ...

Страница 556: ...he server has been connected to the mains 6 AC connected indicator green on The server is switched off and connected to the mains standby mode The server has been switched on but Power Cycle Delay settings delay it from turning on for a specified time I After connecting the server to the mains it will take about 60 seconds until the server will enter standby mode and can be switched on off The ser...

Страница 557: ...ding on your hardware configuration HDD SSD prefailure detection will be supported The requirements are iRMC S5 Firmware 1 2 or later supported OOB RAID system ID indicator Global error indicator Description blue flashing off A remote connection has been established Local VGA output has been disabled during the remote session blue flashing orange flashing An emergency flash of the iRMC firmware is...

Страница 558: ...M4 Appendix A 17 2 2 2 Indicator on the ODD I ODDs may have an indicator or not Figure 418 Example Indicator on the ODD Pos Indicator Status Description 1 Activity indicator off The ODD is inactive green on The storage medium is being accessed ...

Страница 559: ...D is inactive green on The HDD SSD being accessed 2 Error indicator off No HDD SSD error detected orange on An HDD SSD error has been detected Possible causes The drive is defective and needs replacing A RAID rebuild process has failed The HDD SSD module has not been inserted correctly flashing orange slowly HDD SSD RAID rebuild is in progress Data is being restored after replacing a drive that ha...

Страница 560: ...etup Utility reference manual I Some of the devices connected require special software e g drivers see documentation for the connected device No Description 1 COM1 connector optional 2 Management LAN connector for iRMC S5 server management function 3 Video connector VGA 4 LAN connector LAN2 5 Shared LAN connector LAN1 6 2x USB 3 0 connector 7 OCP module optional different variants The serial inter...

Страница 561: ...s on OCP modules The LAN connectors on the OCP modules are numbered in ascending order from right to left beginning with 0 17 2 3 2 Indicators on the I O panel Global Error ID and CSS indicators Figure 421 Global Error ID and CSS indicators visible through the chassis perforation ...

Страница 562: ...been highlighted using ServerView Operations Manager iRMC web interface or the ID button on the front panel for easy identification blue flashing The server has been highlighted for easy identification using the iRMC AVR with disabled local VGA output Global Error indicator see also iRMC related status signals on page 563 off No critical event detected non CSS component orange on Prefailure event ...

Страница 563: ...ection Updating or recovering the BIOS and iRMC S5 on page 96 ID indicator Global error indicator Description blue flashing off A remote connection has been established Local VGA output has been disabled during the remote session blue flashing orange flashing An emergency flash of the iRMC firmware is in progress ...

Страница 564: ... link transfer indicator green on A LAN connection has been established off LAN is not connected flashing green LAN data transfer is in progress 2 LAN speed indicator yellow on Data traffic at a transfer rate of 1 Gbit s green on Data traffic at a transfer rate of 100 Mbit s off Data traffic at a transfer rate of 10 Mbit s 1 2 4 7 8 5 ...

Страница 565: ... s The separate management LAN connector is used as a management interface iRMC S4 and is prepared for operation with the Remote Management Optionally LAN connector 1 can also be used for iRMC S4 server management Pos Indicator Status Description 1 LAN link transfer indicator short flashing green 3x then off A LAN connection has been established 1 Gbit or 100 Mbit and EEE mode is active 2 LAN spee...

Страница 566: ...566 Upgrade and Maintenance Manual RX2540 M4 Appendix A 17 2 3 3 Indicator on hot plug PSU Figure 423 Indicator on hot plug PSU AC PSU Figure 424 Indicator on hot plug PSU DC PSU 0 ...

Страница 567: ...ing properly flashing orange An overload has been detected The PSU is still running but failure might be imminent orange on An PSU failure has been detected Possible causes Over under voltage Overheating Fan failure of Beep Description Action 1 Memory not installed Ê Check if the memory module is installed Ê Check if the memory module is installed correctly 2 Recovery started Recovery procedure is...

Страница 568: ...bled 2 Serial console redirection is considered a console input device if enabled This beep code is only an information 6 Flash update is failed A processing bar and an error message is displayed on the screen This beep code is only an information 8 Platform PCI resource requirements cannot be met Ê Check the connection of your expansion card whether it is installed in a correct slot Ê Enter the B...

Страница 569: ...to keep the jumper Password Clear enabled This jumper setting will permanently delete the current BIOS password and apply default BIOS settings Recovery BIOS enabled 3 JP3 BIOS Flash Write Protect Default BIOS Flash write protect enabled INDICATE CSS t 1 JP3 SATA ODD JP2 JP1 1 1 2 CPU 1 DIMM 2D CPU 1 DIMM 1D CPU 1 DIMM 2E CPU 1 DIMM 1E CPU 1 DIMM 2F CPU 1 DIMM 1F LC1 CPU1 M 2 SSD1 M 2 SSD2 Riser s...

Страница 570: ...the power cord on page 56 Ê Take the system down to its minimum startup configuration Ê Connecting the power cord on page 67 Ê Connect a display to the server Ê Switch on the server see section Switching on the server on page 70 Field Replaceable Units FRU Component Notes System board no TPM or expansion cards installed 1 CPU with CPU heat sink installed in CPU slot CPU 1 1 memory module installed...

Страница 571: ...not included in the minimum startup configuration the server must be shut down immediately after the diagnostic process is complete POST phase has been passed The minimum startup configuration must be used exclusively for diagnostic purposes by maintenance personnel never in daily operation ...

Страница 572: ...572 Upgrade and Maintenance Manual RX2540 M4 Appendix A ...

Страница 573: ...he following documents are available in this appendix Cable plan for FUJITSU Server PRIMERGY RX2540 M4 Reference Manual List of Released Adapters incl Installation sequence and priority List of all used screws for PRIMERGY Servers Assembled in Germany and Japan ...

Страница 574: ...574 Upgrade and Maintenance Manual RX2540 M4 Appendix B ...

Страница 575: ...FUJITSU Server PRIMERGY RX2540 M4 System Cabling Overview System Cabling Overview English Cable plan for November 2018 ...

Страница 576: ...31 Data 8x3 5 onboard 32 Data 8x3 5 PCIeCtrl EP4x0i 33 Data 8x3 5 PCIe Ctrl EP5x0i 34 Data 12x3 5 PCIeCtrl EP4x0i 35 Data 12x3 5 PCIeCtrl EP5x0i 36 Data 4x2 5 12x3 5 PCIeCtrl EP5x0i 37 Data 8x2 5 onboard 38 Data 8x2 5 PCIeCtrl EP4x0i 39 Data 8x2 5 PCIeCtrl EP5x0i 40 Data 16x2 5 Expander EP4x0i 41 Data 16x2 5 Expander EP5x0i 42 Data 3x8x2 5 PCIeCtrl CP EP4x0i 43 Data 2x 8x2 5 PCIeCtrl EP5x0i 44 Dat...

Страница 577: ...306 CBL PWR 3CO 600 C18 T26139 Y2193 V501 CBL PWR RDX 400 C19 T26139 Y3946 V705 CBL GPU PWR 320 GTL C20 T26139 Y3946 V706 CBL_PWR_GPU_3_RAIL C40 T26139 Y3946 V703 CBL_GPU_BP_830 C21 T26139 Y4040 V38 CBL SAS3 0 500 C22 T26139 Y4040 V25 CBL SAS3 0A720 C23 T26139 Y4040 V26 CBL SAS3 0A500 C24 T26139 Y4040 V8 CBL HOST BP 470 C25 T26139 Y4040 V9 CBL HOST BP 540 C26 T26139 Y4040 V10 CBL HOST BP 620 C27 T...

Страница 578: ...5 V612 CBL_VPP_320 50 C46 T26139 Y4049 V2 CBL_BS100SD_450 C47 T26139 Y4018 V8 CBL_I2C_ROC_330 C48 T26139 Y2361 V105 CBL_HDD_SIG_2x450 C50 T26139 Y4050 V14 CBL_HOST BP1_850 C51 T26139 Y4050 V15 CBL_HOST BP2_850 C52 T26139 Y4050 V17 CBL_HOST BP1_300 C53 T26139 Y4050 V18 CBL_HOST BP2_300 C55 T26139 Y4050 V19 CBL_HOST BP1_650 C63 T26139 Y4040 V63 CBL_SAS3_810 C70 T26139 Y4040 V75 CBL_SAS3_SATA_350 ...

Страница 579: ...nn Cable plan System Board D3384 FRONTPANEL 1 USB 3 0 FRONT FP2 FRONT VGA SATA 4 7 PWR 2 PWR 3 PWR 4 SATA ODD SATA 0 3 PWR 1 OOB FRONT REAR VGA HDD LED 1 HDD LED 2 HDD LED 7 VPP CPU1 VPP CPU2 ROC I2C2 INTRUSION USB 3 0 INT1 ...

Страница 580: ...x 16x2 5 Cable plan C1 C4 C2 FRONTPANEL 1 USB 3 0 Front Front VGA FRONTPANEL 2 Rear VGA Front Panel ODD Front Panel USB VGA Module ODD data ODD PWR C8 Rear VGA System Board D3384 FRONTPANEL 1 USB 3 0 Front Front VGA FP 2 Rear VGA ...

Страница 581: ...7 RX2540 M4 Basic 12x3 5 24x2 5 Cable plan C5 System Board D3384 FRONTPANEL 1 USB 3 0 Front Front VGA FP 2 Rear VGA C8 Rear VGA Front Panel on QRL ...

Страница 582: ...8 RX2540 M4 Basic Serial RS 232 Cable plan System Board D3384 RS 232 onboard RS 232 rear C6 ...

Страница 583: ...stem Board D3384 OOB FRONT 4x 3 5 HDD Backplane 2 X17 ODD PWR X40 HDD PWR X11 OOB X9 SAS SATA 4x 3 5 HDD Backplane 1 X17 ODD PWR X40 HDD PWR X11 OOB X9 SAS SATA C7 X10 HDD PWR X11 OOB X5 SAS SATA 4x2 5 rear HDD SSD Backplane SB BP1 BP2 BP4 OOB FRONT ...

Страница 584: ...c OOB Cable 12x3 5 Cable plan System Board D3384 OOB FRONT 12x3 5 HDD Backplane with Expander X40 PWR 1 X41 PWR 2 X42 OOB SAS 3 0 Expander X1 X2 C7 X10 HDD PWR X11 OOB X5 SAS SATA 4x2 5 rear HDD SSD Backplane SB BP1 BP4 ...

Страница 585: ...SATA 8x2 5 HDD Backplane 1 X17 ODD PWR X40 HDD PWR X11 OOB X9 SAS SATA X10 SAS SATA 8x2 5 HDD Backplane 2 X17 ODD PWR X40 HDD PWR X11 OOB X9 SAS SATA X10 SAS SATA 8x2 5 HDD Backplane 3 C7 X10 HDD PWR X11 OOB X5 SAS SATA 4x2 5 rear HDD SSD Backplane SB BP1 BP2 BP3 BP4 System Board D3384 I2C5 OOB FRONT ...

Страница 586: ...0_X1 8x2 5 PCIeSSD Backplane 3 P3_X4 P2_X3 X1 OOB P1_X2 P0_X1 4x2 5 PCIeSSD Backplane 2 X17 ODD PWR X40 HDD PWR X11 OOB X9 SAS SATA X10 SAS SATA 8x2 5 HDD Backplane 1 C7 X11 OOB 4x2 5 rear PCIeSSD Backplane SB BP1 BP2 BP3 BP4 System Board D3384 I2C5 OOB FRONT P3_X4 P2_X3 P1_X2 P0_X1 ...

Страница 587: ...13 RX2540 M4 Basic HDD Activity EP5x0i Cable plan System Board D3384 EP5x0i slot1 EP5x0i slot2 boot J14 J14 C41 J10 J10 HDD LED1 C41 HDD LED2 EP5x0i slot7 J14 J10 HDD LED7 C41 ...

Страница 588: ... Power 4x3 5 ODD Cable plan C9 Front Panel ODD Front Panel USB VGA Module ODD data ODD PWR C16 4x 3 5 HDD Backplane 1 X17 ODD PWR X40 HDD PWR X11 OOB X9 SAS SATA System Board D3384 PWR 2 PWR 3 PWR 4 PWR 12V 1 PWR 1 ...

Страница 589: ...t Panel USB VGA Module ODD data ODD PWR C16 4x 3 5 HDD Backplane 1 X17 ODD PWR X40 HDD PWR X11 OOB X9 SAS SATA 4x 3 5 HDD Backplane 2 X17 ODD PWR X40 HDD PWR X11 OOB X9 SAS SATA C10 System Board D3384 PWR 12V 2 PWR 12V 3 PWR 12V 4 PWR 12V 1 PWR 2 PWR 3 PWR 4 PWR 1 ...

Страница 590: ...540 M4 Power 12x3 5 Cable plan System Board D3384 PWR 12V 2 PWR 12V 3 PWR 12V 4 PWR 12V 1 12x3 5 HDD Backplane with Expander X40 PWR 1 X41 PWR 2 X42 OOB SAS 3 0 Expander X1 X2 C10 C10 PWR 2 PWR 3 PWR 4 PWR 1 ...

Страница 591: ...le plan System Board D3384 PWR 12V 2 PWR 12V 3 PWR 4 PWR 12V 1 Front Panel ODD Front Panel USB VGA Module ODD data ODD PWR C17 8x 2 5 HDD Backplane 1 X17 ODD PWR X40 HDD PWR X11 OOB X9 SAS SATA X10 SAS SATA C9 PWR 2 PWR 3 PWR 4 PWR 1 ...

Страница 592: ...Module ODD data ODD PWR C17 C10 X17 ODD PWR X40 HDD PWR X11 OOB X9 SAS SATA X10 SAS SATA 8x2 5 HDD Backplane 1 X X X X X X X X X3 PWR SAS 3 0 Expander C13 X17 ODD PWR X40 HDD PWR X11 OOB X9 SAS SATA X10 SAS SATA 8x2 5 HDD Backplane 2 C9 System Board D3384 PWR 2 PWR 3 PWR 4 PWR 1 ...

Страница 593: ...SAS SATA 8x2 5 HDD Backplane 1 X17 ODD PWR X40 HDD PWR X11 OOB X9 SAS SATA X10 SAS SATA 8x2 5 HDD Backplane 2 X17 ODD PWR X40 HDD PWR X11 OOB X9 SAS SATA X10 SAS SATA 8x2 5 HDD Backplane 3 C6 C10 C10 System Board D3384 PWR 1 PWR 2 PWR 3 PWR 4 X X X X X X X X X3 PWR SAS 3 0 Expander C13 ...

Страница 594: ... X11 OOB X9 SAS SATA X10 SAS SATA 8x2 5 HDD Backplane 2 Front Panel ODD Front Panel USB VGA Module ODD data ODD PWR C17 C18 LTO PWR SAS X17 ODD PWR X40 HDD PWR X11 OOB X9 SAS SATA X10 SAS SATA 8x2 5 HDD Backplane 2 Front Panel ODD Front Panel USB VGA Module ODD data ODD PWR C17 C36 ...

Страница 595: ... Power rear HDD SSD Cable plan System Board D3384 PWR 12V 2 PWR 12V 3 PWR 12V 4 PWR 12V 1 X10 HDD PWR X11 OOB X5 SAS SATA 4x2 5 rear HDD SSD Backplane C11 PWR 12V 2 PWR 12V 3 PWR 4 PWR 12V 1 PWR 2 PWR 3 PWR 4 PWR 1 ...

Страница 596: ...SSD SFF Cable plan X40 HDD PWR X11 OOB P0 X1 4x2 5 front PCIe SSD SFF Backplane C11 P1 X2 P2 X3 P3 X4 X40 HDD PWR X11 OOB P0 X1 4x2 5 rear PCIe SSD SFF Backplane C12 P1 X2 P2 X3 P3 X4 System Board D3384 PWR 2 PWR 3 PWR 4 PWR 1 ...

Страница 597: ...Class 1 Slot 3 PWR PWR GPU Class 2 Slot 9 PWR System Board D3384 PWR 2 PWR 3 PWR 4 PWR 1 GPU Class 2 Slot 3 PWR GPU Class 3 Slot 9 PWR GPU Class 3 Slot 3 PWR C10 C10 C19 C19 P1 C20 P2 P3 P4 P5 GPU Class 2 Quadro M4000 GPU Class 1 GRID K1 GRID K2 QUADRO P4000 QUADRO P5000 QUADRO P6000 GPU Class 3 TESLA M60 TESLA P40 TESLA P100 TESLA V100 ...

Страница 598: ...ODD Front Panel USB VGA Module ODD data ODD PWR C16 4x 3 5 HDD Backplane 2 X17 ODD PWR X40 HDD PWR X11 OOB X9 SAS SATA 4x 3 5 HDD Backplane 1 X17 ODD PWR X40 HDD PWR X11 OOB X9 SAS SATA PWR 12V 2 PWR 12V 3 PWR 12V 4 PWR 12V 1 System Board D3384 PWR 2 PWR 3 PWR 4 PWR 1 C40 ...

Страница 599: ...25 RX2540 M4 Power FBU EP4x0i Cable plan System Board D3384 RAID Ctrl Slot2 boot RAID Ctrl Slot7 FBU FBU FBU 1 C14 FBU 2 C14 ...

Страница 600: ...26 RX2540 M4 Power FBU EP5x0i Cable plan System Board D3384 EP5x01 Slot2 boot EP5x01 Slot7 J14 J14 FBU 1 C15 J10 J10 C15 FBU 1 ...

Страница 601: ...27 RX2540 M4 Data ODD Cable plan System Board D3384 SATA 4 7 SATA ODD SATA 0 3 Front Panel ODD Front Panel USB VGA Module ODD data ODD PWR C3 ...

Страница 602: ...28 RX2540 M4 Data 4x3 5 onboard Cable plan System Board D3384 SATA 4 7 SATA ODD SATA 0 3 4x 3 5 HDD Backplane 1 X17 ODD PWR X40 HDD PWR X11 OOB X9 SAS SATA C38 ...

Страница 603: ...29 RX2540 M4 Data 4x3 5 PCIeCtrl EP4x0i Cable plan System Board D3384 RAID Ctrl Slot2 boot MLC1 MLC2 4x 3 5 HDD Backplane 1 X17 ODD PWR X40 HDD PWR X11 OOB X9 SAS SATA C23 ...

Страница 604: ...30 RX2540 M4 Data 4x3 5 PCIeCtrl EP5x0i Cable plan System Board D3384 EP5x01 Slot2 boot C0 C1 4x 3 5 HDD Backplane 1 X17 ODD PWR X40 HDD PWR X11 OOB X9 SAS SATA C23 C2 C3 ...

Страница 605: ...ata 8x3 5 onboard Cable plan System Board D3384 SATA 4 7 SATA ODD SATA 0 3 4x 3 5 HDD Backplane 1 X17 ODD PWR X40 HDD PWR X11 OOB X9 SAS SATA 4x 3 5 HDD Backplane 2 X17 ODD PWR X40 HDD PWR X11 OOB X9 SAS SATA C38 C39 ...

Страница 606: ...3 5 PCIeCtrl EP4x0i Cable plan 4x 3 5 HDD Backplane 1 X17 ODD PWR X40 HDD PWR X11 OOB X9 SAS SATA 4x 3 5 HDD Backplane 2 X17 ODD PWR X40 HDD PWR X11 OOB X9 SAS SATA C23 System Board D3384 RAID Ctrl Slot2 boot MLC1 MLC2 C22 ...

Страница 607: ...3 5 PCIe Ctrl EP5x0i Cable plan System Board D3384 EP5x0i Slot2 boot 4x 3 5 HDD Backplane 1 X17 ODD PWR X40 HDD PWR X11 OOB X9 SAS SATA 4x 3 5 HDD Backplane 2 X17 ODD PWR X40 HDD PWR X11 OOB X9 SAS SATA C23 C0 C1 C2 C3 C22 ...

Страница 608: ... Data 12x3 5 PCIeCtrl EP4x0i Cable plan 12x3 5 HDD Backplane with Expander X40 PWR 1 X41 PWR 2 X42 OOB SAS 3 0 Expander X1 X2 C21 C21 RAID Ctrl PCIe Slot2 MLC1 MLC2 System Board D3384 RAID Ctrl Slot2 boot MLC1 MLC2 ...

Страница 609: ...35 RX2540 M4 Data 12x3 5 PCIeCtrl EP5x0i Cable plan 12x3 5 HDD Backplane with Expander X40 PWR 1 X41 PWR 2 X42 OOB SAS 3 0 Expander X1 X2 C21 C21 System Board D3384 EP5x0i Slot2 boot C0 C1 C2 C3 ...

Страница 610: ...eCtrl EP5x0i Cable plan 12x3 5 HDD Backplane with Expander X40 PWR 1 X41 PWR 2 X42 OOB SAS 3 0 Expander X1 X2 C21 C21 System Board D3384 B EP5x0i slot2 boot C1 C1 C2 C3 X40 HDD PWR X11 OOB X5 SAS SATA 4x2 5 rear HDD SSD Backplane C0 C24 ...

Страница 611: ...37 RX2540 M4 Data 8x2 5 onboard Cable plan System Board D3384 SATA 4 7 SATA ODD SATA 0 3 X17 ODD PWR X40 HDD PWR X11 OOB X9 SAS SATA X10 SAS SATA 8x2 5 HDD Backplane 1 C27 C28 ...

Страница 612: ...RX2540 M4 Data 8x2 5 PCIeCtrl EP4x0i Cable plan RAID Ctrl PCIe Slot2 X17 ODD PWR X40 HDD PWR X11 OOB X9 SAS SATA X10 SAS SATA 8x2 5 HDD Backplane 1 C24 C25 System Board D3384 RAID Ctrl Slot2 boot MLC1 MLC2 ...

Страница 613: ...39 RX2540 M4 Data 8x2 5 PCIeCtrl EP5x0i Cable plan System Board D3384 EP5x0i Slot2 boot C0 C1 X17 ODD PWR X40 HDD PWR X11 OOB X9 SAS SATA X10 SAS SATA 8x2 5 HDD Backplane 1 C24 C25 C2 C3 ...

Страница 614: ... HDD PWR X11 OOB X10 SAS SATA X9 SAS SATA 8x2 5 HDD Backplane 1 X3 PWR SAS 3 0 Expander X17 ODD PWR X40 HDD PWR X11 OOB X9 SAS SATA X10 SAS SATA 8x2 5 HDD Backplane 2 System Board D3384 RAID Ctrl Slot2 boot MLC1 MLC2 X X X15 X14 X13 X12 X11 X10 C23 C23 C31 C30 C30 C33 ...

Страница 615: ...0 HDD PWR X11 OOB X10 SAS SATA X9 SAS SATA 8x2 5 HDD Backplane 1 X3 PWR SAS 3 0 Expander X17 ODD PWR X40 HDD PWR X11 OOB X9 SAS SATA X10 SAS SATA 8x2 5 HDD Backplane 2 System Board D3384 EP5x01 Slot2 boot C0 C1 X X X15 X14 X13 X12 X11 X10 C23 C23 C33 C31 C30 C30 C2 C3 ...

Страница 616: ...0 SAS SATA 8x2 5 HDD Backplane 1 X17 ODD PWR X40 HDD PWR X11 OOB X9 SAS SATA X10 SAS SATA 8x2 5 HDD Backplane 2 System Board D3384 RAID Ctrl Slot1 P1 P2 C25 C24 C34 C26 RAID Ctrl Slot2 boot P1 P2 X17 ODD PWR X40 HDD PWR X11 OOB X9 SAS SATA X10 SAS SATA 8x2 5 HDD Backplane 3 RAID Ctrl Slot7 P1 P2 C26 C22 ...

Страница 617: ...P5x0i Cable plan System Board D3384 EP5x01 Slot2 boot C0 C1 X17 ODD PWR X40 HDD PWR X11 OOB X9 SAS SATA X10 SAS SATA 8x2 5 HDD Backplane 1 C24 C25 C2 C3 X17 ODD PWR X40 HDD PWR X11 OOB X9 SAS SATA X10 SAS SATA 8x2 5 HDD Backplane 2 C26 C34 ...

Страница 618: ...D Backplane 1 X17 ODD PWR X40 HDD PWR X11 OOB X9 SAS SATA X10 SAS SATA 8x2 5 HDD Backplane 2 System Board D3384 C25 C24 C26 C34 X17 ODD PWR X40 HDD PWR X11 OOB X9 SAS SATA X10 SAS SATA 8x2 5 HDD Backplane 3 C63 EP5x01 Slot2 boot C0 C1 C2 C3 EP5x01 Slot1 C0 C1 C3 X40 HDD PWR X11 OOB X5 SAS SATA 4x2 5 rear HDD Backplane C24 C2 C63 ...

Страница 619: ... plan X17 ODD PWR X40 HDD PWR X11 OOB X9 SAS SATA X10 SAS SATA 8x2 5 HDD Backplane 1 X17 ODD PWR X40 HDD PWR X11 OOB X9 SAS SATA X10 SAS SATA 8x2 5 HDD Backplane 2 System Board D3384 C25 C24 C34 C26 EP5x01 Slot2 boot C0 C1 C2 C3 EP5x01 Slot1 C0 C1 C3 C2 ...

Страница 620: ...A 8x2 5 HDD Backplane 1 X3 PWR SAS 3 0 Expander X17 ODD PWR X40 HDD PWR X11 OOB X9 SAS SATA X10 SAS SATA 8x2 5 HDD Backplane 2 System Board D3384 RAID Ctrl Slot2 boot MLC1 MLC1 X1 X2 X15 X14 X13 X12 X11 X10 C23 C23 X17 ODD PWR X40 HDD PWR X11 OOB X9 SAS SATA X10 SAS SATA 8x2 5 HDD Backplane 3 C31 C32 C31 C30 C30 C33 ...

Страница 621: ...TA 8x2 5 HDD Backplane 1 X3 PWR SAS 3 0 Expander X17 ODD PWR X40 HDD PWR X11 OOB X9 SAS SATA X10 SAS SATA 8x2 5 HDD Backplane 2 X1 X2 X15 X14 X13 X12 X11 X10 C23 C23 C31 C32 C31 C30 C30 System Board D3384 EP5x01 Slot2 boot C0 C1 C2 C3 X17 ODD PWR X40 HDD PWR X11 OOB X9 SAS SATA X10 SAS SATA 8x2 5 HDD Backplane 3 C33 ...

Страница 622: ... SAS 3 0 Expander X17 ODD PWR X40 HDD PWR X11 OOB X9 SAS SATA X10 SAS SATA 8x2 5 HDD Backplane 2 X1 X2 X15 X14 X13 X12 X11 X10 C23 C23 C31 C32 C31 C30 C30 System Board D3384 B EP5x0i slot2 boot C0 C1 C2 C3 X17 ODD PWR X40 HDD PWR X11 OOB X9 SAS SATA X10 SAS SATA 8x2 5 HDD Backplane 3 C33 X40 HDD PWR X11 OOB X5 SAS SATA 4x2 5 rear HDD SSD Backplane C24 ...

Страница 623: ...SAS SATA 8x2 5 HDD Backplane 1 X3 PWR SAS 3 0 Expander X17 ODD PWR X40 HDD PWR X11 OOB X9 SAS SATA X10 SAS SATA 8x2 5 HDD Backplane 2 X1 X2 X15 X14 X13 X12 X11 X10 C23 C23 C31 C32 C24 C25 C30 C30 System Board D3384 EP5x0i slot2 boot C0 C1 C2 C3 X17 ODD PWR X40 HDD PWR X11 OOB X9 SAS SATA X10 SAS SATA 8x2 5 HDD Backplane 3 ...

Страница 624: ...50 RX2540 M4 Data RDX LTO Cable plan RDX USB USB 3 0 PWR LTO PWR SAS System Board D3384 USB 3 0 Int1 C37 C36 System Board D3384 RAID Ctrl Slot1 MLC1 MLC2 ...

Страница 625: ...51 RX2540 M4 Data rearHDD 4x2 5 PCIeCtrl EP4x0i Cable plan System Board D3384 RAID Ctrl Slot7 MLC1 MLC2 X10 HDD PWR X11 OOB X5 SAS SATA 4x2 5 rear HDD SSD Backplane C29 ...

Страница 626: ...52 RX2540 M4 Data rearHDD 4x2 5 PCIe Ctrl EP5x0i Cable plan System Board D3384 EP5x01 Slot2 boot C0 C1 X10 HDD PWR X11 OOB X5 SAS SATA 4x2 5 rear HDD SSD Backplane C24 C2 C3 ...

Страница 627: ... 0 Con 5 4x 2 5 PCIe Backplane 1 port 3 port 2 port 1 port 0 PWR C43 4x 2 5 PCIe Backplane 2 port 3 port 2 port 1 port 0 PWR PCIe Retimer 3 Slot9 Port 1 Port 3 Port 2 Port 0 Con 5 4x 2 5 PCIe rear BP port 0 PWR port 1 port 3 port 2 C44 C42 System Board D3384 PWR 12V 2 PWR 12V 1 PWR 2 PWR 3 PWR 4 PWR 1 C11 oob VPP oob VPP oob VPP VPP CPU1 VPP CPU2 C12 C12 C45 P1 P2 C45 P1 P2 P3 P3 ...

Страница 628: ...ckplane 1 port 0 port 1 port 2 port 3 X12 C51 4x 2 5 PCIe Backplane 2 port 0 port 1 port 2 port 3 X12 3rd EP5x01 Slot9 Port 1 Port 3 Port 2 Port 0 Con 5 4x 2 5 PCIe rear BP port 0 X12 port 1 port 3 port 2 C51 C53 System Board D3384 PWR 12V 2 PWR 12V 1 PWR 2 PWR 3 PWR 4 PWR 1 C11 X1 VPP X1 VPP X11 VPP HDD LED2 HDD LED1 C12 C12 C41 P2 P2 C50 C50 HDD LED7 C48 P3 P1 P1 C52 ...

Страница 629: ...01 Exp rear PCIeSSD Cable plan X3 PWR SAS 3 0 Expander X1 X2 X15 X14 X13 X12 X11 X10 C23 C23 System Board D3384 EP5x01 Slot2 boot C0 C1 C2 C3 4x 2 5 PCIe rear BP port 0 X12 port 1 port 3 port 2 X11 VPP C55 C41 Con 5 HDD LED2 ...

Страница 630: ...56 RX2540 M4 Dual microSD 64GB Enterprise Cable plan Dual microSD 64GB Enterprise C47 C46 Systemboard D3384 USB3 0 Int1 VROC CON1 CON4 ...

Страница 631: ...57 RX2540 M4 PDUAL_AP200 Cable plan SATA ODD SAS Controller slot2 boot MLC2 MLC1 TFM PDUAL AP200 Slot 7 SATA JP3 SATA JP1 Systemboard D3384 C44 P2 P1 ...

Страница 632: ...tion 3 1 front 2 front 1 rear 2 front 1 rear 3 1 front PSAS CP400i D3327 for PDUAL AP200i 1 1 PRAID EP520i Controller Card SAS RAID int PRAID EP540i 2 2 1 3 1 2 1 PRAID EP580i 2 2 front 1 front 1 rear 1 rear PRAID CP400i 2 2 front 1 front PRAID EP420i 3 2 front 1 front 1 fr re 1 fr re PRAID EP400i 3 2 front 1 front PRAID EP420e 4 7 8 1 5 2 3 4 6 PRAID EP540e Controller Card SAS RAID ext Controller...

Страница 633: ...7 1 4 5 8 9 3 4 7 8 PLAN EP QL41212 25Gb 2p SFP28 8 9 10 1 5 6 2 3 4 7 8 10 1 5 6 2 7 8 PLAN EP OCe14102 2x 10Gb BASE T 2 9 10 1 5 6 2 3 4 7 8 5 6 2 3 4 PLAN EP X550 T2 2x10GBASE T 4 9 10 1 7 8 PLAN EP OCe14102 2x 10Gb 4 9 10 1 5 6 2 3 4 7 8 5 6 2 3 4 PLAN CP 4x1Gbit Cu Intel I350 T4 4 9 10 1 7 8 PLAN CP 2x1Gbit Cu Intel I350 T2 4 9 10 1 5 6 2 3 4 7 8 5 6 2 3 4 PLAN EP MCX4 EN 40Gb 2p QSFP 8 9 10 ...

Страница 634: ...List of all used screws for PRIMERGY Servers Assembled in Germany and Japan January 2017 ...

Страница 635: ...Torx 6 Plus silver 0 2 Nm X F6 SNA2 03121 M2 x3 mm Torx 6 Plus silver 0 2 Nm S202 X C26192 Y10 C112 M2 x 4 mm countersink Phillips PH1 silver 0 09 Nm X F6 SW4N2 03121 M2 x 4 mm countersink Phillips PH1 silver 0 09 Nm S203 X C26192 Y10 C166 M2 x 4 mm Torx 6 Plus black 0 09 Nm S204 X X C26192 Y10 C103 Replacement screw for A3C40137316 LSZ L3 25419 01 M2 5 x 4 mm Phillips PH1 JIS 1012 type H1 silver ...

Страница 636: ...hite 0 09 Nm S304 X A3C40142649 M3 x 4 mm countersink Phillips PH1 silver 0 4 Nm S305 X X Screws in kit S26361 D3305 A10 M3 x 4 mm Phillips PH1 silver 0 4Nm S306 X C26192 Y10 C67 M3 x 4 5 mm hexagon head 5 mm cross PZ2 silver 0 6 Nm X F6 SW2N3 06121 M3 x 5 mm with spring and washer Phillips PH2 silver 0 6 Nm S307 X C26192 Y10 C68 M3 x 6 mm hexagon head 5 mm cross PZ2 silver 0 6 Nm X F6 SW2N3 06121...

Страница 637: ... 0 6 Nm S502 X X C26192 Y10 C176 REM 3 x 15 mm special bit insert one way head black 0 6 Nm S503 X X C26192 Y10 C174 Cross head EJOT PT 8 mm silver 0 4 Nm S504 X C26192 Y10 C75 UNC 6 32 x 4 8 mm hexagon head 5 mm cross PZ2 black 0 6 Nm X CP126822 01 UNC 6 32 x 4 8 mm hexagon head 5 mm cross PZ2 black 0 6 Nm S505 X C26192 Y10 C200 UNC 6 32 x 4 mm Phillips PH1 silver 0 6 Nm X CA32432 0164 or CA32432...

Страница 638: ...6 mm bolt 8 mm total 14 mm hexagon screw driver 5 mm silver 0 6 Nm S604 X X C26192 Y1 C67 standoff M3 x 6 mm bolt 12 mm total 18 mm hexagon screw driver 5 mm silver 0 6 Nm S605 X X C26361 B443 C210 standoff M3 x 3 2 mm bolt 4 mm total 7 2 mm hexagon screw driver 5 mm silver 0 6 Nm mechanic part in one chassis provided by chassis vendor X X C26361 K1444 C11 M3 X 4 5 mm cheese head screw with spacer...

Страница 639: ...s Assembled in Germany and Japan Page 6 6 Document History Date Item Description 04 July 2017 05 July 2017 Name of a tool for fastening hexagon bolt Old hexagon nut New hexagon spanner head hexagon screw driver 27 July 2017 S306 F6 SW2N3 06121 Changed part number of the screw ...

Отзывы: