


258
Upgrade and Maintenance Manual
RX2540 M4
Expansion cards and backup units
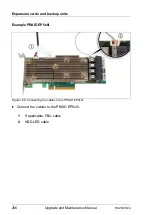
Figure 168: Installing Retimer controller in slot 3
Ê
Connect the VPP cable to the connector "CON5" on the Retimer controller
(1).
Ê
Install the Retimer controller in slot 3 (see arrow).
Ê
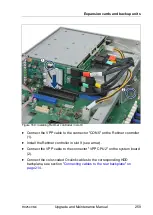
Connect the VPP cable to the connector "VPP CPU1" on the system board
(see close-up 2).
Ê
Connect the color-coded Oculink cables to the corresponding HDD
backplane, see section
"Connecting a 4x 2.5-inch PCIe SSD backplane" on
.
Example configuration with one Retimer controller in slot 9
I
To connect the rear PCIe SSD backplane, install the Retimer controller
in slot 9.
Содержание PRIMERGY RX2540 M4
Страница 40: ...40 Upgrade and Maintenance Manual RX2540 M4 Before you start ...
Страница 90: ...90 Upgrade and Maintenance Manual RX2540 M4 Basic hardware procedures ...
Страница 136: ...136 Upgrade and Maintenance Manual RX2540 M4 Power supply unit PSU ...
Страница 228: ...228 Upgrade and Maintenance Manual RX2540 M4 Hard disk drives HDD and solid state drives SSD ...
Страница 344: ...344 Upgrade and Maintenance Manual RX2540 M4 Main memory ...
Страница 362: ...362 Upgrade and Maintenance Manual RX2540 M4 Processor CPU ...
Страница 390: ...390 Upgrade and Maintenance Manual RX2540 M4 Liquid cooling LC ...
Страница 498: ...498 Upgrade and Maintenance Manual RX2540 M4 Additional interfaces ...
Страница 572: ...572 Upgrade and Maintenance Manual RX2540 M4 Appendix A ...
Страница 574: ...574 Upgrade and Maintenance Manual RX2540 M4 Appendix B ...
Страница 575: ...FUJITSU Server PRIMERGY RX2540 M4 System Cabling Overview System Cabling Overview English Cable plan for November 2018 ...
Страница 582: ...8 RX2540 M4 Basic Serial RS 232 Cable plan System Board D3384 RS 232 onboard RS 232 rear C6 ...
Страница 634: ...List of all used screws for PRIMERGY Servers Assembled in Germany and Japan January 2017 ...