


RX1330 M3
Upgrade and Maintenance Manual
123
Power supply unit (PSU)
Ê
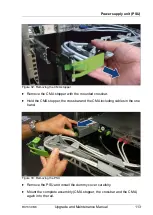
Push the lock spring inward to unlock the CMA stopper (see figure
).
V
CAUTION!
In case of not enough space at the under side, unlock the CMA
stopper of the server below and pull out the CMA to the rear side
Ê
Remove the CMA stopper with the mounted crossbar (see figure
).
Ê
Hold the CMA stopper, the crossbar and the CMA including cables in the one
hand.
Ê
Remove the FJBU and install the dummy cover carefully.
Ê
Mount the complete assembly (CMA stopper, the crossbar and the CMA)
again into the rail.
6.4.2.1
Preliminary steps
Ê
No steps needed.
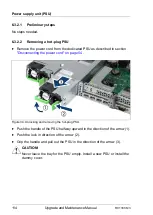
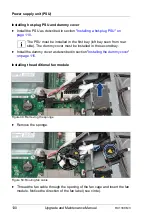
6.4.2.2
Removing an FJBU
Figure 41: Removing an FJBU
Ê
Press in on the green locking latch (1).
Ê
While keeping the green locking latch pressed, pull the FJBU out of its bay
(2).
V
CAUTION!
Never leave the bay for the FJBU empty. Install a new FJBU or install the
dummy cover.
Содержание PRIMERGY RX1330 M3
Страница 20: ...Upgrade and Maintenance Manual RX1330 M3 Contents ...
Страница 48: ...48 Upgrade and Maintenance Manual RX1330 M3 Important information ...
Страница 70: ...70 Upgrade and Maintenance Manual RX1330 M3 Basic hardware procedures ...
Страница 132: ...132 Upgrade and Maintenance Manual RX1330 M3 Power supply unit PSU ...
Страница 178: ...178 Upgrade and Maintenance Manual RX1330 M3 Hard disk drive HDD solid state drive SSD ...
Страница 184: ...184 Upgrade and Maintenance Manual RX1330 M3 Fans ...
Страница 222: ...222 Upgrade and Maintenance Manual RX1330 M3 Expansion cards and backup units ...
Страница 244: ...244 Upgrade and Maintenance Manual RX1330 M3 Processor CPU ...
Страница 310: ...310 Upgrade and Maintenance Manual RX1330 M3 System board and components ...