


GX2460 M1
Upgrade and Maintenance Manual
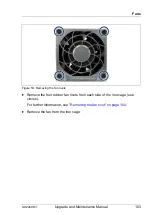
95
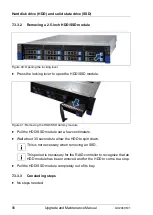
Hard disk drive (HDD) and solid state drive (SSD)
Figure 45: Installing the HDD backplane
Ê
Place the HDD backplane on the hooks (1) and fold it back (2).
Ê
Fasten the two thumb screws (3).
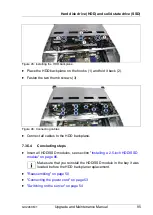
Figure 46: Connecting cables
Ê
Connect all cables to the HDD backplane.
7.3.5.4
Concluding steps
Ê
Insert all HDD/SSD modules, see section
"Installing a 2.5-inch HDD/SSD
.
I
Make sure that you reinstall the HDD/SSD module in the bay it was
located before the HDD backplane replacement.
Ê
Ê
"Connecting the power cord" on page 53
Ê
Содержание PRIMERGY GX2460 M1
Страница 16: ...16 Upgrade and Maintenance Manual GX2460 M1 Contents ...
Страница 26: ...26 Upgrade and Maintenance Manual GX2460 M1 Before you start ...
Страница 56: ...56 Upgrade and Maintenance Manual GX2460 M1 Basic hardware procedures ...
Страница 78: ...78 Upgrade and Maintenance Manual GX2460 M1 Power supply unit PSU ...
Страница 96: ...96 Upgrade and Maintenance Manual GX2460 M1 Hard disk drive HDD and solid state drive SSD ...
Страница 108: ...108 Upgrade and Maintenance Manual GX2460 M1 Fans ...
Страница 143: ...GX2460 M1 Upgrade and Maintenance Manual 143 Expansion cards and riser modules Ê Switching on the server on page 54 ...
Страница 153: ...GX2460 M1 Upgrade and Maintenance Manual 153 Expansion cards and riser modules Ê Switching on the server on page 54 ...
Страница 158: ...158 Upgrade and Maintenance Manual GX2460 M1 Expansion cards and riser modules ...
Страница 225: ...GX2460 M1 Upgrade and Maintenance Manual 225 Appendix A Figure 183 Indicators on the system board ...
Страница 242: ...242 Upgrade and Maintenance Manual GX2460 M1 Appendix A ...
Страница 244: ...244 Upgrade and Maintenance Manual GX2460 M1 Appendix B ...
Страница 250: ...RAID Card RAID Card HDD Back Plane 411T61300070 SAS MLC1 SAS MLC2 SATA 0 3 SATA 4 7 C17 C17 ...


