


254
Upgrade and Maintenance Manual
CX270
S2
Processors
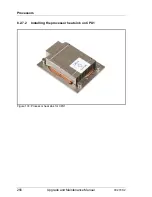
Figure 172: Installing the heat sink CPU0 (A)
Ê
Carefully seat the heat sink on the four threaded holes as shown.
V
CAUTION!
– Ensure that the screws on the heat sink are properly seated on the
threaded holes (see circles).
– Ensure that the heat sink cooling fins match the direction of the
airflow!
Содержание Primergy CX270 S2
Страница 6: ...Upgrade and Maintenance Manual CX270 S2 ...
Страница 18: ...18 Upgrade and Maintenance Manual CX270 S2 ...
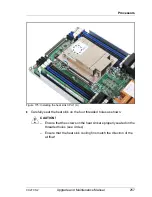
Страница 246: ...246 Upgrade and Maintenance Manual CX270 S2 Processors Figure 163 Opening the load plate B Ê Fully open the load plate ...
Страница 302: ...302 Upgrade and Maintenance Manual CX270 S2 System board and components ...