Operation and Cleaning
5-2 C156-E228-02EN
1) Disk insertion slot
Insert and eject an optical disk cartridge into and out of this slot.
2) Eject button & BUSY LED (indicator lamp)
On this optical disk drive, the eject button serves also as the BUSY LED
(indicator lamp). Eject an optical disk cartridge by pressing this button,
which also goes on in green during seeking and during erasing, writing or
reading of data. When ejection is disabled by an SCSI command, an optical
disk cartridge cannot be taken out.
3) Manual eject hole
Use this hole to eject an optical disk cartridge manually at power-off.
5.1.2 Precautions
To maintain the performance and reliability of the drive and to prevent data from
being damaged, observe the following instructions:
•
Do not eject an optical disk cartridge while the drive is in the Busy state.
Particularly, do not manually eject the cartridge by force.
•
Be extra careful not to insert the wrong media such as a floppy disk or foreign
matter, which causes a malfunction of the drive.
5.1.3 Inserting an optical disk cartridge
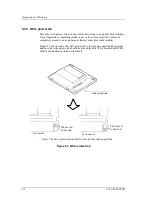
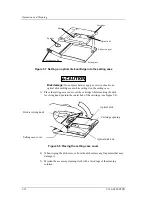
Insert an optical disk cartridge as follows (see Figure 5.2):
(1) While the drive is powered on:
1) Make sure that there is no other optical disk cartridge in the drive.
2) Hold an optical disk cartridge with the printed shutter surface facing upward.
3) Press the opening section of the cartridge against the disk insertion slot.
4) Hold the center of the rear half of the cartridge to insert the cartridge straight
into the slot until the cartridge is lowered to the bottom (a little inside the
operator panel).
The cartridge starts to be loaded when it has been inserted. The BUSY LED
indicator lamp goes on immediately and goes off in a few seconds, indicating the
completion of loading.
Notes:
1. Insert a cartridge as far as it will go until the BUSY LED indicator lamp goes
on.
2. A cartridge may not be sufficiently inserted if you press only the left or right
edge of the rear half of the cartridge. Be sure to push the central part straight
into the slot as far as it will go.
Содержание MCM3064SS
Страница 1: ...C156 E228 02EN MCM3064SS MCM3130SS MCP3064SS MCP3130SS OPTICAL DISK DRIVES PRODUCT MANUAL ...
Страница 4: ...This page is intentionally left blank ...
Страница 8: ...This page is intentionally left blank ...
Страница 20: ...This page is intentionally left blank ...
Страница 30: ...This page is intentionally left blank ...
Страница 42: ...Specifications 2 12 C156 E228 02EN Figure 2 3 Example of alternate processing ...
Страница 47: ...3 2 Mounting Requirements C156 E228 02EN 3 5 Figure 3 2 Outer dimensions 1 of 2 ...
Страница 49: ...3 2 Mounting Requirements C156 E228 02EN 3 7 Figure 3 3 Outer dimensions 1 of 3 ...
Страница 51: ...3 2 Mounting Requirements C156 E228 02EN 3 9 Figure 3 3 Outer dimensions 3 of 3 ...
Страница 82: ...Installation 4 16 C156 E228 02EN Figure 4 6 SCSI connection check ...
Страница 84: ...This page is intentionally left blank ...
Страница 98: ...This page is intentionally left blank ...
Страница 146: ...SCSI BUS 7 44 C156 E228 02EN Rest Hold Time Min Bus Clear Delay Max Figure 7 20 RESET condition ...
Страница 148: ...SCSI BUS 7 46 C156 E228 02EN Figure 7 21 Bus phase sequence 1 of 2 ...
Страница 149: ...7 8 Bus Sequence C156 E228 02EN 7 47 Figure 7 21 Bus phase sequence 2 of 2 ...
Страница 150: ...SCSI BUS 7 48 C156 E228 02EN Figure 7 22 Example of bus phase transition on execution of a single command 1 of 5 ...
Страница 152: ...SCSI BUS 7 50 C156 E228 02EN Figure 7 22 Example of bus phase transition on execution of a single command 3 of 5 ...
Страница 154: ...SCSI BUS 7 52 C156 E228 02EN Figure 7 22 Example of bus phase transition on execution of a single command 5 of 5 ...
Страница 158: ...This page is intentionally left blank ...
Страница 166: ...This page is intentionally left blank ...
Страница 168: ...This page is intentionally left blank ...
Страница 169: ......
Страница 170: ......


