


45
U s e r I n s t a l l a b l e F e a t u r e s
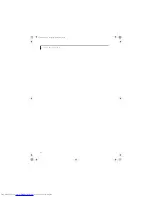
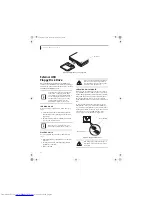
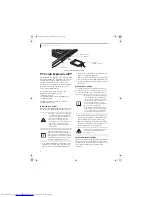
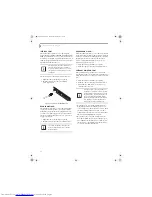
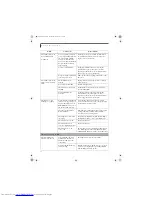
ExpressCards are installed in the ExpressCard slot (the
top slot).
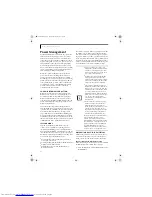
(Figure 4-8)
.
Figure 4-8.
Installing/Removing ExpressCards
See your ExpressCard manual for instructions on the
installation of your card. Some cards may require that
your notebook is off while installing them.
To install an ExpressCard, follow these steps:
1. Make sure there is no ExpressCard currently in the
slot. If there is, see Removing ExpressCards.
2. If the eject button is extended, press it in until it
clicks.
3. Insert your ExpressCard into the slot with the
product label facing up. If you are inserting a 34 mm
card, be sure to align it with the left side of the slot
when inserting it.
4. Push the card firmly into the slot until it is seated in
the connector.
REMOVING EXPRESSCARDS
See your ExpressCard manual for specific instructions
on removing your card. Some cards may require your
notebook to be in Suspend Mode or Off during removal.
To remove an ExpressCard, follow these steps:
2. Unlock the card from the slot by pressing the eject
button associated with the slot in which the card is
located. When pressed, the button will pop out.
3. Firmly press the button again until it is flush with
the notebook. This will eject the card slightly out of
the slot allowing you to remove the card.
SMART CARD READER
An embedded Smart Card Reader is provided on your
notebook. Smart Cards are the same size and shape as
credit cards, but they contain an integrated micropro-
cessor chip. The chip can hold a variety of different
information, and provides you with many possible
options, such as allowing you to make secure purchases,
pay for phone calls, store security information, and
provide personal identification and information.
In order to use the embedded Smart Card Reader, you
must purchase an optional Smart Card adapter and
third-party software for installation into an available
Type II PC Card slot.
■
Installing or removing an ExpressCard
during your notebook’s shutdown or
bootup process may damage the card
and/or your notebook.
■
Do not insert an ExpressCard into a slot
if there is water or any other substance
on the card as you may permanently
damage the card, your notebook, or
both.
You may be required to log on as Adminis-
trator or a member of the Administrator’s
Group to complete this procedure. If your
computer is connected to a network, net-
work policy settings may also prevent you
from completing this procedure.
54 mm ExpressCard
34 mm ExpressCard
ExpressCard Slot
(top slot)
■
Windows has a shutdown procedure for
ExpressCards that must be followed
before removing a card. (Review your
operating system manual for the correct
procedure.) It is good practice to remove
devices using the Unplug or Eject Hard-
ware icon in the system tray.
■
If the dialog box states that the device
cannot be removed, you must save all of
your open files, close any open applica-
tions and shut down your notebook.
E8020.book Page 45 Thursday, March 10, 2005 1:55 PM
Содержание Lifebook E8020
Страница 6: ...L i f e B o o k E 8 0 0 0 N o t e b o o k E8020 book Page 6 Thursday March 10 2005 1 55 PM ...
Страница 7: ...1 Preface E8020 book Page 1 Thursday March 10 2005 1 55 PM ...
Страница 8: ...L i f e B o o k E 8 0 0 0 N o t e b o o k E8020 book Page 2 Thursday March 10 2005 1 55 PM ...
Страница 10: ...2 L i f e B o o k E 8 0 0 0 N o t e b o o k E8020 book Page 2 Thursday March 10 2005 1 55 PM ...
Страница 11: ...3 2 Getting to Know Your LifeBook Notebook E8020 book Page 3 Thursday March 10 2005 1 55 PM ...
Страница 12: ...4 L i f e B o o k E 8 0 0 0 N o t e b o o k E8020 book Page 4 Thursday March 10 2005 1 55 PM ...
Страница 32: ...24 L i f e B o o k E 8 0 0 0 N o t e b o o k E8020 book Page 24 Thursday March 10 2005 1 55 PM ...
Страница 33: ...25 3 Getting Started E8020 book Page 25 Thursday March 10 2005 1 55 PM ...
Страница 34: ...26 L i f e B o o k E 8 0 0 0 N o t e b o o k E8020 book Page 26 Thursday March 10 2005 1 55 PM ...
Страница 42: ...34 L i f e B o o k E 8 0 0 0 N o t e b o o k E8020 book Page 34 Thursday March 10 2005 1 55 PM ...
Страница 43: ...35 4 User Installable Features E8020 book Page 35 Thursday March 10 2005 1 55 PM ...
Страница 44: ...36 L i f e B o o k E 8 0 0 0 N o t e b o o k E8020 book Page 36 Thursday March 10 2005 1 55 PM ...
Страница 59: ...51 5 Troubleshooting E8020 book Page 51 Thursday March 10 2005 1 55 PM ...
Страница 60: ...52 L i f e B o o k E 8 0 0 0 N o t e b o o k E8020 book Page 52 Thursday March 10 2005 1 55 PM ...
Страница 74: ...66 L i f e B o o k E 8 0 0 0 N o t e b o o k E8020 book Page 66 Thursday March 10 2005 1 55 PM ...
Страница 75: ...67 6 Care and Maintenance E8020 book Page 67 Thursday March 10 2005 1 55 PM ...
Страница 76: ...68 L i f e B o o k E 8 0 0 0 N o t e b o o k E8020 book Page 68 Thursday March 10 2005 1 55 PM ...
Страница 80: ...72 L i f e B o o k E 8 0 0 0 N o t e b o o k E8020 book Page 72 Thursday March 10 2005 1 55 PM ...
Страница 81: ...73 7 Specifications E8020 book Page 73 Thursday March 10 2005 1 55 PM ...
Страница 82: ...74 L i f e B o o k E 8 0 0 0 N o t e b o o k E8020 book Page 74 Thursday March 10 2005 1 55 PM ...
Страница 87: ...79 8 Glossary E8020 book Page 79 Thursday March 10 2005 1 55 PM ...
Страница 88: ...80 L i f e B o o k E 8 0 0 0 N o t e b o o k E8020 book Page 80 Thursday March 10 2005 1 55 PM ...
Страница 98: ...90 L i f e B o o k E 8 0 0 0 N o t e b o o k E8020 book Page 90 Thursday March 10 2005 1 55 PM ...
Страница 120: ...112 L i f e B o o k E 8 0 0 0 N o t e b o o k E8020 book Page 112 Thursday March 10 2005 1 55 PM ...


