background image

BX630 S2

Operating Manual

71

BIOS Setup

Boot menu

6.7

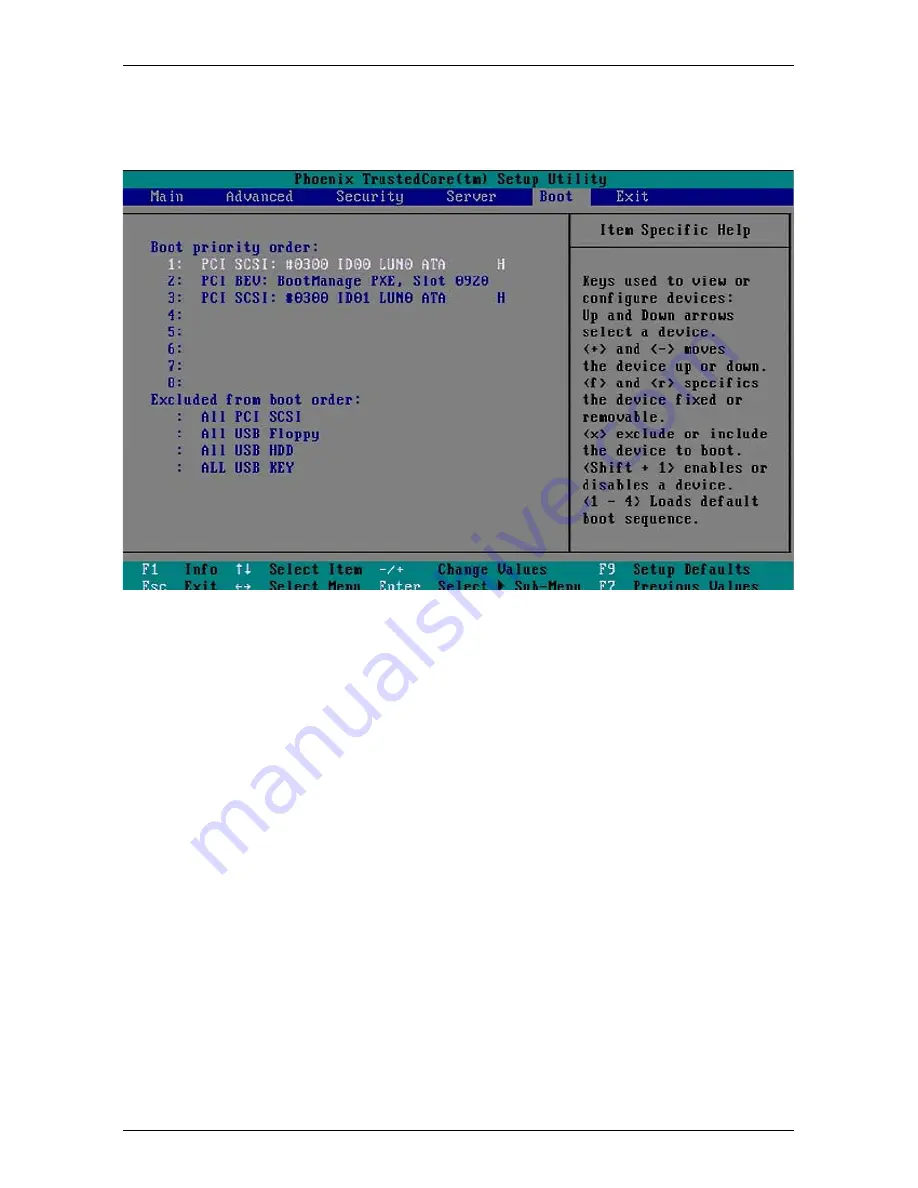
Boot menu

Figure 21: Boot menu

Boot priority order

Defines the order in which the listed devices are searched for the system 
files that the system BIOS requires for booting.

Note:

Use the 

Ê

and 

Ë

 keys to select a device.

Use the 

[+]

 and 

[-]

 keys to move the selected device up or down in the 

list.

Use the 

[f]

 and 

[r]

 keys to mark the selected device as fixed or 

removable.

Use the 

[x]

 key to add a device to the list of bootable devices or to 

remove it from the list.

You can release or lock the selected device for booting with the key 
combination 

[Shift][1]

. A locked device is flagged with an exclamation 

mark at the beginning of the line.

Use the 

[1]

 - 

[4]

 keys to load the default boot order.

Содержание BX630 - PRIMERGY - S2 Dual

Страница 1: ...PRIMERGY BX630 S2 Scalable Server Blade Operating Manual Edition October 2008 ...

Страница 2: ...s created to meet the regulations of a quality management system which complies with the requirements of the standard DIN EN ISO 9001 2000 cognitas Gesellschaft für Technik Dokumentation mbH www cognitas de Copyright and Trademarks cognitas Gesellschft für Technik Dokumentation mbH 2009 Pfad H April PRIMERGY_Rebranding von Walter bx630_s2_ba Archiv bx630s2 ba en OBJ_DOKU 2533 002 fm Copyright 2009...

Страница 3: ...notes 17 3 1 Notes on safety 17 3 2 CE conformity 20 3 3 Environmental protection 20 4 Installing the Hardware 23 4 1 Installation Steps 23 4 2 Unpacking the Server Blade 23 4 3 Installing the Server Blade in the Basic Unit 24 4 4 Connecting Devices 28 5 Installation and Operation 31 5 1 Control and Connection Panel 32 5 2 Switching the Server Blade On Off 35 5 3 Configuring the Server Blade 35 5 ...

Страница 4: ...ation 50 6 4 2 Advanced System Configuration 53 6 4 3 Power On Off menu 54 6 4 4 IPMI menu 56 6 4 4 1 IPMI LAN parameters 59 6 5 Security menu 60 6 6 Server menu 63 6 6 1 CPU Status 65 6 6 2 Memory Status 67 6 6 3 Console Redirection 69 6 7 Boot menu 71 6 8 Exit menu 72 7 Troubleshooting and Tips 73 8 Hot plug components 75 8 1 Hot plug disk drives 75 8 2 Handling hard disk drives and HDD modules ...

Страница 5: ...al socket server blades can be connected to form a quad socket server blade with 16 processor cores Figure 1 PRIMERGY BX630 S2 configurations The PRIMERGY BX630 S2 scalable server blade is designed for the BX600 S3 basic unit but it can also be installed in slots 1 3 and 5 9 of the BX600 S2 basic unit I In the latter case however only 2 of the 4 onboard Ethernet channels of the BX630 S2 server bla...

Страница 6: ...or those responsible for installing the hardware and ensuring that the system runs smoothly It contains all the infor mation you need to put your PRIMERGY BX630 S2 server blade into operation The information in this manual refers to the BX630 S2 dual socket server blade How to connect two BX630 S2 dual socket server blades to form a quad socket server blade is described in the Options Guide For a ...

Страница 7: ...ied with every server The PDF files of the manuals can also be downloaded free of charge from the Internet The overview page showing the online documentation available on the Internet can be found using the URL http manuals ts fujitsu com The PRIMERGY server documentation can be accessed using the Industry standard servers navigation option If you need a replacement copy of the ServerBooks DVD sen...

Страница 8: ...h processor is assigned four memory slots Two memory slots make up one memory bank The memory slots must be fitted by bank i e with pairs of memory modules The server blade supports memory modules of the type DDR2 667 with 512 MB 1 GB 2 GB or 4 GB capacity so the maximum config uration is 32 GB 64 GB in a quad socket server blade ECC with memory scrubbing and ChipKill are supported Only memory mod...

Страница 9: ...talled in slot NET3 of the basic unit The following I O daughter cards are available 4 Gbit s Fibre Channel I O module PCIe allows transfer rates of 1 2 or 4 Gbit s and supports multiple Fibre Channel storage subsystems with the corresponding versions I You can operate the 4 Gbit s Fibre Channel I O module only with a BX600 S3 basic unit and only in combination with a Brocade SW 4016 D4 Fibre Chan...

Страница 10: ...drives you can implement RAID levels 0 and 1 using Promise 20319 to increase the system s availability Server management Server management is implemented using the supplied ServerView software and PDA technology PDA reports the threat of a system error or overloading to the system administrator in good time so that preventive measures can be taken ServerView allows the management of all PRIMERGY s...

Страница 11: ...ar architecture thus enabling quick and simple maintenance The flash EPROM program supplied with the utilities from Fujitsu Technology Solutions allows fast BIOS updating via the USB interface The two redundant hot pluggable management blades of the PRIMERGY BX600 S2 and BX600 S3 basic unit with independent LAN and COM ports for administration allow complete remote administration of the server bla...

Страница 12: ...otational conventions are used in this manual Text in italics indicates commands or menu items Quotation marks indicate names of chapters and terms that are being emphasized Ê describes activities that must be performed in the order shown V CAUTION pay particular attention to texts marked with this symbol Failure to observe this warning may endanger your life destroy the system or lead to the loss...

Страница 13: ...950 1 CNS 14336 GB 4943 EN 50371 Electromagnetic compatibility FCC class A CNS 13438 class A VCCI class A AS NZS CISPR 22 class A GB 9254 class A GB 17625 Interference emissions EN 55022 class A Harmonic current EN 61000 3 2 Flicker EN 61000 3 3 Interference immunity EN 55024 EN 300386 CE marking to EU directives Low Voltage Directive 2006 95 EC Product Safety Electromagnetic Compatibility 2004 10...

Страница 14: ...ifications Weight Max 6 kg quad socket server blade 12 kg Ambient conditions Condensation during operation must be avoided Width 286 mm Depth 470 mm 520 mm incl handles and plugs Height 43 mm quad socket server blade 86 mm 1 or 2 slots in the basic unit Environment class 3K2 Environment class 2K2 EN 60721 IEC 721 Part 3 3 EN 60721 IEC 721 Part 3 2 Temperature Operation 3K2 5 C 35 C Transport 2K2 2...

Страница 15: ...e 23 Ê Mount the server blade into your BX600 S2 or BX600 S3 basic unit see section 4 3 on page 24 Ê Familiarize yourself with the control and display elements on the front of the server blade see chapter Installation and Operation on page 31 Ê Install the operating system and the applications on the server blade To do this you have the following options Cloning the server blade from a remote imag...

Страница 16: ...rverView Installation Manager you can of course install it directly without ServerView Installation Manager I For more information on the remote or local installation of server blades see the ServerView Installation Manager manual which contains a Quick Step Guide and a detailed description of the individual instal lation options and wizards A PDF version of the ServerView Installation Manager man...

Страница 17: ...alists Equipment repairs should only be performed by qualified staff Any failure to observe the guidelines in this manual could endanger the user through electric shock fire hazards or damage the equipment Please note that any unauthorized opening of the device will result in the invalidation of the warranty and exclusion from all liability Before setting up V CAUTION During installation and befor...

Страница 18: ...th identical batteries or with a type recommended by the manufacturer see Options Guide Do not throw batteries into the trash can They must be disposed of in accordance with local regulations on special waste The German battery act obligates consumers in Germany to return waste batteries to the distributor or to the return points established by the public waste management authorities Replace the l...

Страница 19: ...t always discharge static build up e g by touching a grounded object before working with such components Any devices or tools that are used must be free of electrostatic charge Wear a suitable grounding cable that connects you to the external chassis of the system unit Always hold components with ESDs at the edges or at the points marked green touch points Do not touch any connectors or conduction...

Страница 20: ...needed as well as during long breaks and after completion of work Packaging information Do not throw away the packaging You may need it later for transporting the system If possible the equipment should only be transported in its original packaging Information on handling consumables Please dispose of printer consumables and batteries in accordance with the applicable national regulations In accor...

Страница 21: ...r local Fujitsu Technology Solutions branch or from our recycling center in Paderborn Fujitsu Technology Solutions Recycling Center D 33106 Paderborn Tel 49 5251 8 18010 Fax 49 5251 8 18015 The device must not be disposed of with domestic waste This device is labeled in compliance with European directive 2002 96 EC on waste electrical and electronic equipment WEEE This directive sets the framework...

Страница 22: ... cognitas Gesellschft für Technik Dokumentation mbH 2008 Pfad H April PRIMERGY_Rebranding von Walter bx630_s2_ba Archiv bx630s2 ba en OBJ_DOKU 2506 002 fm ...

Страница 23: ...age 24 Connecting the server blade see 4 4 on page 28 4 2 Unpacking the Server Blade V CAUTION Make sure you observe the safety notes in the chapter Important notes on page 17 starting on page 17 Unpack the server blade only at the place where you want to set it up Keep the original packaging of the server blade You may need it for future transport Ê Unpack all the individual parts Ê Check the del...

Страница 24: ...static sensitive devices in the section Notes on safety on page 17 Server blade boots automatically after installation in a switched on BX600 S3 basic unit with management blade S3 If you insert a BX630 S2 server blade into a switched on BX600 S3 basic unit with management blade S3 the server blade will automat ically perform a POST Power On Self Test and then switch itself off You may not switch ...

Страница 25: ... Swivel the top handle upward and the bottom handle downward 2 simulta neously until the locking mechanism of the dummy module disengages and releases the module Ê Pull the dummy module completely out of the slot 3 V CAUTION Keep the dummy module for future use If a server blade is removed again and not replaced with a new one the dummy module must be reinstalled because of cooling fire protection...

Страница 26: ...tic sensitive devices in the section Modules with Electrostatic Sensitive Devices on page 19 Figure 4 Inserting the server blade I Make sure you install the server blade in the correct direction The control panel A must be at the top Ê Undo the locking mechanism of the handles of the server blade by first pressing the green inside touch points of the two handles 1 at the same time Ê Then turn the ...

Страница 27: ...ism Removing the server blade Remove the server blade in the same way as the dummy module see Removing the Dummy Module on page 24 V CAUTION If a server blade has been removed and no new blade is installed in its place you must install a dummy module in the empty slot Ê Press the locking handles inward until the locking mechanism engages fully ...

Страница 28: ...de connections to the infrastructure modules on the back of the basic unit are made automatically by means of plug connectors Power supply units Management blade s for server administration KVM blade for connecting a monitor keyboard and mouse Ethernet switch blade s and or pass thru blades for connecting to the LAN Fibre channel switch blades or pass thru blades for connection to a SAN optional r...

Страница 29: ...S2 Scalable Server Blade has a USB VGA connector on the front A Connecting an external device via the USB VGA connector requires a special cable with two USB plugs 2 and a VGA plug 3 I The USB VGA breakout cable is supplied with the basic unit For information on connecting external devices via the infrastructure module of the basic unit see the operating manual for your basic unit A 1 2 ...

Страница 30: ... cognitas Gesellschft für Technik Dokumentation mbH 2008 Pfad H April PRIMERGY_Rebranding von Walter bx630_s2_ba Archiv bx630s2 ba en OBJ_DOKU 2507 002 fm ...

Страница 31: ...he PRIMERGY BX600 S2 or BX600 S3 basic unit The position and function of the elements on the control and connection panel of the server blade are described in section 5 1 on page 32 The different possible ways of switching the server blade on and off are described in section 5 2 on page 35 Section 5 3 on page 35 explains how to configure the server blade with ServerView Installation Manager Sectio...

Страница 32: ...el Installation and Operation cognitas Gesellschft für Technik Dokumentation mbH 2008 Pfad H April PRIMERGY_Rebranding von Walter bx630_s2_ba Archiv bx630s2 ba en OBJ_DOKU 2508 002 fm 5 1 Control and Connection Panel Figure 7 Control panel 1 8 9 2 3 4 5 6 7 ...

Страница 33: ...0 S2 or BX600 S3 basic unit is on 5 V standby voltage is present and the server blade is switched off the power_up command is sent to the management blade and the server blade is switched on If you press the On Off button for less than 4 seconds when the server blade is running the power_off command is sent to the management blade and the server blade is switched off by the management blade gracef...

Страница 34: ...reen Active LAN 7 USB VGA connector Connector for adapter cable with two USB ports for external devices e g floppy disk drive CD DVD drive or hard disk drive mouse or keyboard and a VGA port I A special cable is required See figure 6 on page 29 8 Hard disk access green LED Dark Hard disk drive not active Glows green Hard disk drive active 9 Hard disk drive indicator orange LED Dark No error Glows ...

Страница 35: ...d switch on switch off time The server blade is switched on or off at the time defined in ServerView After power failure A server blade that was already on when the power failed automatically switches on again when power resumes depending on the BIOS setting see section Power On Off menu on page 54 in chapter BIOS Setup on page 39 I With the basic unit you can also switch the installed server blad...

Страница 36: ...verBooks DVD which is part of the PRIMERGY ServerView Suite provided with each server system Preparing the Hardware To implement initial installation of the server blade or perform subsequent modifications you must meet the the following conditions The relevant server blade must be connected to a CD ROM drive and a diskette drive via the USB VGA interface A monitor a keyboard and a mouse must be c...

Страница 37: ...some cases this may require that you change a few settings Ê Insert the ServerView Installation Manager CD in the CD ROM drive and press the On Off button position 2 in figure 7 on page 32 on the control panel of the server blade Ê Press the KVM button position 4 in figure 7 on page 32 on the control panel of the server blade to switch the keyboard mouse and the monitor of the KVM blade to the ser...

Страница 38: ...ating the firmware of the server blade with TFTP For detailed information see the operating manual for your basic unit Updating the firmware of the server blade with GlobalFlash For detailed information see the GlobalFlash manual Updating the firmware of the server blade from a USB stick To update the firmware of the BX630 S2 Server Blade from a USB stick proceed as follows Ê Create a bootable USB...

Страница 39: ...S Setup The following lists illustrate the structure of the BIOS Setup menus The numbers in brackets refer to the pages on which the individual functions are described Main Basic system configuration System Time 46 System Date 46 Sync RTC with Mgmt Blade 46 POST Errors 46 SM Error Halt 47 Boot Diagnostic Screen 47 Numlock 47 Boot Menu 47 Base Memory Extended Memory 47 Advanced Advanced system conf...

Страница 40: ...iguration 53 High Precision Event Timer 53 Power On Off 54 Power off Source 54 Software 54 Power Button 54 Power Failure Recovery 54 IPMI 56 SEL Load 56 Clear System Event Log 56 Event Log Full Mode 56 System Event Log 57 Entry Number 57 Sensor Type 57 Sensor 57 Event Type 57 Sensor Event 57 Event Data 57 Timestamp 57 SDRR Browser 57 SDR Record ID 57 Entity ID 57 Entity Inst 57 SDR ID 58 Sensor No...

Страница 41: ...ssword 60 Setup Password Lock 61 Set System Password 61 System Password Mode 61 Setup Prompt 61 Flash Write 62 Server Server management O S Boot Timeout 63 Action 63 ASR R Boot Delay min 63 Boot Retry Counter 64 Temperature Monitoring 64 CPU Status 65 Node 1 4 CPU Status 65 Re enable Failed CPUs 66 Memory Status 67 Memory Scrubbing 67 SW Mem Hole Remap 68 DRAM Bank Interleave 68 Node Interleave 68...

Страница 42: ...ell as the individual menus and possible settings Memory on Slave Board 68 CPUn 1 4 DIMMm 1 7 DIMMm 1 2 8 68 Re enable Failed DIMMs 69 Console Redirection 69 Port 69 Baud Rate 69 Protocol 70 Flow Control 70 Console Connection 70 Mode 70 of video pages to support 70 Boot System start Boot priority order 71 Excluded from Boot order 72 Exit Save settings and terminate BIOS Setup Save Changes Exit 72 ...

Страница 43: ...art your system from the drive that is set as the first option in the Boot Sequence parameter in the Boot menu Ê Press ESC A pop up boot menu is displayed Ê Use the Ê or Ë cursor keys to select the drive from which you want to start the operating system and confirm your selection by pressing Enter The selection options are the same as the possible settings of the Boot priority order parameter in t...

Страница 44: ...gs you can make Use the Ê and Ë cursor keys to select the parameter whose setting you want to change A Ê in the left margin indicates that a parameter contains submenus To display a submenu select the relevant parameter and press Enter Pressing ESC returns you from the submenu to the superordinate menu An asterisk indicates configuration conflicts that must be resolved Square brackets enclosing a ...

Страница 45: ...ess Enter Press Enter to perform a menu dependent action F9 Load the default values for all menus I Pressing the F7 function key discards all the changes you have made in this BIOS session and resets the values that were in effect when you opened the BIOS Setup F10 Save the changed values and quit the BIOS Setup Information area 4 The information area displays brief information on the selected par...

Страница 46: ...eys to position the cursor within the individual input fields I If the system time and date are incorrect after you switch the system off and back on again the lithium battery is empty and needs to be replaced Sync RTC with Mgmt Blade Switches synchronization of the real time clock with the time of the management blade on Enabled or off Disabled POST Errors Defines whether the system start is abor...

Страница 47: ...d The system start is not aborted if the iRMC reports an error to the BIOS The error is only displayed Boot Diagnostic Screen Defines whether the screen displays a logo instead of the start infor mation Enabled The logo is displayed If an error occurs or if you press the F3 or Esc key the display switches to the start information Disabled The start information is displayed on the screen Numlock De...

Страница 48: ... Peripheral Configuration on page 50 Advanced System Configuration Calls a submenu for setting the High Precision Event Timer see section Advanced System Configuration on page 53 Power On Off Calls a submenu for setting the power on and power off options of the server blade see section Power On Off menu on page 54 IPMI Calls a submenu with the settings of the Intelligent Platform Management Interf...

Страница 49: ...ter the configuration data of non plug play components manually No After the server blade is started the plug play functionality initializes the installed boards and drives with the configuration data that is currently in effect The configuration data of non plug play components is not changed Multiprocessor Specification Sets the version of the multiprocessor table used I For compatibility reason...

Страница 50: ...uration Figure 11 Peripheral Configuration Serial Defines how the address and the interrupt of the corresponding serial interface are configured Auto Automatic configuration with an available combination of address and interrupt Disabled The interface is disabled Enabled User configured This setting requires the manual configuration of the base I O address and the IRQ in an extra line OS Controlle...

Страница 51: ...lso required if you want to start the operating system from a USB device If emulation is enabled the USB keyboard or the USB mouse can also be used with operating systems that do not support USB The operating system can be started from a USB device if this is also supported by the operating system With emulation disabled the USB keyboard or mouse can only be used if supported by the operating syst...

Страница 52: ...led Channel 1 2 Channels 1 and 2 of the relevant onboard LAN controller are enabled Channel Channel 1 or 2 of the relevant onboard LAN controller is enabled Disabled The relevant onboard LAN controller is disabled I For a dual socket server blade the parameters Slave LAN 1 and Slave LAN 2 are not interpreted Master Daughtercard Slave Daughtercard Defines whether the optional I O daughter card of t...

Страница 53: ...d System Configuration High Precision Event Timer This option allows you to make the system s high precision event timer available to the operating system This timer is also known as the multi media timer Enabled The operating system can use the timer Disabled The timer is not visible to the operating system ...

Страница 54: ...em can be switched off if the ACPI function is not enabled Software Defines whether the system can be switched off by a software program Enabled or not Disabled Power Button Defines whether the system can be switched off via the on off button on the front of the system Enabled or not Disabled Power Failure Recovery Defines the system state after the system is restarted due to a power failure Alway...

Страница 55: ...t the system can be woken via the LAN etc If this option is Disabled the system can only be switched on using the on off button Always On The system switches on Previous State The system switches on checks its current state and returns to the state it was in before the power failure ON or OFF Disabled The system does not switch on ...

Страница 56: ... event log is Clear System Event Log Defines whether the system event log file is to be cleared the next time the system is started All system events and errors are written to this file Disabled The system event log is not deleted Enabled The system event log is deleted the next time the system is started Event Log Full Mode Defines whether the system event log can be overwritten or not Overwrite ...

Страница 57: ...or Type Shows the sensor type that has triggered the current event Sensor Indicates the sensor that triggered the current event Event Type Indicates the type of the current event Sensor Event Shows the current event in plain text The data from Event Data are evaluated for this purpose Event Data Shows the data of the current event as a number code Timestamp Shows the data and time at which the cur...

Страница 58: ...630s2 ba en OBJ_DOKU 2509 002 fm SDR ID Sensor type Sensor No Serial number of the sensor Sensor Type Units Type and unit of the sensor Sensor Value Measured value of the sensor Sensor Value max Maximum permissible sensor value Sensor Value min Minimum permissible sensor value LAN Settings Opens the submenu for the iRMC LAN settings see section IPMI LAN parameters on page 59 ...

Страница 59: ...e iRMC can have an IP address assigned to it automatically by a DHCP server in the network In this case you do not have to enter an IP address manually under Local IP Address Local IP Address Ê Enter the IP address of the system s LAN board using numeric characters only Subnet Mask Ê Enter the subnet mask of your LAN segment using numeric characters only Gateway Address Ê Enter the gateway address...

Страница 60: ... whether a supervisor or user password has been defined Installed or not Not installed Set Supervisor Password When you press the Enter key a window is opened in which you can define the supervisor password The supervisor password prevents unauthorized BIOS Setup calls To delete an existing supervisor password without defining a new one open the password definition window enter the current passwor...

Страница 61: ...assword Set User Password When you press the Enter key a window is opened in which you can define the user password The user password prevents unauthorized access to the system I Requirement A supervisor password must have been defined System Password Mode Defines the effect of the user password I Requirement A supervisor password and a user password must have been defined System After the device ...

Страница 62: ...kumentation mbH 2008 Pfad H April PRIMERGY_Rebranding von Walter bx630_s2_ba Archiv bx630s2 ba en OBJ_DOKU 2509 002 fm Flash Write Defines whether the system BIOS is write protected Enabled The system BIOS can be written to or deleted Disabled The system BIOS cannot be written to or deleted ...

Страница 63: ...ystem startup error I If the operating system has no server management process you must set this parameter to Disabled to prevent the server management firmware from initiating a restart by mistake The watchdog timer and the server management process agent are installed with ServerView Action Defines the behavior following an OS Boot Timeout Continue No Action Reset Power cycle ASR R Boot Delay mi...

Страница 64: ...stem is started Temperature Monitoring Defines whether the system is shut down Enabled or not Disabled if the ambient temperature or a processor s temperature rises above a critical point If the operating system has an active server management process this monitors the temperatures and shuts down the system if critical temper ature values occur After a shutdown the system restarts after the period...

Страница 65: ...ion Utility or the RemoteView or ServerView programs Failed The CPU cannot be used by the operating system As long as the status is Failed an entry is written to the system event log each time the system is started Disabled The CPU cannot be used by the operating system Enabled The CPU can be used by the operating system I If there is only one CPU this parameter has no effect This CPU is always us...

Страница 66: ...il PRIMERGY_Rebranding von Walter bx630_s2_ba Archiv bx630s2 ba en OBJ_DOKU 2509 002 fm Even if only one CPU is installed the status indicators are displayed for all possible CPUs If Disabled is set for all the CPUs the system still starts with one CPU Re enable Failed CPUs Resets all CPUs flagged as Failed to Enabled ...

Страница 67: ...nd restoration of the constant memory This process recovers one bit memory errors and prevents most multibit memory errors since the latter are due to an accumulation of one bit memory errors I The cause of one bit memory errors may be inappropriate or incorrect system environment specifications Enabled One bit memory errors are corrected Disabled One bit errors are not corrected System performanc...

Страница 68: ...e while data is read from or written to another memory bank To allow this bank interleaving the relevant memory banks must be fitted with memory modules of the same capacity Possible settings Auto default and Disabled Node Interleave Enables a memory bank to be addressed across nodes while data is read from or written to another memory bank To allow this node interleaving the relevant memory banks...

Страница 69: ...communication with the terminal Serial or Disabled The Disabled setting switches off the terminal functionality and makes the other parameters described in this section disappear Baud Rate Requirement The Port field must not be set to Disabled Defines the transfer speed used for communication with the terminal This setting must be the same both on the terminal and on the server 300 1200 2400 9600 ...

Страница 70: ... the settings for operating a terminal on the system The terminal can be connected to the server using a direct serial connection null modem cable Screen output is displayed in parallel on the terminal and on the system monitor Keyboard input on the terminal is sent to the system and handled in the same way as input made on the connected server keyboard You can for example open and modify the BIOS...

Страница 71: ...ct a device Use the and keys to move the selected device up or down in the list Use the f and r keys to mark the selected device as fixed or removable Use the x key to add a device to the list of bootable devices or to remove it from the list You can release or lock the selected device for booting with the key combination Shift 1 A locked device is flagged with an exclamation mark at the beginning...

Страница 72: ...efines the list of devices that are excluded from the boot order 6 8 Exit menu Figure 22 Exit menu Save Changes Exit Saves parameter changes and terminates the BIOS Setup Discard Changes Exit Discards parameter changes and terminates the BIOS Setup Get Default Values Resets all the parameters to their default values Load Previous Values Resets all the parameters to the values that were in effect w...

Страница 73: ... it as described in the chapter Troubleshooting and Tips in the BX600 S2 or BX600 S3 basic unit operating manual in the chapters for the installed components in the documentation for the connected devices in the help systems of the individual programs used If you are unable to correct the problem proceed as follows Ê Make a note of the steps you have taken and the situation in which the fault occu...

Страница 74: ... cognitas Gesellschft für Technik Dokumentation mbH 2008 Pfad H April PRIMERGY_Rebranding von Walter bx630_s2_ba Archiv bx630s2 ba en OBJ_DOKU 2510 002 fm ...

Страница 75: ...et server blade you can install up to four hard disk drives I You cannot operate both SAS and SATA hard disks together in a server blade On delivery the available hard disk drives for the BX630 S2 server blade are mounted in a module frame that allows you to replace defective drives and add new ones while the system is running Together the hard disk drive and the module frame make up the hard disk...

Страница 76: ...igure 23 2 5 inch hard disk module and dummy module 1 Hard disk module hard disk carrier with installed hard disk drive 2 Indicators HDD Busy LED green HDD Fault LED orange For a description see the table on page 33 in the section Control and Connection Panel 3 Handle for engaging and disengaging the hard disk module 4 Locking button 5 Indentation for a sticker with the current drive identifier 6 ...

Страница 77: ...nd transport HDD modules within the limits stipulated in the specification When transporting HDD modules even over short distances always use the original packaging ESD label Never expose HDD modules to a temperature shock Avoid the formation of condensation inside and on the outside of the hard disk drive V CAUTION The HDD module must be acclimatized in its operating environment for an acclimatiz...

Страница 78: ...onal hard disk module Figure 24 Removing the dummy module Ê Press the two tabs on the dummy module together until the lock is released 1 Ê Remove the memory module from the slot 2 To install the dummy module follow the above procedure in reverse V CAUTION Keep the dummy module for future use If you have removed the hard disk module and do not replace it with a new one you must reinstall the dummy ...

Страница 79: ...stalling removing a hard disk module 8 4 Installing removing a hard disk module Unlocking the hard disk module Figure 25 Unlocking a 2 5 inch hard disk module Press the green locking lever to the left 1 and swivel the locking handhold to the front 2 2 1 ...

Страница 80: ... direction of the arrow until the locking mechanism engages Removing the hard disk module V CAUTION Only remove a HDD module during operation if the drive is not currently being accessed Observe the control LEDs for the corre sponding HDD modules see Control and Connection Panel on page 32 Under no circumstances should you remove an HDD module while the system is in operation if you are not sure w...

Страница 81: ...ocking the hard disk module on page 79 Ê Pull the HDD module out a few centimeters Ê Wait for at least 60 seconds I This period is necessary for the RAID controller to recognize that an HDD module has been removed and for the hard disk drive to come to a stop Ê Pull the HDD module out completely Ê Install the new HDD module as described in Unlocking the hard disk module on page 79 and Installing a...

Страница 82: ... cognitas Gesellschft für Technik Dokumentation mbH 2008 Pfad H April PRIMERGY_Rebranding von Walter bx630_s2_ba Archiv bx630s2 ba en OBJ_DOKU 2511 002 fm ...

Страница 83: ...dvanced Technology Attachment BIOS Basic Input Output System CD Compact Disk COM Communication CPU Central Processing Unit DBMS Database Management System DC Dual Core DDR Double Data Rate RAM DIMM Dual Inline Memory Module DVD Digital Versatile Disk ECC Error Correcting Code EDC Error Detection Code ...

Страница 84: ... en OBJ_DOKU 2535 002 fm EMC Electromagnetic Compatibility ESD Electrostatic Discharge FBD Fully Buffered DIMMs FC Fibre Channel FSB Front Side Bus GAM Global Array Manager HDD Hard Disk Drive HU Height Unit I O Input Output ID Identification IDE Integrated Drive Electronics IP Internet Protocol iSCSI Internet Small Computer System Interface over IP LAN Local Area Network ...

Страница 85: ...Network Interface Card NMI Non Maskable Interrupt PCI Peripheral Component Interconnect PDA Prefailure Detection and Analyzing POST Power On Self Test PSU Power Supply Unit RAID Redundant Arrays of Independent Disks ROM Read Only Memory SAN Storage Area Network SAS Serial Attached SCSI SATA Serial Advanced Technology Attachment ...

Страница 86: ...randing von Walter bx630_s2_ba Archiv bx630s2 ba en OBJ_DOKU 2535 002 fm SCA Single Connector Attachment SCSI Small Computer System Interface SCU Server Configuration Utility SFP Small Form Factor Pluggable TOE TCP IP Offload Engine USB Universal Serial Bus VGA Video Graphics Adapter VPD Vital Product Data WOL Wakeup on LAN ...

Страница 87: ...certification product safety 13 compliance standards 13 configure server blade 11 consumables 20 CPU 8 D data manipulation 5 delivery note 23 disposal devices 21 dummy module install 24 server blade 24 dummy module hard disk module 78 dummy module HDD module 81 E ECC 10 electrical specifications 13 electromagnetic compatibility 13 20 electrostatic sensitive devices ESD 19 EMC directive 13 EMC regu...

Страница 88: ...cessor 8 R RAID level 10 recycling devices 21 reliability 10 replacing online 81 return of devices 21 S safety standards 13 saving energy 20 security functions 5 server blade ambient conditions 14 compliance standards 13 control panel 32 CPU 8 dimensions 14 dummy module 24 electrical specifications 13 hard disk drives 75 indicators 32 memory 8 safety standards 13 technical data 13 ventilation spac...

Страница 89: ...BX630 S2 Operating Manual 89 Index U unpacking system 23 update BIOS 38 BMC 38 firmware 38 USB VGA connector 34 V ventilation space 14 W weight 14 ...

Страница 90: ... cognitas Gesellschft für Technik Dokumentation mbH 2008 Pfad H April PRIMERGY_Rebranding von Walter bx630_s2_ba Archiv bx630s2 ba en OBJ_DOKU 2540 002 fm ...

Отзывы: