En-10
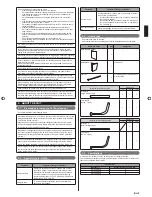
Pipe connection
5. 3. 3.
CAUTION
Seal the pipe route hole with putty (
fi
eld supply) such that there are no gaps.
Small insects or animals that are trapped in the outdoor unit may cause a short circuit
in the electrical component box.
To prevent pipe damage; do not make sharp bends.
Bend the pipe at a radius of 70mm or greater.
Do not bent pipe many times at same part to prevent break.
After completing all the pipe connection by brazing, perform the indoor unit pipe con-
nection with a
fl
are joint.
When removing the pinch pipe or brazing the joint pipe, carry out the work while
cooling down the 3-way valve suf
fi
ciently.
Braze the joint pipe onto the 3-way valves at the liquid , suction gas and discharge
•
gas side.
Install the joint pipe appropriately so that it can be connected easily with the main
pipe.
Braze the joint pipe at the liquid , suction gas and discharge gas side with the main
•
pipe.
* Be sure to supply nitrogen when brazing.
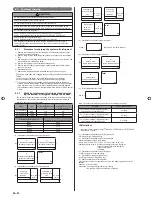
A
Fig.
Knockout hole
Joint pipe D
(Accessories)
Joint pipe B
(Accessories)
Suction gas pipe
(Field supply)
Discharge gas pipe
(Field supply)
Liquid pipe
(Field supply)
Joint pipe
(Field supply)
To RB unit or indoor unit
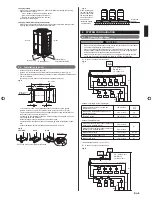
B
Fig.
Joint pipe
(
fi
eld supply)
Knockout hole
Joint pipe C
(Accessory or
fi
eld supply) *1
Joint pipe A
(Accessory or
fi
eld supply) *1
*1) Field supply and accessory
depend on the model, so for
details, refer "2.3. Accessories".
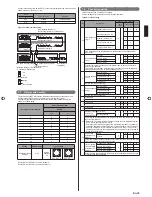
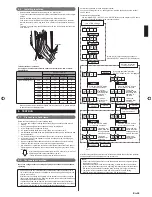
Multiple connections
5. 4.
CAUTION
When connecting multiple (maximum 3) units, be sure to install the unit with the
•
largest capacity nearest to the indoor unit.
For example) AJ 108GALH (Outdoor Unit1) + AJ A90GALH (Outdoor Unit2) +
AJ A72GALH (Outdoor Unit3)
When connecting multiple units, set the unit with the largest capacity as the master
•
unit, and the rest as the slave units.
(Refer to 7. Field Setting)
When connecting multiple units, use the optional outdoor unit branch kit.
•
Out
door u
nit 1
(Master
unit)
To
ind
oor u
nit
Out
door u
nit 2
(Slave unit 1
)
Out
door u
nit 3
(Slave unit 2)
Outdoor unit
branch kit
(Optional)
Liquid pipe
(Field supply)
Discharge gas pipe
(Field supply)
Suction gas pipe
(Field supply)
Joint pipe
(Accessory)
To indoor unit
(To main pipe)
To outdoor unit
To outdoor unit
Outdoor Capacity
2 Unit : Unit 1
≥
Unit 2
3 Unit : Unit 1
≥
Unit 2
≥
Unit 3
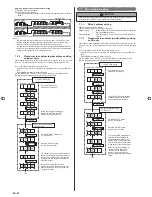
Branch kit restriction when install
Be sure following restriction.
Installation angle
1)
Outdoor unit branch kit
A
C
B
A
B
C
C
Horizontal
To indoor unit
To outdoor unit
To outdoor unit or
next branch kit
Prohibited
Prohibited
Prohibited
Vertical
Prohibited
Prohibited
Prohibited
Prohibited
Good:
0° to -10°
Good:
0° to -10°
Install the outdoor unit branch kit horizontally level, within 0° to -10°, so that the
•
refrigerant separates evenly.
Do not install the outdoor unit branch kit vertically.
•
Straight pipe length
2)
To indoor unit
(To main pipe)
To outdoor unit
To outdoor unit
To outdoor unit
0.5 m or more
0.5 m or more
To indoor unit (To main pipe)
To outdoor unit
To outdoor
unit
Leave the distance 0.5 m or more for straight part to outdoor unit branch kit.
•
For details, refer to the Installation Instruction Sheet of the outdoor unit branch kit.
3)
Examples of multiple unit installation
Fig.
Master
unit
Slave
unit1
Slave
unit2
(Example 3)
(Example 1)
(Example 2)
Master unit
Slave unit1 Slave unit2
Master unit
Slave unit1 Slave unit2
9378945074_IM.indb Sec1:10
9378945074_IM.indb Sec1:10
2012-7-19 16:44:31
2012-7-19 16:44:31
Содержание AirStage AJH108GALH
Страница 236: ......


