background image

Operation


24 

A26361-K666-Z120-1-7619, edition 3 

Settings in BIOS Setup 

The 

BIOS Setup

 menu allows you to set your hardware configuration and system functions. When the 

PC is delivered, the default entries are valid (see "BIOS Setup" manual and if necessary technical 
manual for the mainboard). You may customise these settings to your requirements in the 

BIOS 

Setup

Property and data protection 

Software functions and mechanical locking offer a broad range of functions for protecting your PC 
and your personal data from unauthorised access. You can also combine these functions. 

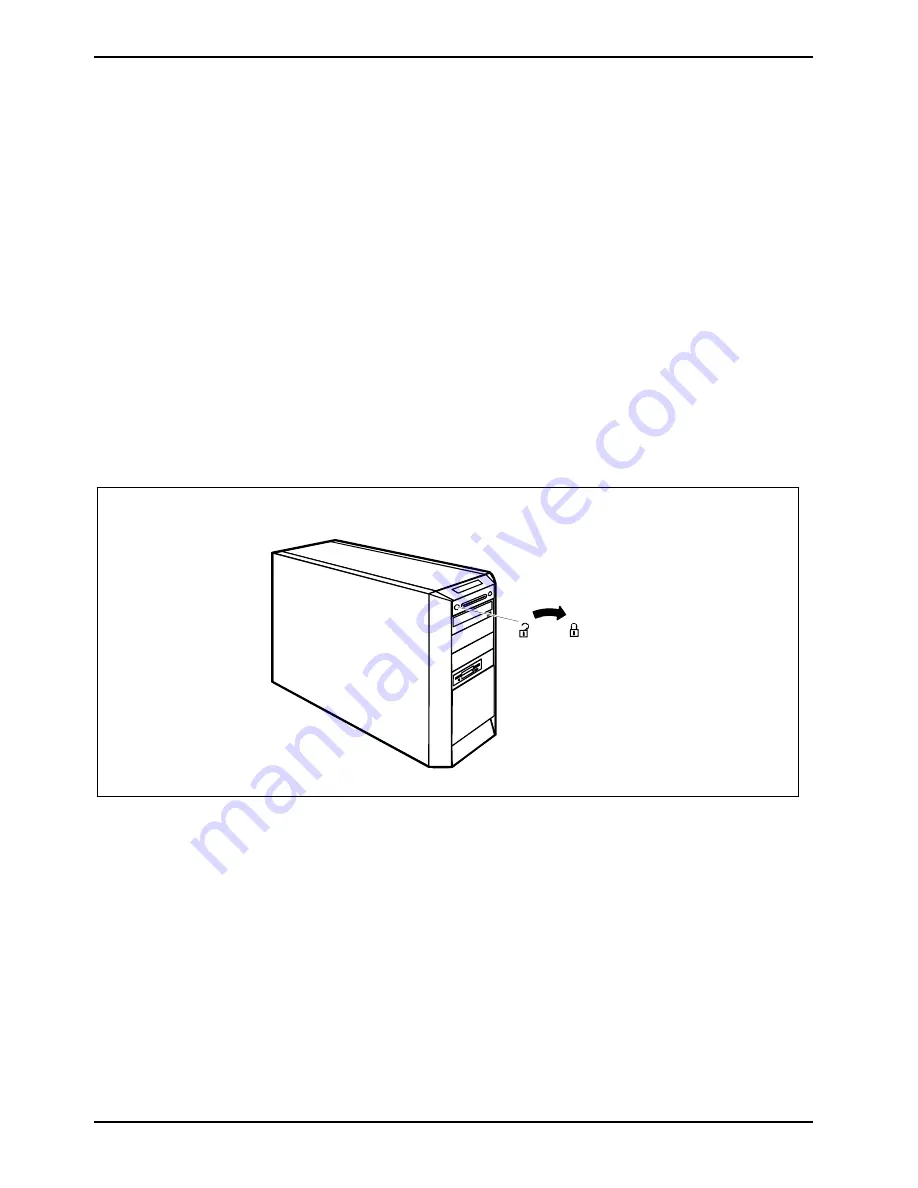
Mechanical casing lock 

With the casing lock you can mechanically lock the casing to prohibit unauthorised persons from 
opening it. 

Locking the casing 


Turn the key clockwise. 

Unlocking the casing 


Turn the key counterclockwise. 

Содержание SCENIC W

Страница 1: ...Operating manual SCENIC W English answers2 ...

Страница 2: ...ike to be clarified Please contact your sales partner your sales outlet Further information can be found in the Safety Ergonomics and Warranty manuals The latest information on our products tips updates etc can be found on the internet under http www fujitsu siemens com ...

Страница 3: ......

Страница 4: ...Herausgegeben von Published by Fujitsu Siemens Computers GmbH AG 1004 10 04 Ausgabe Edition 3 Bestell Nr Order No A26361 K666 Z120 1 7619 ...

Страница 5: ...SCENIC W Operating manual Introduction Important notes Preparing for use Operation Troubleshooting and tips System expansions Technical data Index October 2004 edition ...

Страница 6: ...poration All other trademarks referenced are trademarks or registered trademarks of their respective owners whose protected rights are acknowledged Copyright Fujitsu Siemens Computers GmbH 2004 All rights including rights of translation reproduction by printing copying or similar methods in part or in whole are reserved Offenders will be liable for damages All rights including rights created by pa...

Страница 7: ...mains voltage 11 Initial switch on Software will be installed 13 Switching on monitor and PC 13 Installing the software 14 Connecting external devices 15 Ports on the PC 16 Connecting external devices to the serial port 16 Connecting external devices to the parallel port 17 Connecting external devices to the USB ports 17 Operation 19 Switching on the PC 19 Switching off the PC 19 Indicators on the...

Страница 8: ...emoving a board 36 Installing a board 36 Removing a board 38 Low Profile boards 40 Mounting slot adapter 40 Removing slot adapter 40 Installing and removing drives 41 Removing the front panel 41 Attaching the front panel 42 Installing an accessible drive 43 Removing an accessible drive 45 Changing the floppy disk drive 47 Installing or removing the hard disk drive 51 Replacing the SmartCard reader...

Страница 9: ...ctions in the BIOS Setup also allow you to protect your data by means of passwords In addition you can also mechanically lock your PC Systems with a SmartCard reader offer additional protection DeskUpdate allows you under some operating systems to easily and quickly install the latest drivers and operating system extensions with a few mouse clicks DeskUpdate is contained on the Drivers Utilities C...

Страница 10: ...B X Boot and write protection for floppy disk and hard disk drives X Virus protection in the BIOS X Write protection for flash EPROM X Casing access monitoring X System lock including support for hard disk password X Hardware access protection optional external SmartCard reader X optional internal SmartCard reader X Software access protection LAN alarm with heartbeat function X Virus protection F ...

Страница 11: ...ates information which is important for your health or for preventing physical damage i indicates important information which is required to use the system properly Text which follows this symbol describes activities that must be performed in the order shown This font indicates commands or menu items Quotation marks indicate names of chapters or terms ...

Страница 12: ......

Страница 13: ...age set for this device see the Preparing for use chapter The main switch and the ON OFF switch do not disconnect the PC from the mains voltage To completely disconnect the mains voltage remove the power plug from the grounded mains outlet Remove the power plug before opening the device Replace the lithium battery on the mainboard in accordance with the instructions in the Extensions to the mainbo...

Страница 14: ...uipment into an outlet on a circuit different from that to which the receiver is connected Consult the dealer or an experienced radio TV technician for help Fujitsu Siemens Computers GmbH is not responsible for any radio or television interference caused by unauthorised modifications of this equipment or the substitution or attachment of connecting cables and equipment other than those specified b...

Страница 15: ...your new PC into operation for the first time Select location for PC and set up PC Connect the monitor mouse and keyboard Check the voltage at the mains outlet and connect the PC to an electrical outlet enable PC You will learn more about the individual steps in the following sections i External devices If you have received other devices in addition to your PC e g a printer or a modem do not conne...

Страница 16: ...hapter When installing the PC provide sufficient clearance around the PC as indicated in the Technical data chapter to ensure adequate ventilation In order to avoid overheating do not cover the ventilation area of the monitor or the PC Depending on the location of your device bothersome vibrations and noises may occur To prevent this a distance of at least 3 mm should be maintained from other devi...

Страница 17: ... monitor s power cable into either the PC 1 or the mains supply 2 i We recommend to connect the monitor power cable to the server monitor socket The monitor is then switched off automatically when you switch the PC off The monitor power cable may only be connected to the PC monitor socket if the monitor current consumption is smaller than 1 5 A with 230 V or 3 A with 115 V The values for the monit...

Страница 18: ...e IRQ12 for a different application Connecting a keyboard Depending on the equipment level selected your PC will be supplied with a standard keyboard or a USB keyboard Connecting standard keyboard Use the supplied keyboard cable only Plug the other end of the keyboard cable square plug into the socket on the underside of the keyboard Plug the round plug of the keyboard cable into the keyboard port...

Страница 19: ...tion level This means that manual voltage setting is not necessary for these devices Therefore there is no switch available for the voltage setting The following refers to the other devices The value indicated with an arrow must be compatible with the local rated voltage 115 100 V to 127 V 230 200 V to 240 V If the voltage setting is incorrect then lift out the manual voltage adjuster with a screw...

Страница 20: ...Preparing for use 12 A26361 K666 Z120 1 7619 edition 3 1 2 1 Connect the power cable to the PC 1 Plug the power plug into the grounded mains outlet 2 ...

Страница 21: ...r this as this process must not be interrupted Once the installation has been started the PC must not be switched off During installation the PC may only be rebooted when you are requested to do so Otherwise the installation will not be performed correctly If a fault occurs during the installation the contents of the hard disk must be completely restored You may require the Windows licence number ...

Страница 22: ...e front of the PC The corresponding indication then appears on the LCD or the relevant indicators light see chapter Indicators on the PC Installing the software During installation follow the instructions on screen Consult the operating system manual if there is anything unclear about the requested input data i You will find further information about the system drivers utilities updates manuals et...

Страница 23: ...l power plugs from the mains outlets Plug all cables into the PC and peripherals You must observe the information provided in the Important notes chapter Plug all data communication cables into the utility sockets Plug all power cables into the grounded mains outlets Disconnecting cables Turn off all power and equipment switches Remove all power plugs from the mains outlets Unplug all data communi...

Страница 24: ... of the devices that you connect require special drivers see the operating system and device documentation Connecting external devices to the serial port External devices can be connected to the serial port e g a modem Connect the data cable to the external device Connect the data cable to the serial port For an exact description of how to connect external devices to the serial port please refer t...

Страница 25: ... system already includes many drivers Nevertheless if the driver you need is not on the hard disk please install it from the data carrier supplied with the device or with the application programme Connecting external devices to the USB ports You can connect a wide range of external devices to the USB port e g printer scanner modem or keyboard i USB devices are hot pluggable This allows cables from...

Страница 26: ......

Страница 27: ...witch off the PC at the power switch The PC no longer uses any power The main power switch and the power button do not disconnect the PC from the mains voltage To completely disconnect the mains voltage remove the power plug from the socket If necessary switch the monitor off see the operating manual for the monitor Placing a PC with soft power off function in a ready to operate state by means of ...

Страница 28: ...operating state Power on appears on the LCD as soon as the PC is switched on Standby appears on the LCD as soon as the PC goes into standby mode The PC can be switched on with the ON OFF switch In standby powersaving mode the LCD is not lit Hard disk appears on the LCD as soon as the hard disk is accessed X Error appears on the LCD if there is a hardware error in the PC or if a critical hardware s...

Страница 29: ...at supports this function 2 CD ROM indicator The indicator lights up when the CD ROM drive is accessed You may only remove the CD when the indicator is dark 3 Floppy disk indicator The indicator lights up when the floppy disk drive of the PC is accessed You may only remove the floppy disk when the indicator is unlit Keyboard 1 3 4 5 2 1 Function keys 2 Power button optional 3 Alphanumeric keypad 4...

Страница 30: ...nter key is also referred to as the Return key Start key calls up the Windows Start menu Menu key invokes the menu for the marked item Windows Shift key enables upper case letters and the upper key symbols to be used Alt Gr Alt Gr e g German keyboard produces a character shown on the right hand side of a key e g the character on the key Q Num Lock Num key Switches the numeric key pad between the n...

Страница 31: ...fication of a 1 44 MB floppy disk or write protect switch on a 120 MB floppy disk 5 Eject button for inserted floppy disks 6 Disk is write protected 7 Disk is not write protected To insert a diskette Push the floppy disk into the drive in the insertion direction 1 until it engages The label should be facing upward To remove a diskette Push the eject button 5 Protect the floppy disk against being o...

Страница 32: ...ustomise these settings to your requirements in the BIOS Setup Property and data protection Software functions and mechanical locking offer a broad range of functions for protecting your PC and your personal data from unauthorised access You can also combine these functions Mechanical casing lock With the casing lock you can mechanically lock the casing to prohibit unauthorised persons from openin...

Страница 33: ... with a pad lock To prevent unauthorised persons from opening the casing the casing can be sealed To do this feed the sealing chain through the large eye 1 and the small eye 2 and seal the chain with the lead seal You can also attach a padlock to the large eye 1 to prevent unauthorised opening of the casing You can also use this eye to anchor the casing if necessary 1 2 3 1 Large eye 2 Small eye 3...

Страница 34: ...cess can be restricted to those users who have a corresponding SmartCard Access protection with SystemLock With SystemLock you can protect your system from unauthorised booting Then a system can only be booted when the user inserts a valid SmartCard in the SmartCard reader and enters his her personal code number PIN To use SystemLock you require the following components External or internal SmartC...

Страница 35: ...ing entry of the user PIN You can change the user PIN an the administrator PIN unlock locked SmartCards open and change the BIOS Setup and generate additional SmartCards for this system For instructions on how to install and operate SystemLock and how to initialise SmartCards see the BIOS Setup manual Operating the SmartCard reader Operating the internal SmartCard reader You can switch on the PC b...

Страница 36: ......

Страница 37: ...device This number can be found on the type rating plate on the back of the casing Contact your sales outlet or our customer service centre Installing new software When installing programmes or drivers important files may be overwritten and modified To be able to access the original data in the event of any problems following installation you should backup your hard disk prior to installation Powe...

Страница 38: ...r cable is properly connected to the monitor and depending on the connector to the PC or to a grounded mains outlet Check that the PC power cable is properly plugged into the PC and grounded mains outlet Switch on the monitor and the PC Monitor cable not connected Switch off the monitor and the PC Check that the monitor cable is properly connected to the PC and monitor Switch on the monitor and th...

Страница 39: ...to the system unit If you use an adapter or extension lead with the mouse cable check the connections Make sure that only one mouse is connected Switch the PC on The mouse controller must be enabled if you use a PS 2 mouse on the PS 2 mouse port Check in the BIOS Setup that the mouse controller is Enabled Check that the mouse driver is properly installed and is present when the application program...

Страница 40: ...he programmes used Restoring the hard disk contents Should you need to restore your hard disk the instructions are provided on the case of the Recovery CD delivered with your system Tips The PC cannot be switched off with the ON OFF switch Cause The PC was not switched on with the ON OFF switch Press the ON OFF switch again Cause System crash Press and hold the ON OFF switch for at least four seco...

Страница 41: ...ead the supplied documentation before installing new drives and or boards Refer to the technical manual for the mainboard before making any extensions to the mainboard Information about boards Take care with the locking mechanisms catches and centring pins when you are replacing boards or components on boards To prevent damage to the board or the components and conductors on it please take care wh...

Страница 42: ... of the mains outlet Only insert the power plug after you have closed the casing Remove any connected cables in the unit that obstruct you Place the device in a convenient working position 1 2 If necessary unlock the casing Press the green unlocking button on the rear of the casing 1 Hold the green unlocking button depressed and slide the casing side cover upwards in the direction of the arrow 2 P...

Страница 43: ...losing the casing 1 Push the side cover from above in the direction of the arrow 1 until it engages Lock the casing again if necessary Return the system unit to its original position Reconnect any disconnected cables power cord cables to external devices etc ...

Страница 44: ...he mainboard Boards may already be installed when the device is shipped Installing a board Open the casing see Opening the casing 1 2 3 Press the unlocking mechanism 1 down and open the locking rail 2 The word PRESS is embossed on the unlocking mechanism Remove the slot cover from the slot 3 Do not dispose of the slot cover For cooling protection against fire and in order to comply with EMC regula...

Страница 45: ...nd press on the locking mechanism in the direction of the arrow 3 The word PUSH is embossed on the locking mechanism Close the casing see Closing the casing i If you have installed or removed a PCI board please check the relevant PCI slot settings in the BIOS Setup If necessary change the settings Further information is provided in the PCI board documentation The slots 1 3 5 and 7 are suitable for...

Страница 46: ...he board 1 2 3 Press the unlocking mechanism 1 down and open the locking rail 2 The word PRESS is embossed on the unlocking mechanism Pull the board out of the slot 3 Place the board into appropriate packaging For cooling protection against fire and in order to comply with EMC electromagnetic compatibility regulations you must refit the slot cover ...

Страница 47: ... the locking rail There is a danger of damage Close the locking rail 2 and press on the locking mechanism in the direction of the arrow 3 The word PUSH is embossed on the locking mechanism Close the casing see Closing the casing i If you have installed or removed a PCI board please check the relevant PCI slot settings in the BIOS Setup If necessary change the settings Further information is provid...

Страница 48: ...rresponding slot adapter beforehand Two piece rear covers are fitted into the slots intended for low profile boards The two pieces are connected together with a screw Remove the desired rear cover and then remove the screw Mounting slot adapter 2 1 Fit the slot adapter on the slot cover of the low profile board 1 and screw it on 2 Now you can install the low profile board in a suitable slot like a...

Страница 49: ... can be inserted from outside Non accessible drives are e g hard disk drives IDE drives Two IDE drives are supported as standard equipment Ideally hard disks are connected to IDE interface 1 and other drives to IDE interface 2 see also the technical manual for the mainboard SCSI drives If you want to install a SCSI drive you require a SCSI controller and a SCSI cable Details are provided in the ma...

Страница 50: ...gh that you can carefully place it to one side with the front panel You do not need to unplug the cable before removing the front panel Attaching the front panel Engage the locking mechanism on the right of the casing Attach the front panel on the casing such that the plastic hooks engage into the correct recesses Close the front panel 1 and make sure that the LCD cable is not pinched and that the...

Страница 51: ...nt panel 1 1 Press the EasyChange rails 1 together and pull the empty slide in module out of the casing 2 Pull the EasyChange rails off the empty slide in module i Do not dispose of the empty slide in module For cooling protection against fire and in order to comply with EMC regulations you must refit the empty slide in module if you remove the drive again later ...

Страница 52: ...e drive if necessary on already installed drives as well Press the EasyChange rails into the provided holes Push the accessible drive into the casing until the EasyChange rails engage Plug the data and the power supply connectors into the drive Make sure the polarity is correct Attach the front panel see Attaching the front panel ...

Страница 53: ... drive All rails are mounted correctly on delivery It may be necessary to modify the entry for the drive in the BIOS Setup Removing an accessible drive Open the casing see Opening the casing Remove the front see Removing the front panel 1 1 Pull the data and the power supply connectors from the desired drive Press the EasyChange rails together 1 and pull the drive out of the casing 2 If necessary ...

Страница 54: ...System expansions 46 A26361 K666 Z120 1 7619 edition 3 Pull the EasyChange rails off the drive Press the EasyChange rails into the holes provided in the empty slide in module ...

Страница 55: ... the casing i It may be necessary to modify the entry for the remaining drives in the BIOS Setup Changing the floppy disk drive Open the casing see Opening the casing Remove the front see Removing the front panel Disconnect the cables connected to the floppy disk drive If it is present pull the cable of the front USB or USB audio interface from the mainboard see also the technical manual for the m...

Страница 56: ...Z120 1 7619 edition 3 Removing the floppy disk drive 1 1 Press the EasyChange rails in the direction of the arrows 1 Pull the floppy disk slide in module out of the casing 2 Pull the EasyChange rails off the floppy disk slide in module ...

Страница 57: ... the slide in module Pull the disk drive out of the slide in module 2 Installing the floppy disk drive Take the new floppy disk drive out of its packaging 2 2 Slide the floppy disk drive into the slide in module 1 Fasten the floppy disk drive with the screws 2 on both sides of the slide in module ...

Страница 58: ...oticeably Fit the data and power supply connectors to the floppy disk drive If it is present pull the cable of the front USB or USB audio interface from the mainboard see also the technical manual for the mainboard Attach the front panel see Attaching the front panel Close the casing see Closing the casing i It may be necessary to modify the entry for the drive in the BIOS Setup ...

Страница 59: ...ich casing version you have a serial ATA hard disk can only be installed in the upper three slots The bottom slot does not offer sufficient space to install a serial ATA hard disk Take the new hard disk drive out of its packaging Make the required settings e g master slave settings on the drive Secure the EasyChange rails on the side of the hard disk by inserting the upper pins of the EasyChange r...

Страница 60: ...s i IDE interface Connect the blue plug of the data cable to the connection on the mainboard Connect the plug on the other end to the hard disk drive Serial ATA interface Connect the angled plug of the data cable to the drive and the straight plug to the connection on the mainboard Even if your serial ATA has two power supply connectors you may use only one Otherwise damages may result Observe the...

Страница 61: ...plate 2 1 a a Set the cover plate into the casing such that the projections a engage into the appropriate recesses 1 Close the cover and fasten it with the screw 2 Close the casing see Closing the casing i It may be necessary to modify the entry for the drive in the BIOS Setup ...

Страница 62: ...e power supply cable 1 1 2 Press the EasyChange rails in the direction of the arrows 1 Pull the hard disk drive out of the carrier 2 Pull the EasyChange rails off the hard disk drive If necessary make the required settings on the remaining hard disk drive Attach the cover see Installing the cover plate Close the casing see Closing the casing i It may be necessary to modify the entry for the drive ...

Страница 63: ...SmartCard data cable from the mainboard see also the technical manual for the mainboard Loosen the screws 1 Pull the SmartCard reader together with its mounting out of the casing 2 i If you remove the upper accessible drive first you will find it easier to remove the SmartCard reader together with its mounting 1 2 Remove the data cable from the SmartCard reader Undo the screws 1 and pull the Smart...

Страница 64: ...nect the data cable to the SmartCard reader 1 2 Place the carrier on the guide clips in the casing Slide the carrier in the direction of the arrow as far as it will go 1 Fasten the mounting to the casing with the screws 2 Connect the plug of the SmartCard data cable to the mainboard see the technical manual for the mainboard Attach the front panel see Attaching the front panel Close the casing see...

Страница 65: ... two audio ports or two USB interfaces combined with two audio ports Each of the audio ports have the connections Headphone OUT and Microphone IN Installing front USB or USB audio ports Open the casing see Opening the casing Remove the front see Removing the front panel Pull the cables from the floppy disk drive 1 1 Press the EasyChange rails in the direction of the arrows 1 Pull the floppy disk s...

Страница 66: ...20 1 7619 edition 3 Pull the EasyChange rails off the floppy disk slide in module Detach the locking mechanisms 1 and remove the front bezel of the floppy disk slide in module 2 Remove the blanking plate from the slide in module bezel 3 ...

Страница 67: ...rough the hole provided 1 First slide the tongue into the upper opening Fasten the USB or USB audio ports with the screw 2 If appropriate insert the interface frame into the slide in module bezel 1 First attach the bezel at the bottom and then push the upper tongues into place until they engage 2 ...

Страница 68: ...the casing 1 until it engages noticeably Fit the data and power supply connectors to the floppy disk drive Connect the USB cable and if necessary the audio cable to the corresponding connector on the mainboard see also the technical manual for the mainboard Attach the front panel see Attaching the front panel Close the casing see Closing the casing ...

Страница 69: ...he front panel Detach the USB data cable and if present the audio data cable from the mainboard see the technical manual for the mainboard Pull the cables from the floppy disk drive 1 1 Press the EasyChange rails in the direction of the arrows 1 Pull the floppy disk slide in module out of the casing 2 Pull the EasyChange rails off the floppy disk slide in module ...

Страница 70: ...3 Detach the locking mechanisms 1 and remove the bezel of the floppy disk slide in module 2 If appropriate remove the interface frame from the bezel of the floppy disk slide in module 3 1 Remove the screw 1 and then remove the USB or USB audio interface 2 ...

Страница 71: ...120 1 7619 edition 3 63 Insert the blanking plate into the slide in module bezel 1 First attach the bezel at the bottom and then push the upper tongues into place until they engage 2 Press the EasyChange rails into the provided holes ...

Страница 72: ...tion 3 Slide the floppy disk slide in module into the casing 1 until it engages noticeably Fit the data and power supply connectors to the floppy disk drive Attach the front panel see Attaching the front panel Close the casing see Closing the casing ...

Страница 73: ...ta cable from the mainboard see the technical manual for the mainboard Pull the cables from the floppy disk drive Remove the floppy disk drive see Changing the floppy disk drive Removing the floppy disk drive section 2 2 Slide the WLAN module into the slide in module 1 Fasten the WLAN module with the screws 2 on both sides of the slide in module Insert the blind cover into the slide in module beze...

Страница 74: ...stem expansions 66 A26361 K666 Z120 1 7619 edition 3 First attach the bezel at the bottom and then push the upper tongues into place until they engage 2 Press the EasyChange rails into the provided holes ...

Страница 75: ...le onto the corresponding connector on the mainboard also see Technical Manual for the mainboard Attach the front panel see Attaching the front panel Close the casing see Closing the casing i More detailed information on the use of Wireless LAN can be found in the Wireless LAN manual This manual is provided as PDF file on the User Documentation or Drivers Utilities CD ...

Страница 76: ...t see Removing the front panel Detach the USB data cable of the WLAN module and if present the audio data cable from the mainboard see the technical manual for the mainboard 1 1 Press the EasyChange rails in the direction of the arrows 1 Pull the slide in module out of the casing 2 Pull the EasyChange rails off the slide in module ...

Страница 77: ...pansions A26361 K666 Z120 1 7619 edition 3 69 Detach the locking mechanisms 1 and remove the bezel 2 1 1 Remove the screws on both sides of the slide in module 1 Pull the WLAN module out of the slide in module 2 ...

Страница 78: ...tem expansions 70 A26361 K666 Z120 1 7619 edition 3 First attach the bezel at the bottom 1 and then push the upper tongues into place until they engage 2 Press the EasyChange rails into the provided holes ...

Страница 79: ...xpansions A26361 K666 Z120 1 7619 edition 3 71 Slide the slide in module into the casing until it engages noticeably Attach the front panel see Attaching the front panel Close the casing see Closing the casing ...

Страница 80: ...ing Removing the power supply 1 2 Unscrew the screw with which the power supply is secured in the casing 1 Swing the power supply out of the casing as far as it will go 2 Only connect the power plug after you have reinstalled the power supply and closed the unit Upgrading main memory Upgrade the memory according to the description in the technical manual for the mainboard Close the casing see Clos...

Страница 81: ...by the manufacturer Do not throw lithium batteries into the household waste They must be disposed of in accordance with local regulations concerning special waste Make sure that you insert the battery the right way round The plus pole must be on the top The lithium battery holder exists in different designs that function in the same way 2 3 3 1 2 4 Press the catch in the direction of the arrow 1 T...

Страница 82: ......

Страница 83: ...V 3 0 A 200 V 240 V 1 5 A Dimensions Width depth height 204 mm 503 mm 387 mm Weight with the basic configuration approx 15 kg Environmental conditions Environment class 3K2 Environment class 2K2 DIN IEC 721 part 3 3 DIN IEC 721 part 3 2 Temperature Operating 3K2 Transport 2K2 15 C 35 C 25 C 60 C Condensation in operating must be avoided Clearance required to ensure adequate ventilation top left ri...

Страница 84: ......

Страница 85: ...ain 25 Class B Compliance Statement 6 Configuration BIOS Setup 24 Contents of delivery 7 Control key 22 Courier 3 Ctrl key 22 Ctrl Alt Del 22 Cursor keys 21 D Data protection 24 Date not correct 32 Device drivers parallel port 17 serial port 16 USB 17 Devices connecting 15 16 17 ports 16 Disposal 5 Drive 41 accessible 41 installing 41 43 non accessible drive 41 removing 41 45 E Electromagnetic com...

Страница 86: ... connecting 10 important keys 22 port 16 Keyboard port 8 10 Keypad alphanumeric 21 numeric 21 L LAN port 16 LCD 20 Lead sealing 25 Line in 16 Line out 16 Lithium battery 72 replacing 73 Lock 24 Low profile boards 40 mounting slot adapter 40 removing slot adapter 40 M Main memory 72 upgrading 72 Main power switch 14 Mainboard extensions 72 Manuals further 32 Memory insufficient 32 not enough 32 Men...

Страница 87: ... parallel port 16 printer 16 PS 2 mouse 16 SCSI 16 serial port 16 USB 16 Power supply removing 72 Power on indicator 14 dark 29 fails to light 29 Preparing for first use overview 7 Preparing for use 7 overview 7 Printer 16 Processor 72 Property protection 24 Protection property and data 24 PS 2 mouse connecting 10 port 16 PS 2 mouse port 8 10 R Ready to operate 14 Recycling 5 Retransportation 6 Re...

Страница 88: ...9 screen 30 Troubleshooting 29 U USB 8 USB devices connecting 17 software 17 USB keyboard connecting 10 USB mouse connecting 10 USB port 10 17 connecting devices 17 USB port or USB audio port installing 57 USB ports removing 61 USB port 16 V Ventilation area 8 Video workstation 8 W Warm boot 22 WLAN module installing 65 removing 68 Write protection floppy disk 23 31 ...

Отзывы: