background image

Using your notebook

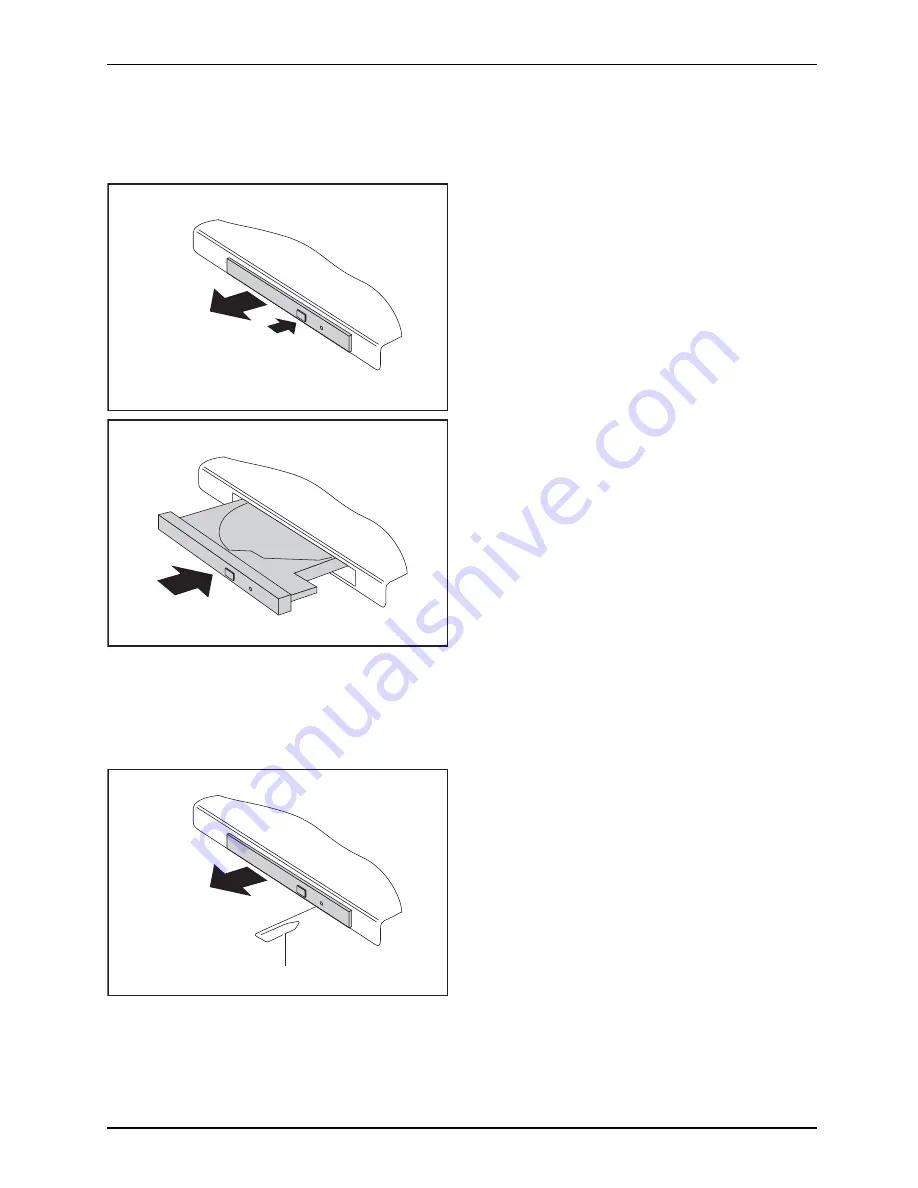
Inserting or removing a CD/DVD

CD/DVD:

CD/DVD:

The notebook must be switched on.

2

1

Push the insert/eject button (1).

The drive tray will open.

Gently pull the drive tray (2) completely out.

Place the CD/DVD in the drive tray with
the label facing upwards.

or

Take out an inserted CD/DVD.

Push in the drive tray until you
feel it lock into place.

Manual removal (emergency removal)

CD/DVD:

Manualremoval,CD/DVD

Emergencyremoval,CD/DVD

In the event of a power failure or damage to the drive it may be necessary
to manually remove the CD/DVD.

1

2

Switch your notebook off.

Push a pen or a piece of wire (such as a
paperclip)

fi

rmly into the opening (1).

The drive tray is ejected. You can now pull
the drive tray (2) out of the drive.

A26391-K200-Z126-1-7619, edition 3

21

Содержание Professional Notebook

Страница 1: ...Professional Mobile English Operating Manual Professional Notebook...

Страница 2: ...www fujitsu siemens com support your sales partner your sales office Additional information is contained in the Help Desk list and the Warranty manual The Warranty manual can be found on the Drivers...

Страница 3: ......

Страница 4: ...This manual was produced by Xerox Global Services Published by Fujitsu Siemens Computers GmbH AG 07 07 Edition 3 Order no A26391 K200 Z126 1 7619...

Страница 5: ...tant notes 3 Preparing the notebook for use 6 Using your notebook 9 Security functions 30 Connecting external devices 38 Energy saving functions 42 Settings in BIOS Setup 45 Troubleshooting and tips 4...

Страница 6: ...ovision Corporation USA Microsoft MS MS DOS Windows and Windows NT are registered trademarks of Microsoft Corporation PS 2 is a registered trademark of International Business Machines Inc Alle weitere...

Страница 7: ...solution under Windows XP 15 Adjusting the resolution under Windows Vista 15 Selecting the font size under Windows XP 15 Selecting the font size under Windows Vista 15 Adjusting the brightness of the...

Страница 8: ...ophone port 40 Audio output Line out SPDIF optional 40 Connecting an external device to S Video Out 41 Activating the external TV projector 41 Connecting FireWire devices 41 Energy saving functions 42...

Страница 9: ...DVD playback 56 User and or supervisor password forgotten 56 Acoustic warnings 56 Error messages on the screen 57 Restoring the hard disk contents under Windows 58 Manufacturer s notes 59 Disposal and...

Страница 10: ...Contents A26391 K200 Z126 1 7619 edition 3...

Страница 11: ...dels it is possible that your notebook may not be equipped with all of the components and modules which are described here Information which is specific to your device such as the Device Overview and...

Страница 12: ...sword Name123 or a command to launch a program start exe This style refers to information displayed by a program on the screen e g Installation is completed This style is for terms and texts in a soft...

Страница 13: ...ta processing equipment If you have questions about using your notebook in a particular area please contact your sales outlet or our Hotline Help Desk Additional safety notes for devices with radio co...

Страница 14: ...Enquire with the corresponding government office of the country you will be travelling in as to whether you may operate the radio component integrated in your notebook there also see CE marking Page 6...

Страница 15: ...damage the markings on the keyboard and the device the paintwork or the notebook itself Ensure that no liquid enters the notebook Remove the battery refer to the section entitled Battery in the EasyGu...

Страница 16: ...ery for damage incurred during transportation Check whether the delivery conforms to the details in the delivery note Should you discover that the delivery does not correspond to the delivery note not...

Страница 17: ...notebook is connected to the mains adapter Do not use the mains adapter for other notebooks or devices Do not use a mains adapter that is not specially intended for this notebook Make sure that the r...

Страница 18: ...ins adapter During installation the notebook must only be rebooted when you are requested to do so Switch the notebook on refer to the section entitled Switching on the notebook in the EasyGuide The i...

Страница 19: ...the device can be found in the EasyGuide Keyboard Keyboard The keyboard of your notebook is subject to continuous wear through normal use The key markings are especially prone to wear The key marking...

Страница 20: ...ain Shiftkey CapsLock Shift key The Shift key causes uppercase characters to appear In the case of overlay keys the character printed on the upper left of the key appears when that key is pressed Shif...

Страница 21: ...a numeric keypad your keyboard is equipped with a virtual numeric keypad The special keys of the virtual numeric keypad are recognisable by the numbers and symbols printed in the upper right corner o...

Страница 22: ...uchpad buttons 4 TouchStick buttons and Touchpad buttons offer the same functions Depending on the model your notebook may also have a scroll button 5 which makes it easier for you to scroll through d...

Страница 23: ...eld you wish to select Tap the Touchpad twice or press the left TouchStick Touchpad button twice The command is executed Dragging an object Touchpad TouchStick Move the pointer to the item you wish to...

Страница 24: ...GA 1600 x 1200 WUXGA 1920 x 1200 The correct screen resolution for your notebook can be found under Technical Data in the EasyGuide Permanently unlit or lit pixels The standard of production technique...

Страница 25: ...stingthefontsize LCDscreen You can choose between a larger and a smaller font Right click on the desktop Configure the settings as desired under Personalization Adjust font size DPI in the left hand m...

Страница 26: ...a fault please stop using them immediately Do not touch the contacts of batteries Never interconnect the positive and negative terminals of a battery Batteries must be disposed of in accordance with t...

Страница 27: ...for monitoring the battery capacity This can be activated under Start Settings Control Panel Power Options Windows XP or Start Settings Control Panel Mobile PC Power Options Windows Vista The indicato...

Страница 28: ...Left click on the icon Select the module you want to stop and remove Press the Enter key Wait for the dialogue box which tells you that it is now safe to remove the module Carefully pull the eject lev...

Страница 29: ...r notebook Installing module Place the module into the module bay so that the contacts enter first Push the module into the module bay until you feel it locking into place A26391 K200 Z126 1 7619 edit...

Страница 30: ...d direct sunlight Avoid storing a CD DVD in areas subject to high temperatures or humidity You may use both 8 cm and 12 cm CDs DVDs in the optical drive When using CDs DVDs of poor quality vibrations...

Страница 31: ...inserted CD DVD Push in the drive tray until you feel it lock into place Manual removal emergency removal CD DVD Manualremoval CD DVD Emergencyremoval CD DVD In the event of a power failure or damage...

Страница 32: ...supplied with the memory card for any special instructions Memory card inserting Memorycard Carefully push the memory card into the slot The label should be facing upward The memory card may protrude...

Страница 33: ...eep the placeholder in a safe place When you remove the PC card or ExpressCard you should also refit the placeholder in the empty slot This prevents foreign matter from getting into the slot Please se...

Страница 34: ...ook casing To do this press the eject button until it pops out Press the eject button 1 to make the placeholder for the card protrude from the notebook s case Pull the card placeholder out of the slot...

Страница 35: ...the connection contacts first Gently push the card into the slot until you feel it click into place Device with card release 1 2 Press the card release in the direction of the arrow 1 so that the car...

Страница 36: ...emove the card Devices with an eject button 2 1 2 If the eject button is lowered you must first cause the eject button to release from the notebook casing To do this press the eject button until it po...

Страница 37: ...Gently slide the card placeholder into the slot until you feel it click into place Device with card release 1 2 Press the card release in the direction of the arrow 1 so that the card protrudes a litt...

Страница 38: ...bourg the Netherlands Norway Austria Portugal Sweden Switzerland and Spain Pulse dialling Belgium France Italy and the Netherlands Also in Poland Slovenia South Africa and Hungary Connecting notebook...

Страница 39: ...Using your notebook Connecting the notebook to a LAN LAN LAN 2 1 Connect the LAN cable to the notebook s LAN port 1 Connect the LAN cable to your device 2 A26391 K200 Z126 1 7619 edition 3 29...

Страница 40: ...lephone numbers can be found on the supplied helpdesk list or at www fujitsu siemens com support Passwords are not covered by your warranty and a charge will be made for assistance Brief overview of s...

Страница 41: ...ssory Fit the Kensington MicroSaver to the corresponding device on your notebook Configuring the fingerprint sensor optional Fingerprintsensor Fingerprintsensor Depending on the model your notebook is...

Страница 42: ...s of the BIOS Setup while the user password only provides some of the functions You can only set a user password if a supervisor password has already been assigned Please refer to section Settings in...

Страница 43: ...hich you have assigned in the BIOS Setup see also Entering supervisor and user password section you can also block booting of the operating system Activating system protection Call up the BIOS Setup a...

Страница 44: ...condary Master Password and proceed exactly as when configuring the password for the first hard disk The field Password Entry on Boot is set to Enabled by default You can exit the BIOS Setup once you...

Страница 45: ...is included in the Mobile Secure IT Suite is locked after an incorrect PIN is input three times to ensure maximum security for you The first time you use your SmartCard you must enter the preset PIN p...

Страница 46: ...the BIOS Setup i e before the operating system is booted To use SystemLock the following conditions must be met You must configure a SmartCard reader You must install SystemLock on your notebook You...

Страница 47: ...PM and the related software is provided on the TPM software CD DVD If you use TPM and the software on the TPM software CD DVD we strongly recommend that you use the emergency restoration function and...

Страница 48: ...tebook Devices 1 Turn off all power and equipment switches 2 Remove power plugs from the mains outlets for all devices 3 Connect all the cables to the notebook and the external devices 4 Plug all data...

Страница 49: ...r output is saved in this profile This profile will be loaded as soon as the notebook is connected to a Port Replicator of the same type Setting the refresh rate for your external monitor The refresh...

Страница 50: ...e operating system However if the USB device requires its own software please install it from the data carrier provided with the USB device Connecting external audio devices Connectingaudiodevices Mic...

Страница 51: ...earance and Themes Display Settings Advanced Graphics card folder for Intel e g Intel External Graphics you can select which key combination is used to switch over the screen output Connecting FireWir...

Страница 52: ...rmation on this service programme is contained in your operating system help files To avoid loss of data never switch off the notebook via the ON OFF button Always shut the operating system down prope...

Страница 53: ...your notebook may be equipped with the E button The enclosed software allows you to set up various energy saving functions e g decreasing screen brightness These energy saving functions can be easily...

Страница 54: ...ing is also triggered when you do not make an entry on your notebook for a certain time When you resume work your notebook returns to the place at which you discontinued working Windows XP You can set...

Страница 55: ...etup BIOS Setup starting BIOSSetup Restart the notebook switch OFF and back ON or perform a restart The following display briefly appears on the screen during start up ESC Diagnostic screen F12 Boot M...

Страница 56: ...carding Changes To discard the changes select Exit Discarding Changes and Yes The settings which were in force when the BIOS Setup was called remain effective BIOS Setup is terminated and the device i...

Страница 57: ...ebook Notes of any messages that appear on the screen and information on acoustic signals Any changes you have made to the hardware or software since receiving the notebook Any changes you have made t...

Страница 58: ...een and the external screen The notebook s LCD screen remains blank LCDscreen LCDscreenistoodark Cause Troubleshooting The screen power management feature may be active Press any key to activate the d...

Страница 59: ...hnical Data in the EasyGuide The external monitor remains blank Externalmonitor Cause Troubleshooting Monitor is switched off Switch the external monitor on Power saving has been activated monitor is...

Страница 60: ...ings Control Panel Display Settings Advanced Monitor Set the screen resolution Start Settings Control Panel Display Settings Screen resolution field Windows Vista Terminate the application program in...

Страница 61: ...short the battery is probably too old Replace battery if necessary You may have an application running that consumes a great deal of power due to frequent accessing of the hard disk or optical drive...

Страница 62: ...l outlet Switch the notebook on The notebook does not react Notebook Cause Troubleshooting The notebook is in Standby or Suspend mode Disable Standby mode press a key or Suspend mode switch notebook o...

Страница 63: ...N OFF switch for the wireless LAN Bluetooth module is in the OFF position Switch your radio component on refer to the section entitled Switching the radio components on and off in the EasyGuide The ON...

Страница 64: ...ing the notebook and the printer is connected properly Wrong printer driver installed Check that the correct printer driver is installed Wrong printer settings Check the printer settings in Windows Wr...

Страница 65: ...or Increasing decreasing the volume to check the volume Windows Vista Make sure that the sound driver is correctly installed under Control Panel System and Maintenance System Device Manager Press the...

Страница 66: ...r Increasing decreasing the volume to check the volume User and or supervisor password forgotten Userpassword Supervisorpassword Cause Troubleshooting Forgotten password If you have forgotten your use...

Страница 67: ...nd press the Enter key Extended memory failed at offset xxxx Failing Bits zzzz zzzz When testing the extended memory an error has resulted at the address xxxx Check whether the additional memory modul...

Страница 68: ...ry CD and the Drivers Utilities CD DVD The instructions are provided on the case of the Recovery CD During the reinstall process your personal files and any installed programs will be deleted We advis...

Страница 69: ...ates copyright protection technology that is protected by method claims of certain U S patents and other intellectual property rights owned by Macrovision Corporation and other rights owners Use of th...

Страница 70: ...6 95 EC Low voltage directive CE marking for devices with radio component This equipment complies with the requirements of Directive 1999 5 EC of the European Parliament and Commission from 9 March 19...

Страница 71: ...ienced radio TV technician for help Notice to Users of the US Telephone Network Your notebook may be supplied with an internal modem which complies with Part 68 of the FCC rules On this notebook is a...

Страница 72: ...prisons Hotel motel or apartment lobbies Stores where telephones are used by patrons to order merchandise Public transportation terminals where telephones are used to call taxis or to reserve lodging...

Страница 73: ...le mat riel Avant de connecter cet quipement une ligne t l phonique l utilisateur doit v rifier s il est permis de connecter cet quipement aux installations de t l communications locales L utilisateur...

Страница 74: ...comply with the limits for a Class B digital device pursuant to Part 15 of the FCC Rules These limits are designed to provide reasonable protection against harmful interference in a residential insta...

Страница 75: ...adio devices in specific environments is not clear e g airports hospitals chemical oil gas industrial plants private buildings obtain authorization to use these devices prior to operating the equipmen...

Страница 76: ...handling 20 inserting 21 manual emergency removal 21 removing 21 CD ROM drive 17 CE marking 60 Charging capacity battery 16 17 Cleaning 5 Configuration BIOS setup 45 Connecting audio devices 40 41 Co...

Страница 77: ...necting 29 LCD screen difficult to read 49 remains blank 48 settings 15 LCD screen is too dark 48 49 LCD screen adjusting the resolution 15 cleaning 5 decreasing brightness 15 font size 15 increasing...

Страница 78: ...onnection does not work 53 Regulatory information notebooks with radio device 64 Regulatory information notebooks without radio device 61 Return 10 S safety information 3 Screen brightness decreasing...

Страница 79: ...ing the pointer 13 scrolling down 13 scrolling up 13 selecting an item 13 TPM 37 Transport 4 Travel preparations 4 Troubleshooting 47 Trusted Platform Module 37 U USB devices connecting 40 software 40...

Отзывы: