background image

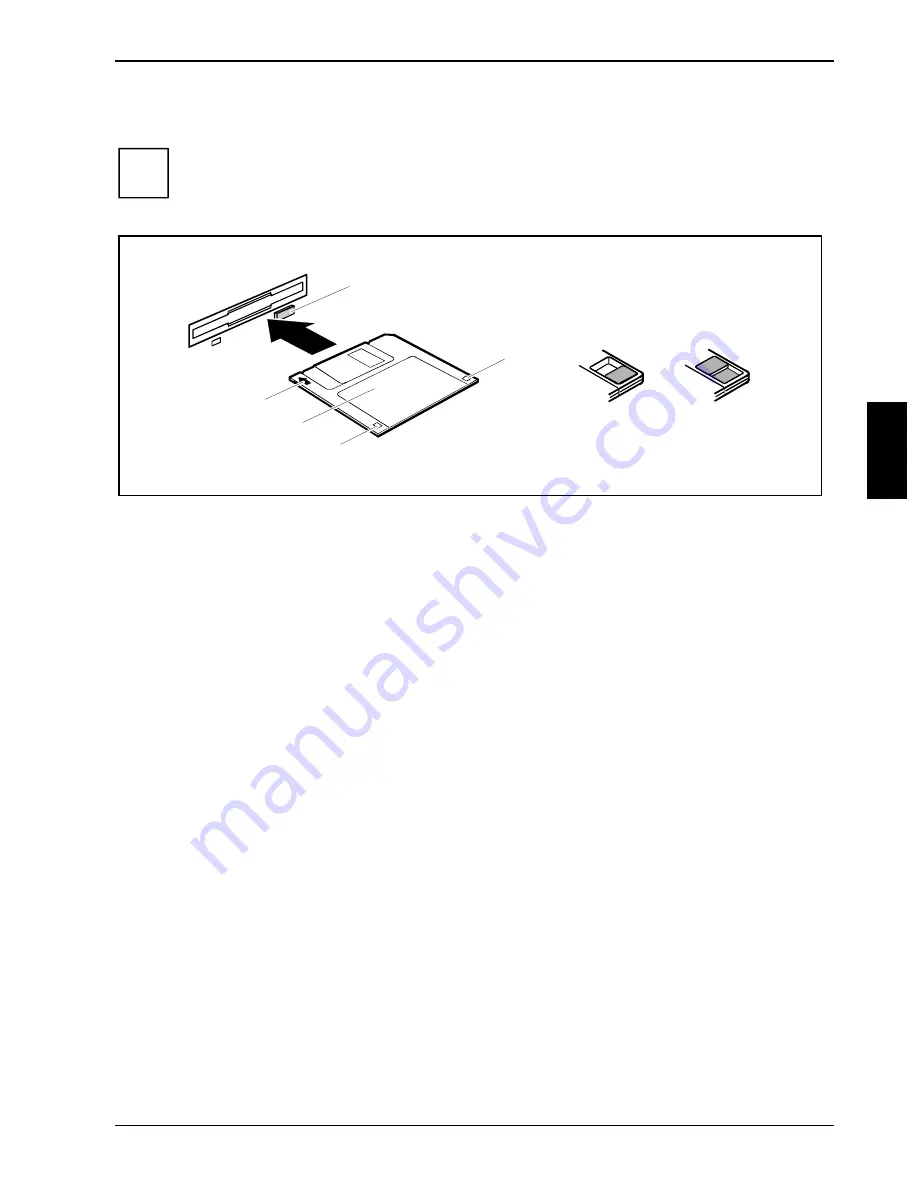
Working with floppy disks

Working with your notebook

A26391-LJ1-Z120-1-7619

31

Working with floppy disks

i

Follow the instructions supplied by the vendor of the floppy disks.

Never clean the floppy disk drives with cleaning disks. Even one attempt would destroy
the read/write head in the disk drive within 20 seconds.

3

2

1

5

6

4

7

1 = Insertion direction
2 = Label area
3 = Write protection tab for a 1.44 Mbyte floppy disk
4 = Identification of a 1.44 MB floppy disk or write protect switch on a 120 MB floppy disk
5 = Eject button for inserted floppy disks
6 = Disk is write-protected
7 = Disk is not write-protected

To insert a diskette:

Ê 

Push the floppy disk into the drive in the insertion direction (1) until it engages. The label
should be facing upward.

To remove a diskette:

Ê 

Push the eject button (5).

Protect the floppy disk against being overwritten or erased

Ê 

Slide the write-protect slider into position "write-protected" (6). The hole is now visible.

Deactivate write protection

Ê 

Slide the write-protect slider into position (7). The hole is now covered.

Содержание AMILO M Series

Страница 1: ...AMILO M Series AMILO M Series AMILO M Series AMILO M Series EasyGuide ...

Страница 2: ...l questions please refer to your sales partner your sales outlet Further information can be found in the Safety and Warranty manual The latest information on our products tips updates etc can be found on the internet under http www fujitsu siemens com ...

Страница 3: ......

Страница 4: ...Distributed by Fujitsu Siemens Computers GmbH Order No A26391 LJ1 Z120 1 7619 A26391 LJ1 Z120 1 7619 A26391 LJ1 Z120 1 7619 A26391 LJ1 Z120 1 7619 AG 0301 03 01 A26391 LJ1 Z120 1 7619 ...

Страница 5: ...Manual Introduction Important notes Preparing the notebook for use Working with your notebook Connecting external devices Settings in BIOS Setup Troubleshooting and tips Memory extension Technical data Index March 2001 edition ...

Страница 6: ...acrovision is a trademark of Macrovision Corporation USA All other trademarks referenced are trademarks or registered trademarks of their respective owners whose protected rights are acknowledged Copyright ã Fujitsu Siemens Computers GmbH 2001 All rights including rights of translation reproduction by printing copying or similar methods in part or in whole are reserved Offenders will be liable for...

Страница 7: ...itial switch on Software will be installed 14 First time software installation 14 Working with your notebook 15 Switching on the notebook 15 Switching off the notebook 16 Indicators 17 Keyboard 19 Key combinations 21 Touchpad and touchpad buttons 23 Display settings 24 Battery 25 Charging caring for and maintaining the battery 25 Storing the battery 25 Inserting and removing the battery 26 Using t...

Страница 8: ...lling new software 45 Saving and restoring system files 45 Restoring the hard disk contents under Windows ME 46 The notebook s date or time is incorrect 46 Battery indicator does not illuminate 46 The LCD screen of the notebook remains blank 46 The notebook s LCD screen is difficult to read 47 The external monitor stays blank 47 The external monitor is blank or the image is unstable 47 The noteboo...

Страница 9: ...external devices such as an external monitor a printer and a mouse The ECP capable parallel port is designed for fast bidirectional data transfer You can connect peripheral devices such as a scanner loudspeakers gamepads keyboard or mouse via the two USB ports An audio controller two built in loudspeakers and a built in microphone provide your AMILO with audio functionality You can thus incorporat...

Страница 10: ...lead to loss of data invalidate your warranty destroy the notebook or endanger your life i Indicates important information which is required to use the system properly Ê Text which follows this symbol describes activities that must be performed in the order shown This font represents text output on the screen This font indicates programme names commands or menu items Quotation marks indicate names...

Страница 11: ...workstation Window permissible reaching sector 600 mm edge of desk permissible reaching sector 600 mm Avoid direct and reflected glare Avoid glare from electric lighting Position the keyboard where it is easiest to reach 30 30 65 65 0 60 preferable viewing sector permissible viewing sector permissible viewing sector approx 90 and more approx 90 Position the monitor for optimum viewing The viewing ...

Страница 12: ......

Страница 13: ...connect the positive and negative terminals of a battery Used batteries must be disposed of in accordance with local regulations special waste If a lithium battery button cell is installed in the notebook for real time buffering please note that The lithium battery may only be replaced by authorised specially trained personnel Incorrect handling may lead to a risk of explosion The lithium battery ...

Страница 14: ...ching a grounded object before working The equipment and tools you use must be free of static charges Remove the power plug from the mains supply before inserting or removing boards containing ESDs Always hold boards with ESDs by their edges Never touch pins or conductors on boards fitted with ESDs Manufacturer s notes This product incorporates copyright protection technology that is protected by ...

Страница 15: ...could also prevent the emission of 20 million tons of carbon dioxide into the atmosphere the equivalent of 5 million automobiles As an Energy Star Partner Fujitsu Siemens Computers GmbH has determined that this product meets the Energy Star guidelines for energy efficiency Disposal and recycling This device has been manufactured to the highest possible degree from materials which can be recycled o...

Страница 16: ...ble If this is not the case buy a power cable that matches the local conditions Do not use a connection adapter for electrical devices to connect the notebook If you use a PC modem card incompatibilities with the local telecommunications system may result Transporting the notebook Remove all data carriers e g floppy disk CD from the drives Switch off the notebook Unplug the power adapter and all p...

Страница 17: ...g the battery Do not clean any interior parts yourself leave this job to a service technician Do not use any cleaning agents that contain abrasives or may corrode plastic Ensure that no liquid enters the notebook Wipe the casing with a dry cloth If particularly dirty use a cloth that has been moistened in mild domestic detergent and then carefully wrung out To clean the keyboard and the touchpad y...

Страница 18: ......

Страница 19: ...ng material of the devices Keep it for future transportation Selecting a location Select a suitable location for the notebook before setting it up Consider the following points when looking for a location Do not place it on a soft surface e g a carpet or soft furnishings The space between the notebook s feet must be clear Place the notebook on a stable flat nonslippery surface In view of the multi...

Страница 20: ...ok Make sure that the power cable is approved for use in the country in which you intend to use it The power adapter s AC cord should only be connected to a mains outlet if the notebook is connected to the power adapter Upon delivery the battery can be found in the battery compartment Do not use the power adapter for other notebooks or devices Do not use a power adapter that is not specially inten...

Страница 21: ...Ê Connect the power adapter cable to the DC jack DC IN of the notebook 1 Ê Connect the power cable to the power adapter 2 Ê Plug the power plug into the mains outlet 3 The power indicator on the notebook and the indicator on the power adapter should illuminate The notebook battery is charging ...

Страница 22: ...tor on the notebook lights up First time software installation Leave the external power adapter connected to your notebook during the initial installation Once the installation has been started the notebook must not be switched off During installation the notebook may only be rebooted when you are requested to do so Ê During installation follow the instructions on screen Consult the operating syst...

Страница 23: ...connect devices such as a mouse and a printer to the notebook Switching on the notebook 1 2 Ê Press the release button 1 and unfold the LCD screen upwards 2 Ê Press the Suspend Resume button to switch on the notebook 3 i You can configure the Suspend Resume button under Start Settings Control Panel Power Options Power Options Properties If you have assigned a password in order to start the operati...

Страница 24: ...1 LJ1 Z120 1 7619 Switching off the notebook Ê Shut down the operating system properly If the notebook does not switch off automatically press the Suspend Resume button for approx four seconds 1 Ê Close the LCD screen of the notebook 2 so that it locks into place ...

Страница 25: ...dicator Microphone Hard disk indicator Power on indicator 1 NumLK indicator Num Lock Power indicator A CapsLK indicator Caps Lock Battery indicator Scroll indicator Scroll Lock Floppy disk drive indicator Suspend Resume button The Suspend Resume button functions like an ON OFF switch It turns the notebook on and off ...

Страница 26: ... when a floppy disk in the floppy disk drive is being accessed You must not remove the floppy disk from the floppy disk drive when this indicator is lit Optical drive indicator The indicator is lit when the CD DVD in the optical drive is being accessed You must not remove the CD DVD from the drive when this indicator is lit Hard disk indicator The indicator lights up when the hard disk drive is be...

Страница 27: ... enter line feed carriage return The enter key terminates a command line The command you have entered is executed when you press this key Caps Lock key The Caps Lock key activates uppercase mode CapsLK indicator lit The Caps Lock function causes all the characters you type to appear in uppercase In the case of overlay keys the character on the upper left on the keycap appears when that key is pres...

Страница 28: ...up down left or right Pause Break Pause key The Pause Pause Pause Pause key temporarily suspends display output Output will resume when you press any other key Start key The Start key invokes the START menu of Windows Menu key The Menu key invokes the menu for the marked item Numeric keypad 7 8 9 0 U I O P J M K L 7 8 9 4 5 6 1 2 3 0 1 2 1 Characters enabled when NumLK indicator is not lit see Ind...

Страница 29: ... Save to Disk mode Fn F1 Reducing the contrast only with HPA displays This key combination reduces the contrast F2 Fn Increasing the contrast only with HPA displays This key combination increases the contrast Fn F3 Switching the loudspeakers on off This key combination switches your notebook s integrated loudspeakers off and on F4 Fn Switch internal touchpad on off This key combination enables and...

Страница 30: ...You can opt to use just the notebook s internal display just the external display both the internal and the external display Fn F11 Switching TV Out on off This key combination switches the video output TV out on or off Ctrl C Halting the current operation This key combination can be used to halt an operation instantly without clearing the keyboard buffer Backtab Shift Tab This key combination mov...

Страница 31: ... on the screen The two touchpad buttons allow the selection and execution of commands They correspond to the buttons on a conventional mouse b a a Touchpad b Touchpad buttons Moving the pointer Ê Move your finger over the touchpad The pointer moves accordingly Selecting an item Ê Move the pointer to the item you wish to select Ê Tap the touchpad once or press the left button once The item is selec...

Страница 32: ...nd F1 F1 F1 F1 you can reduce the contrast with Fn Fn Fn Fn and F2 F2 F2 F2 you can increase the contrast i These key combinations Fn Fn Fn Fn F1 F1 F1 F1 and Fn Fn Fn Fn F2 F2 F2 F2 only work with HPA displays Setting the display brightness You can adjust the brightness of your LCD screen with the keys Fn Fn Fn Fn and F6 F6 F6 F6 or Fn Fn Fn Fn and F7 F7 F7 F7 With Fn Fn Fn Fn and F6 F6 F6 F6 you...

Страница 33: ...he power adapter within five minutes of the signals described above your notebook automatically switches itself off i If you do not use the batteries for long periods remove them from the notebook Never store the batteries in the unit See also section Storing the battery The remaining battery charge is indicated by the battery symbol in the status indicator panel see the section Indicators When no...

Страница 34: ...emoving a battery Make sure that no foreign objects enter the slots Ê Switch off the notebook Ê Place the notebook on a flat surface Ê Close the LCD screen Ê Turn the notebook over Removing the battery Ê Push the slide in the direction of the arrow up to the stop 1 Ê Lift out the battery upward in the direction of the arrow 2 Ê Pull the battery out of the battery compartment 3 ...

Страница 35: ...nection When not using the notebook for long periods of time first end the energy saving mode then switch off the notebook Never switch off the notebook with the Suspend Resume button while the notebook is in one of the energy saving modes If your notebook is in an energy saving mode mode Do not connect any external peripheral devices Do not disconnect any external peripheral devices Do not attemp...

Страница 36: ...a CD RW drive or a DVD ROM drive This device contains a light emitting diode classified according to IEC 825 1 1993 LASER CLASS 1 and must not be opened Avoid touching the surface of a CD DVD Handle CDs DVDs only by their edges Always store CDs DVDs in their cases Thus you avoid dust contamination scratches bending or other damage Protect your CDs DVDs from dust mechanical vibration and direct sun...

Страница 37: ...ve is accessed i If the CD DVD drive indicator does not go out after inserting a CD DVD but instead continues to flash the CD DVD is probably damaged or dirty Inserting or removing a CD DVD The notebook must be switched on 1 Ê Push the insert eject button 1 The drive tray will open Ê Pull the drive tray all the way out 2 Ê Place the CD DVD in the drive tray with the label facing upwards or Ê Take ...

Страница 38: ... into place Manual removal emergency removal In the event of a power failure or damage to the drive it may be necessary to manually remove the CD DVD Ê Switch off the notebook a Ê Press a pen or a piece of wire e g a paperclip firmly into the opening a The drive tray is unlocked You can now pull it out of the drive ...

Страница 39: ...Identification of a 1 44 MB floppy disk or write protect switch on a 120 MB floppy disk 5 Eject button for inserted floppy disks 6 Disk is write protected 7 Disk is not write protected To insert a diskette Ê Push the floppy disk into the drive in the insertion direction 1 until it engages The label should be facing upward To remove a diskette Ê Push the eject button 5 Protect the floppy disk again...

Страница 40: ...lecommunications terminal equipment directive and has been checked in agreement with the guideline TBR 21 The modem can be operated in the following countries Multifrequency MFC dialing Belgium Denmark Germany Finland France Greece Great Britain Holland Ireland Iceland Italy Luxembourg Norway Austria Portugal Sweden Switzerland and Spain Pulse dialing Belgium France Holland and Italy Also in Polan...

Страница 41: ...g or removing a PC card Make sure that foreign objects do not fall into the PC card slot Installing a PC card Ê Insert the PC card contacts first into the lower slot guide The labelled side of the PC card must be facing upward Ê Gently push the PC card into the slot until you feel it click into place i Consult the documentation supplied with the PC card for information on how to install the necess...

Страница 42: ...f your local network LAN Local Area Network Before you can use PC LAN cards you must configure your notebook for use with the network operating system Open the Configuration tab under Start Control Panel Network and select the desired configuration If your notebook or your PC LAN card is delivered with a driver diskette install the drivers from this diskette Set up your notebook for use in a local...

Страница 43: ...contains a built in microphone a and two loudspeakers b If you attach an external microphone the built in microphone is disabled The internal loudspeakers switch off when you attach headphones or external loudspeakers to the audio jack Kensington Lock a a Kensington Lock You can protect your notebook from theft with the Kensington Lock device a and a Kensington MicroSaver ...

Страница 44: ......

Страница 45: ...pulling the cable itself Connect and disconnect peripheral devices in the order described below Connecting devices 1 Turn off all power and equipment switches 2 Pull all power plugs out of grounded mains outlets 3 Connect all the cables to the notebook and the external devices 4 Plug all data communication cables into the utility sockets 5 Plug all power cables into the mains supply Disconnecting ...

Страница 46: ...llowing symbols or with similar symbols USB port Monitor port Modem connector TV TV out socket Parallel port Headphones port Serial port Microphone connector PS 2 port for keyboard or mouse i Some of the devices that you connect require special drivers see the operating system and device documentation ...

Страница 47: ...type in the menu Start Settings Control Panel Display Settings Advanced Monitor Ê Now select the Adapter tab Ê Adjust the refresh rate and then click Apply If the refresh rate set is too high the monitor may be damaged Please see the documentation included with your monitor for the maximum possible refresh rate Connecting an external keyboard You do not need to switch off your notebook Ê Simply co...

Страница 48: ...the notebook Using the serial port Ê Switch off the notebook Ê Connect the data cable of the printer to the parallel port on the notebook Ê Plug the power cable of the printer into the mains outlet Ê First switch on the printer then the notebook Establishing a direct connection to a PC Ê Produce a parallel or serial cable connection Ê Select Start Settings Control Panel Network and release the fol...

Страница 49: ...system on which Windows ME is not running you can change the setting to IrDA Please note that IrDA is the slower mode and is generally used on older computers Connecting USB devices You can connect a wide range of external devices to the USB port e g a printer a scanner or a modem i USB devices are hot pluggable Therefore the cables from USB devices can connected and disconnected with the system s...

Страница 50: ......

Страница 51: ...tart BIOS Setup Ê Restart the notebook switching ON OFF or warm boot Ê When the message Press F2 to enter Setup appears press the key F2 F2 F2 F2 i If a password has been assigned Ê Enter the password and press the Enter key Ê If you have forgotten the password contact your system administrator or contact our Hotline Help Desk Operating BIOS Setup Ê Use the cursor key å å å å or ç ç ç ç to select ...

Страница 52: ...ing the password Ê Switch on your notebook Ê Start the BIOS Setup Ê Change to the Security menu Ê Use the cursor keys æ æ æ æ or è è è è to select the password Ê Press the Enter key to change the setting The Password dialogue field appears on the screen Ê Enter the password and press the Enter key The password can be up to seven characters long You can only use lowercase letters and numbers The ch...

Страница 53: ...grammes or drivers important files may be overwritten and modified To be able to access the original data in the case of any problems following installation you should backup your hard disk prior to installation Saving and restoring system files With Microsoft Backup you can create backup copies of your system files and restore the files We recommend that you create a backup copy of all important ...

Страница 54: ... Ê Double click on the clock in the task bar and adjust the time or Ê Set the time and or date in the BIOS Setup menu Main i If the date and time are repeatedly incorrect when you switch on the notebook the buffer battery that supplies the internal clock is dead Connect the notebook via its power adapter to a grounded mains outlet or install a fresh battery The buffer battery will take approximate...

Страница 55: ...dapter and into the mains outlet Ê Check whether the data cable is properly connected to the notebook and the external monitor if it is plugged in with a connector Ê Switch on the external monitor and the notebook The external monitor is blank or the image is unstable The wrong external monitor has been selected or the wrong screen resolution has been set for the application programme Ê Close the ...

Страница 56: ...ther the power adapter is connected correctly to the notebook Ê Check whether the power cable is plugged properly into the power adapter and into the mains outlet The indicator on the power adapter should illuminate Ê Switch the notebook on The notebook stops working If the notebook stops working this may have the following reasons The notebook is in Standby or Suspend mode Ê Reactivate the notebo...

Страница 57: ... check the connections Ê Switch the notebook on The floppy disk cannot be written Ê Check whether the disk is OK and is not write protected The printer does not print Ê Make sure that the printer is switched on and is on line see the manuals supplied with the printer Ê Check that the cable connecting the notebook and the printer is connected properly Ê Check that the correct printer driver is inst...

Страница 58: ... Default Setup entry and click on OK If the error message appears repeatedly please contact the place of purchase or our Hotline Help Desk Insert system diskette and press Enter key to reboot The operating system cannot be loaded or the hard disk contains no operating system or is not formatted Ê Insert a system disk Ê Press any key to continue Invalid system disk Replace the disk and then press a...

Страница 59: ...or message appears again please contact your point of sale or our Hotline Help Desk Keyboard error If you use an external keyboard Ê Check the connection and reboot the notebook If this error message appears again please contact your point of sale or our Hotline Help Desk nn Stuck key Ê Make sure that no key is pressed If this error message appears again please contact your point of sale or our Ho...

Страница 60: ...d to do so Real Time clock error Ê Contact your sales outlet or our Hotline Help Desk nnnnK Shadow RAM failed at offset xxxx Failing Bits zzzz Ê Contact your sales outlet or our Hotline Help Desk System battery is dead Replace and run SETUP Ê Contact your sales outlet or our Hotline Help Desk System cache error Cache disabled Ê Contact your sales outlet or our Hotline Help Desk nnnnK System RAM fa...

Страница 61: ...8 Mbyte modules SD RAM JEDEC 144 pin SO DIMM 3 3 V Never use force when installing or removing memory modules Make sure that foreign objects do not fall into the memory module compartment The main memory of your notebook can be expanded to 256 Mbyte using a second 128 Mbyte memory module The notebook will not start without memory modules as no fixed main memory is installed Removing and installing...

Страница 62: ...he cover off the notebook in the direction of the arrow 2 Ê Pull off the cover from the notebook in the direction of the arrow 3 Installing memory modules Ê Insert the memory module contacts first into the slot 1 Ê Carefully push the memory module downwards until you feel it latch into place 2 ...

Страница 63: ...odule will flap upward 2 Ê Pull the memory module out of its slot 3 Mounting the cover 3 2 1 Ê Place the cover on its mounting location 1 Ê Close the cover on the bottom of the notebook 2 Ê Fasten the cover with the screw 3 Ê Refit the battery Ê Place the notebook right side up on a flat stabile nonslip surface Ê Reconnect the cables ...

Страница 64: ......

Страница 65: ... Floppy disk drive Electrical data Regulations complied with CE EN60950 FCC Part 15 Class B Energy Star Protection class II Maximum power draw notebook on with battery charging 60 W LCD screen Display diagonal 12 1 inch SVGA HPA 12 1 inch SVGA TFT 14 1 inch XGA TFT Screen controller Chip Silicon Motion Lynx3D M4 M8 Video memory 4 Mbyte M4 8 Mbyte M8 Supported resolutions on external monitor Colour...

Страница 66: ...phone jack connector mono Headphone port connector stereo 1 x Modem port connector RJ11 2 x USB Universal Serial Bus Infrared interface Kensington Lock Environmental conditions Environment class 7K1 DIN IEC 721 Environment class 7M2 DIN IEC 721 Temperature Operating 7K1 5 C 35 C Transport 2K2 25 C 60 C Dimensions Width depth height 308 mm 260 mm 39 1 mm Weight approx 3 0 kg Battery Rated voltage 1...

Страница 67: ...9 Power adapter Primary Rated voltage 90 V to 240 V automatic Frequency 50 Hz to 60 Hz automatic Max rated current 1 5 A Secondary Rated voltage 19 V Max rated current 3 16 A You can readily order an additional power adapter and an additional power cable ...

Страница 68: ......

Страница 69: ...indicator 18 29 manually opening 30 CD RW drive 28 indicator 18 29 CE certificate 7 Cleaning 9 Contents of delivery 11 Contrast increasing 21 24 reducing 21 24 Ctrl C 22 D Damage during transport 11 Data audio 57 battery 58 dimensions 58 electrical notebook 57 environmental conditions 58 graphics card 57 input devices 58 LCD screen 57 notebook 57 ports 58 power adapter 59 slots 58 technical 57 bat...

Страница 70: ...A display increasing the contrast 21 24 reducing the contrast 21 24 I Important notes 5 Indicators 17 Infrared connection 40 41 Infrared software 41 Initial software installation 14 Internal touchpad 21 K Kensington Lock 35 Key Alt Gr 19 Backspace 19 Caps Lock 19 cursor control keys 20 Enter 19 Fn 20 Fn F11 22 Fn F3 21 Fn F4 21 Fn F9 21 menu 20 numeric keypad 20 Pause 20 Return 19 Shift 19 Shift T...

Страница 71: ... the LCD screen 16 initial software installation 14 not starting 48 operating 15 placing in service 11 setting up 11 stops working 48 switching off 16 switching on 15 switching on for the first time 14 transporting 8 travelling 8 Notes 5 battery 25 boards 6 CE certificate 7 cleaning 9 disposal 7 energy saving 6 manufacturer 6 safety 5 transporting 8 Num Lock indicator 18 Numeric keypad 19 20 NumLK...

Страница 72: ...spend Resume button 15 16 17 Symbols explanation of 2 System configuration 43 System expansion 53 System files 45 System settings BIOS Setup 43 T Time daylight savings 46 not correct 46 Tips 45 Touchpad 23 buttons 23 cleaning 9 dragging items 24 executing commands 23 moving the pointer 23 selecting items 23 Transport 8 Travel notebook 8 Troubleshooting 45 TV Out socket 38 U USB devices connecting ...

Отзывы: