background image


Using your notebook 

This chapter describes the basics for operating your notebook. 
Please see the "Connecting external devices" chapter for instructions on how to connect devices 
such as a mouse and a printer to the notebook. 


!


Please refer to the notes in the "Important notes" chapter. 

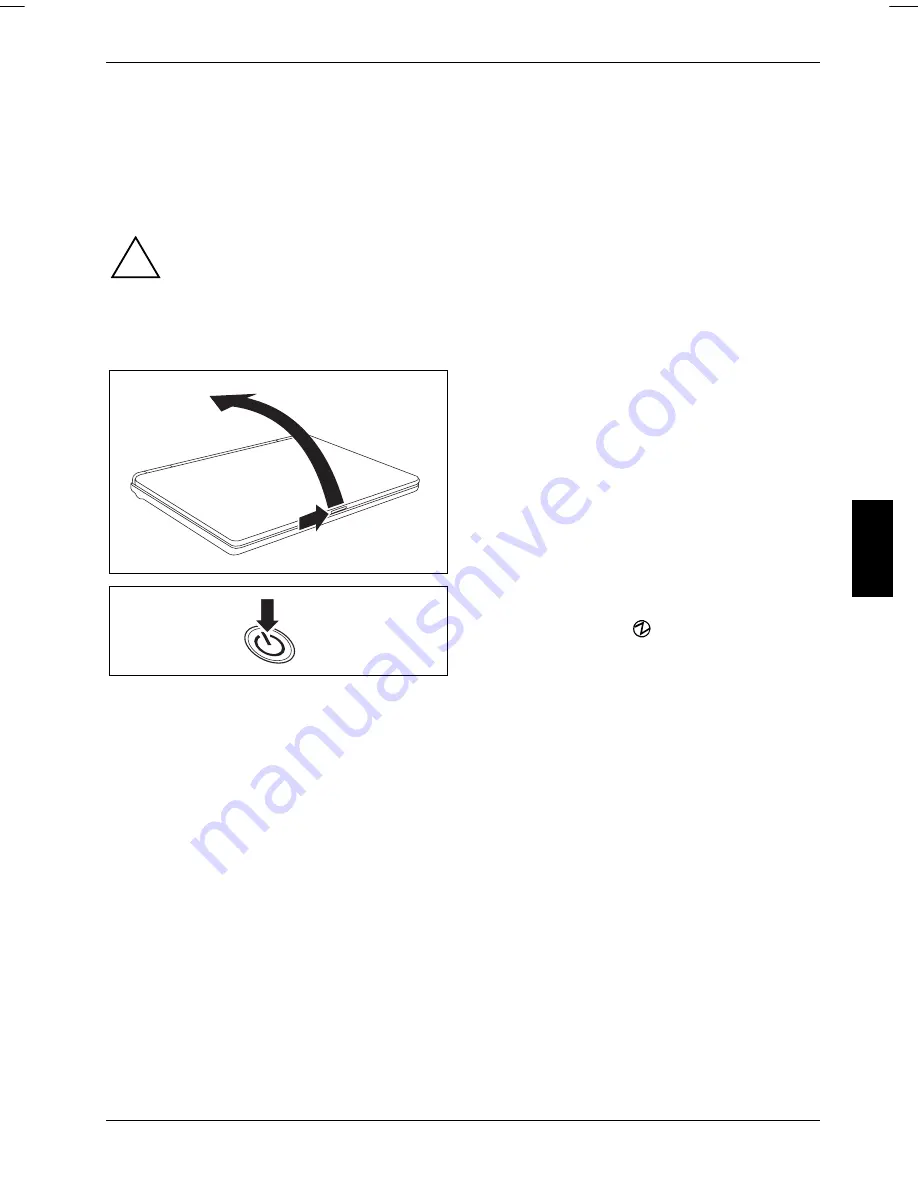
Switching on the notebook 


Slide the release button in the direction of 
the arrow (1) and unfold the LCD screen 
upward (2). 

2

1


Press the ON/OFF switch (1) to switch the 
notebook on. 

1

The power-on indicator (

) on the notebook lights 

up. 
 

10600727428

, edition 1 

13


Содержание AMILO L7320

Страница 1: ...Notebook EasyGuide English AMILO L7320...

Страница 2: ...port helpdesk html your sales partner Your sales office Additional information is contained in the Help Desk list and the Warranty manual You can find the Warranty manual on your notebook under Start...

Страница 3: ......

Страница 4: ...This manual was produced by Xerox Global Services Published by Fujitsu Siemens Computers GmbH Printed in the Federal Republic of Germany AG 06 06 Edition 1 Order No 10600727428 Order No 440 N30790...

Страница 5: ...ting elements Manufacturer s notes Important notes Index Using your notebook for the first time Using your notebook Security functions Connecting external devices Removing and installing components Se...

Страница 6: ...are trademarks or registered trademarks of their respective owners whose protected rights are acknowledged Copyright Fujitsu Siemens Computers GmbH 2006 All rights including rights of translation repr...

Страница 7: ...touchpad buttons 22 LCD screen 23 Information on the LCD screen 23 Monitor settings 24 Battery 24 Charging caring for and maintaining the battery 24 Removing and installing the battery 25 Using the p...

Страница 8: ...up Utility 53 Exiting BIOS Setup Utility 54 Troubleshooting and tips 55 Restoring installed software 55 Restoring the operating system drivers manuals and special software 55 The date time of the note...

Страница 9: ...ned CDRW DVD dual drive or a multi format DVD drive with double layer support for playing DVD films or writing CDs DVDs Several USB connections for easy expansion with webcams game pads printers and m...

Страница 10: ...ate your warranty destroy the notebook or endanger your life i Indicates important information which is required to use the system properly Texts which follow this symbol describe activities that must...

Страница 11: ...with your notebook 2 9 8 7 1 3 4 5 6 10 12 15 17 18 20 11 19 14 13 16 11 DC IN jack 1 LCD screen 12 USB port 2 ON OFF switch of the notebook 13 Headphones connection Line Out 3 Keyboard 14 Microphone...

Страница 12: ...Ports and operating elements 4 10600727428 edition 1...

Страница 13: ...ns for devices with wireless components in the Safety manual Please refer to the notes in the Removing and installing components during servicing chapter This notebook complies with the relevant safet...

Страница 14: ...ebook during a flight first check with the flight attendants if it is OK to do so When travelling in other countries If you are travelling abroad check that the mains adapter can be operated with the...

Страница 15: ...ook off Unplug the mains adapter from the mains socket Remove the battery Do not clean any interior parts yourself leave this job to a service technician Only use cleaning products designed for comput...

Страница 16: ...Important notes 8 10600727428 edition 1...

Страница 17: ...e the battery s life by enabling the system s energy saving functions When you use your notebook in your home or office we recommend you use the mains adapter instead of the battery Please see the Con...

Страница 18: ...mm away from the notebook and its mains adapter to ensure adequate ventilation Never cover the fan intake or exhaust openings of the notebook or the mains adapter Do not expose the notebook to extrem...

Страница 19: ...easier for you when you are starting up your notebook for the first time the operating system is already pre installed on the hard disk and the manuals are saved to the hard disk Switch the notebook...

Страница 20: ...Using your notebook for the first time 12 10600727428 edition 1...

Страница 21: ...ect devices such as a mouse and a printer to the notebook Please refer to the notes in the Important notes chapter Switching on the notebook Slide the release button in the direction of the arrow 1 an...

Страница 22: ...operating system properly e g Windows XP by clicking Start then Turn off Computer 1 If the notebook is not switched off automatically press the ON OFF switch 1 for approx five seconds Close the LCD s...

Страница 23: ...supply the drives and the keyboard functions These indicators are also visible with the notebook closed A 1 Power on indicator A Caps Lock indicator Battery charging indicator Scroll indicator Scroll...

Страница 24: ...e indicator lights up The wireless LAN module is switched on The indicator is dark The wireless LAN module is switched off A Caps Lock indicator The indicator lights up The Caps Lock key has been pres...

Страница 25: ...ced keyboard Some enhanced keyboard functions are mapped with key combinations The following description of keys refers to Windows Additional functions supported by the keys are described in the relev...

Страница 26: ...nction simply press the Caps Lock key again Shift key The Shift key causes uppercase characters to appear In the case of overlay keys the character printed on the upper left of the key appears when th...

Страница 27: ...us indicators section 2 Characters enabled when Num Lock indicator is lit see Status indicators section Key combination The following description of key combinations refers to functions when using Mic...

Страница 28: ...combination You can opt to use just the notebook s LCD screen LCD just the external monitor CRT both the LCD screen and the external monitor LCD CRT LCD CRT LCD CRT Increasing the volume This key com...

Страница 29: ...are contained in the manual for your operating system Country and keyboard settings If you want to change the country and keyboard settings proceed as follows Click on Start Control Panel Double click...

Страница 30: ...ointer will move accordingly Selecting an item Move the pointer to the item you wish to select Tap the touchpad once or press the left button once The item will be selected Executing a command Move th...

Страница 31: ...1440 x 900 UXGA 1600 x 1200 WSXGA 1680 x 1050 WUXGA 1920 x 1200 The screen resolution of the LCD monitor of your notebook is optimally set at the factory Permanently unlit or lit pixels The standard...

Страница 32: ...between 5 C and 35 C You can charge the battery by connecting the notebook to the mains adapter see Power adapter connecting You can maintain long life from your battery by allowing it to discharge f...

Страница 33: ...ok off and pull the power plug out of the mains socket Close the LCD screen so that it locks into place Disconnect all cables connected to the notebook Turn your notebook over and place it on a sturdy...

Страница 34: ...off as normal Never turn off your notebook while it is in an energy saving mode If the notebook is in an energy saving mode Do not connect any external devices Do not disconnect any external devices D...

Страница 35: ...sc or Digital Video Disc A DVD is an optical data storage medium that can contain a maximum of 17 GB of data These data cannot be changed DVD R DVD R Abbreviation for Digital Versatile Disc Recordable...

Страница 36: ...er with double layer support With the Multi format DVD burner with double layer support you can read all optical data storage media named above You can also write CD Rs CD RWs DVD Rs DVD RWs DVD Rs DV...

Страница 37: ...ing upwards or Take out an inserted CD DVD Push in the drive tray until you feel it lock into place Manual removal emergency removal In the event of a power failure or damage to the drive it may be ne...

Страница 38: ...DVD films Then the last regional code selected is retained and cannot be changed again If a DVD film is to be watched in all regions it has the regional code 0 i Before buying a DVD film you should c...

Страница 39: ...wnloads at up to 56 000 bit s V 9x Downward compatible to V 34 modems Fax operation Transmitting and receiving at up to 14 400 bit s Simple country adaptation with programme The modem complies with th...

Страница 40: ...into the telephone wall socket Pull the modem cable out of the telephone socket after you have finished your internet session or the fax mode and reconnect the telephone cable i Ethernet and LAN The...

Страница 41: ...led wireless LAN software i You can switch the wireless LAN module on and off by pressing the key combination Fn F2 The wireless LAN indicator lights up when the wireless LAN module is switched on Ple...

Страница 42: ...Using your notebook 34 10600727428 edition 1...

Страница 43: ...u forget your passwords you will need to contact the help desk Passwords are not covered by your warranty and a charge will be made for assistance Brief overview of the security functions Security fun...

Страница 44: ...es not matter if you use upper or lowercase characters i Protecting BIOS Setup Utility supervisor and user password i If you have opened these operating instructions on the screen we recommend that yo...

Страница 45: ...mation message Changes have been saved The new password has been saved To assign the user password select the field Set User Password and proceed exactly as when configuring the supervisor password If...

Страница 46: ...owing steps Enter the BIOS Setup Utility and go to the Security menu Mark the Set Supervisor Password or Set User Password field and press the Enter key Enter your current password under Enter Current...

Страница 47: ...Select Enabled and press the Enter key Select the Exit Saving Changes option under Exit The notebook restarts You will be prompted to enter your password the supervisor password Deactivating system p...

Страница 48: ...Security functions 40 10600727428 edition 1...

Страница 49: ...necting devices to notebook 1 Turn off your notebook and all external devices 2 Unplug your notebook and all devices from the mains sockets 3 Connect the cables for your external devices following the...

Страница 50: ...al devices Ports 1 2 4 8 9 3 6 5 7 6 Microphone connection Line In 7 USB ports 1 Modem port 2 LAN port 8 Screen port 3 DC IN jack 9 Kensington Lock 4 USB port 5 Headphones connection Line Out 42 10600...

Страница 51: ...s LCD screen You can display the same picture on the external monitor and the LCD screen simultaneously Setting the refresh rate for your external monitor The refresh rate must be correctly set so tha...

Страница 52: ...Mbit s i USB 2 x has a data transfer rate of up to 480 Mbit s Additional information can be found in the documentation for the USB devices Connect the data cable to the external device Connect the dat...

Страница 53: ...e to the Line In port of the notebook Headphones connection Line Out You can connect either headphones or external loudspeakers to your notebook via the headphones connection Connect the data cable to...

Страница 54: ...Connecting external devices 46 10600727428 edition 1...

Страница 55: ...t of the mains socket Remove the battery Take care when you use the locking mechanisms on the battery and any other component Never use sharp objects such as screwdrivers scissors or knives as leverag...

Страница 56: ...slip cloth on this surface to prevent the notebook from being scratched Remove the battery see Removing and installing the battery 1 2 Remove the screw 1 Lift the cover off the notebook in the directi...

Страница 57: ...on of the arrow 1 insert the hard disk with the frame into the hard disk compartment Pull the hard disk by the pulling aid 2 in the direction of the arrow 3 so that the contacts engage If necessary us...

Страница 58: ...are located in a larger service compartment You must open the entire service compartment when removing and installing a memory module Once you have removed the cover the various components are expose...

Страница 59: ...in the direction of the arrow 3 Memory module installing Insert the memory module with the contacts and the recess a facing the slot 1 Carefully push the memory module downwards until it engages notic...

Страница 60: ...Removing and installing components during servicing 52 10600727428 edition 1...

Страница 61: ...ing system The following or a similar display appears on the screen during booting F2 Setup F12 Boot menu When this message appears press the function key F2 i If a password has been assigned Enter th...

Страница 62: ...ttings come into effect Exit Discarding Changes Reject changes and exit BIOS Setup Utility Select YES to discard the changes The settings which were in force when BIOS Setup Utility was called remain...

Страница 63: ...on acoustic signals Any changes you have made to the hardware or software after receiving the notebook Any changes you have made to the BIOS Setup settings after receiving the notebook Your system con...

Страница 64: ...ttery that supplies the internal clock is dead i Please contact your sales outlet or our hotline help desk The LCD screen of the notebook remains blank Cause Troubleshooting Monitor is switched off Pr...

Страница 65: ...otebook and the external monitor if it is plugged in with a connector Switch on the external monitor and the notebook The external monitor is blank or the image is unstable Cause Troubleshooting The w...

Страница 66: ...is installed correctly in its compartment Switch the notebook on Charge the battery Or The battery is dead Install a charged battery Or Connect the mains adapter to the notebook The mains adapter is...

Страница 67: ...ed battery Or Connect the mains adapter to the notebook The printer does not print Cause Troubleshooting Printer not switched on Make sure that the printer is switched on and is on line see the manual...

Страница 68: ...uration The Settings window will appear Click on Video In the Hardware Acceleration area uncheck the Activate box The checkmark disappears Click on OK The function is now deactivated The radio connect...

Страница 69: ...Troubleshooting and tips An acoustic signal is sounding once every second Cause Troubleshooting The battery is almost flat Charge the battery 10600727428 edition 1 61...

Страница 70: ...Troubleshooting and tips 62 10600727428 edition 1...

Страница 71: ...e device information plate is located on the underside of the device Contains Lithium Battery Must be Recycled or Disposed of Properly Licensed for limited viewing uses only L7320 reg no LM13W ME01 Ma...

Страница 72: ...echnical data The data sheet is available to download from the Internet at www fujitsu siemens com i Battery Times Charging time when not in operation approx 1 5 hours Operating time approx 1 5 hours...

Страница 73: ...rements and other relevant provisions of Directive 1999 5 EC Copyright protected technology This product incorporates copyright protection technology that is protected by method claims of certain U S...

Страница 74: ...ent and mutual recognition of conformity This equipment can be used in the following countries Belgium Denmark Germany Estonia Finland France Greece UK Ireland Iceland Italy Latvia Liechtenstein Lithu...

Страница 75: ...battery load 56 Built in loudspeakers 3 31 C Caps Lock Anzeige 16 Caps Lock indicator 16 CD blank 28 CD DVD AutoPlay function 30 inserting 29 Notentnahme 29 overview 27 removing 29 working with 28 CD...

Страница 76: ...Drives 16 hard disk drive indicator 16 Num Lock 16 19 Indicator Scroll 16 K Kensington Lock 3 using 35 Kensington MicroSaver 35 Key Backspace 18 Caps Lock 18 cursor control keys 18 Enter 18 Fn key 18...

Страница 77: ...meric keypad 17 see Virtual numeric keypad O ON OFF switch notebook 3 Operating system activating system protection 39 cancel system protection 39 protecting with password 39 Optical data storage medi...

Страница 78: ...play 60 Time not correct 56 Time daylight savings 56 Tips 55 Touchpad 3 22 buttons 22 cleaning 7 dragging items 22 executing commands 22 moving the pointer 22 selecting items 22 Touchpad buttons 3 Tra...

Отзывы: