background image

RD-S45T

1

7

 -


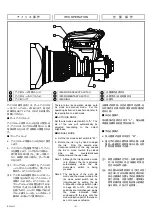
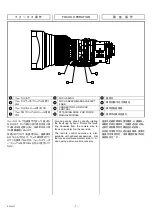
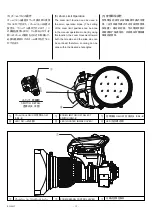
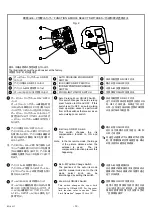
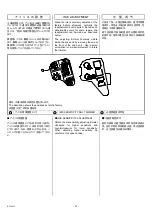
■ エクステンダ切替レバー

  (Fig. A)

この切替レバーを回し、レバーの文字『×

2

を指標点に合わせることにより、内蔵エクス
テンダが光路に入ります。

VTR 

スイッチ

  (Fig. A)

カメラに接続されている

 VTR 

のスタート/ス

トップ操作を行うスイッチです。スイッチを押
すごとにスタート/ストップが切り替わりま
す。

機能&モード切替スイッチの設定を変え
ると、このスイッチの機能はクイックズー
ムまたはクイックズーム&オートクルージ
ングズームスイッチの機能となります。

1

9

ページ参照)


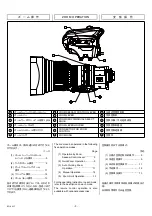
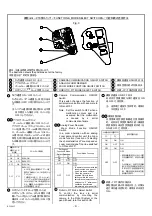
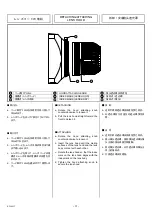
■ リターンスイッチ

  (Fig. B)

スイッチを押している間、リターンビデオ画像
をカメラのビューファインダで見ることができ
ます。

機能&モード切替スイッチの設定を変え
ると、このスイッチの機能はクイックズー
ムまたはクイックズーム&オートクルージ
ングズームスイッチの機能となります。

1

9

ページ参照)


OTHER  FUNCTIONS 

Extender Select Lever  (Fig. A)

To use the built-in extender, rotate the 
extender select lever to align the letters 
“×2” with the index mark. 

VTR Switch  (Fig. A)

Operation of this switch starts or stops the 
VTR linked to the camera.

Note.  If the setting of the function & mode 

select switches is properly 
arranged, this switch works as a 
quickzoom switch or a quickzoom 
& auto cruising zoom switch. 

 (refer to page 1

9

Return Switch  (Fig. B)

While pressing this switch, the return video 
picture can be seen through the viewfinder 
of the camera. 

Note.  If the setting of the function & mode 

select switches is properly 
arranged, this switch works as a 
quickzoom switch or a quickzoom 
& auto cruising zoom switch. 

 (refer to page 1

9

其  它  功  能

■ 倍率镜选择杆(图

 A

要使用倍率镜,转动倍率镜选择杆使其对准
指标点的


×2

”。


VTR 

开关(图

 A

操作这个开关可启动或停止与摄像机连接

VTR


注:如果适当设定功能和模式转换开关,则

VTR 

开关可用作快速变焦开关或快速

变焦和自动导航变焦开关。
(参阅

1

9

页)

■ 回放开关(图

 B

当按下这个开关时,可以从摄像机取景器中
看到回放的录像画面。

注:如果适当设定功能和模式转换开关,则

回放开关可用作快速变焦开关或快速
变焦和自动导航变焦开关。
(参阅

1

9

页)

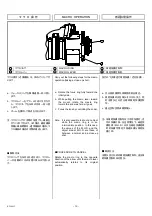
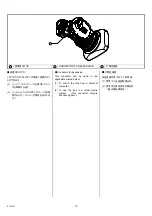
Fig. A /

Fig. B / 

1

3

4

2

1

指標点

1

INDEX MARK 

1

指标点

2

エクステンダ切替レバー

2

EXTENDER SELECT LEVER 

2

倍率镜选择杆

3

VTR 

スイッチ


3

VTR SWITCH 

3

VTR 

开关


4

リターンスイッチ

4

RETURN SWITCH 

4

回放开关

Содержание Fujinon UA22x8BERD-S8

Страница 1: ...H BB00031483 101 LP750A S8 2804 UA22 8BERD S8...

Страница 2: ......

Страница 3: ...ories is able to supply sufficient electric power to the lens system If not the lens system may not work normally and the camera may be damaged The specifications of the power consumption of the lens...

Страница 4: ...let the lens adjust to the ambient temperature of the place where the lens will be used prior to using the lens Be sure not to subject the front part of the lens to any impact when operating the came...

Страница 5: ...10 SJ T11364 GB T26572 GB T26572...

Страница 6: ...l interference to radio or television reception which can be determined by turning the equipment off and on the user is encouraged to try to correct the interference by one or more of the following me...

Страница 7: ...Iris Operation 6 Focus Operation 7 Zoom Operation 8 2 9 3 11 4 12 5 13 2 QuikZoom Operation 9 3 Auto Cruising Zoom Operation 11 4 Manual Operation 12 5 Zoom Limit Operation 13 1 9 1 Operation by Zoom...

Страница 8: ...off b Rotate the mount clamp ring on the camera fully counterclockwise c Fit the mounting surface of the lens to that of the camera aligning the pin on the lens with the slot in the camera d Rotate th...

Страница 9: ...nstalling the lens to a camera for the first time or installing it to another camera CONDITIONS OF OBJECT AND DIAPHRAGM 1 Object Cut off the Siemens Star the chart made up of radial black and white li...

Страница 10: ...ly 3 meters away The position where the radial black and white lines become sharpest is the optimum focus position d Operate the zoom to set it to the telephoto end e Operate the focus to bring the ob...

Страница 11: ...eason rotate the F f adjustment gear located inside the cover using a finely pointed tool for example and adjust If this adjustment is to be performed replace the operation in step c above with the op...

Страница 12: ...ring causes the iris to move toward the closed side and counterclockwise rotation toward the open side Note 1 Although the iris operation mode is in Manual the iris is adjusted automatically while the...

Страница 13: ...era side to focus on an object on the near side The remote control operation is also available with optional accessories Set the focus servo manual select knob to S when using a servo control accessor...

Страница 14: ...Zoom Operation 11 4 Manual Operation 12 5 Zoom Limit Operation 13 For the operating instruction in each mode refer to the description on each mode The remote control operation is also available with o...

Страница 15: ...um Speed By means of the zoom maximum speed control knob see the illustration below the zoom maximum speed can be changed in seven steps Rotate the knob clockwise to increase the speed 2 QuickZoom Ope...

Страница 16: ...om returns to its former position the quickzoom movement restarts After this operation if the switch is released the zoom will move to its former position quickly Note 1 By setting an appropriate swit...

Страница 17: ...at is determined when the quickzoom auto cruising zoom switch is pressed Note By setting an appropriate switch in the area of Function Mode Select Switches see page 19 the return switch and the VTR sw...

Страница 18: ...mode will be released immediately and the zoom will stop 4 Manual Operation a Set the zoom servo manual select knob to M b Rotate the zoom ring directly or using the zoom lever Clockwise rotation of t...

Страница 19: ...in the servo operation mode The setting of the zoom limit positions can be done in the manual operation mode By using this function the zoom movement toward both the tele side and the wide side can be...

Страница 20: ...control lever and the quickzoom a u t o c r u i s i n g z o o m s w i t c h simultaneously for more than 3 seconds refer to Note 4 The wide side zoom limit position will be set Note1 Either side of th...

Страница 21: ...nd the wide side zoom limit positions when the seesaw control lever is operated the zoom will move only toward the zoom limit positions not toward the opposite side of them a M S b ON OFF OFF ON c T W...

Страница 22: ...as it goes c Focus the lens by controlling the zoom PROCEDURE TO CANCEL Rotate the macro ring in the opposite direction of the arrow until the macro lever automatically returns to its original positio...

Страница 23: ...ly arranged this switch works as a quickzoom switch or a quickzoom auto cruising zoom switch refer to page 19 Return Switch Fig B While pressing this switch the return video picture can be seen throug...

Страница 24: ...nsion This connector can be used in two applications listed below 1 To control the lens from a personal computer 2 To use the lens in a virtual studio system This connector outputs encoder signals 2 1...

Страница 25: ...to that of the quickzoom switch The function of the VTR switch incorporated in the zoom rate demand unit or the shot box linked to this lens is also changed to that of the quickzoom switch 3 Return Qu...

Страница 26: ...tion prevent this happening 7 Iris A M Position Change Switch The positions of the auto iris mode and the manual mode set in the iris mode select knob can be interchanged by setting this switch 8 Zoom...

Страница 27: ...elect Switches Zoom Mode Function ON ON ON ON OFF OFF OFF ON ON OFF OFF OFF To operate the zoom with the lens mounted on a pan tilt head use these settings When the camera is powered ON with these set...

Страница 28: ...Seesaw Control Lever can be selected from ten modes Refer to the following figure 10 FUNCTION MODE SELECT SWITCHES Fig 4 The illustration shows the positions set at the factory 1 1 ZOOM MODE SELECT SW...

Страница 29: ...Mode Select Switches 2 VTR Q Z 5 C Z ON Function of VTR Switch OFF VTR Switch ON ON Quickzoom auto cruising zoom switch ON OFF Quickzoom Switch QuickZoom Auto Cruising Zoom Switch Settings of Function...

Страница 30: ...mes visible inside the drive unit by removing the cap at the front of the drive unit Use a small screwdriver or similar implement to rotate the trimmer IRIS SENSITIVITY ADJUSTMENT Rotate the iris sens...

Страница 31: ...ttaching knob counterclockwise to loosen it b Insert the lens hood until the mating surfaces of the lens hood and the lens body contact with each other c Rotate the lens hood so that the index mark on...

Страница 32: ...Then put it together with desiccant into a vinyl bag for sealing to remove the moisture inside STORAGE If it is assumed that the lens will not be used for a long term store it in a place where high t...

Страница 33: ...Control unit for focus operation Operation angle of the knob is two turn Focus Position Demand Unit REMARKS MODEL Note The speed of the zoom achieved by operating the ZOOM RATE DEMAND UNIT is the spee...

Страница 34: ...ol by Personal Computer 2 Configuration 2 All Servo System 2 2 ACCESSORY NAME MODEL REMARKS 1 EXTENSION CABLE SA 206D 005 Required when a personal computer is used to control the iris focus and zoom o...

Страница 35: ...0 04 m in Macro Operation 0 04 m Field Angle Hor Ver Diag 61 52 3 07 37 14 1 45 69 01 3 35 33 22 1 34 19 07 0 53 37 56 1 47 at Wide End Object Area at M O D at Tele End 905 mm 509 mm 43 mm 24 mm 472...

Страница 36: ...14 17 19 23 20 QUICKZOOM AUTO CRUISING ZOOM SWITCH 9 10 11 12 14 17 19 20 23 21 ON OFF QUICKZOOM ON OFF SWITCH ON OFF 19 22 CONNECTOR FOR ZOOM CONTROL 8 21 23 ZOOM SERVO MANUAL SELECT KNOB 8 9 10 11 1...

Страница 37: ...ILLUSTRATIONS...

Страница 38: ......

Страница 39: ...MEMO...

Страница 40: ...EXTENDER SELECT LEVER INDEX MARK VTR CRUISING ZOOM SWITCH P GLASS ELEMENTS CONNECTOR FOR EXPANSION P F f F f F f 2 76 F f 65 03 48 IN AIR B f 56 99 39 96 IN AIR B f 56 99 39 96 IN AIR GLASS ELEMENTS...

Страница 41: ...mm UNLESS OTHERWISE SPECIFIED UNIT mm Outline drawing UA22 X 8BERD S8 Fig 1 1 GLP750AS800 11...

Страница 42: ......

Страница 43: ...Drive unit wiring diagram Fig 2 2 AMPLIFIER AMPLIFIER P C B P C B SS00001799 00...

Страница 44: ......

Страница 45: ...SIEMENS STAR CUT LINE...

Страница 46: ......

Страница 47: ...http www fujifilm eom cn products optical_devices FUJIFILM China Investment Co Ltd Optical Devices Division Beijing Branch Room 2606 No 1 Taikang financial Tower No 38 East Third Ring North Road Chao...

Страница 48: ......
Отзывы: