9
INZ-TN5ZBAS-E
7. insPECtion AnD MAintEnAnCE
7.1 Daily inspection
Check to make sure that extractor is properly warmed up.
7.2 Periodical inspection/maintenance (standard)
Item
Remark
Cleaning of wire gauze filter:
Replacement once every several days to 3
months, or when use is no longer possible
Clean or replace according to the amount of
dust deposits in exhaust gas.
Replacement of O-ring or packing:
(at inspection/replacement of wire gauze
filter), Once/6 months for high temperature,
once a year for general use
7.3 Wire gauze filter removal method
①
Turn OFF the power to the gas analyzer gas aspirator.
②
Turn OFF the gas extractor power, open the gas extractor unit case cover, and wait until the
unit drops to a temperature at which it can be touched by hand (50°C or lower).
Note) Wear heat-resistant gloves, etc. when carrying out work. Failure to do so may result in
burns.
③
Remove the hexagonal head bolt.
④
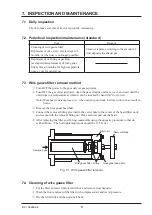
Connect the removal fitting provided to the screw hole in the center of the head (filter unit),
and secure with the removal fitting nut. Once secured, pull out the head.
⑤
After replacing the filter and O-ring, reassemble using the opposite procedure to that de
-
scribed above. (The bolt tightening torque should be 12.5 N·m.)
Removal fitting
Hexagonal head bolt
O-ring
Filter unit
Wire gauze filter
Sampling gas
Fig. 7-1 Wire gauze filter removal
7.4 Cleaning of wire gauze filter
①
Put the filter in water while it is still hot, and remove dust deposits.
②
Wash the front and rear of the filter with compressed air and water pressure.
③
Dry the filter fully and then mount it back.

