background image


BASIC OPERATION 

Now that you have established a proper riding position, take a few minutes to ride 

the bike and determine that your position is comfortable. Start pedaling at a slow 
pace with your toes and knees pointed directly forward. Hold the handlebar lightly 
and in a position that allows your shoulders and upper body to relax. Pedal easily, 
at a low resistance until you feel confident that you could ride in that position for 
the duration of your workout. 


WARNING! 

IF AT ANY TIME DURING YOUR WORKOUT, YOU FEEL CHEST PAIN, 

EXPERIENCE SEVERE MUSCULAR DISCOMFORT, FEEL FAINT, OR ARE 
SHORT OF BREATH, STOP EXERCISING AT ONCE. IF THE CONDITION 
PERSISTS, YOU SHOULD CONSULT YOUR MEDICAL DOCTOR 
IMMEDIATELY. 


1.  Pedaling resistance is controlled by the tension knob. Resistance can be 

changed at any time by turning tension knob: clock-wise for more resistance; 
counterclockwise for less resistance. 

2.  To apply the brake, press down on the tension knob. 
3.  Before dismounting, apply the brake to stop flywheel, or increase resistance 

and let flywheel come to a stop. 


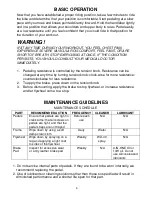
MAINTENANCE GUIDELINES 

MAINTENANCE SCHEDULE 

PART 

RECOMMENDED ACTION 

FREQUENCY 

CLEANER 

LUBRICANT 

Pedals 

Ensure that pedals are tight in 
crank arms; that all screws on 
pedals are tight; and that the   
pedal straps are not frayed 

Before each 

use 

N/A 

N/A 

Frame 

Wipe down by using a soft 
damp clean cloth 

Daily 

Water 

N/A 

Flywheel 

Wipe down by spraying on a   
rag and applying a light coat   
to sides of the flywheel 

Weekly 

WD-40   

spray. 

N/A 

Brake 
Pad 

Inspect for excessive wear 
or a dry leather brake pad 

Weekly 

N/A 

3-IN-ONE Oil or   
10W oil. Do not 
use silicone-based 
lubricants 


1. Do not service internal parts of pedals. If they are found to be worn internally, we       
    recommend replacing the pedal. 
2. Use of lubricants or cleaning solutions other than those so specified will result in       
    diminished performance and a shorter life span for that part. 


Содержание FUE0009

Страница 1: ...PLEASE CAREFULLY READ THIS ENTIRE MANUAL BEFORE OPERATING YOUR SPIN BIKE OWNER S MANUAL SPIN BIKE FUE0009...

Страница 2: ...hand Do not touch any driving mechanism while it is in motion as possible injury could occur 6 In a home setting keep children away from the bike when it is not in use Keep children and pets away from...

Страница 3: ...ent while exercising 4 Overweight or severely de conditioned individuals should be particularly cautious when using the equipment for the first time Even thought such individuals may not have historie...

Страница 4: ...seat is in the desired position tighten the locking knob to secure the seat post 7 Note the final position mark on the seat post for future reference Seat Forward Aft Adjustment 1 Sit on bike with cra...

Страница 5: ...resistance counterclockwise for less resistance 2 To apply the brake press down on the tension knob 3 Before dismounting apply the brake to stop flywheel or increase resistance and let flywheel come...

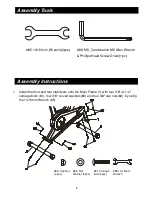
Страница 6: ...olts 81 four 3 8 curved washers 83 and four 3 8 cap nuts 82 by using the 14 15mm Wrench 85 Assembly Instructions 82 Cap Nut 4 pcs 83 Flat Washer 4pcs 85 14 15m m Wrench 81 Carriage Bolt 4pcs Assembly...

Страница 7: ...efore securing and tightening 3 Install the handlebars 6 onto the Handlebar Post 4 with the three of 5 16 x 5 8 Socket Head Cap Bolt 88 and three of 5 16 1 5T_Spring Washer 49 by using the Combination...

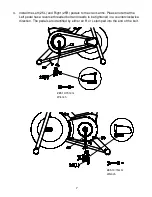
Страница 8: ...the crank arms Please note that the Left pedal has a reverse threaded bolt and needs to be tightened in a counterclockwise direction The pedals are identified by either an R or L stamped into the end...

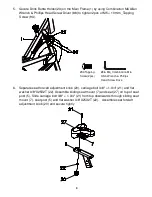
Страница 9: ...ent knob 20 carriage bolt 3 8 1 3 4 21 and flat washer 3 8 X25X2T 22 Assemble sliding seat mount 7 and seat 27 on top of seat post 5 Slide carriage bolt 3 8 1 3 4 21 from top downwards through sliding...

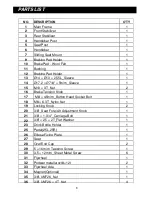
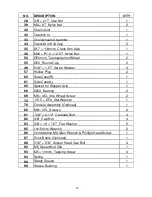
Страница 10: ...t 2 16 Brake Tension Knob 1 17 M8 45m m_Button Head Socket Bolt 1 18 M8 6 3T_Nyloc Nut 1 19 Locking Knob 2 20 3 8 _Seat Fore Aft Adjustment Knob 1 21 3 8 1 3 4 _Carriage Bolt 1 22 3 8 25 2T_Flat Washe...

Страница 11: ...60 Side Case R 1 61 Side Case L 1 62 Spacer for Stopper Axle 1 66 6203_Bearing 2 69 M6 45L_Idle Wheel Screw 2 73 25 5 16_Star Washer 1 76 Console Assembly Optional 1 80 M8 25L_Screws 2 81 3 8 2 1 2 _...

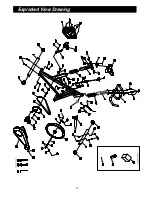
Страница 12: ...11 Exploded View Drawing...

Страница 13: ...2 7010 For efficient processing of your enquiry please have relevant date of purchase retailer name you purchased the item from and the brand on the product This warranty does not extend to any damage...

Страница 14: ...modify any such rights or remedies that are implied by law Our goods come with guarantees that cannot be excluded under the Australian Consumer Law You are entitled to a replacement or refund for a m...

Страница 15: ...itness to comply with a consumer guarantee under the Australian Consumer Law 3 The product was damaged through abnormal use no refund or repair can be offered The sending of replacements spare parts o...

Отзывы: