FT94
TREADMILL
7
102
54
53
4
5
21
125
80
125
80
162
163
29
28
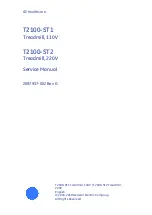
CONSOLE
3
1. Connect the Computer Cable (Middle) (54) and Computer Cable
(Upper) (53).
2. Connect the Speed Cable (Upper) (162) and Speed/Hand Pulse Complex
(28).
3. Connect the Incline Cable (Upper) (163) and Incline/Hand Pulse Complex
(29).
4. Insert Console Assembly (21) into right and left Uprights (4) and (5) and
secure with four Button Head Socket Bolts (125) with four Split Washers (80)
by using Combination M5 Allen Wrench & Phillips Head Screw Driver (102).
Hardware Step 3
#80. Ø8 x 1.5T
Split Washer
(4 pcs)
#125.
5/16” x UNC18 x 3/4”
Button Head Socket Bolt
(4 pcs)
NOTE: This step may work better with a second person assisting.
Содержание FT94
Страница 25: ......
Страница 26: ...www fuelfitnessusa com 2014 All RIghts Reserved FT94 Owner s Manual ...