background image

12

SETTING INDUCTION SURFACE CONTROLS

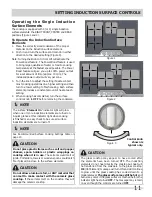
Figure 1

Figure 2

Figure 6

Front plus Rear  

Figure 5

Front portion only

Bridge Induction Surface Radiant 

Element

The cooktop features with a 

"

BRIDGE

"

 induction element 

on the left side. (See Figures 1 & 2) positions. The bridge 

can be used with rectangular or oval shaped cookware 

such as a griddle. The bridge feature maintains an even 

temperature setting across both elements. The “bridge” 

mark on the knob indicates that both front and rear 

portions will heat (Fig. 4). You may switch from bridge 

to single elements settings at any time during cooking. 

To switch settings, turn the front left control knob to OFF 

first. The cooktop will triple beep and flash the display if 

the knob is not turned OFF before switching settings.

NOTE

The surface 

"

Element On

"

 indicator light will glow 

when one or more induction elements are turned on. 

A quick glance at this indicator light when cooking 

is finished is an easy check to be sure all surface 

induction elements are turned off.

See Recommended Surface Cooking Settings table on 

page 10.

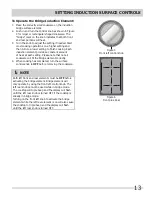
Figure 3

Front left control knob

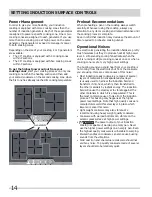
Figure 4

Front left control knob

To Operate the Bridge Induction Element 

as a single element: 

If needed for normal cookware, the Bridge induction 

element can work like a single induction element without 

the Bridge (See Figure 5). The “single” mark on the knob 

indicates that only the front portion will heat (Fig. 3). 
1.  Place the correctly sized cookware on the induction 

bridge surface element.

2.  Push in and turn the control knob as shown in 

Figure 3 to heat the front portion of the Bridge 

element for normal shaped cookware. 

3.  Turn the knob to adjust the setting if needed. Start 

most cooking operations on a higher setting and 

then turn to a lower setting to finish cooking. Each 

induction element provides a constant amount 

of heat at each setting. Please note that not all 

cookware will fit the Bridge element correctly.

4.  When cooking has completed, turn the surface 

control knob to 

OFF

 before removing the cookware.

Содержание FPIC3677RF

Страница 1: ...800 265 8352 All about the Use Care of your Cooktop Welcome Congratulations 2 Important Safety Instructions 3 Cooktop Features 7 Before Using the Cooktop 8 A01704801 August 2016 Rev C Setting Induction Surface Controls 10 Care Cleaning 15 Before You Call 17 Major Appliance Warranty 19 ...

Страница 2: ...t We hope you consider us for future purchases PLEASE CAREFULLY READ AND SAVE THESE INSTRUCTIONS This Use Care Manual contains general operating instructions for your appliance and feature information for several models Your product may not have all the described features The graphics shown are representative The graphics on your appliance may not look exactly like those shown These instructions a...

Страница 3: ...al safety this appliance must be properly grounded For maximum safety the power cord must be securely connected to an electrical outlet or junction box that is the correct voltage is correctly polarized and properly grounded and protected by a circuit breaker in accordance with local codes It is the personal responsibility of the consumer to have the appropriate outlet or junction box with the cor...

Страница 4: ...azard Never use your appliance as a space heater to heat or warm the room Doing so may result in carbon monoxide poisoning and overheating of the appliance WARNING Avoid fire hazard or electrical shock Failure to follow this warning may cause serious injury fire or death Avoid fire hazard or electrical shock Do not use an adapter plug use an extension cord or remove grounding prong from the power ...

Страница 5: ...vers may cause smoking and greasy spills that may ignite A pan that has boiled dry could be damaged and may damage the cooktop When you are flaming foods under a ventilating hood turn on the fan IMPORTANT INSTRUCTIONS FOR GLASS AND CERAMIC COOKTOPS Do not clean or operate a broken cooktop If cooktop should break cleaning solutions and spillovers may penetrate the broken cooktop and create a risk o...

Страница 6: ... and on the user is encouraged to try to correct the interference by one or more of the following measures Reorient or relocate the receiving antennae Increase distance between unit and receiver Connect the unit into an outlet or a circuit different from that to which the receiver is connected IMPORTANT INSTRUCTIONS FOR SERVICE AND MAINTENANCE Do not repair or replace any part of the appliance un ...

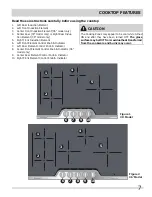
Страница 7: ...Front Element Control Knob Indicator 7 Left Rear Element Control Knob Indicator 8 Center Front Element Control Knob Indicator 36 model only 9 Center Rear Element Control Knob Indicator 10 Right Front Element Control Knob Indicator CAUTION The Cooking Zones may appear to be cool while turned ON and after they have been turned OFF The glass surface may be HOT from residual heat transferred from the ...

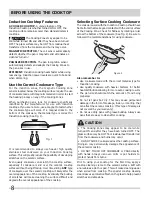
Страница 8: ... PAN SIZE DETECTION The pan recognition sensor automatically detects and adapts the Cooking Zones to the pan sizes in use EFFICIENT Induction cooking heats faster while using less energy Induction power levels are quick to boil and when simmering Selecting Surface Cooking Cookware The cookware used with the Induction Cooktop should have flat bottoms that make good contact with the entire surface o...

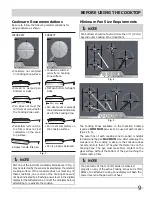
Страница 9: ...ted above in Fig 1 may be detected by the sensors located below the ceramic cooktop surface If the cookware does not meet any of these conditions one or more of the Cooking Zones will not heat indicated by a flashing power level in the digital display for that affected zone Correct the problems before attempting to reactivate the cooktop Be sure to follow the following recommendations for using co...

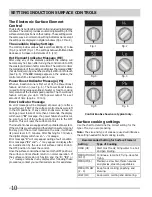
Страница 10: ...ge appears in the window the control can still be turned ON again for use Power Boost Indicator Message Pb When an induction zone is first set at Hi the Power Boost feature will turn on see Fig 6 The Power Boost feature is used to bring large quantities of water or food to cooking temperature at the fastest speed possible The Power Boost feature will give you up to 139 power output for a set amoun...

Страница 11: ...quantities of water or food to cooking temperature at the fastest speed possible The Power Boost feature will give you up to 139 power output for a set amount of time approx 10 min The increased power output will vary per zone 3 Turn the knob to adjust the setting if desired Start most cooking operations on a higher setting and then turn to a lower setting to finish cooking Each surface element pr...

Страница 12: ...hen cooking is finished is an easy check to be sure all surface induction elements are turned off See Recommended Surface Cooking Settings table on page 10 Figure 3 Front left control knob Figure 4 Front left control knob To Operate the Bridge Induction Element as a single element If needed for normal cookware the Bridge induction element can work like a single induction element without the Bridge...

Страница 13: ...the Bridge Induction Element 1 Place the correctly sized cookware on the induction bridge surface element 2 Push in and turn the control knob as shown in Figure 4 for larger or rectangular shaped cookware The bridge mark on the knob indicates that both front and rear portions will heat 3 Turn the knob to adjust the setting if needed Start most cooking operations on a higher setting and then turn t...

Страница 14: ...A soft sounding cooling fan activates when the unit is running multiple cooking zones at once or when a cooking zone is set at very high power settings The buzzing sound you could hear from your cooktop is not coming from the electronics but from the cookware you are using Here are some causes of this noise Most induction ready cookware are made of several layers of materials An encapsulated steel...

Страница 15: ...obs after cleaning line up the flat sides of both the knob and the shaft then push the knob into place Ceramic Glass Cooktop See Ceramic Glass Cooktop in this Owner s Guide Ceramic Glass Cooktop Cleaning Maintenance Consistent and proper cleaning is essential to maintaining your Ceramic glass cooktop Prior to using your cooktop for the first time apply a ceramic cooktop cleaning cream available in...

Страница 16: ...ned to OFF and the cooktop is COOL Aluminum foil Use of aluminum foil will damage the cooktop Do not use under any circumstances Aluminum utensils Since the melting point of aluminum is much lower than that of other metals care must be taken when aluminum pots or pans are used Pans that boil dry may permanently damage cooktop by breaking fusing to or marking it Care and Cleaning of Stainless Steel...

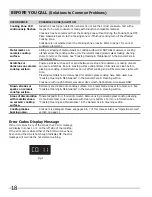
Страница 17: ... in poor condition Cookware is not centered on Cooking Zone Cookware resting on cooktop trim or does not rest completely on cooktop surface Cooking Zone does not heat food No power to the appliance Check steps under Entire cooktop does not operate in this checklist Incorrect Cooking Zone control setting Make sure the correct control is ON for the Cooking Zone being used Cooking Zone heats food too...

Страница 18: ...ean before placing on cooktop Small scratches do not affect cooking and will become less visible with time Cleaning materials not recommended for ceramic glass cooktop have been used See Cooktop Cleaning Maintenance in the General Care Cleaning section Cookware with rough bottoms was used Use smooth flat bottomed cookware ONLY Brown streaks or specks on ceramic cooktop surface Boil overs are cooke...

Страница 19: ... warranties including warranties of merchantability or fitness for particular purpose are limited to one year or the shortest period allowed by law but not less than one year Electrolux shall not be liable for consequential or incidental damages such as property damage and incidental expenses resulting from any breach of this written limited warranty or any implied warranty Some states and provinc...

Отзывы: