Step 7
Step 8
Step 9
Figure 8
Figure 10
Figure 9
Step 10
Figure 11
Step 11
Figure 12
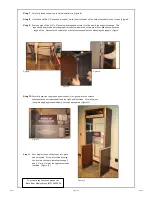
Peel one side of the 3/4" x 3" double sided tape and attach it to the steel back support as shown. The
tape should be placed within the graphic area below where the microwave will set and above where the
range will be. Once secured remove the other protective peel before attaching the graphic. (figure
Carefully position the graphic panel so that it is tight up into the corners
underneath the microwave shelf on both right and left sides. Carefully press
into place applying preassure where the tape was applied. (figure 11)
Your display is now ready to put into place
and be leveled. It can be leveled by using
the levelers that were installed in steps 3
and 4. Once it is level the appliances can be
installed. (Figure 12)
Carefully stand the unit up to finish installation. (figure 8)
Use the two #8 x 1/2" pan head screws to finish the attachment of the header assembly to the frames. (Figure 9)
If you have any questions, please call:
Black River Display Group (419) 524.2000
954133
Page 3 of 3
03/2015


