background image

6

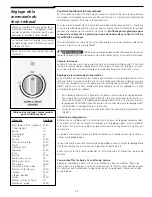
Setting Warmer
Drawer Control

To Operate the Warmer Drawer

The purpose of the warmer drawer is to keep hot cooked foods at serving tem-
perature. Always start with hot food. It is not recommended to heat cold food in
the warmer drawer.

All food placed in the warmer drawer should be covered with a lid or aluminum foil
to maintain moisture and softness. Do not cover crisp foods. 

Do not use plastic

wrap to cover food. Plastic may melt onto the drawer and be very difficult
to clean.

Use only dishware, utensils and cookware recommended for oven use in the warmer
drawer.

Always use potholders or oven mitts when removing food from the

warmer drawer as cookware and plates will be hot.

Indicator Light

The indicator light is located above the thermostat control knob. It turns on when
the control is set, and stays on until the control is turned off. Make sure indicator
light is off when removing food from drawer.

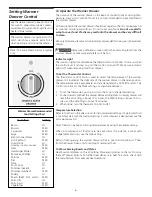
To Set the Thermostat Control

The thermostat control knob is used to select the temperature of the warmer
drawer. It is located at the right side of the warmer drawer in the open position.
The temperatures are approximate, and are designated by HI, MED and LO. The
control can be set to the three settings, or anywhere between.

1.

To set the thermostat, push in and turn the knob to the desired setting.

2.

For best results, preheat the drawer before adding food. An empty drawer will
reach the LO setting in about 12 minutes, the MED setting in about 15 min-
utes, and the HI setting in about 18 minutes.

3.

When done, turn the thermostat control to OFF.

Temperature Selection

Refer to the chart in the side column for recommended settings. If a particular food
is not listed, start with the medium setting. If more crispness is desired, remove the
lid or aluminum foil.

Most foods can be kept at serving temperatures by using the medium setting.

When a combination of foods are to be kept warm (for instance, a meat with
2 vegetables and rolls), use the high setting.

Refrain from opening the warmer drawer while in use to eliminate loss of heat
from the drawer. Open only for adding or removing food.

To Warm Serving Bowls and Plates

Heat bowls and plates on the LO setting. Place empty dishes on the rack to raise
them off drawer bottom. To further heat dishes or to heat fine china, check with
the manufacturer for maximum heat tolerance.

Use the warmer drawer to keep hot foods
hot such as: vegetables, gravies, meats,
casseroles, biscuits and rolls, pastries and
heated dinner plates.

The warmer drawer is equipped with a
catch which may require extra force
when opening and closing the drawer.

Warmer Drawer Recommended

Food Settings Chart

Food Item

Setting

Bacon

HI

Biscuits

MED

Casseroles

MED

Eggs

MED

Empty Dinner Plates

LO

Fish, Seafood

MED

Fried Foods

HI

Gravies, creams, sauces

MED

Ham

MED

Hamburger Patties

HI

Pancakes, Waffles

HI

Pastries

MED

Pies

MED

Pizza

HI

Pork Chops

HI

Potatoes (baked)

HI

Potatoes (mashed)

MED

Poultry

HI

Roasts (Beef, Pork, Lamb)

MED

Rolls, soft

LO

Rolls, hard

MED

Vegetables

MED

Note: The knob shown below is typical
only.

Содержание FEB30XPFSA

Страница 1: ...P N 318201000 9812 Rev A English pages 1 14 Español pages 15 27 Français pages 28 40 Warm Serve Drawer O w n e r s G u i d e Professional S e r i e s and ...

Страница 2: ...T REGISTRATION CARD should be filled in completely signed and returned to Frigidaire Company Product Registration This Owner s Guide contains general operating instructions for your warmer drawer Note The instructions appearing in this Owner s Guide are not meant to cover every possible condition and situation that may occur Common sense and caution must be practiced when installing operating and ...

Страница 3: ...LE OF THE OPEN DRAWER AND SEE IF THE DRAWER WILL SLIDE OUT OF THE OPENING REFER TO THE INSTALLATION INSTRUCTIONS FOR PROPER LOCKING PLATE INSTALLATION ALL WARMER DRAWERS CAN TIP INJURY TO PERSONS COULD RESULT INSTALL ANTI TIP DEVICE PACKED WITH WARMER DRAWER SEE INSTALLATION INSTRUCTIONS Stepping leaning or sitting on the door or drawer can result in serious injuries and may also cause damage to t...

Страница 4: ...door of a hot drawer Let hot air or steam escape before you remove or replace food in the warmer drawer Placement of Warmer Drawer Racks Always place rack in desired location while drawer is cool If rack must be moved while hot use extreme caution Use potholders and grasp the rack with both hands to reposition Do not let potholderscontactthehotelementorinteriorofthewarmer drawer Remove all utensil...

Страница 5: ...n as shown below The rack can be used in 2 ways In the upright position to allow low profile food items to be placed both under and on top of the rack for example rolls or biscuits on top of the rack and a casserole dish under In the downward position to allow you to place light weight food items and empty dishware for example rolls or pastries and dinner plates ...

Страница 6: ...out 12 minutes the MED setting in about 15 min utes and the HI setting in about 18 minutes 3 When done turn the thermostat control to OFF Temperature Selection Refer to the chart in the side column for recommended settings If a particular food is not listed start with the medium setting If more crispness is desired remove the lid or aluminum foil Most foods can be kept at serving temperatures by u...

Страница 7: ...ers made especially for stainless steel are recommended Always follow the manufacturer s instructions Be sure to rinse the cleaners DO NOT clean the door gasket The door gasket is essential for a good seal Care should be taken not to rub damage or remove the gasket Gentlescouringwithasoapyscouringpadwillremovemostspots Rinsewitha1 1solution of clear water and ammonia If necessary cover difficult s...

Страница 8: ...he cleaning chart on page 7 To Replace Warmer Drawer 1 Align the glide latches on both sides of the drawer with the slots on the drawer 2 Push the drawer back in Turn the warmer drawer control knob to OFF before removing the drawer DO NOT touch the warmer drawer element The element may still be hot enough to cause burns even if it is dark in color Electrical Shock Hazard can occur and result in se...

Страница 9: ...ance POSSIBLE CAUSE SOLUTION Poor installation Place a level on the cutout bottom Make sure bottom is level Be sure cutout bottom is strong and stable enough to adequately support drawer and wall oven if applicable Cabinets not square or are built in too tightly Contact builder or installer to make appliance accessible Make sure cord plug is plugged tightly into outlet Service wiring is not comple...

Страница 10: ...NERAL INFORMATION The Warm Serve Drawer can be used As a stand alone appliance As a combination Warm Serve Drawer with a 30 76 cm built in oven mounted above A HEIGHT B WIDTH C DEPTH 9 7 8 25 cm 30 76 2 cm 24 5 8 62 5 cm D CUTOUT E CUTOUT F CUTOUT HEIGHT WIDTH DEPTH Min 8 3 8 21 3 cm 28 1 2 72 4 cm 24 61 cm Max 8 5 8 21 9 cm 28 3 4 73 cm D CUTOUT E CUTOUT F CUTOUT HEIGHT WIDTH DEPTH Min 38 1 2 97 ...

Страница 11: ...NSI NFPA No 70 latest edition in the United States or CSA C22 1 Part 1 in Canada and local code requirements Tools You Will Need Phillips Screwdriver Pencil Ruler or Tape Measure and Straight edge Hand Saw or Saber Saw Spirit Level Warm Serve Drawer Installation 1 Remove the 2 support brackets attached by 2 screws to the top of drawer see Figure 1 Discard these 2 screws These brackets are required...

Страница 12: ... built in oven Make sure to use anti tip brackets supplied with the built in oven NOTE Use a piece of cardboard to protect warmer drawer frame and prevent scratching when installing wall oven over warmer drawer NOTE For stand alone installation the base must be capable of supporting 100 lbs 45 kg For a combination Warm Serve Drawer and built in oven installation the base must be capable of support...

Страница 13: ... are not a part of the appliance when it was shipped from the factory 5 Damages to finish after installation 6 Replacement of light bulbs and or fluorescent tubes on models with these features This warranty does not cover the following 1 CONSEQUENTIAL OR INCIDENTAL DAMAGES SUCH AS PROPERTY DAMAGE AND INCIDENTAL EXPENSES RESULTING FROM ANY BREACH OF THIS WRITTEN OR ANY IMPLIED WARRANTY Note Some st...

Страница 14: ... only for the remainder of the original warranty WARRANTY DOES NOT APPLY TO a Transportation damage b Supply and replacement of porcelain c Parts and service supplied or obtained from other than FRIGIDAIRE PARTS AND SERVICE or FRIGIDAIRE PARTS AND SERVICE authorized depots d Damage or failure as the result of abuse improper or commercial use CONSUMER OWNER RESPONSIBILITY a To provide proof of the ...

Страница 15: ...Tiroir réchaud P N 318201000 9812 Rev A English pages 1 14 Español pages 15 27 Français pages 28 40 Guide de l utilisateur Séries Professionnelles et VISIBLEMENT mieux 28 ...

Страница 16: ...de série que vous trouverez sur la plaque signalétique située à la droite sur le cadre avant du tiroir Numéro de modèle Numéro de série Date de l achat Ce guide donne des instructions générales pour votre tiroir réchaud Remarque Les instructions données dans ce guide ne couvrent pas toutes les conditionsetsituationspossibles Usezde bon sens et de prudence lors de l installation de l emploi et de l...

Страница 17: ...dans le tiroir réchaud des matériaux inflammables ceci comprend les papiers plastiques tissus livres de cuisine objets en plastique et torchons ainsi que les liquides inflammables Ne rangez pas sur ou près du tiroir des produits comme les produits en aérosol qui risquent d exploser et d entraîner un incendie ou des dégâts matériels Ne laissez pas les enfants seuls ne les laissez pas seuls ou sans ...

Страница 18: ... nourriture Emplacement des grilles du tiroir réchaud Placez toujours les grilles à l endroit voulu lorsque le tiroir est froid Si la grille doit être déplacée alors que le tiroir est chaud soyez extrêmement prudent Servez vous de gants isolants et saisissez la grille des deux mains pour la remettre en place Ne laissez pas les gants entrer en contact avec l élément ou l intérieur du tiroir réchaud...

Страница 19: ...ée de 2 façons Grille en U vers le haut pour permettre de disposer des aliments de moindre di mension sur et sous la grille par exemple petits pains ou biscuits sur la grille et cas serole en dessous Grille à plat sur le fond pour permettre de disposer des ailments de moindre poids et la vaisselle vide par exemple petits pains ou pâtisseries et assiettes à dîner U vers le haut À plat ...

Страница 20: ...eindra la température du réglage BAS LO en 12 minutes environ le réglage MOYEN MED prendra environ 15 minutes alors que le réglage HAUT HI atteindra sa température en 18 minutes 3 Lorsque vous aurez terminé tournez le bouton de commande thermostat à OFF ARRÊT Sélection de température Référez vous au tableau dans la colonne ci contre pour les réglages recommandés Si un aliment n est pas énuméré com...

Страница 21: ...au à l intérieur ou autour des commandes peut endommager l appareil Pour replacer le bouton après l avoir nettoyé alignez le plat dans la cavité du bouton avec le plat de l axe et poussez le bouton en place Les nettoyeurs conçus spécialement pour l acier inoxydable sont recommandés Rincez tout résidu de nettoyeur NE PAS nettoyer le joint de la porte Le joint est essentiel à l étanchéité de la port...

Страница 22: ...lignez les loquets des glissières des deux côtés du tiroir avec les supports sur le tiroir 2 Poussez le tiroir dans la cuisinière Tournez le bouton de commande du tiroir réchaud à OFF ARRÊT avant de retirer le tiroir Ne touchez pas à l élément du tiroir réchaud L élément peut être encore chaud et causer des brûlures même s il est de couleur foncée Nettoyage général suite Tiroir réchaud Remontez av...

Страница 23: ...au à bulle sur le plancher du découpage du tiroir réchaud Vérifiez si le fond du découpage est de niveau Assurez vous que le plancher du découpage est solide et capable de supporter adéquatement le tiroir réchaud en plus du four encastré si applicable Les armoires ne sont pas d équerre ou le découpage est trop petit Communiquez avec le constructeur ou l installateur afin de rendre l appareil acces...

Страница 24: ...SEIGNEMENTS GÉNÉRAUX Ce tiroir réchaud peut être utilisé comme Appareil autonome Tiroir réchaud combiné à un four encastré de 30 76 cm superposé A HAUTEUR B LARGEUR C PROFONDEUR 9 7 8 25 cm 30 76 2 cm 24 5 8 62 5 cm D HAUTEUR E LARGEUR F PROFONDEUR DUDÉCOUPAGE DUDÉCOUPAGE DUDÉCOUPAGE Min 8 3 8 21 3 cm 28 1 2 72 4 cm 24 61 cm Max 8 5 8 21 9 cm 28 3 4 73 cm D HAUTEUR E LARGEUR F PROFONDEUR DUDÉCOUPA...

Страница 25: ...22 1 partie 1 au Canada et aux codes et règlements locaux Outils nécessaires Tournevis Phillips Crayon Règle ou ruban à mesurer et équerre Scie à main ou scie sauteuse Niveau à bulle Installation d un tiroir réchaud 1 Retirez les 2 attaches de fixation fixées avec 2 vis au haut du tiroir voir Figure 1 Jetez ces 2 vis Ces attaches ne sont requises que si le tiroir doit être combiné à un four encast...

Страница 26: ...tilisez un morceau de cartonnage en guise de protection du tiroir réchaud qui pourrait être égratigné lors de l installation du four encastré superposé NOTA Pour une installation autonome du tiroir réchaud la base du découpage doit pouvoir supporter un poids de 100 lbs 45 kg Pour un combiné tiroir réchaud et four encastré la base doit pouvoir supporter un poids de 250 lbs 114 kg 3 Retirez les 2 pl...

Страница 27: ...tie légale contenue dans toute législation applicable Les conditions de cette garantie ne sont pas destinées à exclure ou à limiter vos droits en vertu de ces lois Le garant se réserve toutefois le droit de facturer les frais de transport et de déplacement lorsque la distance est supérieure à 48 kilomètres 30 milles du dépositaire de Service autorisé par FRIGIDAIRE PIÈCES ET SERVICE le plus proche...

Страница 28: ...Cajón Calentador P N 318201000 9812 Rev A English pages 1 14 Español pages 15 27 Français pages 28 40 M a n u a l del Usuario Professional S e r i e s y el ASPECTO del mejor rendimiento 15 ...

Страница 29: ...u producto Hay que llenar completamente y firmar la TARJETA DE INSCRIPCION DEL PRODUCTO y enviarla a la Compañía Frigidaire Este Manual del usuario contiene instrucciones generales acerca del funcionamiento de su cajón calentador Nota Las instrucciones que aparecen en el Manual del usuario no cubren todas las posibles condiciones y situaciones que puedan ocurrir Hay que obrar con sentido común y c...

Страница 30: ...emables en el cajón calentador Esto incluye artículos de papel plástico y de tela tales como libros de cocina utensilios de plástico y toallas así como líquidos quemables No almacene explosivos tales como latas de aerosol cerca o encima del cajón calentador Los materiales quemables pueden explotar y causar incendios o daños a la propiedad No deje a los niños solos Nunca hay que dejar a los niños s...

Страница 31: ...ida del cajón calentador o al volver a meterla Colocación de las parrillas del cajón calentador Coloque siempre la parrilla en el sitio deseado cuando esté frío Si hay quemoverlasparrillascuandoelcajóncalentadorestácaliente hágalo con extrema precaución Use manoplas o agarraderas y tome la parrilla con ambas manos para colocarla donde desee No deje que las agarraderas hagan contacto con la llama d...

Страница 32: ...muestra abajo La parrilla se puede usar de dos maneras En la posición para arriba para permitir la colocación de comidas pequeñas por debajo o por encima de la parrilla por ejemplo los panecillos o los bisquets por encima de la parrilla y un plato en cacerola por debajo En la posición para abajo para permitir la colocación de comidas ligeras y la vajilla vacía por ejemplo los panecillos los bollos...

Страница 33: ...2 minutos al ajuste MED en aproximadamente 15 minutos y el ajuste HI en aproximadamente 18 minutos 3 Cuando se ha terminado gire el control de temperatura a OFF Selección de temperatura Consulte el diagrama en la columna al lado para los reglajes recomendados Si una comida no consta en la lista comience con el reglaje medio Si se desea una textura más tostada quite la tapa o el papel de aluminio L...

Страница 34: ...r el aparato Para reinstalar la perilla después de limpiar haga coincidir el lado plano del interior de la perilla con el de la espiga Luego meta la perilla a presión en su lugar Se recomienda limpiadores fabricados especialmente para la limpieza de acero inoxidable Siempre siga las instrucciones del fabricante Asegúrese de que enjuague bien para quitar los limpiadores NO limpie la junta de la pue...

Страница 35: ...tras se quita el cajón 4 Para limpiar el cajón véase el diagrama de limpieza en la página 21 Para volver a poner el cajón calentador 1 Alinée los pestillos de los raíles en ambos lados del cajón con las ranuras en el cajón 2 Empuje el cajón hasta que se quede en posición Limpieza general continúa Gire la perilla de control del cajón calentador hacia OFF antes de sacar el cajón NO toque el elemento...

Страница 36: ...LUCION Mala instalación Ponga un nivel en la base de la abertura Asegúrese de que la base está nivelada Asegúrese de que la base de la abertura es bastante fuerte y estable para soportar el cajón calentador y un horno entegrado si hay uno Los armarios no están bien a escuadra o quedaron muy apretados Llamar a un ebanista para corregir el problema Asegúrese de que el cordón eléctrico enchufe esté e...

Страница 37: ... INSPECTOR LOCAL DE ELECTRICIDAD LEA Y GUARDE ESTAS INSTRUCCIONES PARA FUTURAS REFERENCIAS PARA SU SEGURIDAD No almacene o use gasolina u otros vapores y líquidos combustibles cerca a éste o a cualquier otro electrodoméstico INFORMACIÓN GENERAL El cajón calentador puede ser usado Como unidad independiente En una combinación entre el cajón calentador y el horno de 30 76 cm pulgadas integrado y mont...

Страница 38: ...odas las instrucciones de instalación antes de instalar el electrodoméstico 2 Retire todos los materiales de empaque del electrodoméstico antes de conectar la fuente de energía 3 Observe todos los códigos y leyes del gobierno 4 Asegúrese de dejarle estas instrucciones al consumidor Nota importante para el consumidor Guarde estas instrucciones para futura referencia INSTRUCCIONES IMPORTANTES DE SEG...

Страница 39: ...l gabinete Tenga cuidado de no pinchar el cable eléctrico 5 Abra el cajón y asegure el encapsulado a las platinas de seguridad usando los dos tornillos niquelado suministrados Entre los tornillos desde la parte de adentro del cajón hacia el agujero del centro de cada platina de seguridad vea la Figura 3 No apriete demasiado los tornillos Figura 3 6 El cable de 60 152 cm del electrodoméstico puede ...

Страница 40: ...ten la exclusión por limitación de daños incidentales o consecuentes de modo que esta limitación o exclusión puede no afectarle a usted 2 Llamadas de servicio que no incluyan el mal funcionamiento o defectos de fabricación o de materiales o para electrodomésticos a los que no se les dé uso doméstico ordinario El cliente deberá pagar por dichas llamadas de servicio 3 Daños ocasionados por servicios...

Отзывы: