4
Installation
Installation and connection to the mains should be carried out in compliance with national laws in force.
The following paragraphs describe installation procedures both for the gas and for the electrical sections. These tasks must be performed
according to current standards and by qualified personnel: performance by inexpert persons can create dangers.
The manufacturer declines all responsibility for harm to persons or property caused by failure to comply with these requirements.
Important
- The appliance must be installed by expert and qualified personnel according to current standards.
- Turn to a Franke Service Centre for all repairs and maintenance.
- Never use deformed or unstable pots and pans on the burners which could overflow or tip over.
- If the appliance has a cover make sure the burners are cool before closing the cover.
- Close the gas supply valve when the hob is not being used.
Franke S.p.A. declines all responsibility for harm to persons or property caused by failure to comply with standards. This appliance can only be
used for cooking. Any tampering with or modification to the appliance can be a source of danger. Make sure gas distribution
systems are as required before installing the appliance. The gas for which the hob is designed is indicated on the label on the bottom of the control
box. This appliance is not joined to a device for evacuating products of combustion and must be installed and hooked-up according to current
regulations. Special attention must be given to ventilation. The appliance may have hot parts during operation: keep children and the handicapped
distant. Use of gas-fired cooking appliances generates heat and humidity in the room where they are installed. Make sure the room is properly
ventilated.
Keep natural ventilation openings free and open or install a mechanical ventilation device (extraction hoods with exhaust ducts). Intense and
prolonged use of the appliance may require supplementary ventilation such as opening a window or
taking measures
for more efficient ventilation by, for example, increasing fan powers.
Preparing the cabinet
This booklet deals with a class 3 built-in hob.
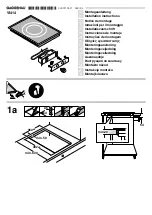
Prepare the hole in the worktop according to the dimensions indicated in the illustration.
Make this hole in the most convenient position. Remember that the gas hose must not
come in contact with the walls of the oven if this is installed below the hob.
Inserting the cabinet


