background image


FRAMA AG 

CH-3438 LAUPERSWIL / BERN 

TITLE: 

SERVICE MANUAL


SUBJECT

AUTOMATIC FEEDER MATRIX AF / AFS


AUTHOR(S)

ROLAND BÄRTSCHI (BAER)


FILE:


PER_MAN_R0102_EN_SERVICE MANUAL AF_AFS.DOC


DOC. REF: 


DOC. 

R01.02


CREATED

:  

31.10.13 16:10


MODIFIED

:  

19.11.13 13:11 


PAGE 

26

 OF 40


8.5.


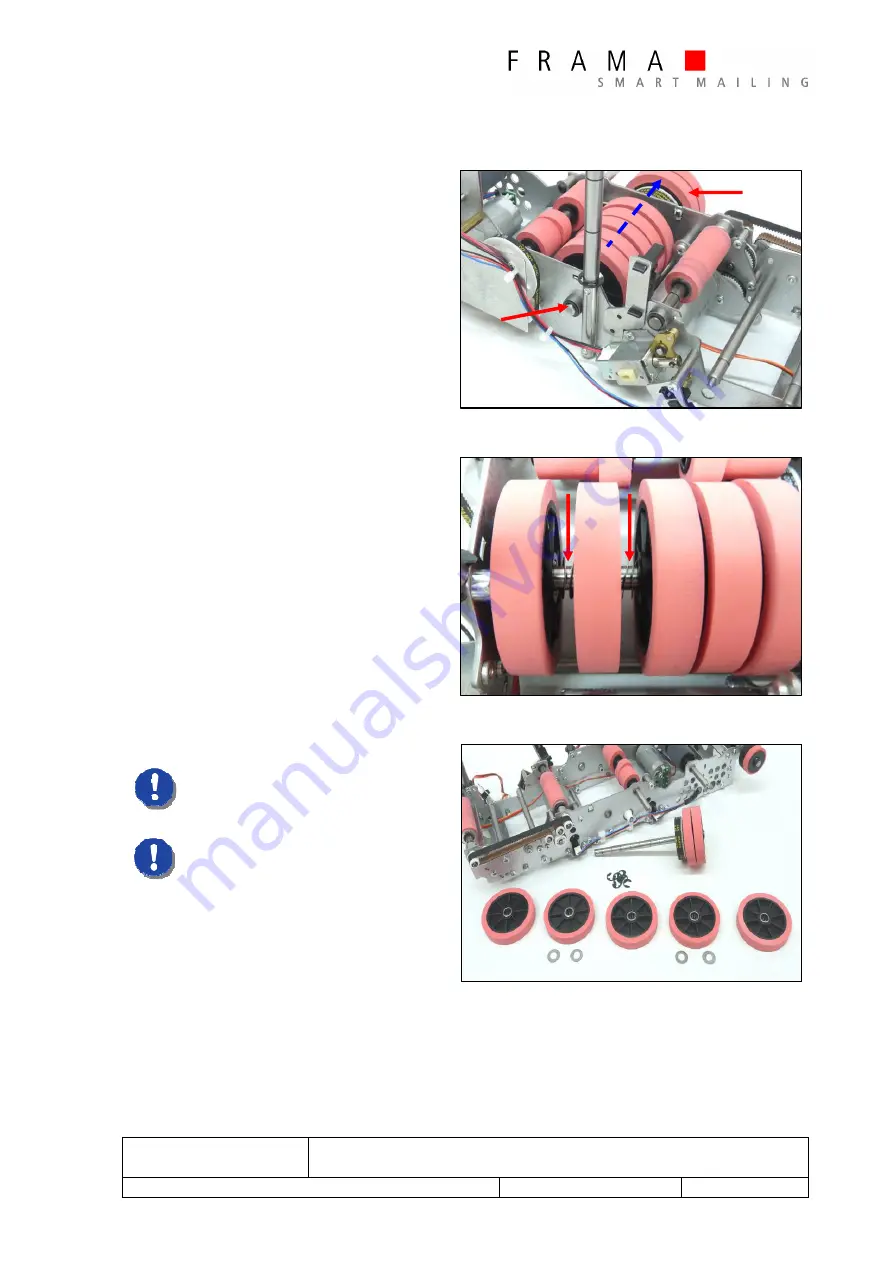
Exchange of the red intake rollers 


There are two different types of intake 
roller: 

3x 249-xx-xxx 

2x 249-xx-xxx (smaller in diameter) 


Take off the clip on the backside 

(1)


The axle will be moved in direction to 
the front side without disassembling of 
the tooth-belt and front wheel 

(2)


Figure 33: Disassembling - Red Intake Rollers 


For the removing of the intake rollers, 
all clips in between of the rollers need 
to be taken off, one after the other. 


Also pay attention for the washers. 
2pcs, only located left and right side of 
the smaller roller 

(X)

 (249.xx.xxx)! 


Figure 34: Disassembling - Red Intake Rollers


Note: 

For the correct sequence of all washers 
and clips by assembly, refer to the spare 
parts catalogue. 

For the assembling, make sure that the 
intake rollers are mounted in the right 
sense of orientation. They contain a 
“one way bearing”. 

For assembly process the inverse way of the 
above disassembly description! 


Figure 35: Disassembling - Red Intake Rollers 


2x 

2x 

Содержание AF

Страница 1: ...Service Manual Automatic Feeder Matrix AF AFS English Version ...

Страница 2: ...WIL BERN TITLE SERVICE MANUAL SUBJECT AUTOMATIC FEEDER MATRIX AF AFS AUTHOR S ROLAND BÄRTSCHI BAER FILE PER_MAN_R0102_EN_SERVICE MANUAL AF_AFS DOC DOC REF DOC R01 02 CREATED 31 10 13 16 10 MODIFIED 19 11 13 13 11 PAGE 2 OF 40 ...

Страница 3: ...RIX AF AFS AUTHOR S ROLAND BÄRTSCHI BAER FILE PER_MAN_R0102_EN_SERVICE MANUAL AF_AFS DOC DOC REF DOC R01 02 CREATED 31 10 13 16 10 MODIFIED 19 11 13 13 11 PAGE 3 OF 40 Service Manual Automatic Feeder Matrix AF AFS R01 02 31 10 2013 AUTHOR S Roland Bärtschi baer For internal use only ...

Страница 4: ...nder the point references Document Overview Document Content Goal Service Manual Intended for Technical staff trained on the Frama AG Matrix MOL and TOL franking system Restrictions References Document History The following table records all changes that were made in this document In case of little changes e g format spelling minor corrections or omissions the version number after the has to be in...

Страница 5: ... TITLE SERVICE MANUAL SUBJECT AUTOMATIC FEEDER MATRIX AF AFS AUTHOR S ROLAND BÄRTSCHI BAER FILE PER_MAN_R0102_EN_SERVICE MANUAL AF_AFS DOC DOC REF DOC R01 02 CREATED 31 10 13 16 10 MODIFIED 19 11 13 13 11 PAGE 5 OF 40 LIST OF CONTENT ...

Страница 6: ...the grey intake rollers 23 8 5 Exchange of the red intake rollers 24 8 6 Exchange of the transport rollers 25 8 7 Exchange of the motor for the red intake rollers 25 8 8 Exchange of the motor for the stack rollers 26 8 9 Exchange of the motor for the transport rollers 27 9 ASSEMBLING FEEDER MATRIX AF AFS 28 9 1 Lower mechanics 28 9 2 Upper mechanics 29 9 3 Assembling upper lower mechanics 31 10 AD...

Страница 7: ...LIST OF PICTURE ...

Страница 8: ...y Intake Rollers 24 Figure 32 Disassembling Gray Intake Rollers 24 Figure 33 Disassembling Red Intake Rollers 25 Figure 34 Disassembling Red Intake Rollers 25 Figure 35 Disassembling Red Intake Rollers 25 Figure 36 Disassembling Transport Rollers 26 Figure 37 Disassembling Transport Rollers 26 Figure 38 Disassembling Motor Replacement 26 Figure 39 Disassembling Motor Replacement 27 Figure 40 Disas...

Страница 9: ...Figure 66 Adjustments Separator Lever 36 Figure 67 Adjustments Belt 37 ...

Страница 10: ...ontains general technical information of the automatic Feeder Matrix AF and AFS Furthermore it includes a detailed description for the disassembling and assembling procedure This document is mainly designed for technical staff and is based on the technical training performed by Frama AG Subject to change without notice Related documents Spare parts manual Version R03 00 and update R04 00 Operating...

Страница 11: ...ERVICE MANUAL AF_AFS DOC DOC REF DOC R01 02 CREATED 31 10 13 16 10 MODIFIED 19 11 13 13 11 PAGE 11 OF 40 2 Security Notes The franking system must be turned off before removing or replacing any periphery devices By open machine avoid touch moving parts while the system is in operation Observe precautions for handling electrostatic sensitive parts ...

Страница 12: ... Feeder Specification Franking per hour 8500 letters h C6 Maximum envelop thickness 10 mm Operating Noise 53 8 dBA Matrix TOL and Feeder AFS Dimensions Dimensions AFS 515 x 217 x 205 mm Wight 9 0kg Power consumption Matrix F8 AFS Standby 12 6Watt In Operation 54Watt Nominal data power supply Automatic feeder AFS 90 264V AC 47 62Hz 0 75A T2A fused Matrix Feeder Types AF Matrix Feeder without envelo...

Страница 13: ...ription for disassembling assembling and adjustments as well as recommendations for maintenance 4 1 Parts designation 1 Side stop 2 Letter separation roller 3 Letter stack roller 4 Letter vibrator roller 5 Water tank 6 Label dispenser device 7 Docking mechanism extension table 5x TR and TL Figure 2 Parts Designation 1 Letter separator roller 2 Additional separator roller for big size letter 3 Labe...

Страница 14: ...1 PAGE 14 OF 40 1 Motor 1 Transport rollers 2 Motor 2 Intake rollers red 3 Motor 3 Stack drive rollers grey 4 Light barrier motor start and short letter control 5 Letter release lever 6 Main board feeder Figure 5 Parts Designation 1 Connector board Power and Data supply for Matrix system 2 Power supply 3 Main power socket with fuse Figure 6 Parts Designation 1 Fissile wedge 2 Seal unit Figure 7 Pa...

Страница 15: ...I BAER FILE PER_MAN_R0102_EN_SERVICE MANUAL AF_AFS DOC DOC REF DOC R01 02 CREATED 31 10 13 16 10 MODIFIED 19 11 13 13 11 PAGE 15 OF 40 4 1 1 Table Right TR and Table Left TL Table TR Only available for matrix F8 system Figure 8 Parts Designation Table TL Only available for Matrix F8 system Figure 9 Parts Designation ...

Страница 16: ...AFS kçK aÉëÅêáéíáçå kçK aÉëÅêáéíáçå 1 Motor Intake rollers red 11 Water level sensor 2 Motor Intake rollers grey 12 Sensor Solenoid sealer 3 Motor Transport rollers 15 Water tank sensor 4 Power supply 16 Light barrier BA1 and BA2 5 Connector board 17 Main board 6 Light barrier Motor intake rollers red 18 Label dispenser motor and light barrier 7 Light barrier Motor transport A Data cable grey 8 Li...

Страница 17: ...t barrier stack release switch 1 Light barrier active 0 Light barrier inactive L Sensor water level 0 Light barrier active tank empty 1 Light barrier inactive tank full T Light barrier water tank 0 Light barrier active tank inserted 1 Light barrier inactive tank removed M Sensor solenoid 0 Light barrier active magnet falling off 1 Light barrier inactive magnet attracted B Light barriers Position L...

Страница 18: ...s the content of the box Afterwards the machine starts to copy the box content and overwrites the existing software version This process takes approximately 4 minutes and can be followed by the percentage bar Do not switch off the machine during the loading process A power interruption would cause a damage of the memories on the feeder main PCB After the successful loading of the new software swit...

Страница 19: ...on of the dissembling procedure of the Feeder Matrix AF AFS Turn off the device disconnect the cord from the rear of the periphery device and separate the feeder as described in the operating guide Note Never separate franking machine and automatic feeder if they are switched on Figure 14 Separation Matrix Feeder Remove the water tank on the back side Remove the seal unit Figure 15 Removing Sealer...

Страница 20: ...hree screws 1 which are fixing the cover 2 and remove it Unhook the water level detection sensor board which is snapped inside the cover 2 Figure 17 Disassembling Upper Mechanics Disconnect cable 18 1 from the connector board Remove the two clips 2 Move the locking lever 3 and lift up the upper mechanics Remove both compression springs 4 and pay attention for the washers Figure 18 Disassembling Up...

Страница 21: ...1 OF 40 8 1 Upper Mechanics Demount the plastic cover 1 of the upper mechanics which is fixed with two screws from the bottom Figure 20 Disassembling Upper Mechanics Unscrew the front plate 1 fixed by three screws 2 and unhook the inside spring 3 Figure 21 Disassembling Upper Mechanics The mechanics of the separation unit 1 and transport roller unit 2 is not fixed and can be removed easily Figure ...

Страница 22: ...DOC R01 02 CREATED 31 10 13 16 10 MODIFIED 19 11 13 13 11 PAGE 22 OF 40 Disconnect the cable of the motor 1 and the light barrier 2 Unscrew three screws 3 of the front plate Figure 23 Disassembling Label Dispenser The label dispenser mechanics 1 can now be further disassembled for example to replace the intake rollers or the motor Figure 24 Disassembling Label Dispenser 1 2 3 1 ...

Страница 23: ...eparator Remove the clip 1 on the back side Pay attention for the washer A Unscrew three screws 2 of the black cover on the front side Take out the clutch unit 3 Pay attention for the washer B on the inside of the clutch Note The clutch can t get further disassembled It has to be replaced as complete unit For assembly process the inverse way For details refer to the spare part manual After each di...

Страница 24: ...Lower mechanics To lift out the mechanics all screws fixed from the bottom have to be removed Figure 27 Disassembling Lower Mechanics Before lifting out the mechanics disconnect the following cables Ground grey flat cable no 4 no 18 no 5 Remove the letter table by removing three screws 1 Figure 28 Disassembling Lower Mechanics Remove both light barriers 1 Pull out the side stop 2 Finally lift up t...

Страница 25: ...rs from the main PCB Follow the ESD Protection role Remove the 4 distance screws 1 and remove the main PCB Remove the cover plate 2 Figure 30 Disassembling Main PCB 8 4 Exchange of the grey intake rollers Loose the belt spanners on the backside Take off the corresponding belt from the pinion on the backside Figure 31 Disassembling Gray Intake Rollers Remove all clips from the corresponding shaft P...

Страница 26: ...e tooth belt and front wheel 2 Figure 33 Disassembling Red Intake Rollers For the removing of the intake rollers all clips in between of the rollers need to be taken off one after the other Also pay attention for the washers 2pcs only located left and right side of the smaller roller X 249 xx xxx Figure 34 Disassembling Red Intake Rollers Note For the correct sequence of all washers and clips by a...

Страница 27: ...ollers Remove the clips fixed on shaft Pull out the shaft For assembly process the inverse way of the above disassembly description For the assembling make sure that the transport rollers are mounted in the right sense of orientation They contain a one way bearing After assembling the toothed belt has to be adjusted Please refer to chapter 6 Adjustments Figure 37 Disassembling Transport Rollers 8 ...

Страница 28: ...isassembling Motor Replacement Move the slot disk 1 with a flat screw driver off the motor axle Unscrew the screws and remove the motor For assembly process the inverse way of the above disassembly description After assembling the toothed belt has to be adjusted Please refer to chapter 6 Adjustments Figure 40 Disassembling Motor Replacement 8 8 Exchange of the motor for the stack rollers Disassemb...

Страница 29: ...ase refer to chapter 6 Adjustments Figure 42 Disassembling Motor Replacement 8 9 Exchange of the motor for the transport rollers Remove the light barrier 1 Disconnect the motor from the cable board Mark the contact with a pen having the correct polarity helpful by later assembling Unscrew three screws 2 and remove the motor unit Figure 43 Disassembling Motor Replacement For assembly process the in...

Страница 30: ...rocedure the inverse way 9 1 Lower mechanics If previous disassembled mount first Note Instructions to belts adjustment see chapter 6 Adjustments The transport rollers 1 The intake rollers red 2 The eccentric roller 3 red and the stack rollers gray 4 Before mounting the back plate 5 the belt adjustment must be done The main PCB 6 and connect all connectors Figure 45 Assembling Lower Mechanics Put ...

Страница 31: ...ttom side screw up the mechanics with the bottom housing Put both washer and compression springs on the rods 2 Figure 48 Assembling Label Dispenser 9 2 Upper mechanics Mount the label dispenser mechanics and screw it up with three screws 1 Connect the light barrier cable 2 Connect the motor s connector board 3 Figure 49 Assembling Label Dispenser Assemble the separation roller together with the tr...

Страница 32: ... MANUAL AF_AFS DOC DOC REF DOC R01 02 CREATED 31 10 13 16 10 MODIFIED 19 11 13 13 11 PAGE 32 OF 40 Mount the front plate 1 on the mechanics Fix it with the corresponding screws 2 and hook in the spring 3 Figure 51 Assembling Upper Mechanics Mount the plastic cover 1 Figure 52 Assembling Upper Mechanics Figure 53 Assembling Upper Lower Mechanics 1 2 3 1 ...

Страница 33: ...w position and lock it with the lever 2 Mount two clips 3 on the poles Connect cable no 18 4 Guide the cable correctly in its clip 5 Figure 54 Assembling Upper Lower Mechanics Snap the Hall Effect Sensor into the cover 1 Mount the cover 1 and fix it with three screws 2 Mount the seal unit Figure 55 Assembling Upper Lower Mechanics Mount the top cover and fix it with the corresponding four screws N...

Страница 34: ...ort tool 1 to the upper mechanics as shown on the illustration Wind up the rope until the spring balance indicates approx 1000g Figure 57 Adjustments Separation Roller Let the separation roller stay untouched for approx 30 sec After these 30 sec the spring balance should indicate a value between 500g and 550g Figure 58 Adjustments Separation Roller If required adjust the separation roller by loose...

Страница 35: ...t the belts to thigh this may slow down the motor to much what may cause malfunctions 10 2 1 Belt Transport Rollers Loose the belt spanner 1 by two screws and one 5 5mm nut Hook in the spring balance 2 as shown Pull the balance spring as shown in alight angle to the requested value Adjust the belt with a value of 600g Screw down the belt spanner Figure 60 Adjustments Belt 10 2 2 Belt Stack Rollers...

Страница 36: ...transmissions motor pinion cogwheel Loose both screws 1 Move the motor in its position to receive the correct belt tension Tighten the motor Note There is no recommended value for this adjustment Make sure that the transmission turns without high resistance Figure 62 Adjustments Belt 10 2 4 Belt Manual Control for correct belt tension Test for free movement of the drive Test by turning of all roll...

Страница 37: ...re adjusted in case of badly separated envelopes Default setting Lever 1 Measure to rubber roller 0 5mm Lever 2 Measure to letter table 1 5mm Process as followed for adjustment First turn out the cross head screw 3 to allow the settings 1 Adjust the lever 1 correctly 2 Adjust lever 2 correctly 3 Adjust lever retarded motion For this loosen the counter nut A and afterwards turn the worm screw B in ...

Страница 38: ...be adjusted that way that the lever 2 gets lifted by lever 1 with a little delay Process as followed for adjustment Turn out the cross head screw A Put the thickness gauge of 0 2mm as showed in the picture between lever 1 and worm screw Turn the cross head screw A in till the screw is touching the lever 1 Figure 67 Adjustments Belt 10 3 2 Tool list Spring balance 600g 1004708 Spring balance with r...

Страница 39: ...s intake rollers etc if required 11 2 Cleaning of the Rubber Rollers For the Feeder Matrix AF AFS rubber rollers use regular rubber roller cleaning agent as used for printer and PC or other office machines Thinner and other unsuitable cleaning solvents may destroy the rubber rollers and plastic parts Thus the functionality of the Feeder Matrix AF AFS is not longer guarantied Frama AG recommends th...

Страница 40: ...compatibility to plastic Excellent for Good re lubrication for all kind off bearings 11 5 Lubrication for after sales service The new lubrication method is basically designed for the Matrix franking machine s life time cycle A re lubrication should only be executed in case of a disassembling and or a repair with exchanging of parts The new lubrication method has to be applied for Matrix R1 BOL MOL...

Страница 41: ...SERVICE MANUAL SUBJECT AUTOMATIC FEEDER MATRIX AF AFS AUTHOR S ROLAND BÄRTSCHI BAER FILE PER_MAN_R0102_EN_SERVICE MANUAL AF_AFS DOC DOC REF DOC R01 02 CREATED 31 10 13 16 10 MODIFIED 19 11 13 13 11 PAGE 41 OF 41 12 Notes Matrix Feeder AF AFS ...

Отзывы: