background image

1. Attach the CPU and heatsink using silica gel to ensure full contact.
2. It is suggested to select high-quality, certified fans in order to avoid

damage to the motherboard and CPU due high temperatures.

3. Never turn on the machine if the CPU fan is not properly installed.
4. Ensure that the DC power supply is turned off before inserting or

removing expansion cards or other peripherals, especially when
you insert or remove a memory module.  Failure to switch off the DC
power supply may result in serious damage to your system or
memory module.

Warning:

We cannot guarantee that your system will operate normally while
over-clocked. Normal operation depends on the over-clock capacity
of your device.

Warning:

Attention:

Since BIOS programs are upgraded from time to time, the BIOS
description in this manual is just for reference. We do not guarantee
that the content of this manual will remain consistent with the actual
BIOS version at any given time in the future.

Attention:

The pictures of objects used in this manual are just for your reference.
Please refer to the physical motherboard.

Содержание 915PL7AE series

Страница 1: ... 0 in English for 915PL7AE series motherboard P N 91 181 915 A5 0E Symbol description Note refers to important information that can help you to use motherboard better Attention indicates that it may damage hardware or cause data loss and tells you how to avoid such problems Warning means that a potential risk of property damage or physical injury exists More information If you want more informatio...

Страница 2: ...there are missing or damaged items contact your dis tributor as soon as possible 915PL7AE Series Motherboard x1 FOXCONN Utility CD x1 915PL7AE User Manual x1 RAID User Manual x1 optional IDE Ribbon Cable x1 FDD Ribbon Cable x1 I O Shield x1 S ATA Signal Cable x2 S ATA Power Cable x1 RAID Floppy x1 optional ...

Страница 3: ...aracteristics of information technology equipment EN 61000 3 2 2000 Electromagnetic compatibility EMC Part 3 Limits Section 2 Limits for harmonic current emissions equipment input current 16A per phase EN 55024 3 3 A1 2001 Electromagnetic compatibility EMC Part 3 Limits Section 2 Limits of voltage fluctuations and flicker in low voltage supply systems for equipment with rated current 16A EN 55024 ...

Страница 4: ...cturer HON HAI PRECISION INDUSTRY COMPANY LTD Address 66 CHUNG SHAN RD TU CHENG INDUSTRIAL DISTRICT TAIPEI HSIEN TAIWAN R O C Supplementary Information This device complies with Part 15 of the FCC Rules Operation is subject to the following two conditions 1 this device may not cause harmful interference and 2 this device must accept any interference received including interference that may cause u...

Страница 5: ...ed Chipset Features Integrated Peripherals Power Management Setup PnP PCIConfigurations PCHealthStatus Load Fail Safe Defaults Load Optimized Defaults Set Supervisor User Password 51 Save Exit Setup Exit Without Saving Table of Contents Chapter Chapter Chapter Driver CD Introduction Utility CD content 54 Start to install drivers 55 Chapter ...

Страница 6: ...ilure to switch off the DC power supply may result in serious damage to your system or memory module Warning We cannot guarantee that your system will operate normally while over clocked Normal operation depends on the over clock capacity of your device Warning Attention Since BIOS programs are upgraded from time to time the BIOS description in this manual is just for reference We do not guarantee...

Страница 7: ...with onboard 1G LAN 6 with 6 channel audio 8 with 8 channel audio E with 1394 function S with SATA function R with RAID function You can find PPID label on the motherboard It indicates the functions that the motherboard has For example On the blue mark of the PPID label it means the motherboard supports 6 channel audio 6 1394 port E onboard 10 100M LAN L SATA function S ...

Страница 8: ... reliability and quality at a reasonable price This motherboard adopts the advanced Intel 915PL ICH6 ICH6R chipset providing users a computer platform with a high integration compatibility performance price ratio This chapter includes the following information Main Features Motherboard Layout 1 1 915PL7AE Manual EN V1 0 01 25 04 p65 2005 5 26 17 34 1 ...

Страница 9: ...3 DIMMs Supports 128 256 512 Mb 1Gb DDR technology up to 2GB USB 2 0 Ports Supports hot plug Eight USB 2 0 ports four rear panel ports two onboard USB connectors providing four extra ports Supports wake up from S1 and S3 mode Supports USB 2 0 Protocol up to 480 Mbps transmission rate Onboard Serial ATA optional 150 MBps transfer rate Supports up to four S ATA devices Supports RAID 0 RAID 1 RAID 0 ...

Страница 10: ...Supports 8 channel audio Supports SPDIF output Supports Intel High Definition Audio Supports high quality differential CD input PCI Express x16 Support Supports 4 GB sec 8 GB sec concurrent bandwidth Low power consumption and power management features F G E Foxconn Graphics Extension 8X Support Compatible with AGP8X 4X specification Supports Microsoft DirectX 9 0 standard Green Function Supports A...

Страница 11: ...graphics slot One F G E slot Advanced Features PCI 2 3 specification compliant Supports Windows 2000 XP soft off Supports Wake on Modem function optional Supports PC Health function capable of monitoring system voltage CPU system temperature and fan speed 915PL7AE Manual EN V1 0 01 25 04 p65 2005 5 26 17 34 4 ...

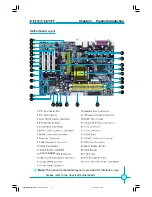
Страница 12: ...Product Introduction Motherboard Layout Note The above motherboard layout is provided for reference only please refer to the physical motherboard ATA 100 66 33 915PL7AE Manual EN V1 0 01 25 04 p65 2005 5 26 17 34 5 ...

Страница 13: ...ing of jumpers Caution should be exercised during the installation of these modules Please refer to the motherboard layout prior to any installation and read the contents in this chapter carefully This chapter includes the following information CPU Memory Power supply Rear Panel Connectors Other Connectors Expansion Slots Jumpers Chapter2 2 915PL7AE Manual EN V1 0 01 25 04 p65 2005 5 26 17 34 6 ...

Страница 14: ...r supply before handling components to avoid damaging them due to static electricity 2 Unplug the power cord before opening your chassis or touching any component 3 Hold components by their edges to avoid touching any exposed integrated circuits ICs 4 Whenever you uninstall a component place it on a grounded anti static pad or into the anti static bag that it came in 915PL7AE Manual EN V1 0 01 25 ...

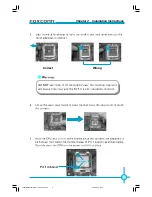
Страница 15: ... Pentium 4 Processor including Prescott Celeron D processor in an LGA775 package It also supports Hyper Thread ing Technology and FSB Dynamic Bus Inversion DBI Installation of CPU Load lever Load plate Load cap Lifted tab 915PL7AE Manual EN V1 0 01 25 04 p65 2005 5 26 17 34 8 ...

Страница 16: ...Chapter 2 Installation Instructions 9 Correct Wrong 915PL7AE Manual EN V1 0 01 25 04 p65 2005 5 26 17 34 9 ...

Страница 17: ...CPU and system Therefore you should install CPU cooling fan and make sure that the cooling fan works normally at all times in order to prevent overheating and damaging to the CPU Please refer to your CPU fan user guide to install it properly 915PL7AE Manual EN V1 0 01 25 04 p65 2005 5 26 17 34 10 ...

Страница 18: ... tested and qualified for use with this motherboard Intel Celeron D Intel Celeron D Intel Pentium 4 Intel Pentium 4 Intel Pentium 4 Intel Pentium 4 Processor Name 3 06G 2 93G 2 80G 3 0G 3 20G 3 40G FSB MHz 533MHz 533MHz 800MHz 800MHz 800MHz 800MHz Clock Speed 915PL7AE Manual EN V1 0 01 25 04 p65 2005 5 26 17 34 11 ...

Страница 19: ...R DDR400 512MB CORSAIR DDR466 256MB CORSAIR DDR500 256MB CRL DDR333 512MB CROTALUS DDR400 512MB GEIL DDR400 512MB HYNIX DDR333 128MB HYNIX DDR400 128MB INFINEON DDR333 128MB INFINEON DDR400 128MB INFINEON DDR400 256MB KINGMAX DDR400 256MB KINGMAX DDR400 512MB KINGSTEK DDR333 512MB KINGSTEK DDR400 512MB KINGSTON DDR400 256MB KINGSTON DDR400 512MB LPT DDR500 256MB MT DDR333 128MB MT DDR333 256MB MT ...

Страница 20: ...mory module to the DIMM slot and insert the module vertically into the DIMM slot 3 The plastic clips at both sides of the DIMM slot will lock automatically Warning 104 Pins 80 Pins Be sure to unplug the AC power supply before adding or removing expansion cards or other system peripherals especially the memory devices otherwise your motherboard or the system memory might be seriously damaged 915PL7...

Страница 21: ...ctor 24 24 pin ATX power connector 13 3 3V 12V RSVD 5V GND GND GND PSON 5V GND 12V GND 5V_AUX 5V 12V 1 GND 5V 3 3V GND GND 5V 12 PWROK 4 pin ATX_12V power connector 12V GND 12V 3 1 4 2 GND 4 pin ATX_12V Power Connector PWR2 The ATX power supply connects to PWR2 and provides power to the CPU 24 pin ATX power connector PWR1 PWR1 is the ATX power supply connector Make sure that the power supply cable...

Страница 22: ...2 4 Line in Line out Microphone 5 SPDIF Coaxial Out Port PS 2 Mouse Connector This green 6 pin connector is for a PS 2 mouse PS 2 Keyboard Connector This purple 6 pin connector is for a PS 2 keyboard Serial Port COM1 This 9 pin COM1 port is for pointing devices or other serial devices Parallel Port Printer Port This 25 pin port connects a parallel printer a scanner or other devices 1 2 3 4 SPDIF C...

Страница 23: ...nects to an external CD player tape player or other audio device The Microphone jack is used to connect to the microphone When using a 6 channel sound source connect the front speaker to the green audio output connect the surround sound speaker to the blue audio output connect the center speaker subwoofer to the red Microphone output Line in Line out Microphone Rear LEF CEN Side Jacks for 8 models...

Страница 24: ...e grey connector to the slave device If you intend to install two hard disks you must configure the second drive as a slave device by setting the jumper accordingly For details please refer to the hard disk documentation for the jumper settings Front Panel Connector FP1 This motherboard includes one connector for connecting the front panel switch and LED indicators IDE LED Connector HD LED The con...

Страница 25: ...CD ROM drive through a CD audio cable FAN1 SENSE 12V GND 1 CD_IN CD_L GND CD_R AUX_IN optional AUX_R AUX_L GND Power LED Connector PWRLED Attach the connector to the power LED on the front panel of the case The Power LED indicates the system s status When the system is in S0 status the LED is on When the system is in S1 status the LED is blink When the system is in S3 S4 S5 status the LED is off P...

Страница 26: ...e S ATA connector is used to connect the S ATA de vice to the motherboard These connectors support the thin Serial ATA cables for primary internal storage devices The current Serial ATA interface allows up to 150MB s data transfer rate SATA _1 SATA _2 SATA _3 SATA _4 GND GND GND TX TX RX RX 1 1394 Connector optional F_1394 The 1394 expansion cable can be connected to either the front provided that...

Страница 27: ...onal The audio connector provides two kinds of audio output choices the Front Audio the Rear Audio Front Audio supports re tasking function Their priority is the same F_AUDIO for 8 models F_AUDIO for 6 models 1 PORT2_L SENSE_SEND PORT1_L PORT1_R PORT2_R AUD_GND PRESENCEJ SENSE1_RETURN Empty SENSE2_RETURN 1 AUD_OUT L NA MIC_IN MIC_PWR AUD_OUT R MIC_GND 5VA AUD_RET R Empty AUD_RET L USB Connectors F...

Страница 28: ...or is capable of providing digi tal audio to external speak ers or compressed AC3 data to an external Dolby digital decoder Note The empty pin of SPDIF cable should be aligned to empty pin of S PDIF out connector Speaker Connector SPEAKER The speaker connector is used to connect speaker of the chassis SPEAKER SPDIF_OUT SPDIF_OUT 5V GND Empty INTR 1 2 INTRUDERJ GND SPK Pull high SPKJ Empty NC Addti...

Страница 29: ...OS setup F G E Slot The F G E Foxconn Graphics Extension slot is a special design that provides an extended graphics interface for AGP8 4X VGA cards The following table lists the AGP VGA cards that have been tested and quali fied on F G E 8X slot Qualified AGP VGA Cards Vendor List Memory Model Name Graphics Chip Vendor Speed ATI RADEON 9200 SE 64MB 8X ELSA GEFORCE 2MX MX400 32M 4X MSI GEFORCE TI4...

Страница 30: ...e cards such as a modem or LAN card The difference in bandwidth between the x16 and x1 slots are not able to be sure with the x16 slot pushing 4GB sec 8GB sec concurrent of bandwidth and the x1 PCI Express slot offering 250 MB sec Installing an expansion card 1 Before installing the expansion card please make sure that the power sup ply is switched off or the power cord is unplugged Please read th...

Страница 31: ... this motherboard Memory Model Name Graphics Chip Vendor ATI RADEON X300SE 128MB ATI RADEON X800SE 128MB ATI RADEON X300SE 256MB WINFAST GEFORCE 6200 128MB WINFAST NVIDIA GEFORCE X6600 128MB WINFAST GEFORCEPCX5750 256MB ASUS RADEON X600PRO 128MB NVIDIA GEFORCE PCX5750 128MB EVGA GEFORCE 6200 256MB DOOM GEFORCE X6600 128MB ARX GEFORCE X6600 128MB 915PL7AE Manual EN V1 0 01 25 04 p65 2005 5 26 17 35...

Страница 32: ... when adjusting jumper settings Jumper Diagram Definition Description 1 2 Set pin1 and pin2 closed 2 3 Set pin2 and pin3 closed Closed Set the pin closed Open Set the pin opened 1 1 1 1 1 Clear CMOS Jumper CLS_CMOS This motherboard uses the CMOS RAM to store all the set parameters The CMOS can be cleared by remov ing the CMOS jumper How to clear CMOS 1 Turn off the AC power supply and connect pins...

Страница 33: ...ut you will have no such worry when using the BIOS TBL function which is used to protect BIOS Top Boot Block By using this function the system still can boot even if the BIOS fails to flash To utilize this function you can short pin 1 and 2 with the jumper cap BIOS TBL Enable BIOS TBL Disable JP3 915PL7AE Manual EN V1 0 01 25 04 p65 2005 5 26 17 35 26 ...

Страница 34: ...onal messages appear on the screen If you do not see anything within 30 seconds from the time you turned on the power the system may have failed a power on test Check the jumper settings and connections or call your retailer for assistance 5 At power on hold down Delete to enter BIOS Setup Follow the instructions in Chapter 3 Powering off the computer 1 Using the OS shut down function If you use w...

Страница 35: ... process 2 You want to change the default CMOS settings This chapter includes the following information Enter BIOS Setup Main Menu Standard CMOS Features BIOS Features Advanced BIOS Features Advanced Chipset Features Integrated Peripherals Power Management Setup PnP PCI Configurations PC Health Status Load Fail Safe Defaults Load Optimized Defaults Set Supervisor User Password Save Exit Setup Exit...

Страница 36: ... SETUP Main Menu The main menu allows you to select from the list of setup functions and two exit choices Use the arrow keys to select among the items and press Enter to accept or go to the sub menu The items in the main menu are explained below Standard CMOS Features The basic system configuration can be set up through this menu BIOS Features The special features can be set up through this menu M...

Страница 37: ...ystem s PnP PCI settings and parameters can be modified through this menu PC Health Status This will display the current status of your PC Load Fail Safe Defaults The fail safe default BIOS settings can be loaded through this menu Load Optimized Defaults The optimal performance settings can be loaded through this menu however the stable default values may be affected Set Supervisor User Password T...

Страница 38: ...ou to set up the desired time usually as the current time with hour minute second format IDE Channel 0 1 2 Master Slave These categories identify the HDD types of 1 IDE channel installed in the com puter system There are three choices provided for the Enhanced IDE BIOS None Auto and Manual None means no HDD is installed or set Auto means the system can auto detect the hard disk when booting up by ...

Страница 39: ...pter powering up in 40 column mode CGA 80 Color Graphic Adapter powering up in 80 column mode MONO Monochrome adapter including high resolution monochrome adapters Halt On This category determines whether or not the computer will stop if an error is detected during powering up All Errors Whenever the BIOS detects a nonfatal error the system will stop and you will be prompted No Errors The system b...

Страница 40: ...st of the BIOS Base Memory The BIOS POST will determine the amount of base or conventional memory installed in the system Extended Memory The BIOS determines how much extended memory is present during the POST Total Memory Total memory of the system 915PL7AE Manual EN V1 0 01 25 04 p65 2005 5 26 17 35 33 ...

Страница 41: ...n protects your PC from viruses e g CIH The available setting values are Disabled and Enabled SuperRecovery SuperRecovery Hotkey Default LSHIFT F12 SuperRecovery provides the users with an excellent data protection and HDD recovery function There are 12 optional hotkeys and the default hotkey is LSHIFT F12 SuperSpeed SuperSpeed Press Enter to set the items of SuperSpeed Setting these items are goo...

Страница 42: ... Default This option is used to configure the overclocking and performance setting The available setting value are Default Manual Optimal Reference 1 Default indicates non overclocking 2 If Manual is selected the following options will be activated and user can set it personally System Memory Frequency Default Auto This option is used to set system memory frequency CPU Clock Default Depend on CPU ...

Страница 43: ...ge System Core Voltage Default Default This option is used to set system core voltage 3 If it is set as Optimal Reference Super Level will be enabled and shown Super Level Default L1 This option is used to set the overclock level Frequency setting varies with the level The higher the level goes up the higher frequency increases 915PL7AE Manual EN V1 0 01 25 04 p65 2005 5 26 17 35 36 ...

Страница 44: ... write data into this area BIOS will show a warning message on screen and an alarm will beep The setting values are Disabled and Enabled Note Such function provides protection to the start up sector only it does not protect the entire hard disk CPU L1 L2 Cache Default Enabled This option is used to turn on or off the CPU L1 and L2 cache The available setting values are Disabled and Enabled Hyper T...

Страница 45: ... Num Lock key is active when your system is started The available setting values are On and Off Gate A20 Option Default Fast This option is used to set up the A20 signal control necessary for access to the 1MB memory The available setting values are Normal and Fast Typematic Rate Setting Default Disabled If this item is enabled you can use the following two items to see the typematic rate and the ...

Страница 46: ...used to set the delay time before the CPU enters auto thermal mode The setting values are 4 Min 8 Min 16 Min 32 Min Thermal Management Default Thermal Monitor 1 This option is used to manage Prescott CPU thermal CPU Feature Menu 915PL7AE Manual EN V1 0 01 25 04 p65 2005 5 26 17 35 39 ...

Страница 47: ...s The available setting values are 5 4 3 2 and Auto DRAM RAS Precharge Default depend on memory This item allows you to select the DRAM RAS precharge time The available setting values are 5 4 3 2 and Auto Precharge delay tRAS Default depend on memory This item allows you to set the precharge delay time The available setting values are Auto 4 15 SLP_S4 Assertion Width Default 4 to 5 Sec This option...

Страница 48: ...and Disabled Memory Hole At 15M 16M Default Disabled This option is used to determine whether the 15M 16M address field of memory is reserved for the ISA expansion card The available setting values are Enabled and Disabled PCI Express Root Port Func Press Enter to set the items of PCI Express root port function shown as below PCI Express Port 1 Default Auto This option is used to enable or disable...

Страница 49: ... IDE Default Enabled Use this item to enable or disable the Primary Secondary PCI IDE channel that is integrated on the motherboard IDE Primary Master Slave PIO Default Auto These four items let you assign which kind of PIO Programmed Input Output is used by IDE devices Choose Auto to let the system auto detect which PIO mode is best or select a PIO mode from 0 4 Integrated Peripherals Menu 915PL7...

Страница 50: ...set the On chip Serial ATA function When it is set to Disabled the function will be disabled when it is set to Combined Mode four HDDs at most will be supported with it set to Enhanced Mode six HDDs at most will be supported for those under Windows 2000 and Windows XP only with it set to SATA Only only the S ATA HDD can be used PATA IDE Mode Default Primary When On Chip Serial ATA set as Combined ...

Страница 51: ...isabled and Enabled Azalia AC97 Audio Select Default Auto This option is used to set whether onboard Azalia AC97 Audio is enabled The available setting values are Disabled and Auto Onboard Lan Control Default Enabled This option is used to set whether the onboard LAN controller is enabled The available setting values are Disabled and Enabled Onboard Lan Boot ROM Default Disabled This option is use...

Страница 52: ...t KEY use this item to set the hot key combination that awakes the system The available setting values are Ctrl F1 F12 Onboard Serial Port 1 2 Default 3F8 IRQ4 2F8 IRQ3 This option is used to assign the I O address and interrupt request IRQ for the onboard serial port 1 2 The onboard serial port 2 I O address and IRQ is for IrDA using UART Mode Select Default Normal Use this option to select the U...

Страница 53: ...include SPP EPP ECP ECP EPP ECP Mode Use DMA Default 3 Select a DMA Channel for the parallel port when using the ECP mode This field is configured only if Parallel Port Mode is set to ECP The available setting values are 3 and 1 PWRON After PWR Fail Default Off This option is used to set what action the PC will take with the power supply when it resumes after a sudden power failure The available o...

Страница 54: ...f the ACPI function When you select S1 POS mode the power will not shut off and the power supply status will remain as it is In S1 mode the computer can be resumed at any time When you select S3 STR mode the power will be cut off after a delay period The status of the computer before it enters STR will be saved in memory and the computer can quickly return to previous status when the STR function ...

Страница 55: ...t 50 0 This option is used to specify the CPU speed at percentage to slow down the CPU when it reaches the predetermined overheat temperature The setting values are 75 0 50 0 25 0 Resume by Alarm Default Disabled This option is used to set the timing of the start up function In order to use this function the start up password function must be cancelled Also the PC power source must not be turned o...

Страница 56: ...support PnP then select Auto ESCD and the BIOS will automatically distribute interruption resources If the ISA cards you installed do not support PnP you will need to select Manual and manually adjust interruption resources in the event of hardware conflicts However since this motherboard has no ISA slot this option does not apply IRQ Resources Only when the Resources Controlled By is set as Manua...

Страница 57: ...tting values are Disabled 700 C 1580 F 750 C 1670 F Warning Temperature Default Disabled This option is used to set the warning temperature for the system When the temperature of CPU is higher than setting value the motherboard will send off warning information The setting values are Disabled and 500 C 1220 F 530 C 1270 F 560 C 1330 F 600 C 1400 F 630 C 1450 F 660 C 1510 F 700 C 1580 F PC Health S...

Страница 58: ...e system to improve the performance of your system components However if the optimized performance parameters are not supported by your hardware devices it will likely cause system reliability and stability issues If you only want to load the optimized default for a specific option select the desired option and press the F7 key Set Supervisor User Password The access rights and permissions associa...

Страница 59: ...word just press Enter when prompted to enter a password and in the screen the following message will appear If no password is keyed in any user can enter the system and view modify the CMOS settings PASSWORDDISABLED Press any key to continue Under the menu Advanced BIOS Features Setup if you select System from the Security Option you will be prompted to enter a password once the system is started ...

Страница 60: ...ontains useful software and several utility drivers that enhance the motherboard features This chapter includes the following information Utility CD content Start to install drivers 4 4 Chapter 915PL7AE Manual EN V1 0 01 25 04 p65 2005 5 26 17 35 53 ...

Страница 61: ...re B IAA RAID optional C DirectX 9 0b D Audio Driver E LAN Driver optional F USB2 0 Driver 2 Accessories Use this option to install additional software programs A SuperUtility a SuperStep SuperStep is a powerful and easy to operate tool for overclocking You can quickly increase your CPU s working frequency through its user friendly interface It will enhance your CPU s performance and meet all kind...

Страница 62: ...N Driver optional and USB2 0 Driver from this CD B Adobe Reader C Norton Internet Security D Word Perfect Office 12 3 Browse CD Click here to browse CD content 4 Homepage Click here to visit Foxconn motherboard homepage c SuperUpdate SuperUpdate function can help to update the BIOS through Internet directly 1 Install the latest patch first if your OS is Windows XP or Win dows 2000 2 Follow the CD ...

Отзывы: