background image


Read all of the instructions in this guide before using this product. Retain this guide for future 

reference. Do not skip, substitute or modify any steps or procedures in this guide, as doing so 

could result in personal injury or product damage.  

Before First Ride 


Before first use, please double-check the function of all the parts of your bike. If you 

have any doubts or if you detect a problem, please contact Kogan.com for support. 


Respect local and national road traffic regulations. 


For your safety, it is highly recommended that you wear a certified helmet. 


When used during heavy rain, snow, in slippery conditions or in the case of low 

visibility, be careful and adjust your speed accordingly. 


The illustrations in this manual are used simply to provide examples; the 
components of your bicycle might differ. In addition, some of the parts shown might 

be optional and not part of your bicycle's standard equipment. 


The following user guide is only a guide to assist you and is not a complete or 
comprehensive manual of all aspects of maintaining and repairing your bicycle. If 

you are not comfortable, or lack the skills or tools to assemble the bicycle yourself, 

you should take it to a qualified mechanic at a bicycle shop. Additionally, you can 

contact Kogan.com for support. 


This product is designed for consumer use. Follow directions and use only as 

described. 


Once fully assembled, inspect to ensure all hardware parts such as bolts, nuts and 

washers are positioned correctly and tightly secured. 


Regularly check the tire pressure. This will make pedalling easier, minimise battery 
consumption and reduce the likelihood of damage to your tyre. 


Always check the brakes prior to riding to ensure that they are working correctly. 
Adjust the brake sensitivity if needed. Only ride at a speed that the conditions 
permit – for example, slow down on snowy or rainy days. 


Always inspect the seat post, seat slider, pedals and handlebar to make sure they 

are in safe and stable position before using the bike. 


Always hold the handlebars with both hands, except when you need to notify 
others that you are turning. 


It is recommended to lubricate all moving parts on a regular basis. 


Always use a light when riding at night or in cases of low visibility.  


Wear bright clothing to help make you visible to others when you are riding at 
night. 


Ensure your body and other objects do not come into contact with the chain or the 
wheels whilst they are moving. 


Do not wear loose clothing while riding. 

            SAFETY & WARNINGS 

Содержание FS20FATEBKB

Страница 1: ...20 FATTYRE FOLDABLE ELECTRIC BIKE FS20FATEBKB...

Страница 2: ...bicycle yourself you should take it to a qualified mechanic at a bicycle shop Additionally you can contact Kogan com for support This product is designed for consumer use Follow directions and use onl...

Страница 3: ...ke before attempting long rides To effectively slow down always apply both brake levers at the same time Never ride the electric bike under the influence of drugs or alcohol Do not ride in bad conditi...

Страница 4: ...ing started Remove the bike from the packaging DO NOT dispose of the original packaging until assembly is complete Check all packaging to ensure all necessary components are found before beginning ass...

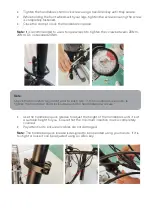
Страница 5: ...he correct position of the clamp as shown below Correct Correct Incorrect Step 3 Handlebars The handlebar assembly comes pre assembled from the factory Unfold the handlebar quick release Insert the ha...

Страница 6: ...ed 24Nm Use the handlebar quick release to adjust the height of the handlebars until it is at a suitable height for you Ensure that the minimum insertion mark is completely covered Pay attention to en...

Страница 7: ...k is completely covered and that the seat is pointing forward in alignment with the bicycle Tighten the clamp and ensure that the seat is firmly fastened Note The seat post quick release is designed t...

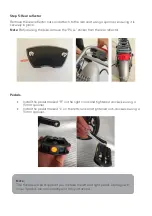
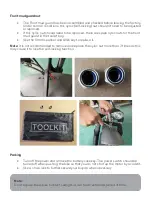
Страница 8: ...ULL sticker from the rear reflector Pedals Install the pedal marked R on the right crank and tightened clockwise using a 15mm spanner Install the pedal marked L on the left crank and tightened anti cl...

Страница 9: ...parately from the bike Unlock the battery with the ignition key Lift the seat with the lever underneath it and remove the battery To replace the battery insert the battery along the bracket and then l...

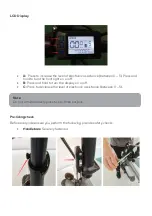
Страница 10: ...ont light on or off B Press and hold to turn the display on or off C Press to decrease the level of electronic assistance between 0 5 Pre riding check Before every ride ensure you perform the followin...

Страница 11: ...Front and rear lights Securely fastened and fully functional Mud guards and cargo rack Securely fastened Pedals and crank Securely fastened and fully functional...

Страница 12: ...re the battery is fully charged and locked Ensure that the quick releases are locked with all the locknuts and screws are tightened Check all cables and wirings on the bike prior to each ride It is no...

Страница 13: ...motor to cut out Motor cable If the motor isn t turning on check the motor cable for loose connection If the motor cable is loose turn off the power and re connect the connectors firmly ensuring the a...

Страница 14: ...derailleur has been assembled and strictly checked before leaving the factory During usage if the chain jumps in gears or cannot be switched in gears turn the black button slightly to adjust Note If...

Страница 15: ...g Use the 10mm spanner and Allen key to replace it Note It is not recommended to remove and replace the nyloc nut more than 3 times as this may cause it to lose the self locking function Parking Turn...

Страница 16: ...s have been adjusted turn the wheels and ensure that there is no binding Confirm that the motor cuts out when either brake lever is pulled Lubrication For a long service life the following parts shoul...

Страница 17: ...distance Insufficient battery charge Battery ageing Frequent braking riding uphill or riding into wind continuously Charge battery fully Change battery Reduce motor assistance No indicator light when...

Страница 18: ...NOTES...

Страница 19: ...ion We hope that this user guide has given you the assistance needed for a simple set up For the most up to date guide for your product as well as any additional assistance you may require head online...

Отзывы: