background image

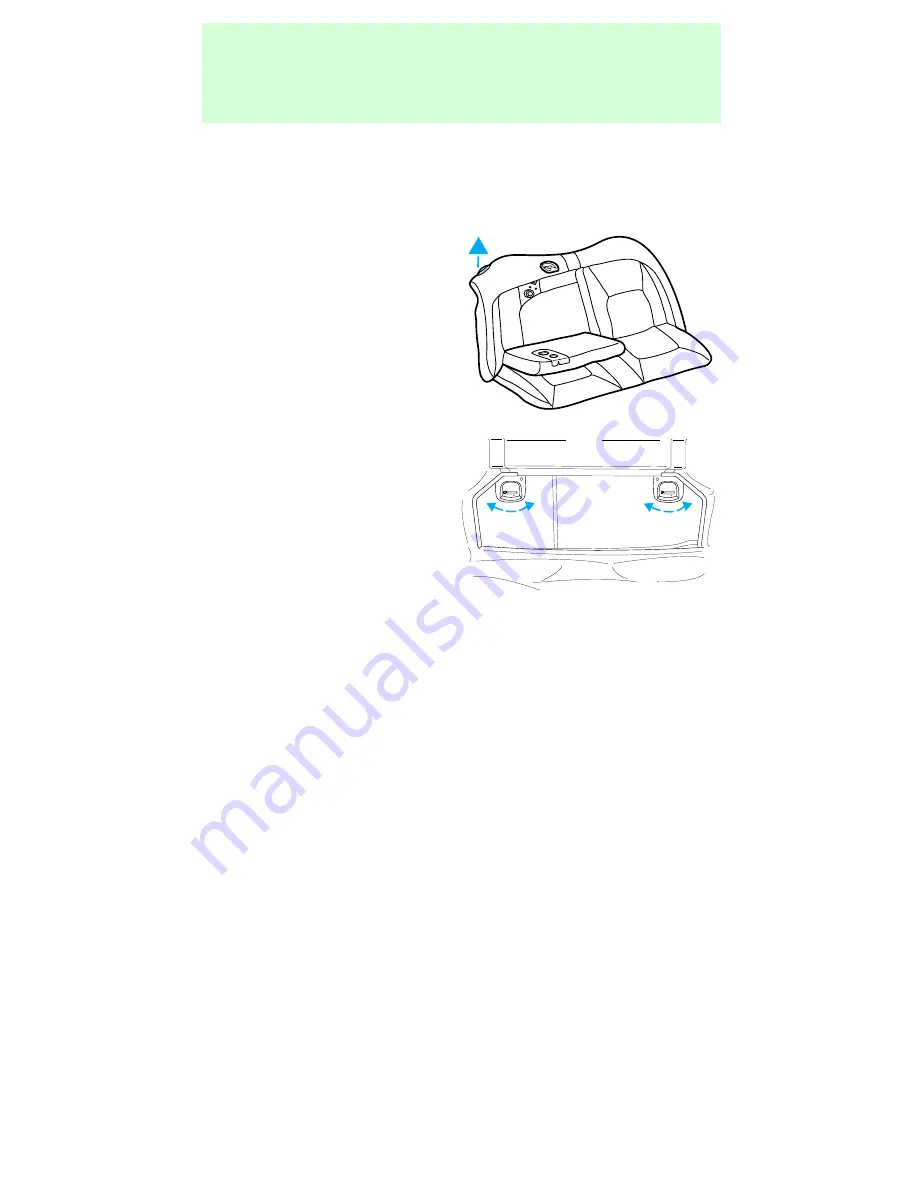
2nd seat/Split-folding rear seat

One or both rear seatbacks can be folded down to
provide additional cargo space.

To lower the
seatback(s) from inside
the vehicle, lift
seatback release
handle, pull tab, then
fold seatback down.

In the sedan, the
seatbacks can also be
folded down from
inside the trunk. Move
the release lever on
the back of the rear
seatback to the OPEN
position and fold the
seatback down.

When raising the seatback(s), make sure you hear
the seat latch into place.

3rd seat (wagon only)

The third seat faces the rear of the vehicle. For
height and weight limits, see the label on the seat
cushion. When the seat is down, the back of your
wagon has a flat surface for carrying cargo.

OPEN

OPEN

Seating and safety restraints

53

Содержание Taurus 1997

Страница 1: ...42 20 AM www carburetor manual com Would you like some Free Manuals http carburetor manual com free shop manual club t 13 html Also visit http freeshopmanual com for more Free Manuals Also Visit my website for 7 FREE Download Manuals starting with this one The ABC s of Carburetion Click Here Now ...

Страница 2: ... 3 Controls and features 14 Seating and safety restraints 35 Starting and driving Starting 78 Driving 84 Roadside emergencies 99 Servicing Maintenance and care 118 Capacities and specifications 156 Reporting safety defects 168 Index 169 Contents 1 ...

Страница 3: ...such questions are contained in comments highlighted by the warning triangle symbol BREAKING IN YOUR VEHICLE There are no particular breaking in rules for your vehicle Simply avoid driving too briskly during the first 1 600 km 1 000 miles of driving Vary speeds frequently This is necessary to give the moving parts a chance to break in If possible you should avoid full use of the brakes for the fir...

Страница 4: ...0 60 100 140 180 P R N D 2 1 MPH km h 0 0 0 0 0 0 0 0 0 0 P BRAKE 110 CRUISE RPMx1000 ABS O D OFF REAR LAMP OUT PREMIUM UNLEADED FUEL RECOMMENDED 0 1 2 3 4 5 6 7 8 Fuel gauge pg 13 Headlamp control pg 14 Engine coolant temperature gauge pg 12 Speedometer pg 11 Tachometer pg 12 Driver air bag pg 64 Cruise control pg 23 Turn signal wiper washer control pg 26 Parking brake release pg 85 Remote trunk ...

Страница 5: ...4 5 6 w TAPE SIDE TAPE R DEF TUNE SEEK SCAN AM FM M H LO HI OFF A C MAX A C VENT VOL PUSH ON w ST FM 12 AMC BL RF Electronic sound system refer to Audio Giude pg 22 Climate control pg 15 Gearshift floor mounted shown pg 86 Instrumentation 5 ...

Страница 6: ...F E F C H FUEL DOOR SERVICE ENGINE SOON THEFT 10 20 30 40 50 60 70 80 90 100 120 20 60 100 140 180 P R N D 2 1 MPH km h 0 0 0 0 0 0 0 0 0 0 P BRAKE LOW COOLANT 110 CRUISE RPMx1000 ABS O D OFF PREMIUM UNLEADED FUEL RECOMMENDED 0 1 2 3 4 5 6 7 8 RPMx1000 0 1 2 3 4 5 6 7 E F C H FUEL DOOR SERVICE ENGINE SOON 10 20 30 40 50 60 70 80 90 100 110 0 0 20 40 80 60 100 120 140 160 180 220 240 P R N 2 1 D MP...

Страница 7: ... Using the safety restraints properly in the Seating and safety restraints chapter Door ajar Illuminates when the ignition switch is in the ON or START position and any door is open Service engine soon This light illuminates when the engine s Emission Control System requires service It will also illuminate when the ignition key is in the ON position and the engine is off Low fuel If the fuel gauge...

Страница 8: ...eft alarm light if equipped This light is used when you set the anti theft alarm system See Anti theft system in the index O D off if equipped Illuminates when the transaxle control switch TCS has been pushed When the light is on the transaxle does not shift into overdrive If the light does not come on when the TCS is depressed or if the light flashes when you are driving have your vehicle service...

Страница 9: ...al operating range this lamp will illuminate The engine oil level being too high or too low could cause this lamp to illuminate This lamp will come on when the ignition is first turned on but then should turn off If the lamp stays on continued operation will cause severe engine damage Charging system Briefly illuminates when the ignition is turned on and the engine is off The light also illuminate...

Страница 10: ...Sounds when the key is left in the ignition in the OFF LOCK or ACC position and the driver s door is opened Low coolant chime Sounds when the engine coolant in the coolant reservoir is low Safety belt warning chime For information on the safety belt warning chime refer to the Seating and safety restraints chapter Supplemental restraint system SRS warning chime For information on the SRS warning ch...

Страница 11: ... 0 20 40 60 80 100 120 140 160 180 P R N D D 1 MPH km h 0 0 0 0 0 0 0 0 0 0 10 20 30 40 50 60 70 80 90 100 120 20 60 100 140 180 P R N D 2 1 MPH km h 0 0 0 0 0 0 0 0 0 0 110 10 20 30 40 50 60 70 80 90 100 110 0 0 20 40 80 60 100 120 140 160 180 220 240 P R N 2 1 D MPH km h 0 0 0 0 0 0 0 0 0 0 120 130 140 150 200 Instrumentation 11 ...

Страница 12: ...lant At normal operating temperature the needle remains within the normal area If it enters the red section the engine is overheating Switch off the ignition and let it cool Refer to Checking and adding engine coolant in the Maintenance and care chapter RPMx1000 0 1 2 3 4 5 6 7 UNLEADED FUEL ONLY RPMx1000 PREMIUM UNLEADED FUEL RECOMMENDED 0 1 2 3 4 5 6 7 8 C H Instrumentation 12 ...

Страница 13: ... tank when the key is in the ON position The fuel gauge may vary slightly when the vehicle is in motion The ignition should be in the OFF position while the vehicle is being refueled 10 20 30 40 50 60 70 80 90 100 110 0 0 20 40 60 80 100 120 140 160 180 P R N D D 1 MPH km h 0 0 0 0 0 0 0 0 0 0 10 20 30 40 50 60 70 80 90 100 110 0 0 20 40 60 80 100 120 140 160 180 P R N D 1 D MPH km h 0 0 1 2 2 0 0...

Страница 14: ...the way to turn on the headlamps Autolamp delay system if equipped The autolamp system sets the headlamps to turn on and off automatically You can use the autolamps to Turn on the lamps automatically at night Turn off the lamps automatically in daylight Keep the lamps on for up to three minutes after the ignition is turned off Setting autolamp 1 Make sure headlamp control is in the OFF position th...

Страница 15: ...Daytime running lights Canadian vehicles only The daytime running light system turns the headlamps on with a reduced light output when the engine is running the parking brake is released the headlamp system is in the OFF position The Daytime Running Light DRL system will not illuminate the tail lamps and parking lamps Turn on your headlamps at dusk Failure to do so may result in a collision CLIMAT...

Страница 16: ...utside air through the instrument panel registers and the front and rear floor ducts The air conditioning compressor will operate in this mode Floor Allows for maximum heating The airflow is from the front and rear floor ducts Floor and defrost Distributes outside air through the floor ducts and the windshield defroster ducts The air conditioning compressor will operate in this mode Front defrost ...

Страница 17: ... intake area at the bottom of the windshield under the hood on the passenger side of your vehicle If the air conditioner works well in MAX A C but not in A C this may indicate that the passenger compartment air filter if equipped needs to be replaced Electronic Automatic Temperature Control EATC system if equipped The EATC system will maintain a selected temperature and automatically control airfl...

Страница 18: ... temperature will be shown on the display Temperature selection TEMP will increase or decrease the set temperature Pressing TEMP will change the temperature one degree in either direction Pressing and holding TEMP will rapidly change the temperature in one degree increments in either direction until either 18 C 65 F or 29 C 85 F The temperature will then jump 15 C 5 F and stop at either 16 C 60 F ...

Страница 19: ...ill show FAN and a series of dots indicating fan speed To return to automatic fan control press AUTO Manual override controls The override controls are located on the bottom of the EATC and allow you to determine where airflow is directed To return to full automatic control press AUTO MAX A C Uses recirculated air to cool the vehicle The temperature will display 16 C TEMP OFF AUTO TEMP OUT SIDE A ...

Страница 20: ...istributes outside air through the floor ducts and the windshield defroster ducts If the outside temperature is about 10 C 50 F or higher the air conditioner will dehumidify the air to prevent fogging The air conditioning compressor will operate in this mode F DEF Defrost Distributes outside air through the windshield defroster ducts It can be used to clear ice or fog from the windshield If the ou...

Страница 21: ...on t put objects under the front seat that will interfere with the air circulation to the back seats Remove any snow ice or leaves from the air intake area at the bottom of the windshield under the hood on the passenger side of your vehicle If the air conditioner works well in MAX A C but not in A C this may indicate that the passenger compartment air filter if equipped needs to be replaced Rear w...

Страница 22: ...ssed if not already on AUDIO SYSTEM Refer to the Audio Guide for instructions on how to operate the audio system FUEL PUMP SHUT OFF SWITCH Refer to the Roadside emergencies chapter for instructions on how to operate the fuel pump shut off switch POSITIONS OF THE IGNITION 1 ACCESSORY allows the electrical accessories such as the radio and wipers washer to operate while the engine is not running 2 L...

Страница 23: ...Press ON Vehicle speed cannot be controlled until the vehicle is travelling at or above 48 km h 30 mph Do not use the cruise control in heavy traffic or winding slippery or unpaved roads Do not shift into N Neutral while the cruise control is on To turn cruise control off Press OFF or turn off the vehicle ignition Once cruise control is switched off the previously programmed set speed will be eras...

Страница 24: ... shift to the next lower gear to reduce your vehicle speed If your vehicle slows down more than 16 km h 10 mph below your set speed on an uphill your cruise control will disengage This is normal Pressing RESUME will re engage it Do not use your cruise control in heavy traffic or roads that are winding slippery or unpaved To set a higher set speed Press and hold SET ACCEL Release the control when t...

Страница 25: ...will decrease the set speed by 1 6 km h 1 mph or Depress the brake pedal When the desired vehicle speed is reached press SET ACCEL To disengage cruise control Depress the brake pedal Disengaging the cruise control will not erase the previously programmed set speed Pressing OFF will erase the previously programmed set speed To return to a set speed Press RESUME For RESUME to operate the vehicle spe...

Страница 26: ...ther the cruise control or the ignition is turned off TURN SIGNAL CONTROL Turn signals Push the control down to activate the left turn signal Push control up to activate the right turn signal High beams Push the control forward to activate the high beams CRUISE Controls and features 26 ...

Страница 27: ...activate washer Push the control once for a single wipe Push and hold for a longer wash cycle Turn the dial at end of the turn signal control to adjust wiper interval and speed HAZARD FLASHER Push the control located on top of the steering column to activate four way flashers Push control again to turn flashers off LO F OFF S HI LO F OFF S H I Controls and features 27 ...

Страница 28: ...lose moon roof Press AUTO and release to open completely with one touch Press UP or DN on the TILT control to tilt moon roof when closed Sliding shade The moon roof has a sliding shade that you can open or close when the moon roof is closed DOME LAMPS AND MAP LAMPS The front dome lamp is located overhead between the driver and passenger seats If the vehicle is equipped with a moon roof the dome la...

Страница 29: ... has been opened from the outside the lamp will remain on for 25 seconds after the door is shut If any other door has been opened from the inside the lamp will shut off immediately after the door is closed The map lamps and controls are located on the dome lamp Press the controls on either side of each map lamp to activate the lamps If equipped with a moon roof the map lamps are located on the moo...

Страница 30: ...leased quickly the driver s window will open completely without holding the switch down Each passenger has window controls The window lock feature allows only the driver to operate the power windows POWER DOOR LOCKS IF EQUIPPED Press U to unlock all doors and L to lock all doors Controls and features 30 ...

Страница 31: ...e wagon only The power liftgate lock is located on the right inside trim panel in the cargo area When this lock is pressed all doors and the liftgate will lock POWER SIDE VIEW MIRRORS To change mirror position first select a mirror by moving the selector control left or right then moving the control to set the desired position Power heated side view mirrors if equipped The heated mirrors will melt...

Страница 32: ...be opened from the outside when the doors are unlocked Move lock control up to engage the lock Move control down to disengage childproof locks CONSOLE If your vehicle is equipped with a floor mounted gearshift it will have a full console with the following features cup holders push to open Controls and features 32 ...

Страница 33: ...n cassette CD storage cellular phone if equipped ashtray push to open The release for the utility compartment is on the front of the console just below the armrest Press and release at the ridges to open Controls and features 33 ...

Страница 34: ...center console in the center front seating position The center console has the same features as the full console To open the storage compartment raise the armrest and pull the strap on the seat up and toward the front of the vehicle The cupholders in the center console can be removed for cleaning Cellular phone Refer to the cellular phone user s manual for instruction on operation Controls and fea...

Страница 35: ...ur vehicle is equipped with a floor mounted gearshift it will have a full console with the following features cup holders push to open coin holder and utility bin cassette CD storage Seating and safety restraints 35 ...

Страница 36: ...e To open the storage compartment raise the armrest and pull the strap on the seat up and toward the front of the vehicle The cupholders in the center console can be removed for cleaning POSITIVE RETENTION FLOOR MAT IF EQUIPPED Position the floor mat so that the eyelet is over the pointed end of the retention post and rotate forward to lock in Make sure the mat does not interfere with the operatio...

Страница 37: ...n hidden under the exterior trim panel just above the license plate You must lock the liftgate with the key or power lock control it does not lock automatically The window locks when the liftgate is locked To open the window make sure the liftgate and window are unlocked then press the outside lock cylinder The window can only be opened from the outside To prevent any damage to the liftgate and wi...

Страница 38: ...e than 22 kg 50 lbs in the net This net is not designed to restrain objects during a collision CARGO COVER WAGON IF EQUIPPED You can cover the rear compartment by fastening the cover into the pockets in the trim panel make sure the cover is right side up so it unrolls from the top then pulling and hooking the cover into the pockets into the trim panel REWINDING THE SLIDING SHADE If the shade is da...

Страница 39: ...hold in while turning the tube toward you fourteen times 5 Let go of the right end cap and unfold the vinyl Place the vinyl into the end cap slots 6 Place the shade back into the vehicle The cover may cause injury in a sudden stop or accident if it is not securely installed LUGGAGE RACK WAGON ONLY The rear crossbar can be adjusted to fit the item being carried The front crossbar does not move No m...

Страница 40: ...ny hard object that could damage the controls Programming your own entry code This code does not replace the permanent code from the dealership To program your own code 1 Select five digits for your personal code 2 Enter the permanent code that the dealership gave you 3 Within five seconds press 1 2 4 Within five seconds of pressing 1 2 enter your personal code pressing each digit within five seco...

Страница 41: ... key or remote entry transmitter s 1 To unlock the driver s door enter one of the two codes After pressing the fifth number the driver s door unlocks 2 To unlock the passenger s door s and liftgate wagon press the 3 4 button within five seconds of unlocking the driver s door 3 To unlock the trunk or liftgate wagon enter the five digit factory code then press the 5 6 button within five seconds Lock...

Страница 42: ... ON position the brake pedal is pressed you shift through R reverse one second has elapsed after the brake pedal is released The autolock feature repeats when a door is opened and then all doors are closed the brake pedal is released The doors may not lock automatically if the driver shifts through gears without pressing the brake shifts through gears quickly after starting the vehicle releases th...

Страница 43: ...key from ON to OFF 5 Press the door power unlock switch three times 6 Turn the ignition key back to ON within 30 seconds of step two 7 The horn should chirp once If not wait 30 seconds and repeat steps one through six 8 Press the door power unlock switch 9 Press the door power lock switch 10 The horn will chirp once if the autolock feature was deactivated twice one short chirp followed by a long c...

Страница 44: ...r The remote entry features only operate with the ignition in the OFF position Unlocking the doors Press UNLOCK once to unlock the driver and illuminate the interior lamps Press UNLOCK a second time within five seconds to unlock all doors and liftgate wagon Using the trunk button Press once to open the trunk sedan or unlock the liftgate wagon LOCK UN LOCK PANIC TRUNK LOCK UN LOCK PANIC TRUNK LOCK ...

Страница 45: ...ignition to ACC or ON This device complies with part 15 of the FCC rules Operation is subject to the following two conditions 1 This device may not cause harmful interference and 2 This device must accept any interference received including interference that may cause undesired operation Arming and disarming the alarm system Your remote entry system will automatically arm the factory installed ant...

Страница 46: ... the two halves back together Replacing lost transmitters Take all your vehicle s transmitters to your dealer for programming if a transmitter is lost or you want to purchase additional transmitters up to four ILLUMINATED ENTRY SYSTEM The interior lamps illuminate when the remote entry system is used to unlock the door or sound the personal alarm The system automatically turns off after 25 seconds...

Страница 47: ...alarm system Pressing LOCK on the remote transmitter doors opened or closed Pressing 7 8 and 9 0 on the keyless entry pad at the same time to lock the doors doors opened or closed Opening a door and pressing the power door lock button to lock the doors Using the door key to lock the doors doors opened or closed If a door or the liftgate wagon is open the system is prearmed and is waiting for the d...

Страница 48: ... transmitter twice to confirm the doors are locked the horn will chirp twice to warn you that the system is not arming Disarming the system You can disarm the system by any of the following actions Unlock the doors by using your remote entry transmitter Unlock the doors by using your keyless entry pad Unlock the doors or liftgate with a key Turn the key full travel toward the front of the vehicle ...

Страница 49: ...ys If you need additional keys electronically coded for your vehicle spares can be purchased total of 16 keys To program a new key perform the following procedure 1 With the coded key in the ignition turn the ignition from ON to OFF 2 Within 15 seconds of turning ignition off insert new electronic key into the ignition and turn it from OFF to ON or START If successful the anti theft indicator will...

Страница 50: ...can be caused by any of the following The new key was not inserted into the ignition within 15 seconds 16 keys have already been programmed The new key does not have an electronic code Seating and safety restraints 50 ...

Страница 51: ...s can be moved up and down Front seats Adjusting the manual seats Lift bar to move seat forward or backward Pull lever up to adjust seatback Never adjust the driver s seat or seatback when the vehicle is moving Seating and safety restraints 51 ...

Страница 52: ...and down Press in the direction to raise or lower the seat or to move the seat forward or backward Push to increase or decrease lumbar support Pull lever up to adjust seatback Never adjust the driver s seat or seatback when the vehicle is moving Seating and safety restraints 52 ...

Страница 53: ...folded down from inside the trunk Move the release lever on the back of the rear seatback to the OPEN position and fold the seatback down When raising the seatback s make sure you hear the seat latch into place 3rd seat wagon only The third seat faces the rear of the vehicle For height and weight limits see the label on the seat cushion When the seat is down the back of your wagon has a flat surfa...

Страница 54: ...ight position 3 Lift the remote latch release on the left side of the compartment and fold the remaining floor panel until it latches Make sure the seatback is locked in the upright position To close the seat make sure the safety belts are in their correct notches then lift the remote latch release and push the seat down until it latches Pull up on the handle and push the floor panel into place Se...

Страница 55: ...jured or killed Do not allow people to ride in any area of your vehicle that is not equipped with seats and safety belts Be sure everyone in your vehicle is in a seat and using a safety belt properly Combination lap and shoulder belts 1 To fasten insert the tongue into the slot in the buckle 2 To unfasten push the red release button and remove the tongue from the buckle The outboard safety restrai...

Страница 56: ...ation safety belts would lock to help reduce forward movement of the driver and passengers Automatic locking mode In this mode the shoulder belt is locked in a certain position by the occupant and does not adjust tightness during vehicle movement The automatic locking mode is not available on the driver belt When to use the automatic locking mode When a tight lap shoulder fit is desired Any time a...

Страница 57: ...ow to cancel the automatic locking mode Disconnect the combination lap shoulder belt and allow it to retract completely to cancel the automatic locking mode and activate the vehicle sensitive emergency locking mode Safety belts for front outboard passenger and rear outboard seating positions except wagon rear facing position Your vehicle is equipped with a dual locking mode retractor on the should...

Страница 58: ...e of your shoulder To lower the shoulder belt height push the button and slide the height control down To raise the height of the shoulder belt slide the height adjuster up Pull down on the height adjustment assembly to make sure it is locked in place Center rear lap belt sedan The safety belt in the center rear seating position has a detachable shoulder belt Seating and safety restraints 58 ...

Страница 59: ...pped and center rear seating position wagon do not adjust automatically You must adjust them to fit snugly and low as possible around your hips Do not wear the lap belt around your waist Make sure you insert the tongue into the correct buckle If you need to lengthen the belt turn the tongue at a right angle to the belt and pull across your lap until it reaches the buckle If you need to tighten the...

Страница 60: ...the tongue so that it is parallel to the webbing and slide the tongue upward provide enough length so that the tongue can reach the buckle To fasten the belt pull the combination lap and shoulder belt from the retractor so that the shoulder belt portion of the safety belt crosses your shoulder and chest Be sure the belt is not twisted If the belt is twisted remove the twist Insert the tongue into ...

Страница 61: ... safety belt will become locked and help reduce your forward movement To unfasten the belt push the red release button on the end of the buckle This allows the tongue to unlatch from the buckle While the belt retracts guide the tongue to its original position to prevent it from striking you or the vehicle Safety belt extension assembly If the safety belt assembly is too short even when fully exten...

Страница 62: ...chime is sounding The safety belt indicator light and warning chime turn off The driver s safety belt is buckled before the ignition key is turned to ON The safety belt warning light and indicator chime remain off Safety belt maintenance Check the safety belt systems periodically to make sure they work properly and are not damaged Check the safety belts to make sure there are no nicks wears or cut...

Страница 63: ...ody injuries Failure to follow these instructions will affect the performance of the safety belts and increase the risk of personal injury The right front passenger air bag is not designed to restrain occupants in the front seating position Do not place objects or mount equipment on or near the air bag covers that may come into contact with an inflating air bag BASS TREB BAL FADE REW FF EJECT 1 2 ...

Страница 64: ...Failure to follow these instructions may increase the risk of injury in a collision Rear facing child seats or infant carriers should never be placed in the front seats HOW DOES THE AIR BAG SUPPLEMENTAL RESTRAINT SYSTEM WORK The SRS is designed to activate when the vehicle sustains sufficient longitudinal deceleration similar to hitting a fixed barrier head on at 12 24 km h 8 14 mph The fact that ...

Страница 65: ...ates the air bag Small amounts of sodium hydroxide may be present which may irritate the skin and eyes but none of the residue is toxic Several air bag system components get hot after inflation Do not touch them after inflation If the air bag is inflated the air bag will not function again and must be replaced immediately If the air bag is not replaced the unrepaired area will increase the risk of...

Страница 66: ...A difficulty with the system is indicated by one or more of the following The readiness light will either flash or stay lit The readiness light will not illuminate immediately after ignition is turned on A group of five beeps will be heard The tone pattern will repeat periodically until the problem and light are repaired If any of these things happen even intermittently have the SRS serviced at yo...

Страница 67: ... you might use When possible place children in the rear seat of your vehicle Accident statistics suggest that children are safer when properly restrained in the rear seating positions than in the front seating position CHILDREN AND SAFETY BELTS Children who are too large for child safety seats as specified by your child safety seat manufacturer should always wear safety belts Follow all the import...

Страница 68: ...the child A belt positioning booster should be used if the shoulder belt rests in front of the child s face or neck or if the lap belt does not fit snugly on both thighs or if the thighs are too short to let the child sit all the way back on the seat cushion when the lower legs hang over the edge of the seat cushion You may wish to discuss the special needs of your child with your pediatrician SAF...

Страница 69: ... mode Refer to Using the automatic locking mode Ford recommends the use of a child safety seat having a top tether strap Install the child safety seat in a seating position which is capable of providing a tether anchorage For more information on top tether straps refer to Attaching safety seats with tether straps Carefully follow all of the manufacturer s instructions included with the safety seat...

Страница 70: ...at move the seat as far back as possible Rear facing child seats or infant carriers should never be placed in the front seats 2 Pull down on the shoulder belt and then grasp the shoulder belt and lap belt together 3 While holding the shoulder and lap belt portions together route the tongue through the child seat according to the child seat manufacturers instructions Be sure the belt webbing is not...

Страница 71: ...The belt will click as it retracts to indicate it is in the automatic locking mode 7 Pull the lap belt portion across the child seat toward the buckle and pull up on the shoulder belt while pushing down with knee on the child seat 8 Allow the safety belt to retract to remove any slack in the belt 9 Before placing the child in the seat forcibly tilt the seat forward and back to make sure the seat i...

Страница 72: ... the front seat 1 Buckle the lap shoulder belt in the seat behind the front passenger seat in which the child safety seat will be installed 2 Pull all the stored belt out of the rear seat retractor to switch the retractor to automatic locking mode 3 Let the retractor wind up the slack from the lap shoulder belt 4 Install the child safety seat in the front seat Refer to Installing child safety seat...

Страница 73: ...ety seat manufacturer s instructions Tighten the anchor according to specifications Otherwise the safety seat may not be properly secured and the child may be injured in a sudden stop or collision If you have a station wagon tether anchors are already installed for each of the second row seating positions 1 Behind the second seat find the plastic snap on covers for the floor anchors 2 Use a screwd...

Страница 74: ...nt or child safety seats in this chapter Built in child seat retractors The belts on built in child seats are equipped with a retractor that locks when both tongues are latched into the crotch safety belt buckle The retractor will automatically snug the belts around the child If the belts do not remain snug take the vehicle to the dealer for child seat repair The belts will not snug during a colli...

Страница 75: ... the top of the seatback and pull the top forward to release the latch 2 Continue to unfold the child seat until it rests on the seat 3 Read all information and warnings on the child seat cushion and shoulder safety belt Make sure the child is not too large for the child seat Seating and safety restraints 75 ...

Страница 76: ...below the child s shoulders and adjust it to comfortably hold the shoulder belts in place on the child s chest The color green must appear in the indicator window when fastened 8 Pull the shoulder belts toward you to make sure the crotch safety belt buckle is properly fastened and the retractor is locked 9 If the belts become too tight unbuckle the crotch safety belt buckle to unlock the retractor...

Страница 77: ...child restraints including seats buckles retractors seat latches Interlocks and attaching hardware should be inspected by a qualified technician after any collision If the child seat was in use during a collision Ford recommends replacing it Built in child restraints not in use during a collision should be inspected and replaced if either damage or improper operation is noted Seating and safety re...

Страница 78: ...en you have difficulty starting the engine For more information on starting the vehicle refer to Starting the vehicle in this chapter Before starting the vehicle 1 Make sure all vehicle occupants have buckled their safety belts For more information on safety belts and their proper usage refer to the Seating and safety restraints chapter 2 Make sure the headlamps and vehicle accessories are off Mak...

Страница 79: ...0 140 160 180 P R N D D 1 MPH km h 0 0 1 2 2 0 0 0 1 3 P BRAKE ABS UNLEADED FUEL ONLY THEFT LOW COOLANT O D OFF REAR LAMP OUT E F C H FUEL DOOR SERVICE ENGINE SOON THEFT 10 20 30 40 50 60 70 80 90 100 120 20 60 100 140 180 P R N D 2 1 MPH km h 0 0 0 0 0 0 0 0 0 0 P BRAKE LOW COOLANT 110 CRUISE RPMx1000 ABS O D OFF REAR LAMP OUT PREMIUM UNLEADED FUEL RECOMMENDED 0 1 2 3 4 5 6 7 8 RPMx1000 0 1 2 3 4...

Страница 80: ...ur vehicle in dry grass or other dry ground cover The emission system heats up the engine compartment and exhaust system which can start a fire Do not start your vehicle in a closed garage or in other enclosed areas Exhaust fumes can be toxic Always open the garage door before you start the engine See Guarding against exhaust fumes in this chapter for more instructions If you smell exhaust fumes i...

Страница 81: ...ake Using the engine block heater if equipped An engine block heater warms the engine coolant which improves starting warms up the engine faster and allows the heater defroster system to respond quickly They are strongly recommended if you live in a region where temperatures reach 23 C 10 F or below For best results plug the heater in at least three hours before starting the vehicle Using the heat...

Страница 82: ...smell exhaust fumes These fumes are harmful and could kill you Have the exhaust and body ventilation systems checked whenever the vehicle is raised for service the sound of the exhaust system changes the vehicle has been damaged in a collision Important ventilating information If the engine is idling while the vehicle is stopped in an open area for long periods of time open the windows at least 2 ...

Страница 83: ...Improve vehicle ventilation by keeping all air inlet vents clear of snow leaves and other debris Starting 83 ...

Страница 84: ... on bottom to a non ABS equipped vehicle on top during hard braking ABS warning lamp The ABS warning lamp in the instrument cluster illuminates if an ABS fault is detected Have your vehicle serviced as soon as possible Normal braking operation is still effective unless the BRAKE warning lamp is also illuminated Using ABS In an emergency apply full force on the brake The ABS will be activated immed...

Страница 85: ...tion is turned ON until the parking brake is released Always set the parking brake fully and make sure the gearshift is latched in P Park Turn off the ignition whenever you leave your vehicle The parking brake is not designed to stop a moving vehicle However if the normal brakes fail the parking brake can be used to stop your vehicle in an emergency Since the parking brake applies only the rear br...

Страница 86: ...hift interlock This vehicle is equipped with a brake shift interlock feature that prevents the gearshift from being moved from P Park unless the brake pedal is pressed If you cannot move the gearshift out of P Park with the brake pedal depressed 1 Apply the parking brake turn ignition key to LOCK then remove the key 2 Insert the key and turn it to OFF Apply the brake pedal and shift to N Neutral 3...

Страница 87: ... leave your vehicle Driving with an automatic overdrive transaxle column gearshift without O D off switch Your automatic overdrive transaxle provides fully automatic operation in either Overdrive or D Drive Driving with the shift selector in gives the best fuel economy for normal driving conditions For manual control start in 1 First and then shift manually To put your vehicle in gear start the en...

Страница 88: ...Overdrive or with the O D OFF switch depressed Driving with the shift selector in D Overdrive gives the best fuel economy for normal driving conditions For manual control start in 1 First and then shift manually If your vehicle is equipped with a console mounted gearshift you must press the thumb button on the side of the gearshift to move the gearshift from P Park Driving 88 ...

Страница 89: ...shift is securely latched in P Park This locks the transaxle and prevent the front wheels from rotating R Reverse With the gearshift in R Reverse the vehicle will move backward You should always come to a complete stop before shifting into and out of R Reverse P R N D 2 1 P R N D D 1 P R N D 2 1 P R N D D 1 Driving 89 ...

Страница 90: ... D Overdrive with the O D OFF switch not depressed works but shifts to a fourth gear an overdrive gear when your vehicle cruises at a constant speed for any length of time This fourth gear will increase your fuel economy when you travel at cruising speeds Overdrive may not be appropriate for certain terrains If the transaxle shifts back and forth between third and fourth gears while you are drivin...

Страница 91: ...axle may occur When to use D Drive or press the O D OFF switch if equipped D Drive eliminates the needless shifting back and forth between third and fourth gears that your vehicle may do when driving on hilly terrain It also gives more engine braking than overdrive to slow your vehicle on downgrades 2 Second if equipped Use 2 Second for start up on slippery roads or to give you more engine braking...

Страница 92: ...rely latched in Park P Turn off the ignition whenever you leave your vehicle Never leave your vehicle unattended while it is running If you do not take these precautions your vehicle may move unexpectedly and injure someone VEHICLE LOADING Before loading a vehicle familiarize yourself with the following terms Base Curb Weight Weight of the vehicle including any standard equipment fluids lubricants...

Страница 93: ...cates the maximum loaded weight that the vehicle is allowed to tow Maximum Trailer Weight Rating Maximum weight of a trailer the vehicle is permitted to tow The maximum trailer weight rating equals the vehicle curb weight for each engine transaxle combination any required option weight for trailer towing and the weight of the driver from the GCWR for the towing vehicle Maximum Trailer Weight maxim...

Страница 94: ...t come from the factory fully equipped to tow No towing packages are available through Ford or Mercury Lincoln dealers Do not tow a trailer until your vehicle has been driven at least 800 km 500 miles If towing with a station wagon inflate the rear tires to 35 psi Towing a trailer places an additional load on your vehicle s engine transaxle brakes tires and suspension Inspect these components care...

Страница 95: ...300 2 135 300 70 150 725 1600 2 135 300 0 795 1750 Station Wagon 5 340 750 70 150 455 1000 2 135 300 70 150 660 1450 2 135 300 0 725 1600 The above chart is based on the specified vehicle at a maximum GCW Vehicle weight Trailer weight equal to 2270 kg 5450 lbs Do not exceed the GVWR or the GAWR specified on the Safety Compliance Certification Label Towing trailers beyond the maximum recommended gr...

Страница 96: ...e and allow slack for turning corners If your use a rental trailer follow the instructions that the rental agency gives to you Trailer brakes Electric brakes and manual automatic or surge type brakes are safe if installed properly and adjust them to the manufacturer s specifications The trailer brakes must meet local and Federal regulations Do not connect a trailer s hydraulic brake system directl...

Страница 97: ...er towing tips Practice turning stopping and backing up in an area before starting on a trip to get the feel of the vehicle trailer combination When turning drive slightly beyond the normal turning point so the trailer wheels will clear curbs and other obstacles Allow more room for stopping with a trailer attached The trailer tongue weight should be 10 15 of the loaded trailer weight After you hav...

Страница 98: ...FUEL CONSUMPTION Fuel economy can be improved by avoiding lack of regular scheduled maintenance excessive speed rapid acceleration Driving 98 ...

Страница 99: ...p shut off switch may have been activated The shut off switch is a device intended to stop the electric fuel pump when your vehicle has been involved in a substantial jolt 1 Turn the ignition switch to the OFF position 2 Check the fuel system for leaks 3 If no fuel leak is apparent reset the fuel pump shut off switch by pushing in the button on the switch 4 Turn the ignition switch to the ON posit...

Страница 100: ... area FUSES AND RELAYS Fuses If electrical components in the vehicle are not working a fuse may have blown Blown fuses are identified by a broken wire Check the appropriate fuses before replacing any electrical components Always replace a fuse with one that has the specified amperage rating Using a fuse with a higher amperage rating can cause severe wire damage and could start a fire 15 Roadside e...

Страница 101: ...nt fuse panel The fuse panel is located below and to the left of the steering wheel by the brake pedal Pull the panel cover outward to access the fuses To remove a fuse use the fuse puller tool provided on the fuse panel cover The fuses are coded as follows Fuse Relay Location Fuse Amp Rating Description 1 Not used 2 5A Instument illumination Roadside emergencies 101 ...

Страница 102: ...ar defroster 6 15A MLPS switch backup lamps speed control climate control 7 10A MLPS switch starter relay 8 5A Power antenna radio control unit GEM 9 10A Anti lock brakes system Central Temperature Monitor 10 20A EEEC relay ignition coil passive anti theft system radio 11 5A Air bag indicator instrument cluster Roadside emergencies 102 ...

Страница 103: ...M 13 5A Air bag blower motor electronic automatic temperature control 14 5A Lamp outage indication Semi active suspension SHO only 15 10A Multi function switch turn signal 16 Not used 17 30A Wiper system front 18 5A Headlamp switch 19 15A Wiper system rear 20 5A Integrated control panel remote entry cigar lighter Roadside emergencies 103 ...

Страница 104: ...ng remote entry anti theft 24 5A Integrated control panel speedometer electronic automatic temperature control module 25 15A Data link connector 26 15A Trunklid 27 10A Battery saver relay 28 15A Brake lamps stop control 29 15A Multi function switch hazard flashers 30 15A High beams daytime running lamps instrument cluster 31 5A Tail lamp feed Roadside emergencies 104 ...

Страница 105: ...or unlock relay 36 Rear defroster relay 37 Interior lamps relay 38 One touch window down relay 39 Accessory delay relay Power distribution box The power distribution box is located in the engine compartment near the battery The power distribution box contains high current fuses that protect your vehicle s main electrical systems from overloads Roadside emergencies 105 ...

Страница 106: ...tarter relay 4 30A Accessory delay relay 5 40A Ignition switch 6 30A Power seats 7 40A Rear window defrost relay 8 30A Thermactor air bypass solenoid EAM solid state relay 9 40A Constant control relay module 10 20A Constant control relay module 11 40A Blower motor relay 12 20A Semi active ride control module 13 40A Anti lock motor module 14 Not used Roadside emergencies 106 ...

Страница 107: ... monitor 17 20A Rear control unit CD changer 18 30A Anti lock brake module 19 15A Horn relay powertrain control module 20 15A Headlamp switch autolamp park relay 21 Not used 22 30A Autolamps relay multi function switch headlamp switch 23 N A 24 N A 25 N A 26 30A Generator Voltage regulator 27 N A Roadside emergencies 107 ...

Страница 108: ... Maxi fuses Mini fuses Always disconnect the battery before servicing high current fuses Always replace the cover to the Power Distribution Box before reconnecting the battery or refilling fluid reservoirs Relays Relays are located in the power distribution box and should be replaced by qualified technicians Roadside emergencies 108 ...

Страница 109: ...ou to lose control of the vehicle possibly injuring yourself or others When driving with the temporary spare tire DO NOT exceed 80 km h 50 mph under any circumstances load the vehicle beyond maximum vehicle load rating listed on the Safety Compliance Label tow a trailer use tire chains drive through an automatic car wash because of the vehicle s ground clearance try to repair the temporary spare t...

Страница 110: ...brake 2 Place gearshift lever in P Park block the diagonally opposite wheel then remove the spare tire jack and lug wrench In the sedan these are located in the trunk under the floor carpet In the wagon they are stored in the left side rear trim panel BRAKE RELEASE Roadside emergencies 110 ...

Страница 111: ...is completely off the ground 5 Remove the lug nuts with the lug wrench 6 Replace the flat tire with the spare tire making sure the valve stem is facing outward Reinstall lug nuts until the wheel is snug against the hub Do not fully tighten the lug nuts until the wheel has been lowered 7 Lower the wheel by turning the jack handle counterclockwise 8 Remove the jack and fully tighten the lug nuts in ...

Страница 112: ...o replace the wheel cover 1 One of the windows on the wheel cover is identified with a valve stem logo on the back side of the wheel cover Install the wheel over the wheel with the window at the valve stem 2 Hold the wheel cover in this position and press the cover onto the wheel with the palm of your hand Do not force or hammer the cover Center wheel cover 1 Pry the center ornament off the wheel ...

Страница 113: ...d press the cover onto the wheel with the palm of your hand Do not force or hammer the cover 3 Attach the bolt to the pedestal through the center hole on the cover with the lug wrench 4 Align the legs of the center ornament with the slots of the wheel cover Reinstall the ornament by pressing with the palm of your hand Do not hammer or force the cover Anti theft lug nuts if equipped If your vehicle...

Страница 114: ...ases around the battery can explode if exposed to flames sparks or lit cigarettes An explosion could result in injury or vehicle damage Do not push start your vehicle You could damage the catalytic converter For further information see Jumper Cables in the Index Batteries contain sulfuric acid which burns skin eyes and clothing CONNECTING THE JUMPER CABLES 1 Position the vehicles so that they do n...

Страница 115: ...re that the jump leads are clear of moving parts of the engine Do not connect the end of the second cable to the negative terminal of the battery to be jumped A spark may cause an explosion of the gases that surround the battery JUMP STARTING 1 Start the booster vehicle and run the engine at moderately increased speed 2 Start the engine of the vehicle with the discharged battery 3 Once the engine ...

Страница 116: ...ECKER TOWING If you need to have your vehicle towed contact a professional towing service or if you are a member your roadside assistance center Your vehicle should be towed from the front unless conditions do not allow it It is recommended that your vehicle be towed with a wheel lift or flatbed equipment When calling for a tow truck tell the operator what kind of vehicle you have A towing manual ...

Страница 117: ...ing brake Move the gearshift to N Neutral Turn the key in the ignition to OFF Unlock the steering wheel Do not tow your vehicle at a speed faster than 56 km h 35 mph or for a distance greater than 80 km 50 miles unless the drive wheels are placed on dollies Never use a tow bar that attaches to the bumper when you tow your vehicle This could damage the bumper and cause an accident Roadside emergenc...

Страница 118: ...e parts conforming to specifications Motorcraft parts are designed and built to provide the best performance in your vehicle Precautions when servicing your vehicle Be especially careful when inspecting or servicing your vehicle Here are some general precautions for your safety Do not work on a hot engine The cooling fan is automatic and may come on at any time Always disconnect the negative termi...

Страница 119: ...orking with the engine off 1 Set the parking brake fully and make sure the gearshift is securely latched is P Park 2 Turn off the engine and remove the key 3 Block the wheels fully to prevent the vehicle from moving unexpectedly Working with the engine on 1 Set the parking brake fully and make sure the gearshift is securely latched is P Park 2 Block the wheels fully to prevent the vehicle from mov...

Страница 120: ...r of the instrument panel 2 Go to the front of the vehicle and release the auxiliary latch that is located under the front center of the hood Lift the hood until the lift cylinders hold it open IDENTIFYING COMPONENTS IN THE ENGINE COMPARTMENT 3 0L Vulcan engine 1 2 3 4 5 6 7 8 9 Maintenance and care 120 ...

Страница 121: ...ipstick 7 Power steering fluid reservoir 8 Engine coolant reservoir 9 Windshield washer fluid reservoir 3 0L Duratec engine 1 Automatic transaxle fluid dipstick 2 Brake fluid reservoir 3 Air filter assembly 4 Battery 5 Engine oil filler cap 6 Engine oil dipstick 7 Engine coolant reservoir 8 9 1 2 3 4 5 6 7 Maintenance and care 121 ...

Страница 122: ...gine 1 Automatic transaxle fluid dipstick 2 Brake fluid reservoir 3 Air filter assembly 4 Battery 5 Engine oil dipstick 6 Engine oil filler cap 7 Engine coolant reservoir 8 Windshield washer fluid reservoir 9 Power steering fluid reservoir 8 9 1 2 3 4 5 6 7 Maintenance and care 122 ...

Страница 123: ...k fully then remove it again The oil level should be in the range shown on the dipstick 6 If the oil level is below the MIN line or the ADD 1 QUART line add oil as necessary If the oil level is beyond the MAX or FULL line engine damage or high engine oil consumption may occur and some oil must be removed from the engine by a service technician 7 Put the dipstick back in and ensure it is fully seat...

Страница 124: ... FILTER Change your engine oil and filter according to the following mileage and time requirements whichever occurs first Normal Schedule 8 000 km 5 000 miles or six months Severe Duty Schedule 5 000 km 3 000 miles or three months Severe duty operation would include extensive idling trailer towing driving in severe dust and police taxi or delivery service Ford production and aftermarket Motorcraft...

Страница 125: ...cessary add brake fluid until the level reaches MAX Do not fill above this line Use only a DOT 3 brake fluid certified to meet Ford specifications Refer to Lubricant specifications in the Capacities and specifications chapter Brake fluid is toxic If you use a brake fluid that is not DOT 3 you will cause permanent damage to your brakes Do not let the reservoir for the master cylinder run dry This m...

Страница 126: ...opening for the reservoir is located on the passenger side under the tail lamp Refill this reservoir with the same fluid you use for your windshield CHECKING AND ADDING ENGINE COOLANT Check the level of the coolant in the reservoir at least once a month Be sure to read and understand Precautions when servicing your vehicle in this chapter If the engine coolant has not been checked for a long perio...

Страница 127: ...ngine coolant and water to the reservoir to the engine coolant recovery reservoir DO NOT ADD DIRECTLY TO THE RADIATOR Add straight water only in an emergency but you should replace it with a 50 50 mixture of coolant and distilled water as soon as possible Check the coolant level in the coolant recovery reservoir the next few times you drive the vehicle If necessary add enough of a 50 50 mixture of...

Страница 128: ...s Do not use alcohol or methanol antifreeze or any engine coolants mixed with alcohol or methanol antifreeze Do not use supplemental coolant additives in your vehicle These additives may harm your engine cooling system The use of an improper coolant may void your warranty of your vehicle s engine cooling system Recycled engine coolant Ford Motor Company recommends that Ford and Lincoln Mercury dea...

Страница 129: ...on in your vehicle is such that the coolant will not freeze at the temperature level in which you drive during winter months Never increase the engine coolant concentration above 60 Leave a 50 50 mixture of engine coolant and water in your vehicle year round in non extreme climates CHECKING AND ADDING POWER STEERING FLUID Check the power steering fluid at least twice a year If adding fluid is nece...

Страница 130: ... the MIN and MAX lines Do not add fluid if the level is within this range 5 If the fluid is low add fluid in small amounts continuously checking the level until it reaches the range between the MIN and MAX lines Be sure to put the cap back on the reservoir AUTOMATIC TRANSAXLE FLUID Under normal circumstances the transaxle fluid does not need to be checked Refer to the Service Guide for fluid repla...

Страница 131: ...earshift through all the gears Allow sufficient time for each position to engage Securely latch the gearshift in P Park leave the engine running and set the parking brake Wipe off the dipstick cap and pull the dipstick out Wipe the dipstick clean put the dipstick back in the filler tube completely then pull it back out and read the fluid level The fluid should be in the crosshatched area not neces...

Страница 132: ...community s standards for disposing of these types of fluids Call your local recycling center to find out about recycling automotive fluids BATTERY If the original equipment maintenance free battery needs replacing it may be replaced with a low maintenance battery For more information on replacement batteries refer to Motorcraft part numbers in the Capacities and specifications chapter The gases a...

Страница 133: ...ve the charging system checked for a possible malfunction Because your vehicle s engine is electronically controlled by a computer some control conditions are maintained by power from the battery When the battery is disconnected or a new battery is installed the engine must relearn its idle conditions before you vehicle will drive properly To begin this process 1 Put the gearshift in P Park turn o...

Страница 134: ...t apply if your vehicle is damaged because you use the wrong air filter Refer to Motorcraft part numbers in the Capacities and specifications chapter CHECKING AND CHANGING WIPER BLADES Check the wiper blades at least twice a year or when they seem less effective than usual Substances such as tree sap and some hot wax treatments used by commercial car washes reduce the effectiveness of wiper blades...

Страница 135: ...Grades apply to new pneumatic tires for use on passenger cars They do not apply to deep tread winter type snow tires space saver or temporary use spare tires tires with nominal rim diameters of 10 to 12 inches or limited production tires as defined in Title 49 Code of Federal Regulations Part 575 104 c 2 U S Department of Transportation Tire quality grades The U S Department of Transportation requ...

Страница 136: ... B and C representing the tire s resistance to the generation of heat and its ability to dissipate heat when tested under controlled conditions on a specified indoor laboratory test wheel Sustained high temperature can cause the material of the tire to degenerate and reduce tire life and excessive temperature can lead to sudden tire failure The grade C corresponds to a level of performance which a...

Страница 137: ...dling and can fail suddenly possibly resulting in loss of vehicle control Tire rotation Because your vehicle s tires perform different jobs they often wear differently To make sure your tires wear evenly and last longer rotate them as indicated in the Service Guide If you notice that the tires wear unevenly have them checked Replacing the tires Replace the tires when the wear band is visible throu...

Страница 138: ...st your vehicle stop and re tighten the chains If this does not work remove the chains to prevent damage to your vehicle If possible avoid fully loading your vehicle Do not use tire chains on aluminum wheels Do not use tire chains if your vehicle is equipped with P225 55VR16 tires Remove the tire chains when they are no longer needed Do not use tire chains on dry roads The suspension insulation an...

Страница 139: ...l Extinguish all smoking materials and any open flames before fueling your vehicle Always turn off the vehicle before fueling Automotive fuels can be harmful or fatal if swallowed If fuel is swallowed call a physician immediately even if no symptoms are immediately apparent The toxic affects of fuel may not be visible for hours Fuels can also be harmful if absorbed through the skin If fuel is spla...

Страница 140: ...on California reformulated gasolines If California reformulated gasoline is not available when you refuel your vehicle can be operated on non California fuels However even though your engine will perform adequately on other gasolines the performance of the emission control devices and systems may be adversely affected Repair of damage caused by using a fuel that your vehicle was not designed for m...

Страница 141: ...service technician The American Automobile Manufacturers Association AAMA issued a gasoline specification to provide information on high quality fuels that optimize the performance of your vehicle We recommend the use of gasolines that meet the AAMA specification if they are available It should not be necessary to add any aftermarket products to your fuel tank if you continue to use a high quality...

Страница 142: ...e is equipped with catalytic converters which enable your vehicle to comply with applicable exhaust emission requirements Exhaust leaks may result in the entry of harmful and potentially lethal fumes into the passenger compartment Under extreme conditions excessive exhaust temperatures could damage the fuel system the interior floor covering or other vehicle components possibly causing a fire To m...

Страница 143: ...dry grass or other dry ground cover The emission system heats up the engine compartment and exhaust system which can start a fire Watch for fluid leaks strange odors smoke loss of oil pressure the charging system warning light the service engine soon light or the temperature warning light These sometimes indicate that the emissions system is not working properly Do not make any unauthorized change...

Страница 144: ...st of the On board Diagnostic OBD II system If the vehicle s powertrain system or its battery has just been serviced the OBD II system is reset to a not ready for I M testing condition To prepare for I M testing the law specifies that additional mixed city and highway driving is required to complete the check of the OBD II system The driving modes required to reach the ready condition consist of a...

Страница 145: ...brake lamp Sedan To remove the brake lamp 1 Remove package tray trim then push attachment toward the rear 2 Slide brake lamp up and away from the rear window to remove it from the tabs that hold it down 3 Disconnect bulbs To install brake lamp 1 Install bulbs then position the brake lamp over tab slots and line up the tab with the tab slots 2 Push down and toward the rear window to engage the tabs...

Страница 146: ...p 1 Install bulbs the position brake lamp into tailgate holes 2 From the inside of the vehicle stall and tighten the four nuts that hold the brake lamp in place 3 Install the interior trim panel Using the right bulbs Function Trade Number Front side marker lamp 194 Front park turn lamp 3457NA Headlamp 9007 Tail lamp brake lamp 3157 Rear turn lamp 3156 Backup lamp 3156 License plate lamp 168 High m...

Страница 147: ...Radio illumination Go to Ford authorized radio service center Clock Go to Ford authorized dealer Warning indicator lights except THEFT Go to Ford authorized dealer THEFT warning Go to Ford authorized dealer Cluster illumination Go to Ford authorized dealer Heater A C Go to Ford authorized dealer Automatic climate control Go to Ford authorized dealer Rear window defrost switch Go to Ford authorized...

Страница 148: ... way 2 Remove the electrical connector from the bulb by pulling the connector 3 Remove the bulb retaining ring by rotating it counterclockwise when viewed from the rear about an eighth of a turn to free it from the bulb socket and by sliding the ring off the plastic base Keep the ring because it will be used again to retain the new bulb 4 Remove the old bulb from its socket by gently pulling it st...

Страница 149: ...was correctly aligned before you changed the bulb you should not need to align it again AIMING THE HEADLAMPS Your vehicle is equipped with a Vehicle Headlamp Aim Device VHAD on each headlamp body Each headlamp may be proeprly aimed in the horizontal direction left right and the vertical position up down A non zero bubble reading does not necessarily indicate out of aim headlamps If your vehicle is...

Страница 150: ...to turn the horizontal adjusting screw until the reference mark on the reflector extension aligns with the 0 reference mark on the horizontal indicator when viewed directly from above 3 When the horizontal aim has been adjusted close the headlamp access panel Adjusting the vertical aim The numbers shown on the vial indicate beam direction in degrees up or down 1 Do not adjust the vertical aim unti...

Страница 151: ...cleaners polishes and waxes Washing your vehicle Wash your vehicle regularly with cold or lukewarm water Never use strong detergents or soap If your vehicle is particularly dirty use a quality car wash detergent Always use a clean sponge washing glove or similar device and plenty of water for best results To avoid spots avoid washing when the hood is still warm immediately after or during exposure...

Страница 152: ...be repaired with touch up paint paint repair foil or aerosol paint spray from the Ford accessory line Observe the application instructions on the products Remove particles such as bird droppings tree sap insect remains tar spots road salt and industrial fallout immediately Cleaning the wheels Wash the wheels with the same detergent you use to clean the body of your vehicle Do not use acid based wh...

Страница 153: ...g engine may cause internal damage Cleaning plastic exterior parts Use a vinyl cleaner for routine cleaning of plastic Clean with a tar remover if necessary Do not clean plastic parts with thinners solvents or petroleum based cleaners Cleaning the exterior lamps Wash the exterior lamps with the same detergent you used to wash the exterior of your vehicle Use glass cleaner or tar remover if necessa...

Страница 154: ...e dull finish in this area is to help protect the driver from undesirable windshield reflection Cleaning the interior fabric Remove dust and loose dirt with a whisk broom or a vacuum cleaner Remove fresh spots immediately Follow the directions that come with the cleaner BASS TREB BAL FADE REW FF EJECT 1 2 3 4 5 6 w TAPE SIDE TAPE R DEF TUNE SEEK SCAN AM FM M H LO HI OFF A C MAX A C VENT VOL PUSH O...

Страница 155: ...these actions may weaken the belt webbing Check the safety belt system periodically to make sure there are no nicks wear or cuts If your vehicle has been involved in an accident have all the safety restraints examined by a qualified technician Cleaning the built in child seat if equipped Clean the built in child seat with mild soap and water Do not use household cleaning products because they may ...

Страница 156: ...trol Information VECI decal for spark plug and gap information If a spark plug is removed for inspection it must be reinstalled in the same cylinder Cylinders No 1 2 and 3 have a PG suffix Cylinders No 4 5 and 6 have a P suffix If a spark plug needs to be replaced use only spark plugs with the service part number suffix letter 9PP9 as shown on the engine decal 3 0L Duratec engine Component Part nu...

Страница 157: ...tery BXT 36R Fuel filter FG 800 A Passenger compartment air filter if equipped FA1628 Oil filter FL 400A PCV valve EV 234 Spark plug AWSF 32FM REFILL CAPACITIES 3 0L Vulcan engine Fluid Ford Part Name Vehicle Type Capacity Brake fluid High performance DOT 3 brake fluid All Fill to line in reservoir Engine coolant Premium cooling system fluid All 11 0 11 6 Capacities and specifications 157 ...

Страница 158: ...tic transaxle AX4N Motorcraft MERCONt ATF All 12 8 13 5 Automatic transaxle AX4S Motorcraft MERCONt ATF All 11 6 12 2 Windshield washer fluid Front Ultra clear windshield washer concentrate All Wagon 2 7 90 oz 2 1 70 oz 3 0L Duratec engine Fluid Ford Part Name Vehicle Type Capacity Brake fluid High performance DOT 3 brake fluid All Fill to line in reservoir Engine coolant Premium cooling system fl...

Страница 159: ...xle AX4N Motorcraft MERCONt ATF All 12 7 13 4 Windshield washer fluid Front Ultra clear windshield washer concentrate All 2 7 90 oz Windshield washer fluid Rear Ultra clear windshield washer concentrate Wagon 2 1 70 oz 3 4L SHO engine Fluid Ford Part Name Vehicle Type Capacity Liters Quarts Brake fluid High performance DOT 3 brake fluid All Fill to line in reservoir Engine coolant Premium cooling ...

Страница 160: ...axle AX4N Motorcraft MERCONt ATF All 12 7 13 4 Windshield washer fluid Ultra clear windshield washer concentrate All 2 7 90 oz LUBRICANT SPECIFICATIONS Fluid Ford Part Name or Equivalent Ford Part Number Ford Specification Brake master cylinder C6AZ 19542 AB Ford high performance DOT 3 brake fluid ESA M6C25 A Door latch hood latch auxiliary latch trunk and liftgate latches D0AZ 19584 AA Multi purp...

Страница 161: ...premium WSS M2C153 F and API Certification Mark Constant velocity joints E43Z 19590 A CV joint grease high temp ESP M1C207 A Engine coolant E2FZ 19549 AA Ford premium cooling system fluid ESE M97B44 A Power steering pump reservoir XT 2 QDX Motorcraft MERCONt ATF MERCONt ENGINE DATA Engine data Engine 3 0L SOHC V6 3 0L DOHC V6 3 4L DOHC V8 Cubic inches 182 183 207 Horsepower 145 5250 rpm 200 5750 r...

Страница 162: ... 046 inch Ignition system DIS DIS DIS Valve clearance cold inlet exhaust 0 Maintenance free 0 Maintenance free Check and adjust as necessary at 160 000 km 100 000 miles VEHICLE DIMENSIONS Vehicle dimensions mm in Sedan Wagon 1 Overall length 5016 5 197 5 5069 8 199 6 2 Overall width 1854 2 73 0 1854 2 73 0 3 Overall height 1399 5 55 1 1463 0 57 6 4 Wheelbase 2755 9 108 5 2755 9 108 5 5 Track Front...

Страница 163: ...Vehicle dimensions mm in Sedan Wagon 5 Track Rear 1559 6 61 4 1569 7 61 8 3 5 2 Capacities and specifications 163 ...

Страница 164: ...5 2 3 Capacities and specifications 164 ...

Страница 165: ...4 1 Capacities and specifications 165 ...

Страница 166: ...anel of the engine compartment This plate bears technical information on your vehicle and identifies various components Vehicle identification number The vehicle identification number VIN is attached to a metal tag and is located in the following areas 4 1 FORD d 1 2 kg kg kg kg Capacities and specifications 166 ...

Страница 167: ...d right front fenders hood left and right front doors front and rear bumpers left and right rear quarter panels decklid liftgate engine compartment transaxle Engine number The engine number is stamped on the engine block Capacities and specifications 167 ...

Страница 168: ...finds that a safety defect exists in a group of vehicles it may order a recall and remedy campaign However NHTSA cannot become involved in individual problems between you your dealer or Ford Motor Company To contact NHTSA you may either call the Auto Safety Hotline toll free at 1 800 424 9393 202 366 0123 in the Washington D C area or write to NHTSA U S Department of Transportation 400 Seventh Str...

Отзывы: