background image

FORCE1 RC

14

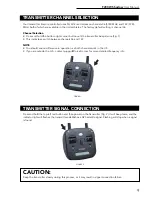
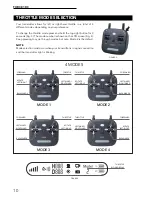
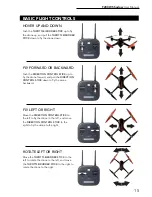
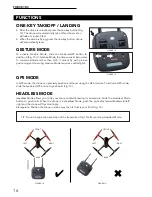
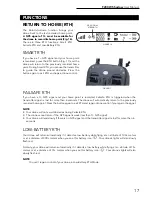
2 WAYS TO LOCK/UNLOCK YOUR DRONE

UNLOCK
1.  Press the red button; the motors rotate and the drone is unlocked (Fig. 6). 
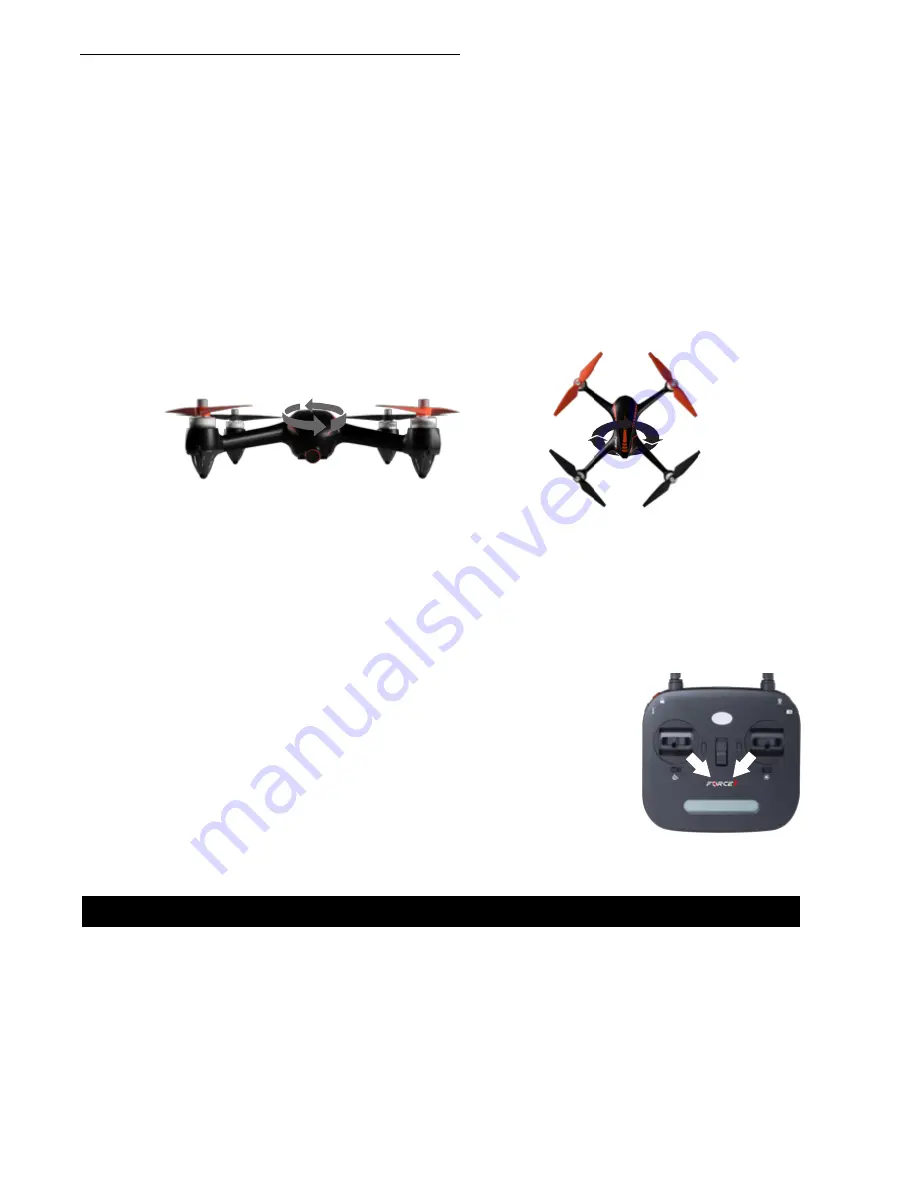
2.  Push the left stick to the lower-right corner and the right stick to the lower-left 

corner at the same time (Fig. 11). 

LOCK
3.  Pull the throttle control stick to the bottom position, then press and hold  


  the red button (Fig. 6) for 3 seconds. The motor will stop immediately and the  
  drone will lock. 
4.  After the drone lands on the ground, pull down the throttle control stick to the  
  bottom position and hold for 3 seconds. The motor will stop immediately and  
  the drone will lock.

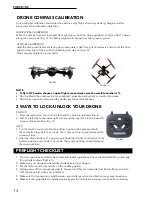
DRONE COMPASS CALIBRATION

Drone compass calibration should be done before every flight, after every battery change and after 
every successful initialization detection. 

FIGURE 11

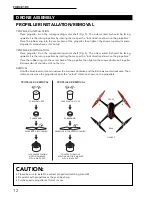
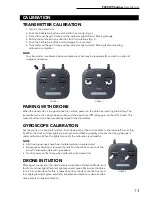
HORIZONTAL CALIBRATION
When the drone’s front and rear lights flash light green, hold the drone upright and rotate it 360° 3 times 
along the central axis (Fig. 9). The flashing lights will change from light green to green. 

VERTICAL CALIBRATION
Hold the drone with its camera facing down and rotate it 360° along its central axis 3 times until the front 
light and rear light of the aircraft stop flashing and stay on (Fig. 10). 
Now compass calibration is successful.

NOTE

• 

To fly in GPS mode, choose an open flight area and make sure the satellite number is 7+ 

•  Don’t calibrate the compass in strong magnetic areas like parking lots or construction areas
•  Don’t carry magnetic materials with you like key fobs and cellphones

PREFLIGHT CHECKLIST

1.  Fly in an open area and abide by all local and federal guidelines. Check the FAA’s B4UFLY mobile app 

for up-to-date drone flight info. 

2.  Make sure your drone and transmitter batteries are fully charged.
3.  Put the left stick of the transmitter in the middle position.
4.  Follow power off/on instructions closely. Always turn ON your transmitter first before flying, and turn 

OFF the drone first when you’re finished. 

5.  Make sure the connection is solid between your battery and motor; vibration may cause loosening.  
6.  Make sure the propellers are installed correctly and the motors are working normally after unlocking.

FIGURE 9

FIGURE 10

Содержание F200W SHADOW

Страница 1: ...USER MANUAL Visit us online at force1rc com for product information replacement parts and flight tutorials 0 6 Miles FOR MORE INFORMATION...

Страница 2: ...ATTENTION PLEASE WATCH THIS FLIGHT INSTRUCTION VIDEO BEFORE FLYING YOUR DRONE https youtu be tk3qzsUwoWs...

Страница 3: ...Overview 6 Transmitter Overview 7 Transmitter Battery Installation 8 Channel Selection Signal Connection 9 Throttle Mode Selection 10 Drone Assembly 11 Calibration 13 Preflight Checklist 14 Basic Flig...

Страница 4: ...iginal Force1 parts and accessories Please keep the packaging and this user manual for future reference This drone is suitable for experienced RC drone operators aged 14 years and older It contains sm...

Страница 5: ...e in temperature If it is sealed the air inside will inflate rapidly causing further heating Charging DO NOT overcharge the battery never charge batteries unattended and stop charging as soon as your...

Страница 6: ...Manual 5 DRONE BATTERY CHARGING LI PO BATTERY DISPOSAL RECYCLING Do not put lithium polymer batteries in household trash Please contact your local waste management agency or LI PO battery recycling ce...

Страница 7: ...RONE WITH CAMERA TRANSMITTER 7 4V 1800MAH LIPO BATTERY 2 PROPELLERS 4 BALANCE CHARGER DRONE TOOLS DRONE OVERVIEW FRONT B PROPELLER COUNTERCLOCKWISE A PROPELLER CLOCKWISE A PROPELLER CLOCKWISE B PROPEL...

Страница 8: ...K LONG PRESS DIRECTION CONTROL STICK DEFAULT HEADLESS MODE SWITCH GESTURE GPS MODE SWITCH APPLICABLE WHEN A MEMORY CARD IS INSERTED IF THERE IS NO MEMORY CARD PHOTOS AND VIDEOS CAN BE TAKEN AND SAVED...

Страница 9: ...new batteries Don t mix alkaline standard carbon zinc and rechargeable nickel cadmium batteries Remove rechargeable batteries before charging Only charge batteries under adult supervision Remove spen...

Страница 10: ...Flashing will stop when a signal is found Your transmitter remote controller uses 5G Wi Fi and works on channels 36 5180 MHz and 149 5745 MHz both of which are available in the United States The facto...

Страница 11: ...essing to cycle through modes but note Mode 2 is the default NOTE Mode selection must occur when your transmitter is in signal connection and the transmitter light is blinking ROTATE LEFT RIGHT LEFTWA...

Страница 12: ...MBLY BATTERY INSTALLATION Insert the battery into the battery compartment until you hear a click Turn the lock button on the bottom 90 to the lock position DRONE OVERVIEW SLIDE BATTERY IN COMPARTMENT...

Страница 13: ...on the propellers Place the rubber ring into the center bore of the propeller then tighten the screws clockwise Propeller B screws do not contain a dot on the top REMOVAL Hold the brushless motor and...

Страница 14: ...en This means that the drone has successfully linked to the transmitter GYROSCOPE CALIBRATION Set the drone on a horizontal surface Push down both of the control sticks to the lower left corner Fig 8...

Страница 15: ...m light green to green VERTICAL CALIBRATION Hold the drone with its camera facing down and rotate it 360 along its central axis 3 times until the front light and rear light of the aircraft stop flashi...

Страница 16: ...to fly the drone forward and pull the DIRECTION CONTROL STICK down to fly the drone backward FLY LEFT OR RIGHT Move the DIRECTION CONTROL STICK to the left to fly the drone to the left and move the D...

Страница 17: ...ing and hovering Gesture Mode requires a skilled pilot In GPS mode the drone can precisely position and hover using the GPS module To activate GPS mode slide the Gesture GPS button to position B Fig 1...

Страница 18: ...ne will automatically return to the previously recorded home point Press the button again to exit RTH and regain drone control if you regain the signal LOW BATTERY RTH Your drone will return automatic...

Страница 19: ...op recording FUNCTIONS PHOTO VIDEO NOTE If there is no memory card inserted into the drone camera photos and videos can only be taken using the F200W app see page 19 LOW BATTERY WARNING The battery is...

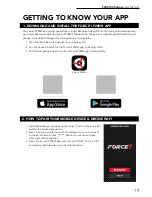
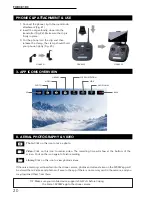
Страница 20: ...ce1 F200W app in the App Store 3 For Android phones Search for the Force1 F200W app in Google Play Force1 F200W 1 DOWNLOAD AND INSTALL THE FORCE1 F200W APP GETTING TO KNOW YOUR APP 1 Install the batte...

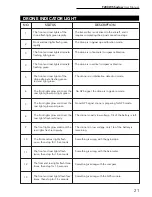
Страница 21: ...If there is a memory card inserted into the drone camera photos and videos taken on the F200W app will be stored there Videos and photos will save to the app if there is no memory card in the camera...

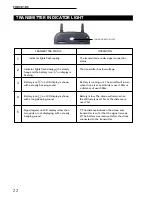
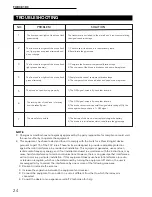
Страница 22: ...zontal compass calibration The drone is in vertical compass calibration The front and rear lights of the drone alternate flashing green red and light green The front lights glow solid red the rear lig...

Страница 23: ...LCD display is less than two grids or not displaying with a steady beeping sound 1 The distance between the drone and transmitter is so far that the signal is weak 2 The battery was removed after the...

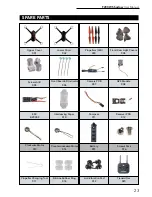
Страница 24: ...ool 017 Lower Cover 002 Counterclockwise Motor 014 Silicone Rubber Ring 018 Anti Vibration Pad 019 Transmitter 020 Propellers A B 003 Compass 011 Battery 015 Front Rear Light Covers 004 Camera PCB 007...

Страница 25: ...lock The front and rear lights of the drone flash light green alternately PROBLEM SOLUTION NO TROUBLESHOOTING 1 2 3 4 5 NOTE Changes or modifications not expressly approved by the party responsible fo...

Страница 26: ......
Страница 27: ...rference by one or more of the following measures Reorient or relocate the receiving antenna Increase the separation between the equipment and receiver Connect the equipment into an outlet on the circ...

Отзывы: